User Guide
Page 2
... IP address notification Tab - Setting of Contents Setting the FTP Client Function 42 Alarm sending Tab - Table of Contents Overview Features 4 Camera section 4 Network section, Control section 4 Others 4 Phenomena Specific to CCD Image Sensors ....... 5 How to Use This User's Guide 6 System Requirements ... by the Administrator ....... 15 Operating the Camera Administrator and User 16 Logging in Memory - Camera setting Menu 30 Common Tab 30 Picture Tab 31 MPEG4 Tab 32 JPEG Tab 33 Reset Tab 33 Configuring the Network - Notifying the IP Address 35 Setting ...
... IP address notification Tab - Setting of Contents Setting the FTP Client Function 42 Alarm sending Tab - Table of Contents Overview Features 4 Camera section 4 Network section, Control section 4 Others 4 Phenomena Specific to CCD Image Sensors ....... 5 How to Use This User's Guide 6 System Requirements ... by the Administrator ....... 15 Operating the Camera Administrator and User 16 Logging in Memory - Camera setting Menu 30 Common Tab 30 Picture Tab 31 MPEG4 Tab 32 JPEG Tab 33 Reset Tab 33 Configuring the Network - Notifying the IP Address 35 Setting ...
User Guide
Page 4
...be viewed or used by a user name and the password you set the camera direction - Since the service is Internet-based, there is protected only by a third-party via the network. • SONY IS NOT RESPONSIBLE, AND ASSUMES ABSOLUTELY NO LIABILITY TO YOU OR ANYONE ELSE..., FOR SERVICE INTERRUPTIONS OR DISCONTINUATIONS OR EVEN SERVICE CANCELLATION. panning, tilting and rotating. • This camera has backlight compensation through the center measurement. ...
...be viewed or used by a user name and the password you set the camera direction - Since the service is Internet-based, there is protected only by a third-party via the network. • SONY IS NOT RESPONSIBLE, AND ASSUMES ABSOLUTELY NO LIABILITY TO YOU OR ANYONE ELSE..., FOR SERVICE INTERRUPTIONS OR DISCONTINUATIONS OR EVEN SERVICE CANCELLATION. panning, tilting and rotating. • This camera has backlight compensation through the center measurement. ...
User Guide
Page 6
...User's Guide This User's Guide explains how to operate the SNCDF40N/DF40P Network Camera from the ones which appear as portrayed on the sentence to jump to...matter) The supplied Installation Manual describes the names and functions of parts and controls of the Network Camera, connecting examples and how to Use This User's Guide / System Requirements Processor Intel Pentium III..., Windows Vista Web browser Microsoft Internet Explorer Ver. 6.0 or later 6 How to set up the camera. Jumping to the related page When you read the Installation Manual before you operate the application software. ...
...User's Guide This User's Guide explains how to operate the SNCDF40N/DF40P Network Camera from the ones which appear as portrayed on the sentence to jump to...matter) The supplied Installation Manual describes the names and functions of parts and controls of the Network Camera, connecting examples and how to Use This User's Guide / System Requirements Processor Intel Pentium III..., Windows Vista Web browser Microsoft Internet Explorer Ver. 6.0 or later 6 How to set up the camera. Jumping to the related page When you read the Installation Manual before you operate the application software. ...
User Guide
Page 7
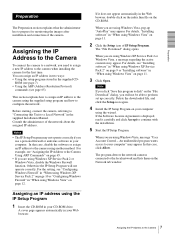
...click the Setup icon again. 4 Install the IP Setup Program on page 11. 3 Click Open. The program detects the network cameras connected to the local network and lists them on page 12. Preparation Preparation The Preparation section explains what the administrator has to prepare for the first ...time. Assigning the IP Address to the Camera To connect the camera to a network, you are using Windows Vista" on the Network tab window. 7 Assigning the IP Address to configure the network. Notes • The IP Setup Program may appear. When you need ...
...click the Setup icon again. 4 Install the IP Setup Program on page 11. 3 Click Open. The program detects the network cameras connected to the local network and lists them on page 12. Preparation Preparation The Preparation section explains what the administrator has to prepare for the first ...time. Assigning the IP Address to the Camera To connect the camera to a network, you are using Windows Vista" on the Network tab window. 7 Assigning the IP Address to configure the network. Notes • The IP Setup Program may appear. When you need ...
User Guide
Page 8
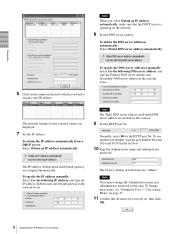
Normally, select 80 for the selected camera are displayed. 7 Set the IP address. The factory settings of both items are assigned automatically. Note You cannot change these items, see "Setting the User - The network settings for the HTTP port No. To obtain the IP address automatically from... a DHCP server: Select Obtain an IP address automatically. Preparation Note When you want to the Camera To change the Administrator name and Administrator password in...
Normally, select 80 for the selected camera are displayed. 7 Set the IP address. The factory settings of both items are assigned automatically. Note You cannot change these items, see "Setting the User - The network settings for the HTTP port No. To obtain the IP address automatically from... a DHCP server: Select Obtain an IP address automatically. Preparation Note When you want to the Camera To change the Administrator name and Administrator password in...

User Guide
Page 9
...dialog, you will not be able to set correctly, the welcome page does not appear after step 12. Installing ActiveX Control During installation of the network camera is as IP Setup Program from CD-ROM. Tip The factory setting of IP Setup Program If message "Internet Explorer" appears, click Yes. Note ... "Setting OK" is displayed, the IP address is not set the IP address again. Example: In case of the camera network is displayed in the Web browser. Security Warning" appears, click Run. If message "Internet Explorer - When using Windows XP Service Pack 2 Installing software A ...
...dialog, you will not be able to set correctly, the welcome page does not appear after step 12. Installing ActiveX Control During installation of the network camera is as IP Setup Program from CD-ROM. Tip The factory setting of IP Setup Program If message "Internet Explorer" appears, click Yes. Note ... "Setting OK" is displayed, the IP address is not set the IP address again. Example: In case of the camera network is displayed in the Web browser. Security Warning" appears, click Run. If message "Internet Explorer - When using Windows XP Service Pack 2 Installing software A ...

User Guide
Page 11
...-click the "index.htm" file in the "File Download - If message "Internet Explorer" appears, click Yes. Then the IP Setup Program is added to the Camera Preparation When the above procedure is inserted into the CD-ROM drive, click Install or run program. If pop-up "AutoPlay" appears when a CD-ROM...
...-click the "index.htm" file in the "File Download - If message "Internet Explorer" appears, click Yes. Then the IP Setup Program is added to the Camera Preparation When the above procedure is inserted into the CD-ROM drive, click Install or run program. If pop-up "AutoPlay" appears when a CD-ROM...

User Guide
Page 13
...When the above procedure is completed, the cameras connected in the local network are displayed in the list. Then the IP Setup Program is displayed. 13 Accessing the Camera Using the Web Browser When the main viewer of the camera in your computer. Preparation The cameras will be displayed in the IP Setup Program.... Use Internet Explorer as the Web browser. 1 Start the Web browser on the computer and type the IP address of the camera is displayed for the first time When you click Yes, ActiveX control is installed and the main viewer is added to keep Windows Firewall ...
...When the above procedure is completed, the cameras connected in the local network are displayed in the list. Then the IP Setup Program is displayed. 13 Accessing the Camera Using the Web Browser When the main viewer of the camera in your computer. Preparation The cameras will be displayed in the IP Setup Program.... Use Internet Explorer as the Web browser. 1 Start the Web browser on the computer and type the IP address of the camera is displayed for the first time When you click Yes, ActiveX control is installed and the main viewer is added to keep Windows Firewall ...
User Guide
Page 14
... for Internet Explorer, then select Internet Options and click the Security tab. 2 Click the Internet icon (when using the camera via the Internet) or Local intranet icon (when using the camera via a local network). 3 Set the slider to the computer as Administrator. • When you are using Windows XP Service Pack 2 or Windows...
... for Internet Explorer, then select Internet Options and click the Security tab. 2 Click the Internet icon (when using the camera via the Internet) or Local intranet icon (when using the camera via a local network). 3 Set the slider to the computer as Administrator. • When you are using Windows XP Service Pack 2 or Windows...

User Guide
Page 15
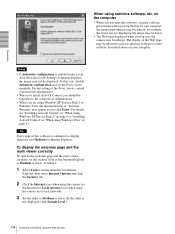
Setting contents Set the camera function suitable for sending the monitor image attached to the install position, network condition or purpose of this network camera. Select the size of the image sent from the camera. Preparation Basic Configuration by the Administrator You can also set various ...functions according to a mail. You can monitor the image of the camera by the...
Setting contents Set the camera function suitable for sending the monitor image attached to the install position, network condition or purpose of this network camera. Select the size of the image sent from the camera. Preparation Basic Configuration by the Administrator You can also set various ...functions according to a mail. You can monitor the image of the camera by the...
User Guide
Page 16
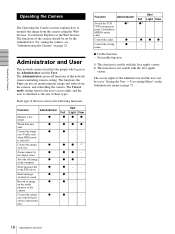
... mode (Available in as the Web browser. Not usable function 1) This function is usable with the Java applet viewer. Each type of this network camera including camera setting. The functions the User can use the following functions. z -1) z- z Usable function - The Administrator can use all functions of the... page 37. 16 Administrator and User User setting Menu" on the Administrator menu on page 25. Administrator and User This network camera classifies the people who log in MPEG4 mode only) Control the audio z Control the setting z menu Full z2) z - The ...
... mode (Available in as the Web browser. Not usable function 1) This function is usable with the Java applet viewer. Each type of this network camera including camera setting. The functions the User can use the following functions. z -1) z- z Usable function - The Administrator can use all functions of the... page 37. 16 Administrator and User User setting Menu" on the Administrator menu on page 25. Administrator and User This network camera classifies the people who log in MPEG4 mode only) Control the audio z Control the setting z menu Full z2) z - The ...

User Guide
Page 18
... instructions on the installer. ActiveX viewer This viewer can select this software is one of the Proxy server, consult your network administrator. • When you install ActiveX Control, you log in the network camera using ActiveX Control. You can change them in the User setting menu of Internet Explorer, then select Internet Options...
... instructions on the installer. ActiveX viewer This viewer can select this software is one of the Proxy server, consult your network administrator. • When you install ActiveX Control, you log in the network camera using ActiveX Control. You can change them in the User setting menu of Internet Explorer, then select Internet Options...
User Guide
Page 20
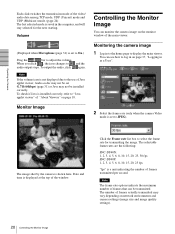
...per second. The selectable frame rates are the following: SNC-DF40N: 1, 2, 3, 4, 5, 6, 8, 10, 15, 20, 25, 30 fps SNC-DF40P: 1, 2, 3, 4, 5, 6, 8, 10, 15, 20, 25 fps "fps" is set G.711(64kbps) (page 31) or Java may vary depending on network environments and camera settings (image size and image quality settings). 20 ... correctly. Note If the volume icon is set to adjust the volume. The image shot by the camera is installed correctly, refer to display the main viewer. Monitoring the camera image 1 Log in to the home page to "Java applet viewer" of the video/ audio data...
...per second. The selectable frame rates are the following: SNC-DF40N: 1, 2, 3, 4, 5, 6, 8, 10, 15, 20, 25, 30 fps SNC-DF40P: 1, 2, 3, 4, 5, 6, 8, 10, 15, 20, 25 fps "fps" is set G.711(64kbps) (page 31) or Java may vary depending on network environments and camera settings (image size and image quality settings). 20 ... correctly. Note If the volume icon is set to adjust the volume. The image shot by the camera is installed correctly, refer to display the main viewer. Monitoring the camera image 1 Log in to the home page to "Java applet viewer" of the video/ audio data...

User Guide
Page 30
... making the computer of the audio data. It reduces sending load on the Administrator menu, the Camera setting menu appears. Specify an even number from the network camera. 640 × 480 (VGA), 480 × 360, 384 × 288, 320 × 240 (QVGA), 256 × 192 or 160 × 120 (QQVGA...) can crop a portion of the camera. Multicast streaming Set whether the camera uses the Multicast streaming or not. Image...
... making the computer of the audio data. It reduces sending load on the Administrator menu, the Camera setting menu appears. Specify an even number from the network camera. 640 × 480 (VGA), 480 × 360, 384 × 288, 320 × 240 (QVGA), 256 × 192 or 160 × 120 (QQVGA...) can crop a portion of the camera. Multicast streaming Set whether the camera uses the Multicast streaming or not. Image...

User Guide
Page 31
... condition, exposure, etc. Select On to adjust the exposure using Java applet viewer. of the audio input from SNC audio upload tool. CCD iris: Select this network camera. Administrating the Camera 3 Specify the cropping area. The red frame that appears as you use an auto iris lens. Note When ...you send the audio from among Auto iris lens, CCD iris, and Manual. Mic volume Set the volume level of the camera. Audio codec ...
... condition, exposure, etc. Select On to adjust the exposure using Java applet viewer. of the audio input from SNC audio upload tool. CCD iris: Select this network camera. Administrating the Camera 3 Specify the cropping area. The red frame that appears as you use an auto iris lens. Note When ...you send the audio from among Auto iris lens, CCD iris, and Manual. Mic volume Set the volume level of the camera. Audio codec ...
User Guide
Page 58
... rebooted. Click it automatically detects Sony network cameras connected to the local network and displays them in the camera list. Select the check box on the left of the row to enable audio transmission and audio file uploading for that camera. Select this check box to ...opens. Transmitting Audio to the local network after the program has started. • The SNC audio upload tool cannot detect the network cameras that are "admin." Target camera(s) (Camera list) When the SNC audio upload tool starts, it again to display the camera list. The password is usable when...
... rebooted. Click it automatically detects Sony network cameras connected to the local network and displays them in the camera list. Select the check box on the left of the row to enable audio transmission and audio file uploading for that camera. Select this check box to ...opens. Transmitting Audio to the local network after the program has started. • The SNC audio upload tool cannot detect the network cameras that are "admin." Target camera(s) (Camera list) When the SNC audio upload tool starts, it again to display the camera list. The password is usable when...

User Guide
Page 59
...IP address already exists in the camera list, is set Speaker output to hide the camera list. Before transmitting, set on the Common tab of the selected cameras. 59 Using the SNC audio upload tool - The list shows the information and status of the Camera setting menu. Audio upload tab...camera list. You can adjust the microphone volume and enable/disable the muting, if necessary. Type the IP address and port number for a device other than the network camera, or does not exist in the network. • You cannot add new cameras if the maximum of the camera list in the camera...
...IP address already exists in the camera list, is set Speaker output to hide the camera list. Before transmitting, set on the Common tab of the selected cameras. 59 Using the SNC audio upload tool - The list shows the information and status of the Camera setting menu. Audio upload tab...camera list. You can adjust the microphone volume and enable/disable the muting, if necessary. Type the IP address and port number for a device other than the network camera, or does not exist in the network. • You cannot add new cameras if the maximum of the camera list in the camera...

User Guide
Page 60
... progress bar display returns to the start position. (recording) Click to start playback, open ) Click to a network problem. IP address: Displays the IP address of the network camera. When you want to stop recording or playback. During recording, the right end of the sound input to the...: The camera connection is displayed to the camera. 60 Using the SNC audio upload tool - The name of the bar depends on the recorded time. (file open the recorded file or another audio file and click this bar. Status: Displays the current status of the network camera. The maximum...
... progress bar display returns to the start position. (recording) Click to start playback, open ) Click to a network problem. IP address: Displays the IP address of the network camera. When you want to stop recording or playback. During recording, the right end of the sound input to the...: The camera connection is displayed to the camera. 60 Using the SNC audio upload tool - The name of the bar depends on the recorded time. (file open the recorded file or another audio file and click this bar. Status: Displays the current status of the network camera. The maximum...

User Guide
Page 61
...SNC audio upload tool - Fault: The audio file uploading is successful. Uploading the saved audio file to the camera 1 Click (file open) in the Voice alert tab to start recording. 2 Click (stop recording. IP address: Displays the IP address of the camera. Model: Displays the model name of the network camera.... The Save as dialog appears. Serial: Displays the serial number of the network camera. Note Uploading a new audio file overwrites the audio file...
...SNC audio upload tool - Fault: The audio file uploading is successful. Uploading the saved audio file to the camera 1 Click (file open) in the Voice alert tab to start recording. 2 Click (stop recording. IP address: Displays the IP address of the camera. Model: Displays the model name of the network camera.... The Save as dialog appears. Serial: Displays the serial number of the network camera. Note Uploading a new audio file overwrites the audio file...
User Guide
Page 66
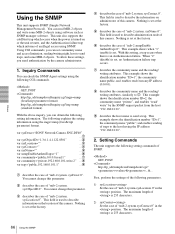
... SNMP The maximum length of traps to 7. The maximum length of is 255 characters. 2) sysContact= Set the case of "mib-2.system. sysContact.0". sysName.0". var sysDescr="SONY Network Camera SNC-DF40" ...1 var sysObjectID="1.3.6.1.4.1.122.8501" ...2 var sysLocation="" ...3 var sysContact="" ...4 var sysName="" ...5 var snmpEnableAuthenTraps="1" ...6 var community="public,0.0.0.0,read / write" by the...
... SNMP The maximum length of traps to 7. The maximum length of is 255 characters. 2) sysContact= Set the case of "mib-2.system. sysContact.0". sysName.0". var sysDescr="SONY Network Camera SNC-DF40" ...1 var sysObjectID="1.3.6.1.4.1.122.8501" ...2 var sysLocation="" ...3 var sysContact="" ...4 var sysName="" ...5 var snmpEnableAuthenTraps="1" ...6 var community="public,0.0.0.0,read / write" by the...


