Operating Instructions
Page 3
... a peak level section is played. ,continued 3 Model No Serial No If this product. FCC Radiation Exposure Statement: This equipment complies with FCC radiation exposure limits set forth for uncontrolled equipment and meets the FCC radio frequency (RF) Exposure Guidelines in Supplement C to use the player for this player, as other adapters... or similar unit. • Do not place the player in a location near heat sources, or in a place subject to them whenever you call upon your Sony dealer regarding this product is not working properly, please call 1-866-9097669.
... a peak level section is played. ,continued 3 Model No Serial No If this product. FCC Radiation Exposure Statement: This equipment complies with FCC radiation exposure limits set forth for uncontrolled equipment and meets the FCC radio frequency (RF) Exposure Guidelines in Supplement C to use the player for this player, as other adapters... or similar unit. • Do not place the player in a location near heat sources, or in a place subject to them whenever you call upon your Sony dealer regarding this product is not working properly, please call 1-866-9097669.
Operating Instructions
Page 5
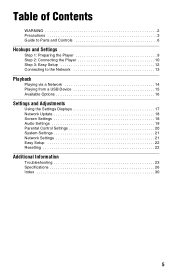
Table of Contents WARNING 2 Precautions 3 Guide to Parts and Controls 6 Hookups and Settings Step 1: Preparing the Player 9 Step 2: Connecting the Player 10 Step 3: Easy Setup 12 Connecting to the Network 13 Playback Playing via a Network 14 Playing from a USB Device 15 Available Options 16 Settings and Adjustments Using the Settings Displays 17 Network Update 18 Screen Settings 18 Audio Settings 19 Parental Control Settings 20 System Settings 21 Network Settings 21 Easy Setup 22 Resetting 22 Additional Information Troubleshooting 23 Specifications 26 Index 30 5
Table of Contents WARNING 2 Precautions 3 Guide to Parts and Controls 6 Hookups and Settings Step 1: Preparing the Player 9 Step 2: Connecting the Player 10 Step 3: Easy Setup 12 Connecting to the Network 13 Playback Playing via a Network 14 Playing from a USB Device 15 Available Options 16 Settings and Adjustments Using the Settings Displays 17 Network Update 18 Screen Settings 18 Audio Settings 19 Parental Control Settings 20 System Settings 21 Network Settings 21 Easy Setup 22 Resetting 22 Additional Information Troubleshooting 23 Specifications 26 Index 30 5
Operating Instructions
Page 6
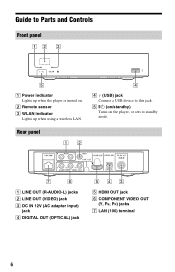
Rear panel A LINE OUT (R-AUDIO-L) jacks B LINE OUT (VIDEO) jack C DC IN 12V (AC adapter input) jack D DIGITAL OUT (OPTICAL) jack E HDMI OUT jack F COMPONENT VIDEO OUT (Y, PB, PR) jacks G LAN (100) terminal 6 E [/1 (on/standby) Turns on . D (USB) jack Connect a USB device to standby mode. Guide to Parts and Controls Front panel A Power indicator Lights up when using a wireless LAN. B Remote sensor C WLAN indicator Lights up when the player is turned on the player, or sets to this jack.
Rear panel A LINE OUT (R-AUDIO-L) jacks B LINE OUT (VIDEO) jack C DC IN 12V (AC adapter input) jack D DIGITAL OUT (OPTICAL) jack E HDMI OUT jack F COMPONENT VIDEO OUT (Y, PB, PR) jacks G LAN (100) terminal 6 E [/1 (on/standby) Turns on . D (USB) jack Connect a USB device to standby mode. Guide to Parts and Controls Front panel A Power indicator Lights up when using a wireless LAN. B Remote sensor C WLAN indicator Lights up when the player is turned on the player, or sets to this jack.
Operating Instructions
Page 7
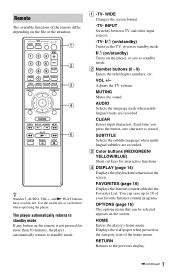
... home menu. Displays the wall paper when pressed on the screen. The player automatically returns to standby mode If any button on the player, or sets to standby mode. INPUT Switches between TV and other input sources. -TV- [/1 (on/standby) Turns on the TV, or... sets to standby mode. [/1 (on/standby) Turns on the remote is erased. B Number buttons (0 - 9) Enters the title/chapter numbers, etc. You can be selected appears on ...
... home menu. Displays the wall paper when pressed on the screen. The player automatically returns to standby mode If any button on the player, or sets to standby mode. INPUT Switches between TV and other input sources. -TV- [/1 (on/standby) Turns on the TV, or... sets to standby mode. [/1 (on/standby) Turns on the remote is erased. B Number buttons (0 - 9) Enters the title/chapter numbers, etc. You can be selected appears on ...
Operating Instructions
Page 8
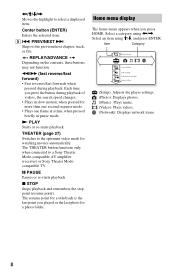
... playback and remembers the stop point (resume point). Home menu display The home menu appears when you press the button during playback. Skips to a Sony Theater Mode-compatible AV amplifier (receiver) or Sony Theater Modecompatible TV. THEATER (page 27) Switches to the optimum video mode for watching movies automatically. Select a category using
... playback and remembers the stop point (resume point). Home menu display The home menu appears when you press the button during playback. Skips to a Sony Theater Mode-compatible AV amplifier (receiver) or Sony Theater Modecompatible TV. THEATER (page 27) Switches to the optimum video mode for watching movies automatically. Select a category using
Operating Instructions
Page 9
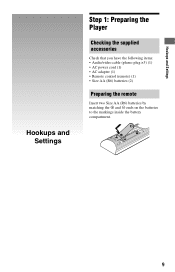
Hookups and Settings Hookups and Settings Step 1: Preparing the Player Checking the supplied accessories Check that you have the following items: • Audio/video cable (phono plug ×3) (1) • AC power cord (1) • AC adapter (1) • Remote control (remote) (1) • Size AA (R6) batteries (2) Preparing the remote Insert two Size AA (R6) batteries by matching the 3 and # ends on the batteries to the markings inside the battery compartment. 9
Hookups and Settings Hookups and Settings Step 1: Preparing the Player Checking the supplied accessories Check that you have the following items: • Audio/video cable (phono plug ×3) (1) • AC power cord (1) • AC adapter (1) • Remote control (remote) (1) • Size AA (R6) batteries (2) Preparing the remote Insert two Size AA (R6) batteries by matching the 3 and # ends on the batteries to the markings inside the battery compartment. 9
Operating Instructions
Page 11
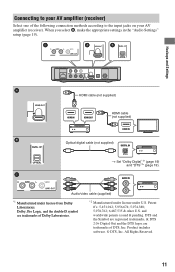
... cable (supplied) *1 *2 Manufactured under license under U.S. Connecting to your AV amplifier (receiver). Hookups and Settings HDMI cable (not supplied) HDMI cable (not supplied) Optical digital cable (not supplied) t Set "Dolby Digital*1" (page 19) and "DTS*2" (page 19). Patent #'s: 5,451,942; 5,956,674...978,762; 6,487,535 & other U.S. Product includes software. © DTS, Inc. When you select B, make the appropriate settings in the "Audio Settings" setup (page 19). DTS and the Symbol are registered trademarks, & DTS 2.0+ Digital Out and the DTS logos are trademarks of...
... cable (supplied) *1 *2 Manufactured under license under U.S. Connecting to your AV amplifier (receiver). Hookups and Settings HDMI cable (not supplied) HDMI cable (not supplied) Optical digital cable (not supplied) t Set "Dolby Digital*1" (page 19) and "DTS*2" (page 19). Patent #'s: 5,451,942; 5,956,674...978,762; 6,487,535 & other U.S. Product includes software. © DTS, Inc. When you select B, make the appropriate settings in the "Audio Settings" setup (page 19). DTS and the Symbol are registered trademarks, & DTS 2.0+ Digital Out and the DTS logos are trademarks of...
Operating Instructions
Page 12
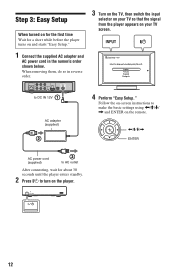
Step 3: Easy Setup When turned on for the first time Wait for a short while before the player turns on and starts "Easy Setup." 1 Connect the supplied AC adapter and AC power cord in reverse order. 3 Turn on the TV, then switch the input selector on your TV so that the signal from the player appears on -screen instructions to DC IN 12V AC adapter (supplied) 4 Perform "Easy Setup." Follow the on your TV screen. When removing them, do so in the numeric order shown below. to make the basic settings using
Step 3: Easy Setup When turned on for the first time Wait for a short while before the player turns on and starts "Easy Setup." 1 Connect the supplied AC adapter and AC power cord in reverse order. 3 Turn on the TV, then switch the input selector on your TV so that the signal from the player appears on -screen instructions to DC IN 12V AC adapter (supplied) 4 Perform "Easy Setup." Follow the on your TV screen. When removing them, do so in the numeric order shown below. to make the basic settings using
Operating Instructions
Page 13
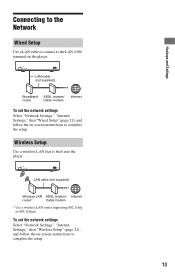
...a LAN cable to connect to complete the setup. LAN cable (not supplied) Broadband ADSL modem/ Internet router Cable modem To set the network settings Select "Network Settings," "Internet Settings," then "Wireless Setup" (page 21), and follow the on-screen instructions to the LAN (100) terminal on -screen instructions...) Wireless LAN ADSL modem/ Internet router* Cable modem * Use a wireless LAN router supporting 802.11b/g or 802.11b/g/n. To set the network settings Select "Network Settings," "Internet Settings," then "Wired Setup" (page 21), and follow the on the player.
...a LAN cable to connect to complete the setup. LAN cable (not supplied) Broadband ADSL modem/ Internet router Cable modem To set the network settings Select "Network Settings," "Internet Settings," then "Wireless Setup" (page 21), and follow the on-screen instructions to the LAN (100) terminal on -screen instructions...) Wireless LAN ADSL modem/ Internet router* Cable modem * Use a wireless LAN router supporting 802.11b/g or 802.11b/g/n. To set the network settings Select "Network Settings," "Internet Settings," then "Wired Setup" (page 21), and follow the on the player.
Operating Instructions
Page 15
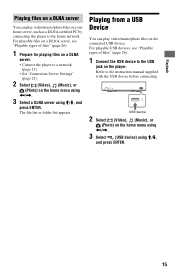
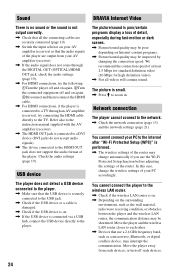
Playback Playing files on a DLNA server You can play video/music/photo files on your home server, such as a DLNA certified PC by connecting the player to a network (page 13). • Set "Connection Server Settings" (page 21). 2 Select (Video), (Music), or (Photo) on a DLNA server. • Connect the player to the home network. For playable files on a DLNA server, see "Playable types of files" (page 26). 1 Prepare for playing files on the home menu using
Playback Playing files on a DLNA server You can play video/music/photo files on your home server, such as a DLNA certified PC by connecting the player to a network (page 13). • Set "Connection Server Settings" (page 21). 2 Select (Video), (Music), or (Photo) on a DLNA server. • Connect the player to the home network. For playable files on a DLNA server, see "Playable types of files" (page 26). 1 Prepare for playing files on the home menu using
Operating Instructions
Page 16
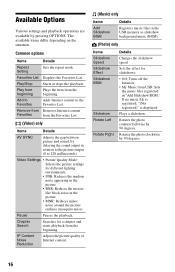
... Items Add Slideshow BGM Details Registers music files in "Add Slideshow BGM." Common options Items Details Repeat Setting Sets the repeat mode. Play/Stop Starts or stops the playback. Sets the effect for slideshows. • Off: Turns off the function. • My Music from the... MNR: Reduces minor noise around the picture outlines (mosquito noise). Rotates the photo clockwise by pressing OPTIONS. Available Options Various settings and playback operations are available by 90 degrees. 16 The available items differ depending on the situation. Add to Favorites Adds ...
... Items Add Slideshow BGM Details Registers music files in "Add Slideshow BGM." Common options Items Details Repeat Setting Sets the repeat mode. Play/Stop Starts or stops the playback. Sets the effect for slideshows. • Off: Turns off the function. • My Music from the... MNR: Reduces minor noise around the picture outlines (mosquito noise). Rotates the photo clockwise by pressing OPTIONS. Available Options Various settings and playback operations are available by 90 degrees. 16 The available items differ depending on the situation. Add to Favorites Adds ...
Operating Instructions
Page 17
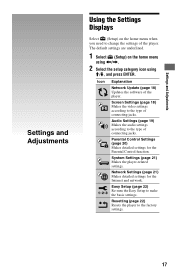
The default settings are underlined. 1 Select (Setup) on the home menu when you need to change the settings of the player. Settings and Adjustments Settings and Adjustments Using the Settings Displays Select (Setup) on the home menu using
The default settings are underlined. 1 Select (Setup) on the home menu when you need to change the settings of the player. Settings and Adjustments Settings and Adjustments Using the Settings Displays Select (Setup) on the home menu using
Operating Instructions
Page 18
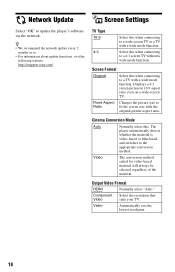
... a wide mode function. Video The conversion method suited for video-based material will always be selected regardless of the material. Video Automatically sets the lowest resolution. 18 Screen Format Original Select this . Displays a 4:3 screen picture in 16:9 aspect ratio even on a wide-...8226; We recommend the network update every 2 months or so. • For information about update functions, visit the following website: http://esupport.sony.com/ TV Type 16:9 4:3 Select this when connecting to a TV with a wide mode function. Component Select the resolution that Video suits...
... a wide mode function. Video The conversion method suited for video-based material will always be selected regardless of the material. Video Automatically sets the lowest resolution. 18 Screen Format Original Select this . Displays a 4:3 screen picture in 16:9 aspect ratio even on a wide-...8226; We recommend the network update every 2 months or so. • For information about update functions, visit the following website: http://esupport.sony.com/ TV Type 16:9 4:3 Select this when connecting to a TV with a wide mode function. Component Select the resolution that Video suits...
Operating Instructions
Page 19
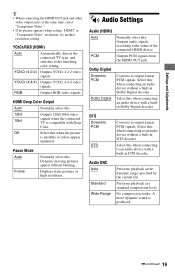
... produced. ,continued 19 Off Select this . RGB Outputs RGB video signals. DTS Downmix PCM DTS Converts to the matching color setting. YCbCr/RGB (HDMI) Auto Automatically detects the connected TV type, and switches to output Linear PCM signals. Select this . ...Displays static pictures at the same time, select "Component Video." • If no picture appears when setting "HDMI" or "Component Video" resolution, try another resolution setting. Audio Settings Audio (HDMI) Auto PCM Normally select this when connecting an audio device without a built-in DTS ...
... produced. ,continued 19 Off Select this . RGB Outputs RGB video signals. DTS Downmix PCM DTS Converts to the matching color setting. YCbCr/RGB (HDMI) Auto Automatically detects the connected TV type, and switches to output Linear PCM signals. Select this . ...Displays static pictures at the same time, select "Component Video." • If no picture appears when setting "HDMI" or "Component Video" resolution, try another resolution setting. Audio Settings Audio (HDMI) Auto PCM Normally select this when connecting an audio device without a built-in DTS ...
Operating Instructions
Page 20
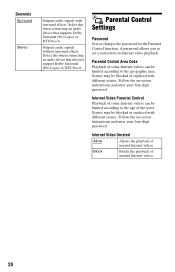
... users. Scenes may be blocked or replaced with different scenes. Internet Video Unrated Allow Allows the playback of unrated Internet videos. 20 Parental Control Settings Password Sets or changes the password for the Parental Control function. Follow the on-screen instructions and enter your four-digit password. Follow the on Internet video.... Parental Control Area Code Playback of some Internet videos can be limited according to the age of some Internet videos can be limited according to set a restriction on -screen instructions and enter your four-digit password.
... users. Scenes may be blocked or replaced with different scenes. Internet Video Unrated Allow Allows the playback of unrated Internet videos. 20 Parental Control Settings Password Sets or changes the password for the Parental Control function. Follow the on-screen instructions and enter your four-digit password. Follow the on Internet video.... Parental Control Area Code Playback of some Internet videos can be limited according to the age of some Internet videos can be limited according to set a restriction on -screen instructions and enter your four-digit password.
Operating Instructions
Page 21
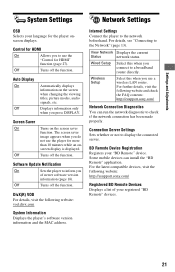
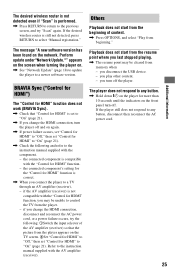
... For details, visit the following website: http://esupport.sony.com/ Registered BD Remote Devices Displays a list of newer software version information (page 18). Internet Settings Connect the player to display the connected server. Connection Server Settings Sets whether or not to the network beforehand. Some mobile...Control for HDMI" function (page 27). For further details, visit the following website and check the FAQ contents: http://esupport.sony.com/ Network Connection Diagnostics You can install the "BD Remote" application. Control for HDMI On Allows you do not use the...
... For details, visit the following website: http://esupport.sony.com/ Registered BD Remote Devices Displays a list of newer software version information (page 18). Internet Settings Connect the player to display the connected server. Connection Server Settings Sets whether or not to the network beforehand. Some mobile...Control for HDMI" function (page 27). For further details, visit the following website and check the FAQ contents: http://esupport.sony.com/ Network Connection Diagnostics You can install the "BD Remote" application. Control for HDMI On Allows you do not use the...

Operating Instructions
Page 22
All the settings within the group will be reset. Resetting Reset to Factory Default Settings You can erase your personal information stored in the player. 22 Follow the on-screen instructions. Initialize Personal Information You can reset the player settings to make the basic settings. Easy Setup Re-runs the "Easy Setup" to the factory default by selecting the group of settings.
All the settings within the group will be reset. Resetting Reset to Factory Default Settings You can erase your personal information stored in the player. 22 Follow the on-screen instructions. Initialize Personal Information You can reset the player settings to make the basic settings. Easy Setup Re-runs the "Easy Setup" to the factory default by selecting the group of settings.
Operating Instructions
Page 23
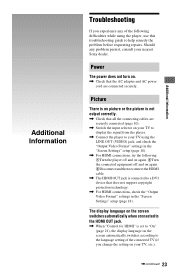
... switches according to a DVI device that does not support copyright protection technology. , For HDMI connections, check the "Output Video Format" settings in the "Screen Settings" setup (page 18). , For HDMI connections, try the following difficulties while using the player, use this troubleshooting guide to help remedy...(page 10). , Switch the input selector on your TV to display the signal from the player. , Connect the player to your nearest Sony dealer. Should any of the following : 1Turn the player off and on again. 2Turn the connected equipment off and on again. 3Disconnect and...
... switches according to a DVI device that does not support copyright protection technology. , For HDMI connections, check the "Output Video Format" settings in the "Screen Settings" setup (page 18). , For HDMI connections, try the following difficulties while using the player, use this troubleshooting guide to help remedy...(page 10). , Switch the input selector on your TV to display the signal from the player. , Connect the player to your nearest Sony dealer. Should any of the following : 1Turn the player off and on again. 2Turn the connected equipment off and on again. 3Disconnect and...
Operating Instructions
Page 24
... Move the player and the wireless LAN router closer to the Internet after "Wi-Fi Protected Setup (WPS)" is performed. , The wireless settings of the router may interrupt the communication. Move the player away from your PC accordingly. Sound There is no sound or the sound is not... the connected equipment off such devices. 24 The picture is connected to a TV through the DIGITAL OUT (OPTICAL)/HDMI OUT jack, check the audio settings (page 19). , For HDMI connections, try connecting the HDMI cable directly to the player. BRAVIA Internet Video The picture/sound is on. , Depending...
... Move the player and the wireless LAN router closer to the Internet after "Wi-Fi Protected Setup (WPS)" is performed. , The wireless settings of the router may interrupt the communication. Move the player away from your PC accordingly. Sound There is no sound or the sound is not... the connected equipment off such devices. 24 The picture is connected to a TV through the DIGITAL OUT (OPTICAL)/HDMI OUT jack, check the audio settings (page 19). , For HDMI connections, try connecting the HDMI cable directly to the player. BRAVIA Internet Video The picture/sound is on. , Depending...
Operating Instructions
Page 25
...AC power cord, or a power failure occurs, try "Scan" again. Refer to the instruction manual supplied with the component. - the connected component's setting for the "Control for HDMI" function is not compatible with the "Control for HDMI" to "On" (page 21). , Check the following : 1Switch...the previous screen, and try the following and refer to the instruction manual supplied with the AV amplifier (receiver). the connected component is set "Control for HDMI" function. - Perform update under "Network Update."" appears on the screen when turning the player on the network. ...
...AC power cord, or a power failure occurs, try "Scan" again. Refer to the instruction manual supplied with the component. - the connected component's setting for the "Control for HDMI" function is not compatible with the "Control for HDMI" to "On" (page 21). , Check the following : 1Switch...the previous screen, and try the following and refer to the instruction manual supplied with the AV amplifier (receiver). the connected component is set "Control for HDMI" function. - Perform update under "Network Update."" appears on the screen when turning the player on the network. ...


