
Operating Instructions
Page 1
... call Sony Customer Information Services Company at : Customer Information Service 115 Gordon Baker Road, Toronto, Ontario, M2H 3R6 SLV-D261P © 2005 Sony Corporation 2-584-680-11 (1) US DVD Player/ Video Cassette Recorder Operating Instructions For customers in Canada If this product is not working properly, please call Sony Customer Information Services Company at 1-800-VHS-SONY (847...
... call Sony Customer Information Services Company at : Customer Information Service 115 Gordon Baker Road, Toronto, Ontario, M2H 3R6 SLV-D261P © 2005 Sony Corporation 2-584-680-11 (1) US DVD Player/ Video Cassette Recorder Operating Instructions For customers in Canada If this product is not working properly, please call Sony Customer Information Services Company at 1-800-VHS-SONY (847...
Operating Instructions
Page 4
Table of contents 2 WARNING 2 Welcome! 2 General Precautions 3 Important Safety Instructions 3 DVD Precautions 6 About this manual 6 This player can play the following discs 8 Notes about discs Getting Started 9 Step 1 : Unpacking 10 Step 2 : Setting up the remote ...Lock) 37 Playing a tape 40 Recording TV programs 43 Recording TV programs using the timer 46 Checking/changing/canceling timer settings 48 Locking the DVD-VCR (Child Lock) DVD Settings and Adjustments 53 Audio Setup 55 Screen Setup 59 Setting the display or sound track language 61 Parental Control (limiting playback by children...
Table of contents 2 WARNING 2 Welcome! 2 General Precautions 3 Important Safety Instructions 3 DVD Precautions 6 About this manual 6 This player can play the following discs 8 Notes about discs Getting Started 9 Step 1 : Unpacking 10 Step 2 : Setting up the remote ...Lock) 37 Playing a tape 40 Recording TV programs 43 Recording TV programs using the timer 46 Checking/changing/canceling timer settings 48 Locking the DVD-VCR (Child Lock) DVD Settings and Adjustments 53 Audio Setup 55 Screen Setup 59 Setting the display or sound track language 61 Parental Control (limiting playback by children...

Operating Instructions
Page 6
... for DATA DVDs (DVD-ROMs/DVD+RWs/ DVD+Rs/DVD-RWs/DVD-Rs containing MP3* audio tracks or JPEG files) Functions available for VHS VIDEOs * MP3 (MPEG 1 Audio Layer 3) is a standard format defined by ISO (International Organization for Standardization). music CD format - MP3 audio tracks and JPEG image files of files and folders on the DVD-VCR having the...
... for DATA DVDs (DVD-ROMs/DVD+RWs/ DVD+Rs/DVD-RWs/DVD-Rs containing MP3* audio tracks or JPEG files) Functions available for VHS VIDEOs * MP3 (MPEG 1 Audio Layer 3) is a standard format defined by ISO (International Organization for Standardization). music CD format - MP3 audio tracks and JPEG image files of files and folders on the DVD-VCR having the...

Operating Instructions
Page 9
Unpacking 9 Getting Started Getting Started Step 1 : Unpacking Check that you have received the following items with the DVD-VCR: • Remote commander • 75-ohm coaxial cable with F-type connectors • Size AA (R6) batteries Note • The supplied remote commander is for the exclusive use of this DVD-VCR.
Unpacking 9 Getting Started Getting Started Step 1 : Unpacking Check that you have received the following items with the DVD-VCR: • Remote commander • 75-ohm coaxial cable with F-type connectors • Size AA (R6) batteries Note • The supplied remote commander is for the exclusive use of this DVD-VCR.
Operating Instructions
Page 10
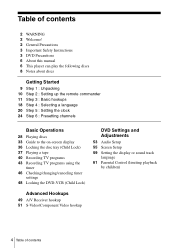
...batteries Insert two size AA (R6) batteries by matching the + and - If the TV does not have the symbol near the remote sensor, this DVD-VCR and a Sony TV. Step 2 : Setting up the remote commander Buttons on the batteries to operate this remote commander will not operate SELECT VIDEO SELECT...operate the DVD player the VCR your TV Set TV / DVD·VIDEO to DVD·VIDEO, then press SELECT DVD and point at the remote sensor at the DVD-VCR DVD·VIDEO, then press SELECT VIDEO and point at the remote sensor at the DVD-VCR TV and point at the remote sensor at your Sony TV. ...
...batteries Insert two size AA (R6) batteries by matching the + and - If the TV does not have the symbol near the remote sensor, this DVD-VCR and a Sony TV. Step 2 : Setting up the remote commander Buttons on the batteries to operate this remote commander will not operate SELECT VIDEO SELECT...operate the DVD player the VCR your TV Set TV / DVD·VIDEO to DVD·VIDEO, then press SELECT DVD and point at the remote sensor at the DVD-VCR DVD·VIDEO, then press SELECT VIDEO and point at the remote sensor at the DVD-VCR TV and point at the remote sensor at your Sony TV. ...
Operating Instructions
Page 11
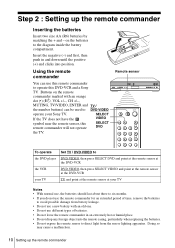
...cable ground shall be connected to the grounding system of the building, as close to the point of the examples provided, see your DVD-VCR so that violates the regulations of the Federal Communications Commission regarding the use the accompanying diagrams and procedures on the hookup you used....it works best for proper grounding and, in the following pages to set up your nearest Sony dealer or qualified technician. Failure to do so may not be able to use your DVD-VCR can be made only as practical. Procedures differ depending on the following instructions. continued Basic ...
...cable ground shall be connected to the grounding system of the building, as close to the point of the examples provided, see your DVD-VCR so that violates the regulations of the Federal Communications Commission regarding the use the accompanying diagrams and procedures on the hookup you used....it works best for proper grounding and, in the following pages to set up your nearest Sony dealer or qualified technician. Failure to do so may not be able to use your DVD-VCR can be made only as practical. Procedures differ depending on the following instructions. continued Basic ...
Operating Instructions
Page 12
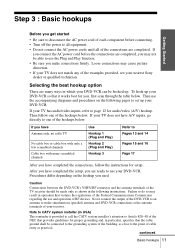
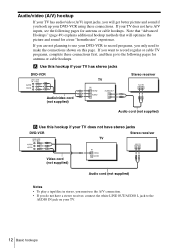
... or cable hookups. Note that "Advanced Hookups" (page 49) explains additional hookup methods that will get better picture and sound if you hook up your DVD-VCR using these connections first, and then go to the following pages for antenna or cable hookups. If you are not planning to use your... DVD-VCR to record programs, you only need to make the connections shown on your TV does not have stereo jacks DVD-VCR Stereo receiver TV Video cord (not supplied) Audio cord (not supplied) Notes • To play...
... or cable hookups. Note that "Advanced Hookups" (page 49) explains additional hookup methods that will get better picture and sound if you hook up your DVD-VCR using these connections first, and then go to the following pages for antenna or cable hookups. If you are not planning to use your... DVD-VCR to record programs, you only need to make the connections shown on your TV does not have stereo jacks DVD-VCR Stereo receiver TV Video cord (not supplied) Audio cord (not supplied) Notes • To play...

Operating Instructions
Page 13
... connection is a flat cable (300-ohm twin lead cable), attach an external antenna connector (not supplied) so you can connect the cable to the DVD-VCR directly If your antenna cable is required. continued Basic hookups 13 VHF C UHF If you cannot connect your antenna cable to the IN connector. If... have cable TV). A Use this hookup if you are using a VHF-only antenna (you get channels 14 and higher) • Separate VHF and UHF antennas DVD-VCR Rear of TV VHF/UHF A Match the type of connector on your or TV: A, B, or C. VHF B UHF or VHF C UHF B Use this hookup if...
... connection is a flat cable (300-ohm twin lead cable), attach an external antenna connector (not supplied) so you can connect the cable to the DVD-VCR directly If your antenna cable is required. continued Basic hookups 13 VHF C UHF If you cannot connect your antenna cable to the IN connector. If... have cable TV). A Use this hookup if you are using a VHF-only antenna (you get channels 14 and higher) • Separate VHF and UHF antennas DVD-VCR Rear of TV VHF/UHF A Match the type of connector on your or TV: A, B, or C. VHF B UHF or VHF C UHF B Use this hookup if...
Operating Instructions
Page 14
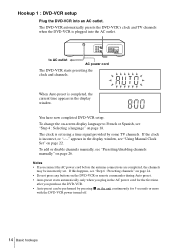
..., the current time appears in the AC power cord for 5 seconds or more with the DVD-VCR power turned off. 14 Basic hookups The clock is plugged into an AC outlet. You have now completed DVD-VCR setup. If this happens, see "Step 4 : Selecting a language" on the unit continuously...6 : Presetting channels" on page 24. • Do not press any buttons on -screen display language to AC outlet AC power cord The DVD-VCR starts presetting the clock and channels. Notes • If you connect the AC power cord before the antenna connections are completed, the channels may be...
..., the current time appears in the AC power cord for 5 seconds or more with the DVD-VCR power turned off. 14 Basic hookups The clock is plugged into an AC outlet. You have now completed DVD-VCR setup. If this happens, see "Step 4 : Selecting a language" on the unit continuously...6 : Presetting channels" on page 24. • Do not press any buttons on -screen display language to AC outlet AC power cord The DVD-VCR starts presetting the clock and channels. Notes • If you connect the AC power cord before the antenna connections are completed, the channels may be...
Operating Instructions
Page 15
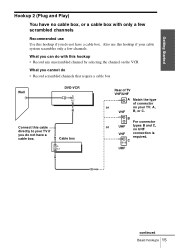
Cable box Rear of TV VHF/UHF A Match the type of connector or on the VCR What you cannot do • Record scrambled channels that require a cable box Wall DVD-VCR Connect this cable directly to your TV if you do not have a cable box. C UHF continued Basic hookups 15 Also use this hookup...
Cable box Rear of TV VHF/UHF A Match the type of connector or on the VCR What you cannot do • Record scrambled channels that require a cable box Wall DVD-VCR Connect this cable directly to your TV if you do not have a cable box. C UHF continued Basic hookups 15 Also use this hookup...
Operating Instructions
Page 16
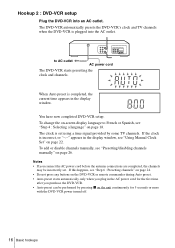
..., see "Using Manual Clock Set" on page 22. To add or disable channels manually, see "Step 4 : Selecting a language" on page 26. Hookup 2 : DVD-VCR setup Plug the DVD-VCR into the AC outlet. to French or Spanish, see "Presetting/disabling channels manually" on page 18. You have now completed... performed by some TV channels. The clock is completed, the current time appears in the display window. Notes • If you purchase the DVD-VCR. • Auto preset can be incorrectly set using a time signal provided by pressing x on -screen display language to AC outlet AC power cord...
..., see "Using Manual Clock Set" on page 22. To add or disable channels manually, see "Step 4 : Selecting a language" on page 26. Hookup 2 : DVD-VCR setup Plug the DVD-VCR into the AC outlet. to French or Spanish, see "Presetting/disabling channels manually" on page 18. You have now completed... performed by some TV channels. The clock is completed, the current time appears in the display window. Notes • If you purchase the DVD-VCR. • Auto preset can be incorrectly set using a time signal provided by pressing x on -screen display language to AC outlet AC power cord...

Operating Instructions
Page 17
to AC outlet AC power cord Basic hookups 17 After you have completed hookup, plug the DVD-VCR into an AC outlet and see "Step 4 : Selecting a language" on your cable system scrambles all or most channels. Getting Started Hookup 3 Connecting a cable box with ...the cable box turned off • Record one channel while watching another channel Wall Cable box DVD-VCR Rear of TV VHF/UHF A Match the type of connector on page 18. VHF B or UHF For connector types B and C, no VHF UHF connection is...
to AC outlet AC power cord Basic hookups 17 After you have completed hookup, plug the DVD-VCR into an AC outlet and see "Step 4 : Selecting a language" on your cable system scrambles all or most channels. Getting Started Hookup 3 Connecting a cable box with ...the cable box turned off • Record one channel while watching another channel Wall Cable box DVD-VCR Rear of TV VHF/UHF A Match the type of connector on page 18. VHF B or UHF For connector types B and C, no VHF UHF connection is...
Operating Instructions
Page 18
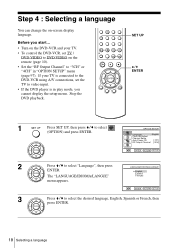
...SET UP, then press V/v to select "Language", then press LANGUAGE/IDIOMA/LANGUE ENTER. Stop the DVD playback. Step 4 : Selecting a language You can change the on the DVD-VCR and your TV. • To control the DVD-VCR, set the TV to select the desired language, English, Spanish or French, then press ENTER.... 18 Selecting a language If your TV is connected to the DVD-VCR using A/V connections, set TV / DVD·VIDEO to DVD·VIDEO on the remote (page 10). • Set the "RF Output Channel" to "3CH" or "4CH" in play...
...SET UP, then press V/v to select "Language", then press LANGUAGE/IDIOMA/LANGUE ENTER. Stop the DVD playback. Step 4 : Selecting a language You can change the on the DVD-VCR and your TV. • To control the DVD-VCR, set the TV to select the desired language, English, Spanish or French, then press ENTER.... 18 Selecting a language If your TV is connected to the DVD-VCR using A/V connections, set TV / DVD·VIDEO to DVD·VIDEO on the remote (page 10). • Set the "RF Output Channel" to "3CH" or "4CH" in play...

Operating Instructions
Page 20
... RETURN SET UP 20 Setting the clock The Auto Clock Set feature works only if a channel in play mode, you start... • Turn on the DVD-VCR and your TV. SET UP V/v/B/b ENTER O RETURN OPTION SETUP Language :English Clock Set/Adjust Channel Setup Auto Power Off [ Off ] RF Output Channel [... Your DVDVCR can pick up this time signal to automatically set TV / DVD·VIDEO to DVD·VIDEO on . • To control the DVD-VCR, set the clock. When using A/V connections, set the time manually (page 22). Stop the DVD playback. 1 Press SET UP, then press V/v to select "Clock Set/...
... RETURN SET UP 20 Setting the clock The Auto Clock Set feature works only if a channel in play mode, you start... • Turn on the DVD-VCR and your TV. SET UP V/v/B/b ENTER O RETURN OPTION SETUP Language :English Clock Set/Adjust Channel Setup Auto Power Off [ Off ] RF Output Channel [... Your DVDVCR can pick up this time signal to automatically set TV / DVD·VIDEO to DVD·VIDEO on . • To control the DVD-VCR, set the clock. When using A/V connections, set the time manually (page 22). Stop the DVD playback. 1 Press SET UP, then press V/v to select "Clock Set/...
Operating Instructions
Page 21
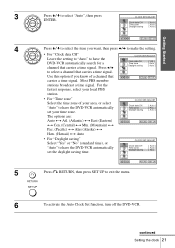
...station. • For "Time zone" Select the time zone of a channel that carries a time signal. Getting Started 3 Press V/v to have the DVD-VCR automatically set the daylight saving time. continued Setting the clock 21 CLOCK SET/ADJUST Clock data CH Time zone Daylight saving [ Auto ] [ Auto ]...your time zone. Press B/b CLOCK SET/ADJUST Clock data CH Time zone Daylight saving [ 123 ] [ Auto ] [ Auto ] to have the DVD-VCR automatically set your area, or select "Auto" to select "Auto", then press ENTER. CLOCK SET/ADJUST Clock data CH Time zone Daylight saving [...
...station. • For "Time zone" Select the time zone of a channel that carries a time signal. Getting Started 3 Press V/v to have the DVD-VCR automatically set the daylight saving time. continued Setting the clock 21 CLOCK SET/ADJUST Clock data CH Time zone Daylight saving [ Auto ] [ Auto ]...your time zone. Press B/b CLOCK SET/ADJUST Clock data CH Time zone Daylight saving [ 123 ] [ Auto ] [ Auto ] to have the DVD-VCR automatically set your area, or select "Auto" to select "Auto", then press ENTER. CLOCK SET/ADJUST Clock data CH Time zone Daylight saving [...

Operating Instructions
Page 22
... UP, then press V/v to select "Clock Set/Adjust", then CLOCK SET/ADJUST press ENTER. Using Manual Clock Set Before you start... • Turn on the DVD-VCR and your area that carries a time signal in "OPTION SETUP" menu (page 97). If so, set the clock manually (page 22). • If there are... mode, you must set the clock accurately. • The clock display appears when VIDEO mode is selected with no tape inserted or when the DVD-VCR is in your TV. • To control the DVD-VCR, set TV / DVD·VIDEO to about 20 minutes, set the TV to "3CH" or "4CH" in your area.
... UP, then press V/v to select "Clock Set/Adjust", then CLOCK SET/ADJUST press ENTER. Using Manual Clock Set Before you start... • Turn on the DVD-VCR and your area that carries a time signal in "OPTION SETUP" menu (page 97). If so, set the clock manually (page 22). • If there are... mode, you must set the clock accurately. • The clock display appears when VIDEO mode is selected with no tape inserted or when the DVD-VCR is in your TV. • To control the DVD-VCR, set TV / DVD·VIDEO to about 20 minutes, set the TV to "3CH" or "4CH" in your area.

Operating Instructions
Page 23
... the timer, you must set the clock accurately. • The clock display appears when VIDEO mode is selected with no tape inserted or when the DVD-VCR is set , and press V/v to be changed, and select the digits by pressing V/v. Tip • To change the digits while setting, press B to return to...
... the timer, you must set the clock accurately. • The clock display appears when VIDEO mode is selected with no tape inserted or when the DVD-VCR is set , and press V/v to be changed, and select the digits by pressing V/v. Tip • To change the digits while setting, press B to return to...

Operating Instructions
Page 24
...RETURN SET UP 24 Presetting channels First, we recommend that you start... • Turn on the DVD-VCR and your area using a cable box, turn it on. • To control the DVD-VCR, set TV / DVD·VIDEO to DVD·VIDEO on the remote (page 10). • Set the "RF Output Channel" to select ... of receiving VHF channels 2 to 13, UHF channels 14 to 69 and unscrambled CATV channels 1 to video input. • If the DVD player is connected to the DVD-VCR using manual presetting methods (page 26). If your TV is in "OPTION SETUP" menu (page 97). If you have already decided which ...
...RETURN SET UP 24 Presetting channels First, we recommend that you start... • Turn on the DVD-VCR and your area using a cable box, turn it on. • To control the DVD-VCR, set TV / DVD·VIDEO to DVD·VIDEO on the remote (page 10). • Set the "RF Output Channel" to select ... of receiving VHF channels 2 to 13, UHF channels 14 to 69 and unscrambled CATV channels 1 to video input. • If the DVD player is connected to the DVD-VCR using manual presetting methods (page 26). If your TV is in "OPTION SETUP" menu (page 97). If you have already decided which ...

Operating Instructions
Page 26
... then press ENTER. 26 Presetting channels CH +/- When using A/V connections, set TV / DVD·VIDEO to DVD·VIDEO on . • To control the DVD-VCR, set the TV to video input. • If the DVD player is in "OPTION SETUP" menu (page 97). Presetting/disabling channels manually Before you cannot...O RETURN 1 Press SET UP, then press V/v to "3CH" or "4CH" in play mode, you start... • Turn on the DVD-VCR and your TV is connected to the DVD-VCR using a cable box, turn it on the remote (page 10). • Set the "RF Output Channel" to select (OPTION) and press...
... then press ENTER. 26 Presetting channels CH +/- When using A/V connections, set TV / DVD·VIDEO to DVD·VIDEO on . • To control the DVD-VCR, set the TV to video input. • If the DVD player is in "OPTION SETUP" menu (page 97). Presetting/disabling channels manually Before you cannot...O RETURN 1 Press SET UP, then press V/v to "3CH" or "4CH" in play mode, you start... • Turn on the DVD-VCR and your TV is connected to the DVD-VCR using a cable box, turn it on the remote (page 10). • Set the "RF Output Channel" to select (OPTION) and press...

Operating Instructions
Page 28
Refer to open the disc tray and place a disc on the TV screen. • Set TV / DVD·VIDEO to DVD·VIDEO, then press SELECT DVD to control the DVD player (page 10). ?/1 Z / m/M y ./ > X PAUSE x STOP H PLAY 1 Press Z to the operating instructions supplied with the playback side facing down 28 Playing discs Basic Operations ... on your disc. with your TV so that the signal from the player appears on the disc tray. Before you start ... • Turn on the DVD-VCR and your TV. • Switch the input selector on the disc, some operations may be different or restricted.
Refer to open the disc tray and place a disc on the TV screen. • Set TV / DVD·VIDEO to DVD·VIDEO, then press SELECT DVD to control the DVD player (page 10). ?/1 Z / m/M y ./ > X PAUSE x STOP H PLAY 1 Press Z to the operating instructions supplied with the playback side facing down 28 Playing discs Basic Operations ... on your disc. with your TV so that the signal from the player appears on the disc tray. Before you start ... • Turn on the DVD-VCR and your TV. • Switch the input selector on the disc, some operations may be different or restricted.


