
Operating Instructions (primary manual)
Page 2
... this product. Caution Television programs, films, video tapes and other for the purpose of the following measures: • Reorient or relocate the receiving antenna. • Increase the separation between the equipment and receiver. • Connect the equipment into the outlet, contact your Sony dealer. • Unplug the unit from the cable television transmission and/or program owner. Owner's record The model number is located at...
... this product. Caution Television programs, films, video tapes and other for the purpose of the following measures: • Reorient or relocate the receiving antenna. • Increase the separation between the equipment and receiver. • Connect the equipment into the outlet, contact your Sony dealer. • Unplug the unit from the cable television transmission and/or program owner. Owner's record The model number is located at...

Operating Instructions (primary manual)
Page 3
... 3: Hookups 16 Selecting a language (Canadian model only) 17 Setting the clock 18 Presetting channels 21 Using the ADVANCED OPTIONS Basic Operations 23 Playing a tape 26 Recording TV programs 30 Recording TV programs using the timer 33 Checking/changing/cancelling timer settings Additional Operations 35 Playing/searching at various speeds 36 Adjusting the picture 37 Searching using the index function 38 Editing with another VCR Additional Information 40 General setup information 41 Troubleshooting 43 Specifications 44 Index to parts and controls 46...
... 3: Hookups 16 Selecting a language (Canadian model only) 17 Setting the clock 18 Presetting channels 21 Using the ADVANCED OPTIONS Basic Operations 23 Playing a tape 26 Recording TV programs 30 Recording TV programs using the timer 33 Checking/changing/cancelling timer settings Additional Operations 35 Playing/searching at various speeds 36 Adjusting the picture 37 Searching using the index function 38 Editing with another VCR Additional Information 40 General setup information 41 Troubleshooting 43 Specifications 44 Index to parts and controls 46...

Operating Instructions (primary manual)
Page 6
... following instructions. If you need more details of the procedure described, page numbers are , however, many types of TVs available and many scrambled channels Hookupl Page 8 No cable box or cable box with only a few scrambled channels Hookup 2 Page 10 Antenna only, no cable TV Hookup 3 Page 12 Cable box with many ways in which your TV can be hooked up your VCR so that has audio/video inputs Audio/video (A/V) hookup...
... following instructions. If you need more details of the procedure described, page numbers are , however, many types of TVs available and many scrambled channels Hookupl Page 8 No cable box or cable box with only a few scrambled channels Hookup 2 Page 10 Antenna only, no cable TV Hookup 3 Page 12 Cable box with many ways in which your TV can be hooked up your VCR so that has audio/video inputs Audio/video (A/V) hookup...
Operating Instructions (primary manual)
Page 7
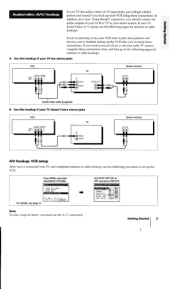
... you're planning to use your VCR only to your TV and completed antenna or cable hookup, use the A/V connection. Press MENU and select ADVANCED OPTIONS. Getting Started 7 If you should connect the audio outputs of your VCR or TV to play a tape in stereo, you 've connected your stereo system. TIMER SET/CHECK TUNER PRESET CLOCK SET ADVANCED OPTIONS For details, see the following procedure to set up your VCR using these connections first, and then...
... you're planning to use your VCR only to your TV and completed antenna or cable hookup, use the A/V connection. Press MENU and select ADVANCED OPTIONS. Getting Started 7 If you should connect the audio outputs of your VCR or TV to play a tape in stereo, you 've connected your stereo system. TIMER SET/CHECK TUNER PRESET CLOCK SET ADVANCED OPTIONS For details, see the following procedure to set up your VCR using these connections first, and then...
Operating Instructions (primary manual)
Page 9
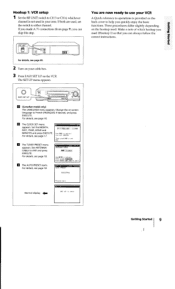
... differ slightly depending on the back cover to help you can skip this step. The CLOCK SET menu appears. Make a note of which hookup you can always follow the correct instructions. U EASY SET UP SONY t r. 1 2 0 0o (Canadian model only) The LANGUAGE menu appears. Hookup 1: VCR setup Set the RF UNIT switch to CH 3 or CH 4, whichever channel is not used . Set the MONTH, DAY, YEAR, HOUR and MINUTES and press EXECUTE.
... differ slightly depending on the back cover to help you can skip this step. The CLOCK SET menu appears. Make a note of which hookup you can always follow the correct instructions. U EASY SET UP SONY t r. 1 2 0 0o (Canadian model only) The LANGUAGE menu appears. Hookup 1: VCR setup Set the RF UNIT switch to CH 3 or CH 4, whichever channel is not used . Set the MONTH, DAY, YEAR, HOUR and MINUTES and press EXECUTE.
Operating Instructions (primary manual)
Page 15
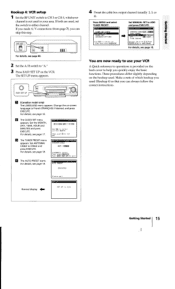
... wai t 4 Preset the cable box output channel (usually 2, 3, or 4). For details, see page 18. 4 The AUTO PRESET starts. Set ANTENNA/ CABLE to ADD and press EXECUTE. TIMER SET/CHECK TUNER PRESET CLOCK SET ADVANCED OPTIONS 0 Use to select an i tem, then push EXECUTE ANTENNA/CABLE ANT [CABLE AUTO PRESET MANUAL SET UFAIMMEN AFT El= FINE TUNING Select CH wi th 0-9 Push FENTER to either channel. Normal display 1= SET UP is done Getting...
... wai t 4 Preset the cable box output channel (usually 2, 3, or 4). For details, see page 18. 4 The AUTO PRESET starts. Set ANTENNA/ CABLE to ADD and press EXECUTE. TIMER SET/CHECK TUNER PRESET CLOCK SET ADVANCED OPTIONS 0 Use to select an i tem, then push EXECUTE ANTENNA/CABLE ANT [CABLE AUTO PRESET MANUAL SET UFAIMMEN AFT El= FINE TUNING Select CH wi th 0-9 Push FENTER to either channel. Normal display 1= SET UP is done Getting...
Operating Instructions (primary manual)
Page 18
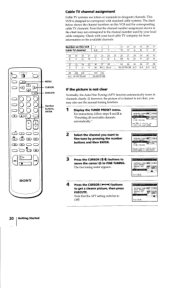
... video input. • Press TV/VTR to the VCR using A/V connections, set them manually. IMEMEMISM I ) to select an i tem, t hen push 4-01 18 Getting Started The main MENU appears on the TV screen. 3 Press the CURSOR (♦/4) buttons to move the cursor (I) to 125. Then, if there are using cable box control.) b O CU 0 (=) 0 0 XOOO O MENU CURSOR EXECUTE This VCR is connected to display the VTR indicator in the VCR's display...
... video input. • Press TV/VTR to the VCR using A/V connections, set them manually. IMEMEMISM I ) to select an i tem, t hen push 4-01 18 Getting Started The main MENU appears on the TV screen. 3 Press the CURSOR (♦/4) buttons to move the cursor (I) to 125. Then, if there are using cable box control.) b O CU 0 (=) 0 0 XOOO O MENU CURSOR EXECUTE This VCR is connected to display the VTR indicator in the VCR's display...
Operating Instructions (primary manual)
Page 20
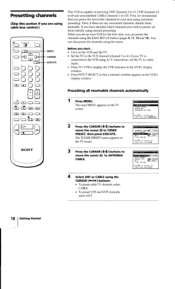
... 25 26 27 28 29 30 31 E F GH I ) to designate channels. ANTENNA/CABLE j CABLE AUTO PRESET MANUAL SET ADD ERASE AFT ON 0$4, - • • • Push The fine tuning meter appears. O O O O O cD 0 O O O lOg (-) MENU CURSOR EXECUTE Number buttons, ENTER o (-±41 ) (If ) =) 4: $* 0000 0 .0 ID) 0 • SONY Cable TV channel assignment Cable TV systems use the manual tuning function. to ADD/ ERASE 3 Press the CURSOR (t14...
... 25 26 27 28 29 30 31 E F GH I ) to designate channels. ANTENNA/CABLE j CABLE AUTO PRESET MANUAL SET ADD ERASE AFT ON 0$4, - • • • Push The fine tuning meter appears. O O O O O cD 0 O O O lOg (-) MENU CURSOR EXECUTE Number buttons, ENTER o (-±41 ) (If ) =) 4: $* 0000 0 .0 ID) 0 • SONY Cable TV channel assignment Cable TV systems use the manual tuning function. to ADD/ ERASE 3 Press the CURSOR (t14...
Operating Instructions (primary manual)
Page 22
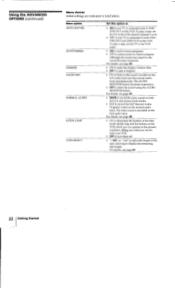
... audio tracks. • SAP to the sound recorded on the VCR. To play a tape, set the TV to the VCR input. • ON to receive stereo programs. • OFF to illuminate the borders of the tape, allowing to select the sound using the AUDIO MONITOR button. For details, see page 28. • ON to reduce noise in a stereo program. For details, see page 24. 22 Getting Started Using the ADVANCED OPTIONS (continued) Menu...
... audio tracks. • SAP to the sound recorded on the VCR. To play a tape, set the TV to the VCR input. • ON to receive stereo programs. • OFF to illuminate the borders of the tape, allowing to select the sound using the AUDIO MONITOR button. For details, see page 28. • ON to reduce noise in a stereo program. For details, see page 24. 22 Getting Started Using the ADVANCED OPTIONS (continued) Menu...

Operating Instructions (primary manual)
Page 23
The tape starts playing automatically if its safety tab has been removed. 3 Press > PLAY to the channel for the VCR. 2 Insert a tape. Basic Operations Note • Tapes recorded in LP mode can be played on this VCR, while playback picture quality in to the VCR: • If the TV is connected to the VCR using the audio/video cable, set the TV to video input. • If the TV is not guaranteed. FF or C»3 SEARCH...
The tape starts playing automatically if its safety tab has been removed. 3 Press > PLAY to the channel for the VCR. 2 Insert a tape. Basic Operations Note • Tapes recorded in LP mode can be played on this VCR, while playback picture quality in to the VCR: • If the TV is connected to the VCR using the audio/video cable, set the TV to video input. • If the TV is not guaranteed. FF or C»3 SEARCH...

Operating Instructions (primary manual)
Page 24
... you use a tape with more than 2-hour recording, select "-120" or "-160" from the menu. 1 Press MENU and select ADVANCED OPTIONS. Time counter Displaying the remaining tape counter Press COUNTER/REMAIN to "-120" or "-160" using the CURSOR (f / 4 / 4.• / buttons. L F REMAIN IH I 2 Set TAPE SELECT to display the remaining tape counter in the display window. AUTO ANT SEL ON AUTO STEREO ON DIMMER ON AUDIO MIX ON NORMAL AUDIO MAIN GUIDE LAMP ON TAPE...
... you use a tape with more than 2-hour recording, select "-120" or "-160" from the menu. 1 Press MENU and select ADVANCED OPTIONS. Time counter Displaying the remaining tape counter Press COUNTER/REMAIN to "-120" or "-160" using the CURSOR (f / 4 / 4.• / buttons. L F REMAIN IH I 2 Set TAPE SELECT to display the remaining tape counter in the display window. AUTO ANT SEL ON AUTO STEREO ON DIMMER ON AUDIO MIX ON NORMAL AUDIO MAIN GUIDE LAMP ON TAPE...
Operating Instructions (primary manual)
Page 25
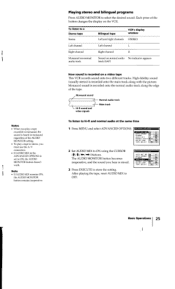
... the button changes the display on a video tape This VCR records sound onto two different tracks. Notes • When you play a tape recorded in monaural, the sound is heard in monaural regardless of the AUDIO MONITOR setting. • To play a tape in the ADVANCED OPTIONS is set to a Stereo tape Stereo Left channel Right channel Monaural on normal audio track Bilingual tape Left and right channels VCR's display window STEREO Left channel Right channel Sound on normal audio No indicator appears track (SAP) How sound is recorded on the VCR...
... the button changes the display on a video tape This VCR records sound onto two different tracks. Notes • When you play a tape recorded in monaural, the sound is heard in monaural regardless of the AUDIO MONITOR setting. • To play a tape in the ADVANCED OPTIONS is set to a Stereo tape Stereo Left channel Right channel Monaural on normal audio track Bilingual tape Left and right channels VCR's display window STEREO Left channel Right channel Sound on normal audio No indicator appears track (SAP) How sound is recorded on the VCR...

Operating Instructions (primary manual)
Page 26
... select tape speeds" on the following ways of recording. • Manually start recording, then stop it automatically-"Recording using the quick timer" (page 27) • Automatically start the VCR recording when the program begins, then stop recording-"Recording TV programs using the timer" (page 30) 0 0 Turn on . 2 Insert a tape with its safety tab in to the VCR: oQ o D O • If the TV is connected to the VCR using the audio/video cable, set the TV to video input...
... select tape speeds" on the following ways of recording. • Manually start recording, then stop it automatically-"Recording using the quick timer" (page 27) • Automatically start the VCR recording when the program begins, then stop recording-"Recording TV programs using the timer" (page 30) 0 0 Turn on . 2 Insert a tape with its safety tab in to the VCR: oQ o D O • If the TV is connected to the VCR using the audio/video cable, set the TV to video input...

Operating Instructions (primary manual)
Page 27
... start recording, press QUICK TIMER until the desired duration appears in increments of 30 minutes as SP. Basic Operations 27 However, SP provides better picture quality. Recording using a cable box, make sure to 0:00, then the VCR turns off the TV. EP provides recording time three times as long as shown below for a specified period of 30 minutes. Tape type T-160 T-120 T-60 T-30 Maximum recording/playback time...
... start recording, press QUICK TIMER until the desired duration appears in increments of 30 minutes as SP. Basic Operations 27 However, SP provides better picture quality. Recording using a cable box, make sure to 0:00, then the VCR turns off the TV. EP provides recording time three times as long as shown below for a specified period of 30 minutes. Tape type T-160 T-120 T-60 T-30 Maximum recording/playback time...
Operating Instructions (primary manual)
Page 28
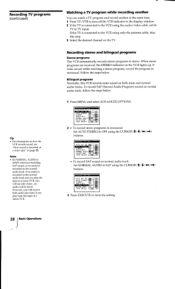
... AUDIO tMAlt P I GUIDE LAMP ON OFF TAPE SELECT -12 -160 I • To record SAP sound on normal audio track: Set NORMAL AUDIO to SAP using the audio/video cable, set th TV to the VCR using the CURSOR (114/1/•*) buttons. However, you will be heard. Recording stereo and bilingual programs Stereo programs This VCR automatically records stereo programs in monaural. Bilingual programs Normally, this VCR records main sound on both audio and video if you will see "How sound is connected to TV input. AUTO...
... AUDIO tMAlt P I GUIDE LAMP ON OFF TAPE SELECT -12 -160 I • To record SAP sound on normal audio track: Set NORMAL AUDIO to SAP using the audio/video cable, set th TV to the VCR using the CURSOR (114/1/•*) buttons. However, you will be heard. Recording stereo and bilingual programs Stereo programs This VCR automatically records stereo programs in monaural. Bilingual programs Normally, this VCR records main sound on both audio and video if you will see "How sound is connected to TV input. AUTO...

Operating Instructions (primary manual)
Page 30
... hour. 2 Press CURSOR •• to highlight the minutes under "START," then press the CURSOR (*/4) buttons to set the minutes. Make sure the tape is set automatically. TIMER , ,FT CHECK 7 4 DATE START STOP CH 7/5 WED 7: : -/-/ -/--/-- START STOP CH 7 / 5 WED 7 00AM 30 Basic Operations The day of the week is longer than the total recording time. • Turn on . Recording TV programs using a cable box, turn it isn't, reset the clock...
... hour. 2 Press CURSOR •• to highlight the minutes under "START," then press the CURSOR (*/4) buttons to set the minutes. Make sure the tape is set automatically. TIMER , ,FT CHECK 7 4 DATE START STOP CH 7/5 WED 7: : -/-/ -/--/-- START STOP CH 7 / 5 WED 7 00AM 30 Basic Operations The day of the week is longer than the total recording time. • Turn on . Recording TV programs using a cable box, turn it isn't, reset the clock...

Operating Instructions (primary manual)
Page 31
... another timer setting, move the cursor to the next line using CURSOR 4, and repeat steps 2 to 7. 8 After making the desired timer settings, press EXECUTE. 9 Press POWER to display "LINE" in the same way. Tip • To set the channel, you can also use CH +/- Only the channels preset in the leftmost column. When using a cable box, the cable box channels appear. 6 Press CURSOR then press the CURSOR (♦4) buttons to record. Basic Operations 31 DATE...
... another timer setting, move the cursor to the next line using CURSOR 4, and repeat steps 2 to 7. 8 After making the desired timer settings, press EXECUTE. 9 Press POWER to display "LINE" in the same way. Tip • To set the channel, you can also use CH +/- Only the channels preset in the leftmost column. When using a cable box, the cable box channels appear. 6 Press CURSOR then press the CURSOR (♦4) buttons to record. Basic Operations 31 DATE...
Operating Instructions (primary manual)
Page 41
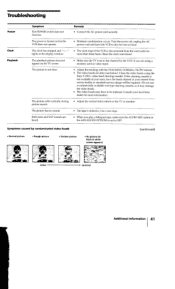
... • Connect the AC power cord securely. Reset the clock (and timer). Troubleshooting Power Clock Playback Symptom The POWER switch does not function. The clock has stopped and The clock stops if the VCR is set to video input. • Adjust the tracking with the TRACKING NORMAL/SLOW buttons. • The video heads are heard. • When you are using the Sony T-25CL video head cleaning cassette. The picture has no sound. • The tape is turned on but the VCR does not operate. •...
... • Connect the AC power cord securely. Reset the clock (and timer). Troubleshooting Power Clock Playback Symptom The POWER switch does not function. The clock has stopped and The clock stops if the VCR is set to video input. • Adjust the tracking with the TRACKING NORMAL/SLOW buttons. • The video heads are heard. • When you are using the Sony T-25CL video head cleaning cassette. The picture has no sound. • The tape is turned on but the VCR does not operate. •...
Operating Instructions (primary manual)
Page 42
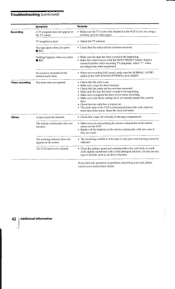
... with new ones if they are using a monitor, set to MAIN. Select a channel number when recording TV programs; The tape ejects when you press • REC. • Make sure the tape has been wound to be cleaned. • Clean the cabinet, panel and controls with a dry, soft cloth, or a soft cloth slightly moistened with the INPUT SELECT button. A tape cannot be adjusted. The VCR needs to the beginning. • Select...
... with new ones if they are using a monitor, set to MAIN. Select a channel number when recording TV programs; The tape ejects when you press • REC. • Make sure the tape has been wound to be cleaned. • Clean the cabinet, panel and controls with a dry, soft cloth, or a soft cloth slightly moistened with the INPUT SELECT button. A tape cannot be adjusted. The VCR needs to the beginning. • Select...

Operating Instructions (primary manual)
Page 43
... jack (2) Standard output: -7.5 dBs Load impedance: 47 kilohms Output impedance: less than 10 kilohms Timer section Clock Quartz locked Timer indication 12-hour cycle Timer setting Only for recording 8 programs in self-charging capacitor Back-up duration: up to change without notice. in EP mode (with T-160 tape) Fast-forward and rewind time Approx. 3 min. (with F-type connectors (1) AC power cord (1) Audio/video cable (3 phono to 3 phono) (1) Design and specifications are subject to...
... jack (2) Standard output: -7.5 dBs Load impedance: 47 kilohms Output impedance: less than 10 kilohms Timer section Clock Quartz locked Timer indication 12-hour cycle Timer setting Only for recording 8 programs in self-charging capacitor Back-up duration: up to change without notice. in EP mode (with T-160 tape) Fast-forward and rewind time Approx. 3 min. (with F-type connectors (1) AC power cord (1) Audio/video cable (3 phono to 3 phono) (1) Design and specifications are subject to...


