SLT A55V Accessories - Sony alpha Translucent Mirror Technology trade Dslr
SLT A55V Accessories
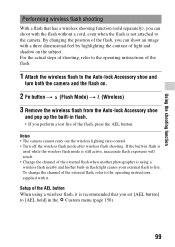
Related Manual Pages


Related Videos

first video shoot using newly acquired sony alpha slt-a55v
Duration: 2:51
Total Views: 1,032
Duration: 2:51
Total Views: 1,032