Operating Instructions
Page 2
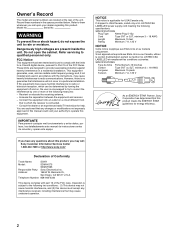
...to radio communications. Telephone Number: 858-942-2230 This device complies with part 15 of Conformity Trade Name: SONY Model: SDM-HS75 SDM-HS95 Responsible Party: Sony Electronics Inc. Refer to provide reasonable protection against harmful interference in a particular installation. Serial No. Dangerously .... You are cautioned that this equipment does cause harmful interference to USA/Canada, install only a UL LISTED/CSA LABELLED power supply cord meeting the following two conditions: (1) This device may not cause harmful interference, and (2) this device must accept...
...to radio communications. Telephone Number: 858-942-2230 This device complies with part 15 of Conformity Trade Name: SONY Model: SDM-HS75 SDM-HS95 Responsible Party: Sony Electronics Inc. Refer to provide reasonable protection against harmful interference in a particular installation. Serial No. Dangerously .... You are cautioned that this equipment does cause harmful interference to USA/Canada, install only a UL LISTED/CSA LABELLED power supply cord meeting the following two conditions: (1) This device may not cause harmful interference, and (2) this device must accept...
Operating Instructions
Page 3
... (MENU POSITION 14 Selecting the on-screen menu language (LANGUAGE 15 Additional settings 15 Technical Features 16 Power saving function 16 Reducing the power consumption ( mode 16 Automatic picture quality adjustment function 16 Troubleshooting 17 On-screen messages 17 Trouble symptoms ...and remedies 18 Specifications 20 http://www.sony.net/ 3 Precautions 4 Identifying parts and controls 5 Setup 7 Step 1: Open the stand 7 Step 2: Connect the display to your computer 7 Step 3: Connect the power cord 8 Step 4: Secure the cords and replace the back ...
... (MENU POSITION 14 Selecting the on-screen menu language (LANGUAGE 15 Additional settings 15 Technical Features 16 Power saving function 16 Reducing the power consumption ( mode 16 Automatic picture quality adjustment function 16 Troubleshooting 17 On-screen messages 17 Trouble symptoms ...and remedies 18 Specifications 20 http://www.sony.net/ 3 Precautions 4 Identifying parts and controls 5 Setup 7 Step 1: Open the stand 7 Step 2: Connect the display to your computer 7 Step 3: Connect the power cord 8 Step 4: Secure the cords and replace the back ...
Operating Instructions
Page 4
... as insecticide, or if prolonged contact is not malfunction. (Effective dots: more than 99.99%) Maintenance • Be sure to unplug the power cord from the monitor and grasp the monitor firmly with general household waste. • The fluorescent tube used in direct sunlight or near a ...be injured or the monitor may fall or cause damaged and injury. This is maintained with highprecision technology. If you use the appropriate UK power cord. Installation Do not install or leave the monitor: • In places subject to extreme temperatures, such as in an automobile parked ...
... as insecticide, or if prolonged contact is not malfunction. (Effective dots: more than 99.99%) Maintenance • Be sure to unplug the power cord from the monitor and grasp the monitor firmly with general household waste. • The fluorescent tube used in direct sunlight or near a ...be injured or the monitor may fall or cause damaged and injury. This is maintained with highprecision technology. If you use the appropriate UK power cord. Installation Do not install or leave the monitor: • In places subject to extreme temperatures, such as in an automobile parked ...

Operating Instructions
Page 5
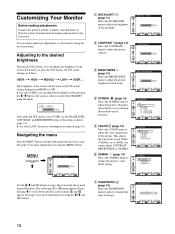
The power indicator lights up in orange when the monitor is in green when the display is turned on the lower ... MENU 54 3 21 Rear of the display Press upward to turn the display on or off , press the 1 (power) switch upward. Micro Saver Security System is a trademark of the display 1 1 (Power) switch and indicator (pages 9, 16) To turn the display on or off . 2 MENU button (pages 10, .... 4 OK button (page 11) This button selects the item or executes the settings in parentheses for further details. The 1 (power) switch and the control buttons are on , and lights up in...
The power indicator lights up in orange when the monitor is in green when the display is turned on the lower ... MENU 54 3 21 Rear of the display Press upward to turn the display on or off , press the 1 (power) switch upward. Micro Saver Security System is a trademark of the display 1 1 (Power) switch and indicator (pages 9, 16) To turn the display on or off . 2 MENU button (pages 10, .... 4 OK button (page 11) This button selects the item or executes the settings in parentheses for further details. The 1 (power) switch and the control buttons are on , and lights up in...
Operating Instructions
Page 6
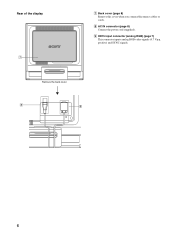
Remove the back cover. 8 9 6 Rear of the display 7 7 Back cover (page 8) Remove this cover when you connect/disconnect cables or cords. 8 AC IN connector (page 8) Connect the power cord (supplied). 9 HD15 input connector (analog RGB) (page 7) This connector inputs analog RGB video signals (0.7 Vp-p, positive) and SYNC signals.
Remove the back cover. 8 9 6 Rear of the display 7 7 Back cover (page 8) Remove this cover when you connect/disconnect cables or cords. 8 AC IN connector (page 8) Connect the power cord (supplied). 9 HD15 input connector (analog RGB) (page 7) This connector inputs analog RGB video signals (0.7 Vp-p, positive) and SYNC signals.
Operating Instructions
Page 7
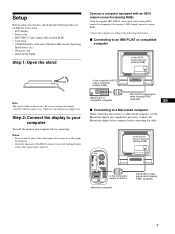
... RGB), connect the computer to the computer before connecting. Be sure not to the following items are included in your carton: • LCD display • Power cord • HD15-HD15 video signal cable (analog RGB) • Cord strap • CD-ROM (utility software for Windows/Macintosh, Operating Instructions, etc.) • Warranty...
... RGB), connect the computer to the computer before connecting. Be sure not to the following items are included in your carton: • LCD display • Power cord • HD15-HD15 video signal cable (analog RGB) • Cord strap • CD-ROM (utility software for Windows/Macintosh, Operating Instructions, etc.) • Warranty...
Operating Instructions
Page 8
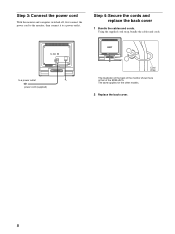
to AC IN to a power outlet. The same applies for the other models. 2 Replace the back cover. 8 Step 4: Secure the cords and replace the back cover 1 Bundle the cables and cords. Step 3: Connect the power cord With the monitor and computer switched off, first connect the power cord to the monitor, then connect it to a power outlet power cord (supplied) Cord strap The illustration of the back of the monitor shown here is that of the SDM-HS75. Using the supplied cord strap, bundle the cables and cords.
to AC IN to a power outlet. The same applies for the other models. 2 Replace the back cover. 8 Step 4: Secure the cords and replace the back cover 1 Bundle the cables and cords. Step 3: Connect the power cord With the monitor and computer switched off, first connect the power cord to the monitor, then connect it to a power outlet power cord (supplied) Cord strap The illustration of the back of the monitor shown here is that of the SDM-HS75. Using the supplied cord strap, bundle the cables and cords.
Operating Instructions
Page 9
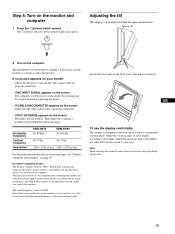
...green. Then adjust the computer's graphics board within the angles shown below. GB To use the display comfortably This display is designed so that the power cord and the video signal cable are unobtrusive on page 18. The Plug & Play monitor is . Try pressing any particular high value. You...is properly connected. • If OUT OF RANGE appears on the screen. Step 5: Turn on the computer. Horizontal frequency Vertical frequency Resolution SDM-HS75 28-80 kHz SDM-HS95 28-80 kHz 48-75 Hz 48-75 Hz 1280 × 1024 or less 1280 × 1024 or less For more information...
...green. Then adjust the computer's graphics board within the angles shown below. GB To use the display comfortably This display is designed so that the power cord and the video signal cable are unobtrusive on page 18. The Plug & Play monitor is . Try pressing any particular high value. You...is properly connected. • If OUT OF RANGE appears on the screen. Step 5: Turn on the computer. Horizontal frequency Vertical frequency Resolution SDM-HS75 28-80 kHz SDM-HS95 28-80 kHz 48-75 Hz 48-75 Hz 1280 × 1024 or less 1280 × 1024 or less For more information...
Operating Instructions
Page 10
... cannot adjust CONTRAST, BRIGHTNESS or GAMMA. 6 GAMMA (page 14) Select the GAMMA menu to change the brightness of the screen. If you select LOW, the power consumption is set to scroll down until the icons in the above main menu illustration.
... cannot adjust CONTRAST, BRIGHTNESS or GAMMA. 6 GAMMA (page 14) Select the GAMMA menu to change the brightness of the screen. If you select LOW, the power consumption is set to scroll down until the icons in the above main menu illustration.
Operating Instructions
Page 12
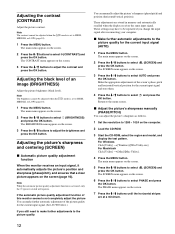
...). The CONTRAST menu appears on the screen. 3 Press the m/M buttons to be adjusted when the MIDDLE, or LOW (page 10). mode is activated, only the 1 (power) switch will operate. The BRIGHTNESS menu appears on the screen. 3 Press the m/M buttons to select 6 (CONTRAST) and press the OK button. If the automatic picture...
...). The CONTRAST menu appears on the screen. 3 Press the m/M buttons to be adjusted when the MIDDLE, or LOW (page 10). mode is activated, only the 1 (power) switch will operate. The BRIGHTNESS menu appears on the screen. 3 Press the m/M buttons to select 6 (CONTRAST) and press the OK button. If the automatic picture...
Operating Instructions
Page 15
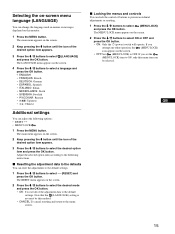
.... 2 Keep pressing the m button until the icon of the adjustment data to select ON or OFF and press the OK button. • ON: Only the 1 (power) switch will operate. The main menu appears on the screen. 2 Keep pressing the m button until the icon of buttons to prevent accidental adjustments or resetting...
.... 2 Keep pressing the m button until the icon of the adjustment data to select ON or OFF and press the OK button. • ON: Only the 1 (power) switch will operate. The main menu appears on the screen. 2 Keep pressing the m button until the icon of buttons to prevent accidental adjustments or resetting...
Operating Instructions
Page 16
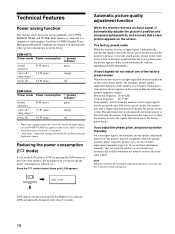
... center of this monitor is reduced. Technical Features Power saving function This monitor meets the power-saving guidelines set these adjustments manually (page 12). SDM-HS75 Power mode Power consumption 1 (power) indicator normal operation 45 W (max.) green active off* 1.0 W (max.) (deep sleep)** orange power off 1.0 W (max.) off SDM-HS95 Power mode Power consumption 1 (power) indicator normal operation 50 W (max.) green active off...
... center of this monitor is reduced. Technical Features Power saving function This monitor meets the power-saving guidelines set these adjustments manually (page 12). SDM-HS75 Power mode Power consumption 1 (power) indicator normal operation 45 W (max.) green active off* 1.0 W (max.) (deep sleep)** orange power off 1.0 W (max.) off SDM-HS95 Power mode Power consumption 1 (power) indicator normal operation 50 W (max.) green active off...

Operating Instructions
Page 17
...; 1024" is displayed This indicates that the video signal cable has been disconnected. I NFORMA T I ON NO I NPUT S I GNA L GO TO POWER SAVE GO TO POWER SAVE The monitor will enter the power saving mode after about 5 seconds from the time the message is being input. To solve the problem, see "Trouble symptoms and...
...; 1024" is displayed This indicates that the video signal cable has been disconnected. I NFORMA T I ON NO I NPUT S I GNA L GO TO POWER SAVE GO TO POWER SAVE The monitor will enter the power saving mode after about 5 seconds from the time the message is being input. To solve the problem, see "Trouble symptoms and...
Operating Instructions
Page 18
... bent or pushed in . • A non-supplied video signal cable is properly connected. Select "SONY" from the "Manufacturers" list and select "SDM-HS75" or "SDM-HS95" from the "Models" list in the power saving mode. If NO INPUT SIGNAL appears on the keyboard or moving the mouse. • Check that... your graphics board manual for the proper monitor setting. • Confirm that the power cord is connected. Even...
... bent or pushed in . • A non-supplied video signal cable is properly connected. Select "SONY" from the "Manufacturers" list and select "SDM-HS75" or "SDM-HS95" from the "Models" list in the power saving mode. If NO INPUT SIGNAL appears on the keyboard or moving the mouse. • Check that... your graphics board manual for the proper monitor setting. • Confirm that the power cord is connected. Even...
Operating Instructions
Page 19
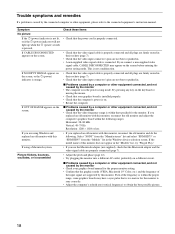
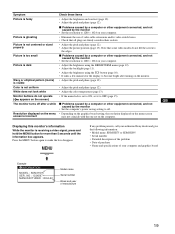
...1280 × 1024 on your computer and graphics board Example INFORMATION MODEL : SDM-HS75 SER . MENU If any problem persists, call your authorized Sony dealer and give the following information: • Model name: SDM-HS75 or SDM-HS95 • Serial number • Detailed description of the problem • ...the computer. x Problems caused by a computer or other equipment connected, and not caused by the monitor • Set the computer's power saving setting to off after turning on the menu screen is incorrect x Problems caused by a computer or other equipment connected, and not ...
...1280 × 1024 on your computer and graphics board Example INFORMATION MODEL : SDM-HS75 SER . MENU If any problem persists, call your authorized Sony dealer and give the following information: • Model name: SDM-HS75 or SDM-HS95 • Serial number • Detailed description of the problem • ...the computer. x Problems caused by a computer or other equipment connected, and not caused by the monitor • Set the computer's power saving setting to off after turning on the menu screen is incorrect x Problems caused by a computer or other equipment connected, and not ...
Operating Instructions
Page 20
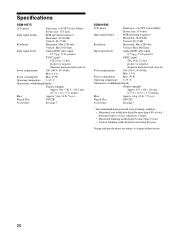
... blanking width should be more than 450 µsec. Design and specifications are subject to change without notice. 20 Specifications SDM-HS75 LCD panel Panel type: a-Si TFT Active Matrix Picture size: 17.0 inch Input signal format RGB operating frequency* Horizontal:... Vp-p, 75 Ω, positive SYNC signal TTL level, 2.2 kΩ, positive or negative (Separate horizontal and vertical) Power requirements 100-240 V, 50-60 Hz, Max. 1.0 A Power consumption Max. 45 W Operating temperature 5-35 °C Dimensions (width/height/depth) Display (upright): Mass Approx. 388 ...
... blanking width should be more than 450 µsec. Design and specifications are subject to change without notice. 20 Specifications SDM-HS75 LCD panel Panel type: a-Si TFT Active Matrix Picture size: 17.0 inch Input signal format RGB operating frequency* Horizontal:... Vp-p, 75 Ω, positive SYNC signal TTL level, 2.2 kΩ, positive or negative (Separate horizontal and vertical) Power requirements 100-240 V, 50-60 Hz, Max. 1.0 A Power consumption Max. 45 W Operating temperature 5-35 °C Dimensions (width/height/depth) Display (upright): Mass Approx. 388 ...
Quick Setup Guide
Page 2
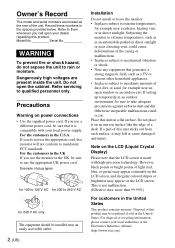
...the U.S.A. Subjecting the monitor to extreme temperatures, such as a TV or various other household appliances. • In places subject to use a different power cord, be sure to inordinate amounts of a desk. However, black points or bright points of this monitor will not conform to them whenever you.... Owner's Record The model and serial numbers are present inside the unit. Refer to mandatory FCC standards. If you use the appropriate UK power cord. Note on the LCD (Liquid Crystal Display) Please note that the LCD screen is not malfunction. (Effective dots: more than 99.99...
...the U.S.A. Subjecting the monitor to extreme temperatures, such as a TV or various other household appliances. • In places subject to use a different power cord, be sure to inordinate amounts of a desk. However, black points or bright points of this monitor will not conform to them whenever you.... Owner's Record The model and serial numbers are present inside the unit. Refer to mandatory FCC standards. If you use the appropriate UK power cord. Note on the LCD (Liquid Crystal Display) Please note that the LCD screen is not malfunction. (Effective dots: more than 99.99...
Quick Setup Guide
Page 3
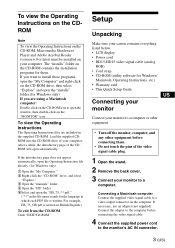
...or other equipment. • Turn off the monitor, computer, and any other equipment before connecting the video signal cable. 4 Connect the supplied power cord to a computer. After a while, the introductory page of the CDROM will open the "HS_75_**.pdf." ("**" in the file name ... (not supplied). For example, HS_75_GB.pdf is written. Setup Unpacking Make sure your carton contains everything listed below. • LCD display • Power cord • HD15-HD15 video signal cable (analog RGB) • Cord strap • CD-ROM (utility software for Windows/ Macintosh, Operating Instructions...
...or other equipment. • Turn off the monitor, computer, and any other equipment before connecting the video signal cable. 4 Connect the supplied power cord to a computer. After a while, the introductory page of the CDROM will open the "HS_75_**.pdf." ("**" in the file name ... (not supplied). For example, HS_75_GB.pdf is written. Setup Unpacking Make sure your carton contains everything listed below. • LCD display • Power cord • HD15-HD15 video signal cable (analog RGB) • Cord strap • CD-ROM (utility software for Windows/ Macintosh, Operating Instructions...
Quick Setup Guide
Page 4
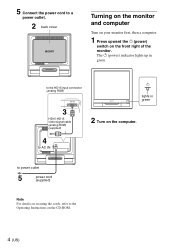
to the HD15 input connector (analog RGB) HD-15 3 HD15-HD15 video signal cable (analog RGB) (supplied) lights in green. The 1 (power) indicator lights up in green 2 Turn on the computer. 4 to AC IN to power outlet 5 power cord (supplied) Note For details on securing the cords, refer to the Operating Instructions on the front right of the monitor. 5 Connect the power cord to a power outlet. 2 back cover Turning on the monitor and computer Turn on your monitor first, then a computer. 1 Press upward the 1 (power) switch on the CD-ROM. 4 (US)
to the HD15 input connector (analog RGB) HD-15 3 HD15-HD15 video signal cable (analog RGB) (supplied) lights in green. The 1 (power) indicator lights up in green 2 Turn on the computer. 4 to AC IN to power outlet 5 power cord (supplied) Note For details on securing the cords, refer to the Operating Instructions on the front right of the monitor. 5 Connect the power cord to a power outlet. 2 back cover Turning on the monitor and computer Turn on your monitor first, then a computer. 1 Press upward the 1 (power) switch on the CD-ROM. 4 (US)
Quick Setup Guide
Page 5
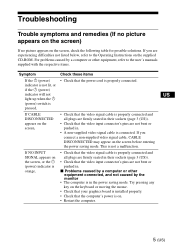
...on the screen) If no picture appears on . • Restart the computer. 5 (US) If you are not bent or pushed in the power saving mode. This is connected. Try pressing any key on the keyboard or moving the mouse. • Check that your graphics board is installed ...properly. • Check that the computer's power is on the screen, check the following table for possible solutions. x Problems caused by a computer or other equipment connected, and not caused by a ...
...on the screen) If no picture appears on . • Restart the computer. 5 (US) If you are not bent or pushed in the power saving mode. This is connected. Try pressing any key on the keyboard or moving the mouse. • Check that your graphics board is installed ...properly. • Check that the computer's power is on the screen, check the following table for possible solutions. x Problems caused by a computer or other equipment connected, and not caused by a ...


