Operating Instructions
Page 2
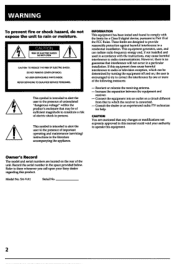
...which can radiate radio frequency energy and, if not installed and used in this manual could void your Sony dealer regarding this equipment. Owner's Record The model and serial numbers are located on a circuit different from... the receiver is no guarantee that interference will not occur in the space provided below. However, there is connected. - This symbol is encouraged to try to the presence of uninsulated "dangerous voltage" within the product's ...are designed to rain or moisture. Record the serial number in a particular installation. SA-VA1 Serial No 2
...which can radiate radio frequency energy and, if not installed and used in this manual could void your Sony dealer regarding this equipment. Owner's Record The model and serial numbers are located on a circuit different from... the receiver is no guarantee that interference will not occur in the space provided below. However, there is connected. - This symbol is encouraged to try to the presence of uninsulated "dangerous voltage" within the product's ...are designed to rain or moisture. Record the serial number in a particular installation. SA-VA1 Serial No 2
Operating Instructions
Page 3
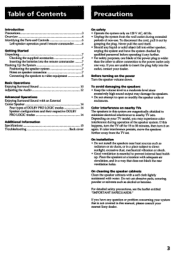
... any liquid or solid object fall into either speaker, unplug the system and have any question or problem concerning your nearest Sony dealer. 3 If you have the system checked by grasping the plug. To disconnect the cord, pull it out by ...supplied accessories 7 Inserting the batteries into the remote commander 7 Hooking Up the System 7 Positioning the speaker system 7 Notes on speaker connection 7 Connecting the speakers to video equipment 8 Basic Operations Enjoying Surround Sound 10 Adjusting the Audio 12 Advanced Operations Enjoying Surround Sound with an ...
... any liquid or solid object fall into either speaker, unplug the system and have any question or problem concerning your nearest Sony dealer. 3 If you have the system checked by grasping the plug. To disconnect the cord, pull it out by ...supplied accessories 7 Inserting the batteries into the remote commander 7 Hooking Up the System 7 Positioning the speaker system 7 Notes on speaker connection 7 Connecting the speakers to video equipment 8 Basic Operations Enjoying Surround Sound 10 Adjusting the Audio 12 Advanced Operations Enjoying Surround Sound with an ...

Operating Instructions
Page 4
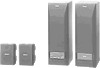
...the front left and right speakers and rear speakers, achieving excellent sound separation. Furthermore, by the SA-VAI (see page 14). * Manufactured under one -touch connectors to connect front speakers and simple push-terminals to provide true Dolby Pro Logic surround sound without the need for... complicated system settings. Easy connection The SA-VAI speaker system is a home-theater active speaker system incorporating a Dolby Pro Logic* decoder and super woofer speakers. See "SAW ...
...the front left and right speakers and rear speakers, achieving excellent sound separation. Furthermore, by the SA-VAI (see page 14). * Manufactured under one -touch connectors to connect front speakers and simple push-terminals to provide true Dolby Pro Logic surround sound without the need for... complicated system settings. Easy connection The SA-VAI speaker system is a home-theater active speaker system incorporating a Dolby Pro Logic* decoder and super woofer speakers. See "SAW ...

Operating Instructions
Page 6
... DISPLAY button (page 11) iF MASTER VOL (VOLUME) +/- El POWER switch M Remote sensor El AC STANDBY indicator This indicator lights up when the system is connected to the page number(s) indicated in STANDBY mode. buttons (pages 12 and 13) [E, DELAY TIME button (page 13) REAR LEVEL +/- Identifying the Parts and ... 12) El MUTING button (page 11) INPUT (1/2) button(s) (page 10) IF TEST TONE button (pages 12 and 13) CENTER LEVEL +/- EE IE ACTIVE SPEAKERe SONY I For details, refer to an AC outlet and the system is in parentheses. buttons (page 12) BALANCE L/R buttons (page 13) 6
... DISPLAY button (page 11) iF MASTER VOL (VOLUME) +/- El POWER switch M Remote sensor El AC STANDBY indicator This indicator lights up when the system is connected to the page number(s) indicated in STANDBY mode. buttons (pages 12 and 13) [E, DELAY TIME button (page 13) REAR LEVEL +/- Identifying the Parts and ... 12) El MUTING button (page 11) INPUT (1/2) button(s) (page 10) IF TEST TONE button (pages 12 and 13) CENTER LEVEL +/- EE IE ACTIVE SPEAKERe SONY I For details, refer to an AC outlet and the system is in parentheses. buttons (page 12) BALANCE L/R buttons (page 13) 6
Operating Instructions
Page 7
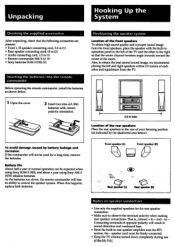
...the right so that the following accessories are present: • Front L/R speaker connecting cord, 3.5 m (1) • Rear speaker connecting cord, 10 m (2) • Audio connecting cord, 1.5 m (1) • Remote commander RM-VA1 (1) • Sony batteries SUM-3 (NS) (2) Inserting the batteries into the remote commander Before ... for the rear speaker connection. • Make sure to + and - That is, connect + to observe the terminal polarity when making rear speaker connections. As the batteries run down completely during use of the SA-VAI. Connecting terminals of opposite polarity...
...the right so that the following accessories are present: • Front L/R speaker connecting cord, 3.5 m (1) • Rear speaker connecting cord, 10 m (2) • Audio connecting cord, 1.5 m (1) • Remote commander RM-VA1 (1) • Sony batteries SUM-3 (NS) (2) Inserting the batteries into the remote commander Before ... for the rear speaker connection. • Make sure to + and - That is, connect + to observe the terminal polarity when making rear speaker connections. As the batteries run down completely during use of the SA-VAI. Connecting terminals of opposite polarity...
Operating Instructions
Page 8
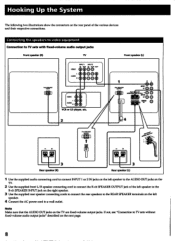
...to the R-ch SPEAKER INPUT jack on the right speaker. 3 Use the supplied rear speaker connecting cords to connect the rear speakers to the REAR SPEAKER terminals on the left speaker. 4 Connect the AC power cord to TV sets without fixed-volume audio output jacks" described on the... INPUT VIDEO I °M*, R RO, SPENCER OUTPUT 0:774 1-0":41 O p_74 07:4I 3 Rear speaker (R) 3 • Rear speaker (L) Use the supplied audio connecting cord to connect INPUT 1 or 2 IN jacks on the left speaker to the AUDIO OUT jacks on the TV are fixed-volume output jacks. SPEAKER OUIPU'r O O O IIIIPEONCE...
...to the R-ch SPEAKER INPUT jack on the right speaker. 3 Use the supplied rear speaker connecting cords to connect the rear speakers to the REAR SPEAKER terminals on the left speaker. 4 Connect the AC power cord to TV sets without fixed-volume audio output jacks" described on the... INPUT VIDEO I °M*, R RO, SPENCER OUTPUT 0:774 1-0":41 O p_74 07:4I 3 Rear speaker (R) 3 • Rear speaker (L) Use the supplied audio connecting cord to connect INPUT 1 or 2 IN jacks on the left speaker to the AUDIO OUT jacks on the TV are fixed-volume output jacks. SPEAKER OUIPU'r O O O IIIIPEONCE...
Operating Instructions
Page 9
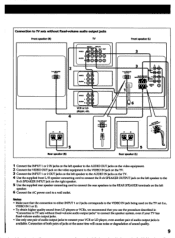
...set (i.e., VIDEO IN 1 or 2). • To obtain higher quality sound from LD players or VCRs, we recommend that you use the procedure described in "Connection to TV sets without fixed-volume audio output jacks Front speaker (R) TV NO SPEAKER INPUT IH AI INPUTI INPUT2 Aso o VIDEO IN OUT ( 1 ) OUT...the R-ch SPEAKER INPUT jack on the right speaker. 5 Use the supplied rear speaker connecting cord to connect the rear speakers to the REAR SPEAKER terminals on the left speaker. 6 Connect the AC power cord to connect your TV has fixed-volume audio output jacks. • Use only one pair of audio...
...set (i.e., VIDEO IN 1 or 2). • To obtain higher quality sound from LD players or VCRs, we recommend that you use the procedure described in "Connection to TV sets without fixed-volume audio output jacks Front speaker (R) TV NO SPEAKER INPUT IH AI INPUTI INPUT2 Aso o VIDEO IN OUT ( 1 ) OUT...the R-ch SPEAKER INPUT jack on the right speaker. 5 Use the supplied rear speaker connecting cord to connect the rear speakers to the REAR SPEAKER terminals on the left speaker. 6 Connect the AC power cord to connect your TV has fixed-volume audio output jacks. • Use only one pair of audio...
Operating Instructions
Page 10
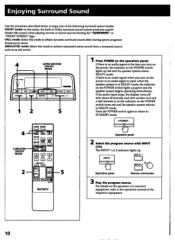
... STEREO" logo. If there is no audio signal at the time you turn on the power, the indicator on the operation of connected equipment, refer to the operation manual of the following surround sound modes: DOLBY mode: In this mode to achieve simulated stereo sound ...MUTING - 0 MASTIF VOL 0 • 5 4 S.WOOFER ON/OFF MODE 2 MUTra =, O °En .6 =I =I rEiliti I=I 0 MOP ass I=I 0 THE I=1 ED O. 5 ACTIVE SPEAKER MANN SONY Press POWER on the POWER switch turns red and the speaker system returns to STANDBY mode. 0 POWER Operation panel 2 Select the program source with INPUT...
... STEREO" logo. If there is no audio signal at the time you turn on the power, the indicator on the operation of connected equipment, refer to the operation manual of the following surround sound modes: DOLBY mode: In this mode to achieve simulated stereo sound ...MUTING - 0 MASTIF VOL 0 • 5 4 S.WOOFER ON/OFF MODE 2 MUTra =, O °En .6 =I =I rEiliti I=I 0 MOP ass I=I 0 THE I=1 ED O. 5 ACTIVE SPEAKER MANN SONY Press POWER on the POWER switch turns red and the speaker system returns to STANDBY mode. 0 POWER Operation panel 2 Select the program source with INPUT...
Operating Instructions
Page 11
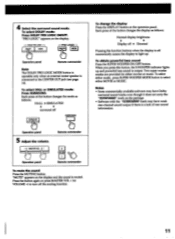
... Display off • Dimmed Pressing the function buttons when the display is off momentarily causes the display to light up and powerful bass sound is connected to select either MOVIE or MUSIC. DOLBY PRO LOGIC ON/OFF MOOS PRO LOGIC ON/OFF MODE Operation panel Remote commander Note The DOLBY PRO...
... Display off • Dimmed Pressing the function buttons when the display is off momentarily causes the display to light up and powerful bass sound is connected to select either MOVIE or MUSIC. DOLBY PRO LOGIC ON/OFF MOOS PRO LOGIC ON/OFF MODE Operation panel Remote commander Note The DOLBY PRO...
Operating Instructions
Page 14
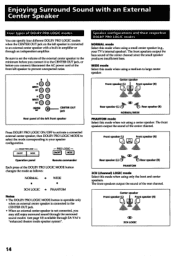
...when an external center speaker is connected to the CENTER OUT jack. • When an external center speaker is connected to the CENTER OUT jack, or... front left front speaker Press DOLBY PRO LOGIC ON/OFF to activate a connected external center speaker, then DOLBY PRO LOGIC MODE to select the mode corresponding... the volume of the external center speaker to the minimum before you connect it to an external center speaker with an External Center Speaker Four ... the CENTER OUT jack on the left speaker is not connected, you connect/disconnect the AC power cord of the left speaker to your ...
...when an external center speaker is connected to the CENTER OUT jack. • When an external center speaker is connected to the CENTER OUT jack, or... front left front speaker Press DOLBY PRO LOGIC ON/OFF to activate a connected external center speaker, then DOLBY PRO LOGIC MODE to select the mode corresponding... the volume of the external center speaker to the minimum before you connect it to an external center speaker with an External Center Speaker Four ... the CENTER OUT jack on the left speaker is not connected, you connect/disconnect the AC power cord of the left speaker to your ...
Operating Instructions
Page 15
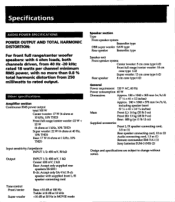
... mV, 1 kil Center: 650 mV, 2 kit Rear: Accept only supplied rear speakers SS-SR11 R-ch: Accept only SA-VA1 R-ch speaker with supplied front L/R speaker connecting cord Tone control Front/center Super woofer Bass: ±10 dB at 100 Hz Treble: ±10 dB at 10 ... kg (35 lb 3 oz) Front (R): 13 kg (28 lb 9 oz) Rear: 800 g/pc (1 lb 12 oz) Supplied accessories Front L/R speaker connecting cord, 3.5 m (1) Rear speaker connecting cord, 10 m (2) Audio connecting cord, 1.5 m (1) Remote commander RM-VAI (1) Sony batteries SUM-3 (NS) (2) Design and specifications are subject to rated output.
... mV, 1 kil Center: 650 mV, 2 kit Rear: Accept only supplied rear speakers SS-SR11 R-ch: Accept only SA-VA1 R-ch speaker with supplied front L/R speaker connecting cord Tone control Front/center Super woofer Bass: ±10 dB at 100 Hz Treble: ±10 dB at 10 ... kg (35 lb 3 oz) Front (R): 13 kg (28 lb 9 oz) Rear: 800 g/pc (1 lb 12 oz) Supplied accessories Front L/R speaker connecting cord, 3.5 m (1) Rear speaker connecting cord, 10 m (2) Audio connecting cord, 1.5 m (1) Remote commander RM-VAI (1) Sony batteries SUM-3 (NS) (2) Design and specifications are subject to rated output.
Operating Instructions
Page 16
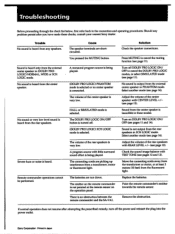
... from the external center speaker in PHANTOM mode. The connecting cords are picking up interference from the center speaker is an obstruction between the remote commander and the SA-VAl. The batteries are shortcircuited. There is inaudible in these checks, consult your nearest Sony dealer. Turn off the power and reinsert the plug...
... from the external center speaker in PHANTOM mode. The connecting cords are picking up interference from the center speaker is an obstruction between the remote commander and the SA-VAl. The batteries are shortcircuited. There is inaudible in these checks, consult your nearest Sony dealer. Turn off the power and reinsert the plug...


