
Operating Instructions
Page 2
... the receiving antenna (aerial). - Consult the dealer or an experienced radio/TV technician for help. For the customers in particular, specifies that may block the ventilation slots. • Do not install the unit near heat sources such as close to correct the interference by turning the equipment off . • Unplug the unit from that may be connected to...
... the receiving antenna (aerial). - Consult the dealer or an experienced radio/TV technician for help. For the customers in particular, specifies that may block the ventilation slots. • Do not install the unit near heat sources such as close to correct the interference by turning the equipment off . • Unplug the unit from that may be connected to...
Operating Instructions
Page 4
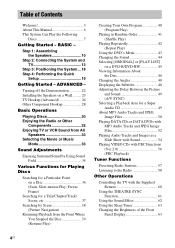
...) Tuner Functions Presetting Radio Stations 57 Listening to the Radio 58 Other Operations Controlling the TV with the Supplied Remote 60 Using the THEATRE SYNC Function 61 Using the Sound Effect 62 Using the Sleep Timer 63 Changing the Brightness of Contents Welcome 3 About This Manual 6 This System Can Play the Following Discs 7 Getting Started - Step 1: Assembling the Speakers 10 Step 2: Connecting the System and TV 13 Step 3: Positioning the System ...18 Step 4: Performing the Quick Setup 19...
...) Tuner Functions Presetting Radio Stations 57 Listening to the Radio 58 Other Operations Controlling the TV with the Supplied Remote 60 Using the THEATRE SYNC Function 61 Using the Sound Effect 62 Using the Sleep Timer 63 Changing the Brightness of Contents Welcome 3 About This Manual 6 This System Can Play the Following Discs 7 Getting Started - Step 1: Assembling the Speakers 10 Step 2: Connecting the System and TV 13 Step 3: Positioning the System ...18 Step 4: Performing the Quick Setup 19...
Operating Instructions
Page 5
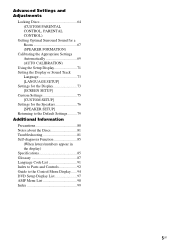
... Setting the Display or Sound Track Language 73 [LANGUAGE SETUP] Settings for the Display 73 [SCREEN SETUP] Custom Settings 75 [CUSTOM SETUP] Settings for the Speakers 76 [SPEAKER SETUP] Returning to the Default Settings.......... 79 Additional Information Precautions 80 Notes about the Discs 81 Troubleshooting 81 Self-diagnosis Function 85 (When letters/numbers appear in the display) Specifications 85 Glossary 87 Language Code List 91 Index to Parts and Controls 92 Guide to the Control Menu Display...... 94 DVD Setup Display List...
... Setting the Display or Sound Track Language 73 [LANGUAGE SETUP] Settings for the Display 73 [SCREEN SETUP] Custom Settings 75 [CUSTOM SETUP] Settings for the Speakers 76 [SPEAKER SETUP] Returning to the Default Settings.......... 79 Additional Information Precautions 80 Notes about the Discs 81 Troubleshooting 81 Self-diagnosis Function 85 (When letters/numbers appear in the display) Specifications 85 Glossary 87 Language Code List 91 Index to Parts and Controls 92 Guide to the Control Menu Display...... 94 DVD Setup Display List...

Operating Instructions
Page 19
... Quick Setup and perform again (page 21). 4 Press without inserting a disc. For details, see "Getting Optimal Surround Sound for using the system. Getting Started - Step 4: Performing the Quick Setup Follow the steps below to be connected appears. The system displays the menu and subtitles in the on the TV. 2 Press [/1. x If you have a wide-screen TV or a 4:3 standard TV with the headphones connected. • Make sure that the function is set...
... Quick Setup and perform again (page 21). 4 Press without inserting a disc. For details, see "Getting Optimal Surround Sound for using the system. Getting Started - Step 4: Performing the Quick Setup Follow the steps below to be connected appears. The system displays the menu and subtitles in the on the TV. 2 Press [/1. x If you have a wide-screen TV or a 4:3 standard TV with the headphones connected. • Make sure that the function is set...
Operating Instructions
Page 30
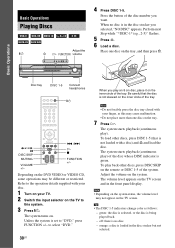
..., or the disc is set to select "DVD." 30US When you play ). Basic Operations Disc tray DISC 1-5 Connect headphones "/1 / X DISC SKIP MUTING VOLUME +/- ./> H x FUNCTION +/- Note • Do not forcibly press the disc tray closed with a disc) and A and load the disc. Perform next Step while "*DISC-1* (eg., 2-5)" flashes. 5 Press A. 6 Load a disc. The system turns on the TV screen. To load other...
..., or the disc is set to select "DVD." 30US When you play ). Basic Operations Disc tray DISC 1-5 Connect headphones "/1 / X DISC SKIP MUTING VOLUME +/- ./> H x FUNCTION +/- Note • Do not forcibly press the disc tray closed with a disc) and A and load the disc. Perform next Step while "*DISC-1* (eg., 2-5)" flashes. 5 Press A. 6 Load a disc. The system turns on the TV screen. To load other...
Operating Instructions
Page 38
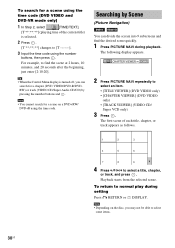
... (DVD VIDEO/DVD-R/DVDRW) or track (VIDEO CD/Super Audio CD/CD) by Scene (Picture Navigation) You can divide the screen into 9 subscreens and find the scene at 2 hours, 10 minutes, and 20 seconds after the beginning, just enter [2:10:20]. For example, to [T --:--:--]. 3 Input the time code using the time code. Tip • When the Control Menu display is selected. 2 Press . [T **:**:**] changes to find the desired scene quickly...
... (DVD VIDEO/DVD-R/DVDRW) or track (VIDEO CD/Super Audio CD/CD) by Scene (Picture Navigation) You can divide the screen into 9 subscreens and find the scene at 2 hours, 10 minutes, and 20 seconds after the beginning, just enter [2:10:20]. For example, to [T --:--:--]. 3 Input the time code using the time code. Tip • When the Control Menu display is selected. 2 Press . [T **:**:**] changes to find the desired scene quickly...
Operating Instructions
Page 57
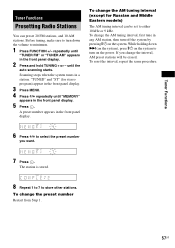
... set to select the preset number you change the AM tuning interval (except for stereo program) appear in the front panel display. 5 Press . To reset the interval, repeat the same procedure. 6 Press X/x to either 10 kHz or 9 kHz. To change the preset number Restart from Step 1. 57US The station is stored. 8 Repeat 1 to 7 to turn off the system by pressing "/1 on the power. Before tuning, make...
... set to select the preset number you change the AM tuning interval (except for stereo program) appear in the front panel display. 5 Press . To reset the interval, repeat the same procedure. 6 Press X/x to either 10 kHz or 9 kHz. To change the preset number Restart from Step 1. 57US The station is stored. 8 Repeat 1 to 7 to turn off the system by pressing "/1 on the power. Before tuning, make...

Operating Instructions
Page 58
... system receives the radio station. Tip • If an FM program is tuned in Step 2. 1 Press D.TUNING. 2 Press the number buttons to . 3 Press . These names (for example, "XYZ") appear in one name can check the frequency by pressing VOLUME +/-. The last received station is noisy, press MENU, and select "FM MODE" by using the cursor buttons. To turn off the radio Press "/1. To listen to radio...
... system receives the radio station. Tip • If an FM program is tuned in Step 2. 1 Press D.TUNING. 2 Press the number buttons to . 3 Press . These names (for example, "XYZ") appear in one name can check the frequency by pressing VOLUME +/-. The last received station is noisy, press MENU, and select "FM MODE" by using the cursor buttons. To turn off the radio Press "/1. To listen to radio...
Operating Instructions
Page 60
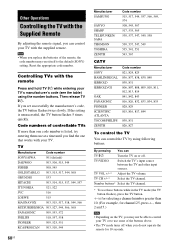
... TV [/1 Turn the TV on the TV, you may reset itself to use these buttons while in the TV mode (the TV button flashes), press the TV button. - If the setting is for selecting a channel number greater than one code number is listed, try entering them one at a time until you find the one that works with your TV with the supplied remote. If you set successfully the manufacturer's code, the TV button flashes twice slowly. Other Operations Controlling the TV...
... TV [/1 Turn the TV on the TV, you may reset itself to use these buttons while in the TV mode (the TV button flashes), press the TV button. - If the setting is for selecting a channel number greater than one code number is listed, try entering them one at a time until you find the one that works with your TV with the supplied remote. If you set successfully the manufacturer's code, the TV button flashes twice slowly. Other Operations Controlling the TV...
Operating Instructions
Page 61
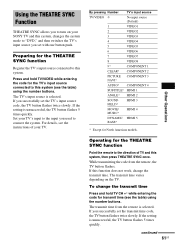
... SYNC function Register the TV's input source connected to this function does not work, change the transmit time Press and hold TV/VIDEO while entering the code for the THEATRE SYNC function Point the remote to the direction of your TV's input to the input you used to connect the system. By pressing Number TV's input source TV/VIDEO 0 No input source (Default) 1 VIDEO1 2 VIDEO2 3 VIDEO3 4 VIDEO4 5 VIDEO5 6 VIDEO6 7 VIDEO7 8 VIDEO8 9* COMPONENT 1 CLEAR* COMPONENT 2 PICTURE NAVI* COMPONENT 3 AUDIO* COMPONENT 4 SUBTITLE* HDMI 1 ANGLE* HDMI 2 SOUND...
... SYNC function Register the TV's input source connected to this function does not work, change the transmit time Press and hold TV/VIDEO while entering the code for the THEATRE SYNC function Point the remote to the direction of your TV's input to the input you used to connect the system. By pressing Number TV's input source TV/VIDEO 0 No input source (Default) 1 VIDEO1 2 VIDEO2 3 VIDEO3 4 VIDEO4 5 VIDEO5 6 VIDEO6 7 VIDEO7 8 VIDEO8 9* COMPONENT 1 CLEAR* COMPONENT 2 PICTURE NAVI* COMPONENT 3 AUDIO* COMPONENT 4 SUBTITLE* HDMI 1 ANGLE* HDMI 2 SOUND...

Operating Instructions
Page 66
..." using the number buttons. 7 Press X/x to select [LEVEL], then press . The display for entering your password appears, enter your new password. To turn off the Parental Control function Set [LEVEL] to select [STANDARD], then press . When the display for setting the playback limitation level appears. The area is complete. When you forget your password, remove the disc and repeat steps 1 to change the level. If the Resume Play mode...
..." using the number buttons. 7 Press X/x to select [LEVEL], then press . The display for entering your password appears, enter your new password. To turn off the Parental Control function Set [LEVEL] to select [STANDARD], then press . When the display for setting the playback limitation level appears. The area is complete. When you forget your password, remove the disc and repeat steps 1 to change the level. If the Resume Play mode...
Operating Instructions
Page 71
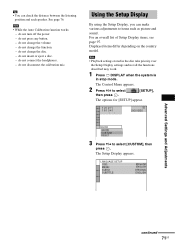
... volume. - Displayed items differ depending on the country model. do not connect the headphones. - do not change the disc. - do not turn off the power. - For an overall list of Setup Display items, see page 97. The Control Menu appears. 2 Press X/x to select then press . [SETUP], The options for [SETUP] appear. 1 2 ( 2 7 ) 1 8 ( 3 4 ) : : DVD VIDEO QUICK QUICK CUSTOM RESET BNR 3 Press X/x to items such as picture and sound. do not change the function. - Using the Setup Display By using the Setup Display...
... volume. - Displayed items differ depending on the country model. do not connect the headphones. - do not change the disc. - do not turn off the power. - For an overall list of Setup Display items, see page 97. The Control Menu appears. 2 Press X/x to select then press . [SETUP], The options for [SETUP] appear. 1 2 ( 2 7 ) 1 8 ( 3 4 ) : : DVD VIDEO QUICK QUICK CUSTOM RESET BNR 3 Press X/x to items such as picture and sound. do not change the function. - Using the Setup Display By using the Setup Display...

Operating Instructions
Page 72
... to 78 return to the default settings. Note • When you turn the system on after resetting and no disc is in Step 3 and press . 2 Select [YES] using X/x. The setting is selected and setup is selected. To perform the Quick Setup (page 19), press , to return to select the setup item from the displayed list: [LANGUAGE SETUP], [SCREEN SETUP], [CUSTOM SETUP], or [SPEAKER SETUP]. Then press . You can also...
... to 78 return to the default settings. Note • When you turn the system on after resetting and no disc is in Step 3 and press . 2 Select [YES] using X/x. The setting is selected and setup is selected. To perform the Quick Setup (page 19), press , to return to select the setup item from the displayed list: [LANGUAGE SETUP], [SCREEN SETUP], [CUSTOM SETUP], or [SPEAKER SETUP]. Then press . You can also...
Operating Instructions
Page 73
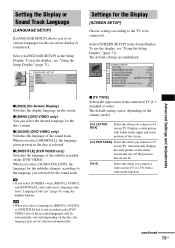
Select [SCREEN SETUP] in [MENU], [AUDIO], and [SUBTITLE], select and enter a language code from "Language Code List" (page 91) using the number buttons. To use the display, see "Using the Setup Display" (page 71). SCREEN SETUP TV TYPE: 16:9 HDMI RESOLUTION: AUTO YCBCR/RGB (HDMI): YCBCR SCREEN SAVER: ON BACKGROUND: JACKET PICTURE BLACK LEVEL: ON BLACK LEVEL (COMPONENT OUT): OFF 4:3 OUTPUT: FULL Advanced Settings and Adjustments x [OSD] (On-Screen Display) Switches the display language on the entire screen and...
Select [SCREEN SETUP] in [MENU], [AUDIO], and [SUBTITLE], select and enter a language code from "Language Code List" (page 91) using the number buttons. To use the display, see "Using the Setup Display" (page 71). SCREEN SETUP TV TYPE: 16:9 HDMI RESOLUTION: AUTO YCBCR/RGB (HDMI): YCBCR SCREEN SAVER: ON BACKGROUND: JACKET PICTURE BLACK LEVEL: ON BLACK LEVEL (COMPONENT OUT): OFF 4:3 OUTPUT: FULL Advanced Settings and Adjustments x [OSD] (On-Screen Display) Switches the display language on the entire screen and...

Operating Instructions
Page 75
... number of channels, the system selects PCM, DTS, Dolby Digital sound, and MPEG audio tracks in high resolution. Priority given. Use this position. Raise the standard black level. Adjust to set up playback related and other settings. Normally select this when the picture becomes too white. Note • When you play a DVD VIDEO on your TV, not the system. continued 75US Use this when you can change...
... number of channels, the system selects PCM, DTS, Dolby Digital sound, and MPEG audio tracks in high resolution. Priority given. Use this position. Raise the standard black level. Adjust to set up playback related and other settings. Normally select this when the picture becomes too white. Note • When you play a DVD VIDEO on your TV, not the system. continued 75US Use this when you can change...

Operating Instructions
Page 80
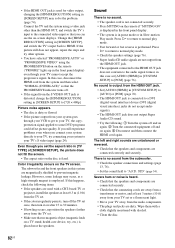
... your television screen indefinitely. On operation • If the system is equipped with very low level inputs or no audio signals. On cleaning • Clean the cabinet, panel, and controls with a soft cloth slightly moistened with adequate ventilation to prevent heat build-up the volume while listening..., turn off the TV then turn up in the system. • At high volume, over long periods of time you don't, the disc may cause overheating. • Do not block the ventilation slots by putting anything on after "STANDBY." 4 Remove the AC power cord (mains lead) from the system. ...
... your television screen indefinitely. On operation • If the system is equipped with very low level inputs or no audio signals. On cleaning • Clean the cabinet, panel, and controls with a soft cloth slightly moistened with adequate ventilation to prevent heat build-up the volume while listening..., turn off the TV then turn up in the system. • At high volume, over long periods of time you don't, the disc may cause overheating. • Do not block the ventilation slots by putting anything on after "STANDBY." 4 Remove the AC power cord (mains lead) from the system. ...
Operating Instructions
Page 82
... to the audio signal format, in [CUSTOM SETUP] to prevent magnetic leakage. Sound There is no sound from the system and then select "NORMAL (INTERLACE)" so that the speakers and components are dirty. Picture noise appears. • The disc is dirty or flawed. • If the picture output from your TV set . • Make sure that you connect your system directly to your TV, try other...
... to the audio signal format, in [CUSTOM SETUP] to prevent magnetic leakage. Sound There is no sound from the system and then select "NORMAL (INTERLACE)" so that the speakers and components are dirty. Picture noise appears. • The disc is dirty or flawed. • If the picture output from your TV set . • Make sure that you connect your system directly to your TV, try other...

Operating Instructions
Page 89
... PBC (playback control) functions, the menu screens, moving pictures and still pictures are recorded on VIDEO CDs (Version 2.0) to the sales region. Region Code This system is the NTSC standard method for Super Audio CD • CD layer1): A layer that incorporates coding technology for the sound or subtitles in a picture are recorded in each DVD system or DVD disc according to control playback. A region number is readable by...
... PBC (playback control) functions, the menu screens, moving pictures and still pictures are recorded on VIDEO CDs (Version 2.0) to the sales region. Region Code This system is the NTSC standard method for Super Audio CD • CD layer1): A layer that incorporates coding technology for the sound or subtitles in a picture are recorded in each DVD system or DVD disc according to control playback. A region number is readable by...
Operating Instructions
Page 99
... Multilingual function 89 MUTING 31 N Naming preset stations 58 O ORIGINAL 45 OSD 73 Other Component Hookup 28 P PARENTAL CONTROL 65 Parental Control 89 PAUSE MODE 75 PBC Playback 56 PICTURE NAVI 38, 52 PLAY LIST 45 Playback Control (PBC) 89 Program Play 40 PROGRESSIVE AUTO 26 Progressive format 26, 89 PROGRESSIVE VIDEO 26 Q Quick Setup 19 R Radio 58 Radio Stations 57 Rear Panel 92 Region Code 8, 89 Remote...
... Multilingual function 89 MUTING 31 N Naming preset stations 58 O ORIGINAL 45 OSD 73 Other Component Hookup 28 P PARENTAL CONTROL 65 Parental Control 89 PAUSE MODE 75 PBC Playback 56 PICTURE NAVI 38, 52 PLAY LIST 45 Playback Control (PBC) 89 Program Play 40 PROGRESSIVE AUTO 26 Progressive format 26, 89 PROGRESSIVE VIDEO 26 Q Quick Setup 19 R Radio 58 Radio Stations 57 Rear Panel 92 Region Code 8, 89 Remote...
Operating Instructions
Page 104
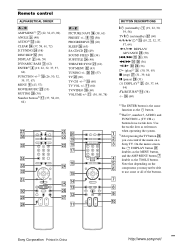
... able to use some or all of the buttons. On the menu screen, the DISPLAY button ea doubles as the MENU button, and the AMP MENU button 7 double as the button. 2)The H, number 5, AUDIO, and FUNCTION + (TV CH +) buttons have tactile dots. wh (36) H (play)2) 9 (30, 39, 65) x (stop) wj (31, 39, 64) X (pause) wl (31) DISPLAY3) ea (20, 37, 64, 94) O RETURN3) qf (38) -/-- Remote control ALPHABETICAL ORDER...
... able to use some or all of the buttons. On the menu screen, the DISPLAY button ea doubles as the MENU button, and the AMP MENU button 7 double as the button. 2)The H, number 5, AUDIO, and FUNCTION + (TV CH +) buttons have tactile dots. wh (36) H (play)2) 9 (30, 39, 65) x (stop) wj (31, 39, 64) X (pause) wl (31) DISPLAY3) ea (20, 37, 64, 94) O RETURN3) qf (38) -/-- Remote control ALPHABETICAL ORDER...


