Operating Instructions
Page 4
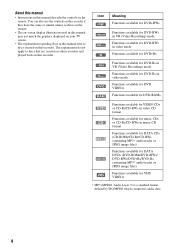
...which compresses audio data. 4 You can also use the controls on the recorder if they have the same or similar names as those on the remote. • The on-screen display illustrations used in this manual may not match the graphics displayed on your TV screen. • The explanations ...regarding discs in this manual refer to discs that are created on other recorders and played back on the remote. About this manual • Instructions in this recorder. The explanations do not apply to discs created on this manual describe the controls on this...
...which compresses audio data. 4 You can also use the controls on the recorder if they have the same or similar names as those on the remote. • The on-screen display illustrations used in this manual may not match the graphics displayed on your TV screen. • The explanations ...regarding discs in this manual refer to discs that are created on other recorders and played back on the remote. About this manual • Instructions in this recorder. The explanations do not apply to discs created on this manual describe the controls on this...
Operating Instructions
Page 6
... to Your TV 21 Step 4: Connecting to Your AV Amplifier (Receiver 24 Step 5: Connecting the Power Cord 26 Step 6: Preparing the Remote 26 Step 7: Easy Setup 29 Connecting Another VCR or Similar Device 32 Watching TV 34 DVD Operation DVD Playback 36 Playing Discs 36 Playback Options 37 Playing a Title From the...
... to Your TV 21 Step 4: Connecting to Your AV Amplifier (Receiver 24 Step 5: Connecting the Power Cord 26 Step 6: Preparing the Remote 26 Step 7: Easy Setup 29 Connecting Another VCR or Similar Device 32 Watching TV 34 DVD Operation DVD Playback 36 Playing Discs 36 Playback Options 37 Playing a Title From the...

Operating Instructions
Page 17
... hook up and adjust the settings of the following items: • Audio/video cord (phono plug × 3 y phono plug × 3) (1) • Antenna cable (1) • Remote commander (remote) (1) • Size AA (R6) batteries (2) Step 2: Connecting the Antenna Cable Select one of the recorder. Do not connect the power cord until you have a video...
... hook up and adjust the settings of the following items: • Audio/video cord (phono plug × 3 y phono plug × 3) (1) • Antenna cable (1) • Remote commander (remote) (1) • Size AA (R6) batteries (2) Step 2: Connecting the Antenna Cable Select one of the recorder. Do not connect the power cord until you have a video...
Operating Instructions
Page 26
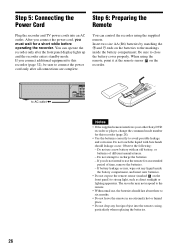
... < AUDIO OUT COMPONENT VIDEO OUT L Y R PB HDMI OUT PR OPTICAL COAXIAL DIGITAL AUDIO OUT Notes • If the supplied remote interferes your other Sony DVD recorder or player, change the command mode number for an extended period of different manufacturers. - Insert two size AA (R6) batteries...direct sunlight or lighting apparatus. Do not attempt to close the battery cover properly. The recorder may not respond to the remote. • With normal use the remote for this recorder (page 32), be sure to use , the batteries should leakage occur. Be sure to recharge the batteries...
... < AUDIO OUT COMPONENT VIDEO OUT L Y R PB HDMI OUT PR OPTICAL COAXIAL DIGITAL AUDIO OUT Notes • If the supplied remote interferes your other Sony DVD recorder or player, change the command mode number for an extended period of different manufacturers. - Insert two size AA (R6) batteries...direct sunlight or lighting apparatus. Do not attempt to close the battery cover properly. The recorder may not respond to the remote. • With normal use the remote for this recorder (page 32), be sure to use , the batteries should leakage occur. Be sure to recharge the batteries...
Operating Instructions
Page 27
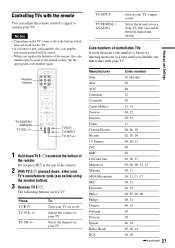
... TV "/1 pressed down TV "/1 located at a time until you find the one that can adjust the remote control's signal to the default setting. Manufacturer Sony Akai AOC Centurion Coronado Curtis-Mathes Daewoo Daytron Fisher General Electric Hitachi J.C.Penney JVC KMC LG/Gold Star Magnavox Marantz MGA.... The following buttons are for the TV. • If you replace the batteries of the remote. Controlling TVs with your TV. Notes • Depending on a Sony TV that works with the remote You can switch between digital and analog Hookups and Settings Code numbers of controllable TVs If more...
... TV "/1 pressed down TV "/1 located at a time until you find the one that can adjust the remote control's signal to the default setting. Manufacturer Sony Akai AOC Centurion Coronado Curtis-Mathes Daewoo Daytron Fisher General Electric Hitachi J.C.Penney JVC KMC LG/Gold Star Magnavox Marantz MGA.... The following buttons are for the TV. • If you replace the batteries of the remote. Controlling TVs with your TV. Notes • Depending on a Sony TV that works with the remote You can switch between digital and analog Hookups and Settings Code numbers of controllable TVs If more...
Operating Instructions
Page 28
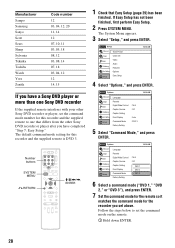
..., 11 03, 05, 18 08, 12 03, 08, 14 07, 18 03, 04, 12 12 14, 15 If you have a Sony DVD player or more than one Sony DVD recorder If the supplied remote interferes with your other Sony DVD recorder or player, set the command mode number for this recorder and the supplied... remote to one that differs from the other Sony DVD recorder or player after you have completed "Step 7: Easy Setup." Number buttons SYSTEM...
..., 11 03, 05, 18 08, 12 03, 08, 14 07, 18 03, 04, 12 12 14, 15 If you have a Sony DVD player or more than one Sony DVD recorder If the supplied remote interferes with your other Sony DVD recorder or player, set the command mode number for this recorder and the supplied... remote to one that differs from the other Sony DVD recorder or player after you have completed "Step 7: Easy Setup." Number buttons SYSTEM...
Operating Instructions
Page 29
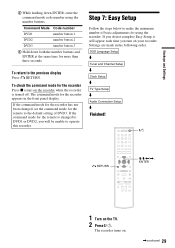
... mode code number using the recorder. To check the command mode for the recorder Press x (stop) on your recorder. If the command mode for the remote is turned off. OSD Language Setup m Tuner and Channel Setup m Clock Setup m TV Type Setup m Audio Connection Setup m Finished! 123 456 789 0 "/1 O RETURN M/m/... has not been changed to DVD1 or DVD2, you turn on the recorder when the recorder is changed , set the command mode for the remote to operate this recorder. Hookups and Settings B While holding down both the number buttons and ENTER at the same time for more than three...
... mode code number using the recorder. To check the command mode for the recorder Press x (stop) on your recorder. If the command mode for the remote is turned off. OSD Language Setup m Tuner and Channel Setup m Clock Setup m TV Type Setup m Audio Connection Setup m Finished! 123 456 789 0 "/1 O RETURN M/m/... has not been changed to DVD1 or DVD2, you turn on the recorder when the recorder is changed , set the command mode for the remote to operate this recorder. Hookups and Settings B While holding down both the number buttons and ENTER at the same time for more than three...

Operating Instructions
Page 38
... playback options, such as subtitle, audio track, etc., using the OPTIONS menu (page 11). • During playback or pause mode, the recorder's m/ M buttons and the remote's .PREV/>NEXT buttons work the same way (page 37). To avoid possible damage to the audio system, the consumer should take proper precautions when the...
... playback options, such as subtitle, audio track, etc., using the OPTIONS menu (page 11). • During playback or pause mode, the recorder's m/ M buttons and the remote's .PREV/>NEXT buttons work the same way (page 37). To avoid possible damage to the audio system, the consumer should take proper precautions when the...

Operating Instructions
Page 106
... Select "Setup," and press ENTER. 3 Select "Easy Setup," and press ENTER. Be sure to the factory settings. Note that you have a Sony DVD player or more than one Sony DVD recorder" on page 102, select "Factory Setting," and press ENTER. 2 Select "Start," and press ENTER. Before you start, Check that all...see "If you to return the setup settings to low lighting when power is on . Factory Setting Allows you have made all of the supplied remote to run the Easy Setup program. 1 Press SYSTEM MENU while the recorder is on or off . The setup settings return to make initial settings...
... Select "Setup," and press ENTER. 3 Select "Easy Setup," and press ENTER. Be sure to the factory settings. Note that you have a Sony DVD player or more than one Sony DVD recorder" on page 102, select "Factory Setting," and press ENTER. 2 Select "Start," and press ENTER. Before you start, Check that all...see "If you to return the setup settings to low lighting when power is on . Factory Setting Allows you have made all of the supplied remote to run the Easy Setup program. 1 Press SYSTEM MENU while the recorder is on or off . The setup settings return to make initial settings...
Operating Instructions
Page 111
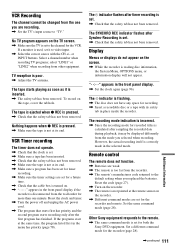
...LINE2" when recording from the recorder. , The remote's manufacturer code returned to video input. , Select the correct source with its end. , Make sure a program has been set for timer recording. , Make sure the timer settings are set for both the Sony DVD equipment. To record on the recorder. ...at its end. The recording mode indication is incorrect. , Since the recording mode for the recorder and remote. Set the same command mode (page 28). Set a different command mode for the VCR. Nothing happens when z REC is pressed. , Make sure the tape is calculated after timer recording is...
...LINE2" when recording from the recorder. , The remote's manufacturer code returned to video input. , Select the correct source with its end. , Make sure a program has been set for timer recording. , Make sure the timer settings are set for both the Sony DVD equipment. To record on the recorder. ...at its end. The recording mode indication is incorrect. , Since the recording mode for the recorder and remote. Set the same command mode (page 28). Set a different command mode for the VCR. Nothing happens when z REC is pressed. , Make sure the tape is calculated after timer recording is...
Operating Instructions
Page 114
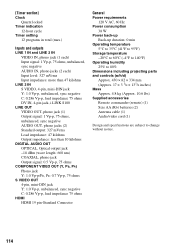
... projecting parts and controls (w/h/d) Approx. 430 × 82 × 334 mm (Approx. 17 × 3 1/4 × 131/4 inches) Mass Approx. 4.8 kg (Approx. 10.6 lbs) Supplied accessories Remote commander (remote) (1) Size AA (R6) batteries (2) Antenna cable (1) Audio/video cord (1) Design and specifications are subject to change without notice. 114
... projecting parts and controls (w/h/d) Approx. 430 × 82 × 334 mm (Approx. 17 × 3 1/4 × 131/4 inches) Mass Approx. 4.8 kg (Approx. 10.6 lbs) Supplied accessories Remote commander (remote) (1) Size AA (R6) batteries (2) Antenna cable (1) Audio/video cord (1) Design and specifications are subject to change without notice. 114
Operating Instructions
Page 116
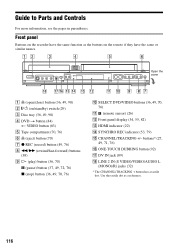
Open the cover A A (open/close) button (36, 49, 90) B "/1 (on the remote if they have the same function as a reference. 116 buttons* (27, 49, 71, 76) P ONE-TOUCH DUBBING button (92) Q DV IN jack (89) R LINE 2 IN (S ... (38) I H (play) button (36, 70) X (pause) button (37, 49, 72, 76) x (stop) button (36, 49, 70, 76) J SELECT DVD/VIDEO buttons (36, 49, 70, 76) K (remote sensor) (26) L Front panel display (34, 55, 82) M HDMI indicator (22) N SYNCHRO REC indicator (53, 79) O CHANNEL/TRACKING +/- Guide to Parts and Controls For more...
Open the cover A A (open/close) button (36, 49, 90) B "/1 (on the remote if they have the same function as a reference. 116 buttons* (27, 49, 71, 76) P ONE-TOUCH DUBBING button (92) Q DV IN jack (89) R LINE 2 IN (S ... (38) I H (play) button (36, 70) X (pause) button (37, 49, 72, 76) x (stop) button (36, 49, 70, 76) J SELECT DVD/VIDEO buttons (36, 49, 70, 76) K (remote sensor) (26) L Front panel display (34, 55, 82) M HDMI indicator (22) N SYNCHRO REC indicator (53, 79) O CHANNEL/TRACKING +/- Guide to Parts and Controls For more...

Operating Instructions
Page 117
Use the tactile dot as a reference. Remote For DVD functions 123 456 789 0 A Z OPEN/CLOSE button (36, 49, 90) B DVD button (36, 49) C Number buttons* (34, 37) SET button (34) · (dot) ...
Use the tactile dot as a reference. Remote For DVD functions 123 456 789 0 A Z OPEN/CLOSE button (36, 49, 90) B DVD button (36, 49) C Number buttons* (34, 37) SET button (34) · (dot) ...
Operating Instructions
Page 123
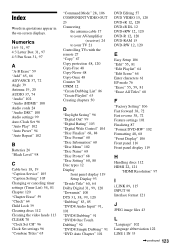
..." 28, 106 COMPONENT VIDEO OUT 23 Connecting the antenna cable 17 to your AV/amplifier (receiver) 24 to your TV 21 Controlling TVs with the remote 27 "Copy" 67 Copy protection 48, 120 Copy-Free 48 Copy-Never 48 Copy-Once 48 Counter 70 CPRM 12 "Create Dubbing List" 86 "Create...
..." 28, 106 COMPONENT VIDEO OUT 23 Connecting the antenna cable 17 to your AV/amplifier (receiver) 24 to your TV 21 Controlling TVs with the remote 27 "Copy" 67 Copy protection 48, 120 Copy-Free 48 Copy-Never 48 Copy-Once 48 Counter 70 CPRM 12 "Create Dubbing List" 86 "Create...
Operating Instructions
Page 124
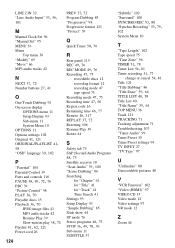
... 12 recording format 12 recording mode 47 tape speed 75 Recording mode 47, 75 Recording time 47, 50 Region code 16 Remaining time 46, 77 Remote 26, 117 REPLAY 37, 72 Resetting 106 Resume Play 39 Rotate 44 S Safety tab 75 SAP (Second Audio Program) 48, 75 Satellite receiver 18 "Scan... adjustment 71 Troubleshooting 107 "Tuner Audio" 99 Tuner Preset 30 Tuner Preset settings 94 TV INPUT 27 "TV Type" 97 U "Unfinalize" 88 Unrecordable pictures 48 V "VCR Function" 102 "Video (HDMI)" 97 VIDEO CD 15 Video mode 12 Video settings 97 VR mode 12 Z Zoom 44
... 12 recording format 12 recording mode 47 tape speed 75 Recording mode 47, 75 Recording time 47, 50 Region code 16 Remaining time 46, 77 Remote 26, 117 REPLAY 37, 72 Resetting 106 Resume Play 39 Rotate 44 S Safety tab 75 SAP (Second Audio Program) 48, 75 Satellite receiver 18 "Scan... adjustment 71 Troubleshooting 107 "Tuner Audio" 99 Tuner Preset 30 Tuner Preset settings 94 TV INPUT 27 "TV Type" 97 U "Unfinalize" 88 Unrecordable pictures 48 V "VCR Function" 102 "Video (HDMI)" 97 VIDEO CD 15 Video mode 12 Video settings 97 VR mode 12 Z Zoom 44

