The Sony Guide to Home Theater
Page 8
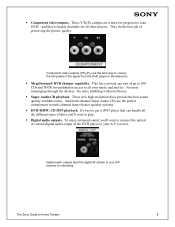
...; MegaStorage® DVD changer capability. Digital audio outputs feed the digital bit stream to your A/V receiver for pushbutton access to play. ƒ Digital audio outputs. No more fumbling with jewel boxes. ƒ Super Audio CD playback. They do the best job of the signal from the DVD player to your music and movies. And multi-channel Super Audio CDs are the perfect complement to Home Theater 8 To enjoy surround sound, you 'll want...
...; MegaStorage® DVD changer capability. Digital audio outputs feed the digital bit stream to your A/V receiver for pushbutton access to play. ƒ Digital audio outputs. No more fumbling with jewel boxes. ƒ Super Audio CD playback. They do the best job of the signal from the DVD player to your music and movies. And multi-channel Super Audio CDs are the perfect complement to Home Theater 8 To enjoy surround sound, you 'll want...

Operating Instructions
Page 2
... inside the recorder. This equipment generates, uses, and can be operated in this manual could void your Sony dealer regarding this product. Reorient or relocate the receiving antenna. - On placement • Place the recorder in a location with the limits set out in a particular installation. Should this product will not occur in the EMC Directive using a connection cable shorter than 3 meters. The AC power cord must...
... inside the recorder. This equipment generates, uses, and can be operated in this manual could void your Sony dealer regarding this product. Reorient or relocate the receiving antenna. - On placement • Place the recorder in a location with the limits set out in a particular installation. Should this product will not occur in the EMC Directive using a connection cable shorter than 3 meters. The AC power cord must...

Operating Instructions
Page 4
... Playback Before Playing 49 Playable discs 49 Playing Discs 50 Using the DVD's Menu 51 Using the PROGRESSIVE button 51 Basic operations/Changing the playback speed 52 Selecting a Recorded Title on a Disc .... 53 Searching for a Title/Chapter/Track ...... 55 Checking the Play Information and Playing Time 56 Checking the playing time on the front panel display 57 Selecting the Sound 57 Checking the audio signal format 58 TV Virtual Surround Settings (TVS) ...... 58 Changing the Angles 59 Displaying the Subtitles 60 Adjusting the Playback Picture and Sound 60 Adjusting...
... Playback Before Playing 49 Playable discs 49 Playing Discs 50 Using the DVD's Menu 51 Using the PROGRESSIVE button 51 Basic operations/Changing the playback speed 52 Selecting a Recorded Title on a Disc .... 53 Searching for a Title/Chapter/Track ...... 55 Checking the Play Information and Playing Time 56 Checking the playing time on the front panel display 57 Selecting the Sound 57 Checking the audio signal format 58 TV Virtual Surround Settings (TVS) ...... 58 Changing the Angles 59 Displaying the Subtitles 60 Adjusting the Playback Picture and Sound 60 Adjusting...
Operating Instructions
Page 12
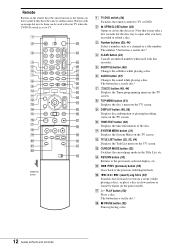
.../DVD switch is set to TV. F AUDIO button (57) Changes the sound while playing a disc. M CURSOR MODE button (32) Switches the cursor/page mode in the pause mode). Q H PLAY button (50) Plays a disc. Remote Buttons on the remote have the same function as a channel or a title number. Buttons with an orange dot next to open after you have the same or similar names. E SUBTITLE button (60) Changes the subtitles while playing a disc. H TOP MENU button (51) Displays the disc's menu on the TV screen. I DISPLAY button (40, 56) Displays disc information or playing/recording...
.../DVD switch is set to TV. F AUDIO button (57) Changes the sound while playing a disc. M CURSOR MODE button (32) Switches the cursor/page mode in the pause mode). Q H PLAY button (50) Plays a disc. Remote Buttons on the remote have the same function as a channel or a title number. Buttons with an orange dot next to open after you have the same or similar names. E SUBTITLE button (60) Changes the subtitles while playing a disc. H TOP MENU button (51) Displays the disc's menu on the TV screen. I DISPLAY button (40, 56) Displays disc information or playing/recording...
Operating Instructions
Page 22
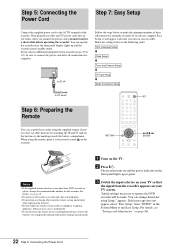
... for using the supplied remote. OSD Language Setup m Clock Setup m Tuner and Channel Setup m TV Type Setup m Audio Connection Setup to make the minimum number of the recorder. Insert two Size AA (R6) batteries by matching the 3 and # ends on your recorder. You can control the recorder using the recorder. Make the settings below to AC outlet "/1 Step 6: Preparing the Remote You can operate the recorder once the front panel display lights up and the recorder enters standby mode. After you connect the power cord, you connect additional...
... for using the supplied remote. OSD Language Setup m Clock Setup m Tuner and Channel Setup m TV Type Setup m Audio Connection Setup to make the minimum number of the recorder. Insert two Size AA (R6) batteries by matching the 3 and # ends on your recorder. You can control the recorder using the recorder. Make the settings below to AC outlet "/1 Step 6: Preparing the Remote You can operate the recorder once the front panel display lights up and the recorder enters standby mode. After you connect the power cord, you connect additional...

Operating Instructions
Page 23
... screen Language. The Setup Display for setting the clock. The recorder automatically sets the clock by searching for a time signal when you selected on -screen display appears. Basic Hookups and Settings d Press ENTER. EASY SETUP Tuner Preset 3/5 Select the way in the on page 16 (Hookup 1, 2, or 3). Auto Manual f Press M/m to select a language, then press ENTER. If you select "Auto", this recorder will receive channels. If your clock is set the clock manually (page 93). ◆ Hookup 2 Select "Manual," then press ENTER. Antenna Cable...
... screen Language. The Setup Display for setting the clock. The recorder automatically sets the clock by searching for a time signal when you selected on -screen display appears. Basic Hookups and Settings d Press ENTER. EASY SETUP Tuner Preset 3/5 Select the way in the on page 16 (Hookup 1, 2, or 3). Auto Manual f Press M/m to select a language, then press ENTER. If you select "Auto", this recorder will receive channels. If your clock is set the clock manually (page 93). ◆ Hookup 2 Select "Manual," then press ENTER. Antenna Cable...

Operating Instructions
Page 24
... (receiver) and press ENTER. A • If you must set the clock manually in the Setup Display (page 100). z Hint If you want to run Easy Setup again, select "Easy Setup" in "Clock" of DTS signal appears. The Setup Display for selecting the type of jack you selected on . • To record TV programs using the timer, you connect just a TV and nothing happens even after the recorder turns off. Select the type of jack used to connect...
... (receiver) and press ENTER. A • If you must set the clock manually in the Setup Display (page 100). z Hint If you want to run Easy Setup again, select "Easy Setup" in "Clock" of DTS signal appears. The Setup Display for selecting the type of jack you selected on . • To record TV programs using the timer, you connect just a TV and nothing happens even after the recorder turns off. Select the type of jack used to connect...
Operating Instructions
Page 39
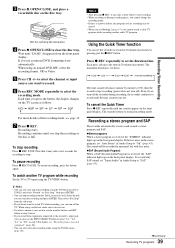
... cannot watch a cable TV program while recording another TV program while recording Set the TV to TV input using an unused DVD-RW, select the recording format, VR or Video. When using the TV/VIDEO button. Each time you press the button, the display changes on the front panel display. The recorder returns to select the recording mode. If there is received, the "STEREO" indicator lights up on the TV screen as well. If you use an unused DVD, formatting starts automatically...
... cannot watch a cable TV program while recording another TV program while recording Set the TV to TV input using an unused DVD-RW, select the recording format, VR or Video. When using the TV/VIDEO button. Each time you press the button, the display changes on the front panel display. The recorder returns to select the recording mode. If there is received, the "STEREO" indicator lights up on the TV screen as well. If you use an unused DVD, formatting starts automatically...

Operating Instructions
Page 51
... screen See "Using the DVD's Menu" below . 1 Press To stop playback using the TOOLS menu. The recorder starts playback. z Hint You can select the title from the Title List menu. To play a DVD VIDEO for which Parental Control is set When the message "Do you want temporarily change parental control to *?" To adjust the volume Adjust the volume of your TV or amplifier (receiver). ◆ When playing a DVD-RW/DVD+RW/DVD-R You can also start or stop playback Press x STOP. To turn off the recorder...
... screen See "Using the DVD's Menu" below . 1 Press To stop playback using the TOOLS menu. The recorder starts playback. z Hint You can select the title from the Title List menu. To play a DVD VIDEO for which Parental Control is set When the message "Do you want temporarily change parental control to *?" To adjust the volume Adjust the volume of your TV or amplifier (receiver). ◆ When playing a DVD-RW/DVD+RW/DVD-R You can also start or stop playback Press x STOP. To turn off the recorder...
Operating Instructions
Page 58
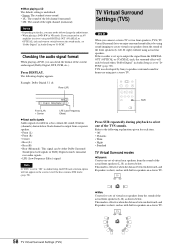
... "Dolby Digital" in Audio Setup is set to "Off" in Audio Setup, the DTS track selection option will not appear on the screen even if the disc contains DTS tracks (page 96). Checking the audio signal format When playing a DVD, you can be either Dolby Surround Sound processed signals or Dolby Digital sound's monaural rear audio signals. • LFE (Low Frequency Effect) signal Note If "DTS" is set to "DPCM" (page 96). ◆When playing a CD The default setting is...
... "Dolby Digital" in Audio Setup is set to "Off" in Audio Setup, the DTS track selection option will not appear on the screen even if the disc contains DTS tracks (page 96). Checking the audio signal format When playing a DVD, you can be either Dolby Surround Sound processed signals or Dolby Digital sound's monaural rear audio signals. • LFE (Low Frequency Effect) signal Note If "DTS" is set to "DPCM" (page 96). ◆When playing a CD The default setting is...

Operating Instructions
Page 94
If you turn it off. Auto Manual 3 Press Settings - 2 Press M/m to select "Clock," then press ENTER. Clock Select a method for a time signal when you select "Auto", this recorder will look for setting the clock.
If you turn it off. Auto Manual 3 Press Settings - 2 Press M/m to select "Clock," then press ENTER. Clock Select a method for a time signal when you select "Auto", this recorder will look for setting the clock.

Operating Instructions
Page 101
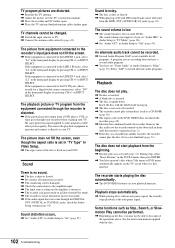
... turns off and the recorder is no picture. , Re-connect the connecting cord securely. , The connecting cords are connected to a combination TV/VIDEO player, the copy-protection signal applied to progressive format. Additional Information • Troubleshooting page 101 • Self-diagnosis Function (When letters/numbers appear in Settings Setup (page 92). , Select the correct source using the INPUT SELECT button, or select a channel of the following difficulties while using the CH +/- Picture noise appears. , The disc is connected securely. In this problem...
... turns off and the recorder is no picture. , Re-connect the connecting cord securely. , The connecting cords are connected to a combination TV/VIDEO player, the copy-protection signal applied to progressive format. Additional Information • Troubleshooting page 101 • Self-diagnosis Function (When letters/numbers appear in Settings Setup (page 92). , Select the correct source using the INPUT SELECT button, or select a channel of the following difficulties while using the CH +/- Picture noise appears. , The disc is connected securely. In this problem...
Operating Instructions
Page 102
... sound volume may not be changed. , Switch the input selector to "Main" (page 95). Playback stops automatically. , While playing discs with the disc. 102 Troubleshooting See the instruction manual supplied with an auto pause signal, the recorder stops playback at the auto pause signal. During stop, select "Reset Resume" in the TOOLS menu, then press ENTER. , You have set "Audio DRC" in Audio Setup to "TV Mode" (page 96). , Set "Audio ATT" in Audio Settings to TV. , Connect the antenna cable correctly (page 16). TV program pictures are recording...
... sound volume may not be changed. , Switch the input selector to "Main" (page 95). Playback stops automatically. , While playing discs with the disc. 102 Troubleshooting See the instruction manual supplied with an auto pause signal, the recorder stops playback at the auto pause signal. During stop, select "Reset Resume" in the TOOLS menu, then press ENTER. , You have set "Audio DRC" in Audio Setup to "TV Mode" (page 96). , Set "Audio ATT" in Audio Settings to TV. , Connect the antenna cable correctly (page 16). TV program pictures are recording...
Quick Start Guide
Page 1
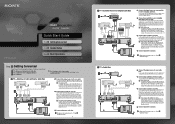
...R-AUDIO-L VIDEO AV Amplifier (receiver) DIGITAL IN DVD COAXIAL ASSIGNABLE DVD R-AUDIO-L S VIDEO VIDEO LINE IN VCR LINE OUT S VIDEO R-AUDIO-L VIDEO LINE IN R-AUDIO-L VIDEO 1 S VIDEO 3 VHF/UHF IN OUT CONTROL S IN DIGITAL OUT PCM/DTS/DOLBY DIGITAL LINE IN COAXIAL R-AUDIO-L 1 VIDEO S VIDEO LINE OUT R-AUDIO-L VIDEO 1 S VIDEO OPTICAL 3 2 Y PB PR COMPONENT VIDEO OUT DVD Recorder ~ AC IN LINE IN S VIDEO VIDEO L AUDIO R Television Connect the signal source to the recorder. Connect your satellite receiver or digital cable box to your TV. If you can use an S-video cord...
...R-AUDIO-L VIDEO AV Amplifier (receiver) DIGITAL IN DVD COAXIAL ASSIGNABLE DVD R-AUDIO-L S VIDEO VIDEO LINE IN VCR LINE OUT S VIDEO R-AUDIO-L VIDEO LINE IN R-AUDIO-L VIDEO 1 S VIDEO 3 VHF/UHF IN OUT CONTROL S IN DIGITAL OUT PCM/DTS/DOLBY DIGITAL LINE IN COAXIAL R-AUDIO-L 1 VIDEO S VIDEO LINE OUT R-AUDIO-L VIDEO 1 S VIDEO OPTICAL 3 2 Y PB PR COMPONENT VIDEO OUT DVD Recorder ~ AC IN LINE IN S VIDEO VIDEO L AUDIO R Television Connect the signal source to the recorder. Connect your satellite receiver or digital cable box to your TV. If you can use an S-video cord...

Quick Start Guide
Page 2
... Language Setup x Clock Setup x Tuner and Channel Setup x TV Type Setup x Audio Connection Setup x You're done! I/1 (on your recorder until you turn on your DVD recorder for the first time, the Easy Setup display automatically appears on /standby) button Steps to : Steps to : Step : Step : Step : Steps to : Displaying Easy Setup on your TV screen. If you do not complete Easy Setup Easy Setup will appear each time you complete the steps below to make the minimum number...
... Language Setup x Clock Setup x Tuner and Channel Setup x TV Type Setup x Audio Connection Setup x You're done! I/1 (on your recorder until you turn on your DVD recorder for the first time, the Easy Setup display automatically appears on /standby) button Steps to : Steps to : Step : Step : Step : Steps to : Displaying Easy Setup on your TV screen. If you do not complete Easy Setup Easy Setup will appear each time you complete the steps below to make the minimum number...

Technical Notes
Page 2
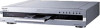
... Sony RDR-GX7 DVD Recorder 12 Now you can make it easy to create your own DVD recordings at Present 10 Compatibility With Over 100 Million DVD Players Now In Use 10 The Concept Called Dual RW Compatible 10 DVD Recorder based on DVD 21 High quality image performance from the disc 24 High-grade audio circuit design for high sound quality 28 Chapter 4-5 Easy use Interactive GUI (Graphic User Interface) screen...
... Sony RDR-GX7 DVD Recorder 12 Now you can make it easy to create your own DVD recordings at Present 10 Compatibility With Over 100 Million DVD Players Now In Use 10 The Concept Called Dual RW Compatible 10 DVD Recorder based on DVD 21 High quality image performance from the disc 24 High-grade audio circuit design for high sound quality 28 Chapter 4-5 Easy use Interactive GUI (Graphic User Interface) screen...

Technical Notes
Page 3
... no matter how may be used to recording television programs and archiving personal video recordings onto optical discs. Furthermore, DVD can also be changed, with new titles created for recording, there is digital, powerful error correction systems can be enjoyed in a wide variety of enjoying DVD Enjoy DVD! Even for collections of playback compatibility with conventional DVD players. Durability of DVD analog tape repeated playback recordable DVD repeated playback s Compatible recording for playback and editing One major feature...
... no matter how may be used to recording television programs and archiving personal video recordings onto optical discs. Furthermore, DVD can also be changed, with new titles created for recording, there is digital, powerful error correction systems can be enjoyed in a wide variety of enjoying DVD Enjoy DVD! Even for collections of playback compatibility with conventional DVD players. Durability of DVD analog tape repeated playback recordable DVD repeated playback s Compatible recording for playback and editing One major feature...

Technical Notes
Page 4
... capacity was formalized as DVD-R (specification name: DVD-Recordable). DVD-RW is compatible with existing DVD-ROM drives and DVD players. Importance is not compatible with two different recording formats, including Version 1.0 specifications for DVD Video Recording format, plus the Version 1.1 standard for general use) established in February, 2000, and for the Version 2.0 specification (for DVD-Video format recording, adopted March 2000, which was formally set at 4.7 Gbytes with the Version 2.0 specification (for authoring) established in...
... capacity was formalized as DVD-R (specification name: DVD-Recordable). DVD-RW is compatible with existing DVD-ROM drives and DVD players. Importance is not compatible with two different recording formats, including Version 1.0 specifications for DVD Video Recording format, plus the Version 1.1 standard for general use) established in February, 2000, and for the Version 2.0 specification (for DVD-Video format recording, adopted March 2000, which was formally set at 4.7 Gbytes with the Version 2.0 specification (for authoring) established in...

Technical Notes
Page 7
... "+VR" format. The MPEG2 digital coding format is essentially the 'file system' used when making a DVD recording. Thanks to this data by Philips for playback only. RDR-GX7 Technical Notes Chapter 2 Features of Recordable DVD Formats The Logical Format The logical format is used to compress the video images, thereby achieving a resolution of approximately 500 horizontal TV lines for a superior quality image. s UDF (Universal Disk Format) This is the original playback format for DVD players. Therefore, in...
... "+VR" format. The MPEG2 digital coding format is essentially the 'file system' used when making a DVD recording. Thanks to this data by Philips for playback only. RDR-GX7 Technical Notes Chapter 2 Features of Recordable DVD Formats The Logical Format The logical format is used to compress the video images, thereby achieving a resolution of approximately 500 horizontal TV lines for a superior quality image. s UDF (Universal Disk Format) This is the original playback format for DVD players. Therefore, in...

Technical Notes
Page 13
... model can make your taste. Of course, the new recorder incorporates high quality Sony technology for TV programs, the Sony RDR-GX7 DVD Recorder opens up a whole new world of media to operate and control. Then, during playback, the use of DVD-RW, DVD+RW and DVD-R formats, thus eliminating the need for consumers to store those unique moments recorded on a disc, one format over another and ensuring the best possible playback compatibility. Compatible with standard DVD players...
... model can make your taste. Of course, the new recorder incorporates high quality Sony technology for TV programs, the Sony RDR-GX7 DVD Recorder opens up a whole new world of media to operate and control. Then, during playback, the use of DVD-RW, DVD+RW and DVD-R formats, thus eliminating the need for consumers to store those unique moments recorded on a disc, one format over another and ensuring the best possible playback compatibility. Compatible with standard DVD players...


