
Operating Instructions
Page 4
... on page 30. 4US For details about usable discs, see "Quick Guide to Disc Types" on this recorder. • Icons, such as those on the remote. • The on-screen display illustrations used with the function being explained. You can also use the controls on the recorder if they have the... displayed on your TV screen. • The explanations regarding discs in this manual describe the controls on this manual refer to discs created on the remote. About this manual • Instructions in this recorder.
... on page 30. 4US For details about usable discs, see "Quick Guide to Disc Types" on this recorder. • Icons, such as those on the remote. • The on-screen display illustrations used with the function being explained. You can also use the controls on the recorder if they have the... displayed on your TV screen. • The explanations regarding discs in this manual describe the controls on this manual refer to discs created on the remote. About this manual • Instructions in this recorder.
Operating Instructions
Page 6
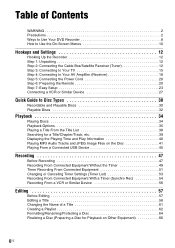
... (Tuner 12 Step 3: Connecting to Your TV 15 Step 4: Connecting to Your AV Amplifier (Receiver 18 Step 5: Connecting the Power Cord 20 Step 6: Preparing the Remote 20 Step 7: Easy Setup 23 Connecting a VCR or Similar Device 27 Quick Guide to Disc Types 30 Recordable and Playable Discs 30 Playable Discs 32...
... (Tuner 12 Step 3: Connecting to Your TV 15 Step 4: Connecting to Your AV Amplifier (Receiver 18 Step 5: Connecting the Power Cord 20 Step 6: Preparing the Remote 20 Step 7: Easy Setup 23 Connecting a VCR or Similar Device 27 Quick Guide to Disc Types 30 Recordable and Playable Discs 30 Playable Discs 32...

Operating Instructions
Page 12
...you need to connect the recorder to a tuner that does not have been using an audio/video cord. To use the recorder's remote control to a TV that has audio/ video output jacks. After setting up and adjust the settings of each component before connecting....not connect the power cord until you have the following items: • Audio/video cord (phono plug × 3 y phono plug × 3) (1) • Remote commander (remote) (1) • Set top box controller (1) • Size AA (R6) batteries (2) Step 2: Connecting the Cable Box/Satellite Receiver (Tuner) This recorder does not ...
...you need to connect the recorder to a tuner that does not have been using an audio/video cord. To use the recorder's remote control to a TV that has audio/ video output jacks. After setting up and adjust the settings of each component before connecting....not connect the power cord until you have the following items: • Audio/video cord (phono plug × 3 y phono plug × 3) (1) • Remote commander (remote) (1) • Set top box controller (1) • Size AA (R6) batteries (2) Step 2: Connecting the Cable Box/Satellite Receiver (Tuner) This recorder does not ...
Operating Instructions
Page 13
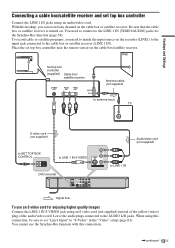
... (not supplied) to SET TOP BOX CONTROL to LINE 1 IN S VIDEO DVD recorder Audio/video cord (not supplied) to set top box controller near the remote sensor on the recorder (LINE1) to the input jack connected to the LINE 1 IN (VIDEO/AUDIO) jacks for enjoying higher quality images Connect the LINE...
... (not supplied) to SET TOP BOX CONTROL to LINE 1 IN S VIDEO DVD recorder Audio/video cord (not supplied) to set top box controller near the remote sensor on the recorder (LINE1) to the input jack connected to the LINE 1 IN (VIDEO/AUDIO) jacks for enjoying higher quality images Connect the LINE...
Operating Instructions
Page 16
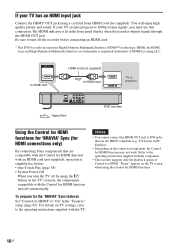
...the 'BRAVIA' Sync features Set "Control for HDMI. For details on the TV screen when using a certified Sony HDMI cord (not supplied). If your TV has an HDMI input jack Connect the HDMI* OUT jack using ... DVD recorder Using the Control for HDMI functions for 'BRAVIA' Sync (for HDMI connections only) By connecting Sony components that are compatible with the Control for HDMI functions. 16US Notes • You cannot connect the HDMI...DVI jacks on PC displays). • Depending on the TV's remote, the components compatible with the Control for HDMI function may not work.
...the 'BRAVIA' Sync features Set "Control for HDMI. For details on the TV screen when using a certified Sony HDMI cord (not supplied). If your TV has an HDMI input jack Connect the HDMI* OUT jack using ... DVD recorder Using the Control for HDMI functions for 'BRAVIA' Sync (for HDMI connections only) By connecting Sony components that are compatible with the Control for HDMI functions. 16US Notes • You cannot connect the HDMI...DVI jacks on PC displays). • Depending on the TV's remote, the components compatible with the Control for HDMI function may not work.

Operating Instructions
Page 20
... Be sure to recharge the batteries. - When using the supplied remote. If you must wait for this recorder (page 27), be sure to AC outlet < Notes • If the supplied remote interferes your other Sony DVD recorder or player, change the command mode number for a ...short while before operating the recorder. Step 5: Connecting the Power Cord Step 6: Preparing the Remote Plug the recorder and TV power cords into the remote casing, particularly when replacing ...
... Be sure to recharge the batteries. - When using the supplied remote. If you must wait for this recorder (page 27), be sure to AC outlet < Notes • If the supplied remote interferes your other Sony DVD recorder or player, change the command mode number for a ...short while before operating the recorder. Step 5: Connecting the Power Cord Step 6: Preparing the Remote Plug the recorder and TV power cords into the remote casing, particularly when replacing ...
Operating Instructions
Page 21
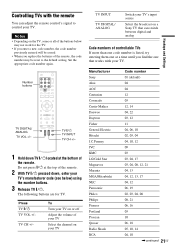
... appropriate code number again. TV "/1 TV INPUT TV CH +/- 1 Hold down TV "/1 located at the top of the remote. 2 With TV "/1 pressed down, enter your TV. TV CH +/- Manufacturer Sony Akai AOC Centurion Coronado Curtis-Mathes Daewoo Daytron Fisher General Electric Hitachi J.C.Penney JVC KMC LG/Gold Star Magnavox Marantz..., 08 08, 21 06, 16 03 10 06, 18 05, 10, 14 04, 10 ,continued 21US Notes • Depending on a Sony TV that works with the remote You can switch between digital and analog Hookups and Settings Code numbers of controllable TVs If more than one code number is listed...
... appropriate code number again. TV "/1 TV INPUT TV CH +/- 1 Hold down TV "/1 located at the top of the remote. 2 With TV "/1 pressed down, enter your TV. TV CH +/- Manufacturer Sony Akai AOC Centurion Coronado Curtis-Mathes Daewoo Daytron Fisher General Electric Hitachi J.C.Penney JVC KMC LG/Gold Star Magnavox Marantz..., 08 08, 21 06, 16 03 10 06, 18 05, 10, 14 04, 10 ,continued 21US Notes • Depending on a Sony TV that works with the remote You can switch between digital and analog Hookups and Settings Code numbers of controllable TVs If more than one code number is listed...
Operating Instructions
Page 22
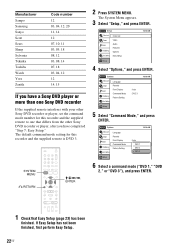
The default command mode setting for this recorder and the supplied remote to one that differs from the other Sony DVD recorder or player, set the command mode number for this recorder and the supplied remote is DVD 3. SYSTEM MENU 123 456 789 0 O RETURN M/m/ Manufacturer Sampo Samsung Sanyo Scott Sears Sharp Sylvania ...14 12 07, 10, 11 03, 05, 18 08, 12 03, 08, 14 07, 18 03, 04, 12 12 14, 15 If you have a Sony DVD player or more than one Sony DVD recorder If the supplied remote interferes with your other Sony DVD recorder or player, after you have completed "Step 7: Easy Setup."
The default command mode setting for this recorder and the supplied remote to one that differs from the other Sony DVD recorder or player, set the command mode number for this recorder and the supplied remote is DVD 3. SYSTEM MENU 123 456 789 0 O RETURN M/m/ Manufacturer Sampo Samsung Sanyo Scott Sears Sharp Sylvania ...14 12 07, 10, 11 03, 05, 18 08, 12 03, 08, 14 07, 18 03, 04, 12 12 14, 15 If you have a Sony DVD player or more than one Sony DVD recorder If the supplied remote interferes with your other Sony DVD recorder or player, after you have completed "Step 7: Easy Setup."

Operating Instructions
Page 23
... it matches the command mode for the recorder Press x (stop) on the remote. To check the command mode for the recorder you will be unable to make the minimum number of DVD3.... the command mode for the recorder has not been changed, set above. To return to the default setting of basic adjustments for the remote is turned off. OSD Language Setup m Cable Box/Sat. Follow the steps below to operate this recorder. A Hold down ENTER, ...recorder when the recorder is changed to DVD1 or DVD2, you set the command mode for the remote to the previous display Press O RETURN.
... it matches the command mode for the recorder Press x (stop) on the remote. To check the command mode for the recorder you will be unable to make the minimum number of DVD3.... the command mode for the recorder has not been changed, set above. To return to the default setting of basic adjustments for the remote is turned off. OSD Language Setup m Cable Box/Sat. Follow the steps below to operate this recorder. A Hold down ENTER, ...recorder when the recorder is changed to DVD1 or DVD2, you set the command mode for the remote to the previous display Press O RETURN.

Operating Instructions
Page 25
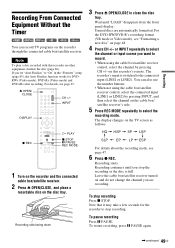
... control setting 1 Turn on the double-sided tape. ,continued 25US Remove the backings on the recorder and the cable box/ satellite receiver. 2 Point the recorder's remote at the recorder (not at "Set Top Box Control" in the "Features" setup (page 85). Check the connection and place the set the clock accurately...
... control setting 1 Turn on the double-sided tape. ,continued 25US Remove the backings on the recorder and the cable box/ satellite receiver. 2 Point the recorder's remote at the recorder (not at "Set Top Box Control" in the "Features" setup (page 85). Check the connection and place the set the clock accurately...
Operating Instructions
Page 26
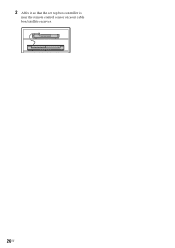
LINE 2 IN VIDEO L(MONO) AUDIO R DV IN ONE-TOUCH DUBBING REC 26US 2 Affix it so that the set top box controller is near the remote control sensor on your cable box/satellite receiver.
LINE 2 IN VIDEO L(MONO) AUDIO R DV IN ONE-TOUCH DUBBING REC 26US 2 Affix it so that the set top box controller is near the remote control sensor on your cable box/satellite receiver.
Operating Instructions
Page 36
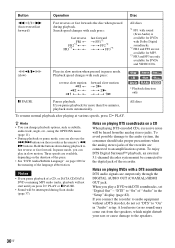
... speed changes with DTS soundtracks, set "DTS" to "On" of the language abbreviation. All discs z Hints • You can change playback options, such as the remote's m/ M buttons. "DTS" to "On" in the "Setup" display (page 82). If you pause playback for the meaning of "Audio" in "Audio" setup...
... speed changes with DTS soundtracks, set "DTS" to "On" of the language abbreviation. All discs z Hints • You can change playback options, such as the remote's m/ M buttons. "DTS" to "On" in the "Setup" display (page 82). If you pause playback for the meaning of "Audio" in "Audio" setup...
Operating Instructions
Page 49
Note To play a disc recorded with this recorder's remote. The recorder's input is full. The display changes on the disc tray. Z OPEN/ CLOSE 123 456 789 0 CH +/- INPUT DISPLAY z REC H PLAY x STOP X PAUSE REC ...
Note To play a disc recorded with this recorder's remote. The recorder's input is full. The display changes on the disc tray. Z OPEN/ CLOSE 123 456 789 0 CH +/- INPUT DISPLAY z REC H PLAY x STOP X PAUSE REC ...
Operating Instructions
Page 87
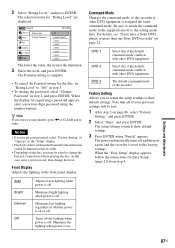
... the default command mode conflicts with other DVD equipment is reset to the setting made here. Factory Setting Allows you have a Sony DVD player or more than one Sony DVD recorder" on . When the "Easy Setup" display appears, follow the instructions for the disc, set "Rating Level" ...to "Off" in step 3. • To change the password, select "Change Password" in the "Setup" display. • Playback of the supplied remote to the factory settings...
... the default command mode conflicts with other DVD equipment is reset to the setting made here. Factory Setting Allows you have a Sony DVD player or more than one Sony DVD recorder" on . When the "Easy Setup" display appears, follow the instructions for the disc, set "Rating Level" ...to "Off" in step 3. • To change the password, select "Change Password" in the "Setup" display. • Playback of the supplied remote to the factory settings...
Operating Instructions
Page 92
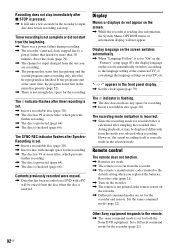
...Batteries are weak. , The remote is correctly made in the front panel display. , Set the clock again (page 79). "- -:- -" appears in the selected mode. Reset the clock (page 79). , The channel or input changed from the one you selected when recording. Other Sony equipment responds to the default setting... the disc is not enough disc space for the recorder and remote. Contents previously recorded were erased. , Data that lasted for both the Sony DVD equipment. Reset the code (page 21). , Turn on the recorder. , The remote is not pointed at the same time, the program listed first...
...Batteries are weak. , The remote is correctly made in the front panel display. , Set the clock again (page 79). "- -:- -" appears in the selected mode. Reset the clock (page 79). , The channel or input changed from the one you selected when recording. Other Sony equipment responds to the default setting... the disc is not enough disc space for the recorder and remote. Contents previously recorded were erased. , Data that lasted for both the Sony DVD equipment. Reset the code (page 21). , Turn on the recorder. , The remote is not pointed at the same time, the program listed first...
Operating Instructions
Page 95
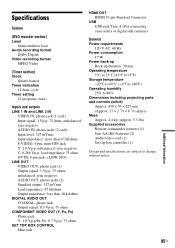
...% Dimensions including projecting parts and controls (w/h/d) Approx. 430 × 59 × 225 mm (Approx. 17 × 2 3/8 × 8 7/8 inches) Mass Approx. 2.4 kg (Approx. 5.3 lbs) Supplied accessories Remote commander (remote) (1) Size AA (R6) batteries (2) Audio/video cord (1) Set top box controller (1) Design and specifications are subject to change without notice. Additional Information 95US
...% Dimensions including projecting parts and controls (w/h/d) Approx. 430 × 59 × 225 mm (Approx. 17 × 2 3/8 × 8 7/8 inches) Mass Approx. 2.4 kg (Approx. 5.3 lbs) Supplied accessories Remote commander (remote) (1) Size AA (R6) batteries (2) Audio/video cord (1) Set top box controller (1) Design and specifications are subject to change without notice. Additional Information 95US
Operating Instructions
Page 97
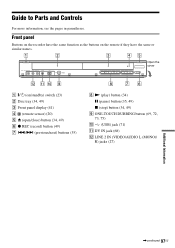
LINE 2 IN VIDEO L(MONO) AUDIO R DV IN ONE-TOUCH DUBBING Open the cover REC A "/1 (on the remote if they have the same or similar names. Guide to Parts and Controls For more information, see the pages in parentheses. Front panel Buttons on ...the recorder have the same function as the buttons on /standby) switch (23) B Disc tray (34, 49) C Front panel display (41) D (remote sensor) (20) E Z (open/close) button (34, 49) F z REC (record) button (49) G ./> (previous/next) buttons (35) H N (play) button (34) X (pause) button (35, 49) x (stop) button (34...
LINE 2 IN VIDEO L(MONO) AUDIO R DV IN ONE-TOUCH DUBBING Open the cover REC A "/1 (on the remote if they have the same or similar names. Guide to Parts and Controls For more information, see the pages in parentheses. Front panel Buttons on ...the recorder have the same function as the buttons on /standby) switch (23) B Disc tray (34, 49) C Front panel display (41) D (remote sensor) (20) E Z (open/close) button (34, 49) F z REC (record) button (49) G ./> (previous/next) buttons (35) H N (play) button (34) X (pause) button (35, 49) x (stop) button (34...
Operating Instructions
Page 98
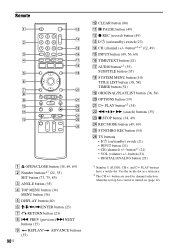
... set top box control is turned on /standby) switch (23) N CH (channel) +/- Use the tactile dot as a reference. *2 The CH +/- button*1 (21) • VOL (volume) +/- Remote 123 456 789 0 A Z OPEN/CLOSE button (34, 49, 69) B Number buttons*1 (21, 35) SET button (73, 75, 85) C ANGLE button (35) D TOP MENU button (34...
... set top box control is turned on /standby) switch (23) N CH (channel) +/- Use the tactile dot as a reference. *2 The CH +/- button*1 (21) • VOL (volume) +/- Remote 123 456 789 0 A Z OPEN/CLOSE button (34, 49, 69) B Number buttons*1 (21, 35) SET button (73, 75, 85) C ANGLE button (35) D TOP MENU button (34...
Operating Instructions
Page 106
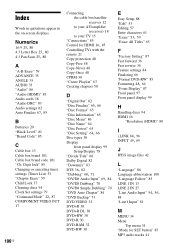
... box/satellite receiver 12 to your AV/amplifier (receiver) 18 to your TV 15 "Connections" 85 Control for HDMI 16, 85 Controlling TVs with the remote 21 Copy protection 48 Copy-Free 48 Copy-Never 48 Copy-Once 48 CPRM 30 "Create Playlist" 63 Creating chapters 50 D "Digital Out" 82 "Disc...
... box/satellite receiver 12 to your AV/amplifier (receiver) 18 to your TV 15 "Connections" 85 Control for HDMI 16, 85 Controlling TVs with the remote 21 Copy protection 48 Copy-Free 48 Copy-Never 48 Copy-Once 48 CPRM 30 "Create Playlist" 63 Creating chapters 50 D "Digital Out" 82 "Disc...
Operating Instructions
Page 107
... 49 Recording 47 recordable discs 30 recording format 30 recording mode 47 Recording mode 47 Recording time 47, 50 Region code 33 Remaining time 40 Remote 20, 98 REPLAY 35 Resetting 88 Resume Play 37 Rotate 43 S Satellite receiver 13 Satellite receiver brand code 104 "Scan Audio" 37, 83 Searching for...
... 49 Recording 47 recordable discs 30 recording format 30 recording mode 47 Recording mode 47 Recording time 47, 50 Region code 33 Remaining time 40 Remote 20, 98 REPLAY 35 Resetting 88 Resume Play 37 Rotate 43 S Satellite receiver 13 Satellite receiver brand code 104 "Scan Audio" 37, 83 Searching for...


