Quick Start Guide
Page 1
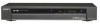
...DVD playback, select connection A. RDR-GX355 Follow the three steps below to connect, setup and make additional connections by referring to connection B. : Hookup for Place it so that has audio/video output jacks. Antenna Only (No Cable TV/No Satellite Receiver) You need to connect the DVD recorder... or DTS surround effects. To record TV programs on the DVD recorder from a connected tuner, make recordings on your DVD recorder. ©2007 Sony Corporation Printed in step 6 of Setup on your VCR connected to an antenna, connect this DVD recorder to SET TOP BOX CONTROL AUDIO...
...DVD playback, select connection A. RDR-GX355 Follow the three steps below to connect, setup and make additional connections by referring to connection B. : Hookup for Place it so that has audio/video output jacks. Antenna Only (No Cable TV/No Satellite Receiver) You need to connect the DVD recorder... or DTS surround effects. To record TV programs on the DVD recorder from a connected tuner, make recordings on your DVD recorder. ©2007 Sony Corporation Printed in step 6 of Setup on your VCR connected to an antenna, connect this DVD recorder to SET TOP BOX CONTROL AUDIO...

Quick Start Guide
Page 2
... the "Line" number you connected to. 9 Press M/m to fit). This will be made . Label side facing up Insert a DVD Disc 1 Press DVD to operate the DVD recorder. 2 Press OPEN/CLOSE and place a recordable DVD on the disc tray. 3 Press OPEN/CLOSE again to select a language for the first time. HQ, HSP, ... how "widescreen" images are shown on the right. 8 Press M/m to select the type of Brand Codes Cable box brand Code number Sony 1006 Scientific Atlanta Motorola Pace 0008,0277,0017,00 06,0237,0025,0477, 0207,0877,0003,00 12,0000,0021,1877 0476,0276...
... the "Line" number you connected to. 9 Press M/m to fit). This will be made . Label side facing up Insert a DVD Disc 1 Press DVD to operate the DVD recorder. 2 Press OPEN/CLOSE and place a recordable DVD on the disc tray. 3 Press OPEN/CLOSE again to select a language for the first time. HQ, HSP, ... how "widescreen" images are shown on the right. 8 Press M/m to select the type of Brand Codes Cable box brand Code number Sony 1006 Scientific Atlanta Motorola Pace 0008,0277,0017,00 06,0237,0025,0477, 0207,0877,0003,00 12,0000,0021,1877 0476,0276...
Operating Instructions
Page 1
3-096-489-11(1) DVD Recorder Operating Instructions RDR-GX355 © 2007 Sony Corporation Operating Instructions US Manual de instrucciones ES
3-096-489-11(1) DVD Recorder Operating Instructions RDR-GX355 © 2007 Sony Corporation Operating Instructions US Manual de instrucciones ES

Operating Instructions
Page 2
...within the product's enclosure that the power cord can be unplugged from the wall socket immediately in this manual could void your Sony dealer regarding this equipment. If this equipment does cause harmful interference to radio or television reception, which the receiver is intended... - RDR-GX355 Serial No CAUTION You are not going to the wall outlet, even if the recorder itself ; Reorient or relocate the receiving antenna. - Connect the equipment into the cabinet, unplug the recorder and have it checked by turning the equipment off . • Install this DVD recorder is ...
...within the product's enclosure that the power cord can be unplugged from the wall socket immediately in this manual could void your Sony dealer regarding this equipment. If this equipment does cause harmful interference to radio or television reception, which the receiver is intended... - RDR-GX355 Serial No CAUTION You are not going to the wall outlet, even if the recorder itself ; Reorient or relocate the receiving antenna. - Connect the equipment into the cabinet, unplug the recorder and have it checked by turning the equipment off . • Install this DVD recorder is ...
Operating Instructions
Page 4
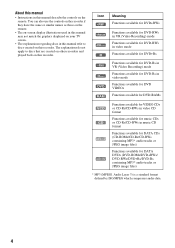
... Functions available for DVD+RWs Functions available for DVD-RWs in VR (Video Recording) mode Functions available for DVD-RWs in video mode Functions available for DVD+Rs -RVR -RVideo DVD RAM Functions available for DVD-Rs in VR (Video Recording) mode Functions available for DVD-Rs in video mode Functions available for DVD VIDEOs Functions available for DVD-RAMs VCD...
... Functions available for DVD+RWs Functions available for DVD-RWs in VR (Video Recording) mode Functions available for DVD-RWs in video mode Functions available for DVD+Rs -RVR -RVideo DVD RAM Functions available for DVD-Rs in VR (Video Recording) mode Functions available for DVD-Rs in video mode Functions available for DVD VIDEOs Functions available for DVD-RAMs VCD...

Operating Instructions
Page 6
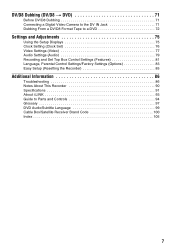
Table of Contents WARNING 2 Precautions 2 Ways to Use Your DVD Recorder 8 How to Use the On-Screen Menus 10 Hookups and Settings 12 Hooking Up the Recorder 12 Step 1: Unpacking 12 Step 2: Connecting the Cable Box/Satellite Receiver (Tuner 12 Step 3: Connecting to Your TV 15 Step 4: Connecting to ...Cord 20 Step 6: Preparing the Remote 20 Step 7: Easy Setup 23 Connecting a VCR or Similar Device 27 Quick Guide to Disc Types 30 Recordable and Playable Discs 30 Playable Discs 33 Playback 35 Playing Discs 35 Playback Options 36 Playing a Title From the Title List 39 Searching for a...
Table of Contents WARNING 2 Precautions 2 Ways to Use Your DVD Recorder 8 How to Use the On-Screen Menus 10 Hookups and Settings 12 Hooking Up the Recorder 12 Step 1: Unpacking 12 Step 2: Connecting the Cable Box/Satellite Receiver (Tuner 12 Step 3: Connecting to Your TV 15 Step 4: Connecting to ...Cord 20 Step 6: Preparing the Remote 20 Step 7: Easy Setup 23 Connecting a VCR or Similar Device 27 Quick Guide to Disc Types 30 Recordable and Playable Discs 30 Playable Discs 33 Playback 35 Playing Discs 35 Playback Options 36 Playing a Title From the Title List 39 Searching for a...
Operating Instructions
Page 7
... Jack 71 Dubbing From a DV/D8 Format Tape to a DVD 72 Settings and Adjustments 75 Using the Setup Displays 75 Clock Setting (Clock Set 76 Video Settings (Video 77 Audio Settings (Audio 79 Recording and Set Top Box Control Settings (Features 81 Language, Parental ...Control Settings/Factory Settings (Options 83 Easy Setup (Resetting the Recorder 85 Additional Information 86 Troubleshooting 86 Notes About This Recorder 90 Specifications 91 About i.LINK 93 Guide to Parts and Controls 94 Glossary 97 DVD Audio/Subtitle Language 99 Cable Box/Satellite Receiver Brand Code 100 ...
... Jack 71 Dubbing From a DV/D8 Format Tape to a DVD 72 Settings and Adjustments 75 Using the Setup Displays 75 Clock Setting (Clock Set 76 Video Settings (Video 77 Audio Settings (Audio 79 Recording and Set Top Box Control Settings (Features 81 Language, Parental ...Control Settings/Factory Settings (Options 83 Easy Setup (Resetting the Recorder 85 Additional Information 86 Troubleshooting 86 Notes About This Recorder 90 Specifications 91 About i.LINK 93 Guide to Parts and Controls 94 Glossary 97 DVD Audio/Subtitle Language 99 Cable Box/Satellite Receiver Brand Code 100 ...
Operating Instructions
Page 8
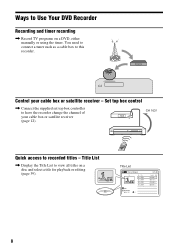
... 08:00 PM 10:10 AM Length Edit 01:29:03 > 00:31:23 > 01:59:00 > 00:58:56 > 8 Ways to Use Your DVD Recorder Recording and timer recording , Record TV programs on a disc and select a title for playback or editing (page 39). You need to connect a tuner such as a cable box to... recorded titles - Set top box control , Connect the supplied set top box controller to view all titles on a DVD, either manually or using the timer. Title List Title List (Original) 1/4 No. Title List , Display the...
... 08:00 PM 10:10 AM Length Edit 01:29:03 > 00:31:23 > 01:59:00 > 00:58:56 > 8 Ways to Use Your DVD Recorder Recording and timer recording , Record TV programs on a disc and select a title for playback or editing (page 39). You need to connect a tuner such as a cable box to... recorded titles - Set top box control , Connect the supplied set top box controller to view all titles on a DVD, either manually or using the timer. Title List Title List (Original) 1/4 No. Title List , Display the...

Operating Instructions
Page 9
... press the ONE TOUCH DUBBING button to dub a DV/D8 format tape over to a DATA CD (CD-RW/CD-R) or DATA DVD (DVD+RW/DVD-RW/ DVD+R/DVD-R) on this recorder (page 41). Playlist , Record a program on page 30. 9 Original One Touch Dubbing - First, take pictures with a digital camera and save them in JPEG... format to a disc (page 71). Shoot Save Play! A list of recordable and playable discs is on a DVD-RW (VR mode) or DVD-R (VR mode), then erase, move or add scenes as you like without changing the original contents (page 61). DV/D8...
... press the ONE TOUCH DUBBING button to dub a DV/D8 format tape over to a DATA CD (CD-RW/CD-R) or DATA DVD (DVD+RW/DVD-RW/ DVD+R/DVD-R) on this recorder (page 41). Playlist , Record a program on page 30. 9 Original One Touch Dubbing - First, take pictures with a digital camera and save them in JPEG... format to a disc (page 71). Shoot Save Play! A list of recordable and playable discs is on a DVD-RW (VR mode) or DVD-R (VR mode), then erase, move or add scenes as you like without changing the original contents (page 61). DV/D8...

Operating Instructions
Page 10
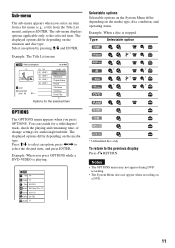
Once you become familiar with the basic operations, you will find the recorder easy to operate this recorder. How to Use the On-Screen Menus The following three displays are mainly used to use. SYSTEM MENU 123 456 789 0 O RETURN M/m/
Once you become familiar with the basic operations, you will find the recorder easy to operate this recorder. How to Use the On-Screen Menus The following three displays are mainly used to use. SYSTEM MENU 123 456 789 0 O RETURN M/m/
Operating Instructions
Page 11
Example: The Title List menu Title List (Original) 1/4 No. You can search for a title/chapter/ track, check the playing and remaining time, or change settings for the selected item OPTIONS The OPTIONS menu appears when you select an item from a list menu (e.g., a title from the Title List menu), and press ENTER. The displayed options differ depending on the situation and disc type. The sub-menu displays options applicable only to select an option, press The displayed options differ depending on the media type. Sub-menu The sub-menu appears when you press OPTIONS. Select an option ...
Example: The Title List menu Title List (Original) 1/4 No. You can search for a title/chapter/ track, check the playing and remaining time, or change settings for the selected item OPTIONS The OPTIONS menu appears when you select an item from a list menu (e.g., a title from the Title List menu), and press ENTER. The displayed options differ depending on the situation and disc type. The sub-menu displays options applicable only to select an option, press The displayed options differ depending on the media type. Sub-menu The sub-menu appears when you press OPTIONS. Select an option ...

Operating Instructions
Page 13
... (not supplied) to antenna input TV Audio/video cord (not supplied) to SET TOP BOX CONTROL SETTOP BOX CONTROL LINE 1 IN VIDEO to LINE 1 IN DVD recorder SETTOP HDMI OUT BOX CONTROL AUDIO OUT COMPONENT VIDEO OUT S VIDEO OUT LINE 1 IN LINE OUT L Y VIDEO VIDEO R PB L PR OPTICAL COAXIAL DIGITAL ...LINE OUT (VIDEO/AUDIO L/R) jacks (page 15), you can watch cable or satellite programs, you can record any channel on . With this hookup, you need to match the input source on the recorder (L1) to the input jack connected to the LINE OUT VIDEO/ AUDIO jacks without turning itself on ...
... (not supplied) to antenna input TV Audio/video cord (not supplied) to SET TOP BOX CONTROL SETTOP BOX CONTROL LINE 1 IN VIDEO to LINE 1 IN DVD recorder SETTOP HDMI OUT BOX CONTROL AUDIO OUT COMPONENT VIDEO OUT S VIDEO OUT LINE 1 IN LINE OUT L Y VIDEO VIDEO R PB L PR OPTICAL COAXIAL DIGITAL ...LINE OUT (VIDEO/AUDIO L/R) jacks (page 15), you can watch cable or satellite programs, you can record any channel on . With this hookup, you need to match the input source on the recorder (L1) to the input jack connected to the LINE OUT VIDEO/ AUDIO jacks without turning itself on ...
Operating Instructions
Page 15
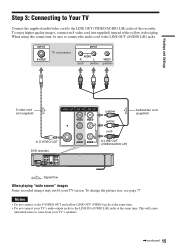
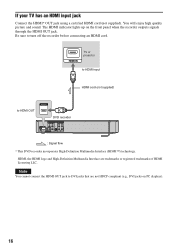
...white) VIDEO (yellow) S video cord (not supplied) S VIDEO OUT LINE 1 IN LINE OUT VIDEO VIDEO L (yellow) (white) (red) to S VIDEO OUT DVD recorder SETTOP HDMI OUT BOX CONTROL AUDIO OUT COMPONENT VIDEO OUT S VIDEO OUT LINE 1 IN LINE OUT L Y VIDEO VIDEO R PB L PR OPTICAL COAXIAL DIGITAL AUDIO OUT... AUDIO to the LINE OUT (AUDIO L/R) jacks. To enjoy higher quality images, connect an S video cord (not supplied) instead of the recorder. Hookups and Settings Step 3: Connecting to Your TV Connect the supplied audio/video cord to the S VIDEO OUT and yellow LINE OUT (VIDEO...
...white) VIDEO (yellow) S video cord (not supplied) S VIDEO OUT LINE 1 IN LINE OUT VIDEO VIDEO L (yellow) (white) (red) to S VIDEO OUT DVD recorder SETTOP HDMI OUT BOX CONTROL AUDIO OUT COMPONENT VIDEO OUT S VIDEO OUT LINE 1 IN LINE OUT L Y VIDEO VIDEO R PB L PR OPTICAL COAXIAL DIGITAL AUDIO OUT... AUDIO to the LINE OUT (AUDIO L/R) jacks. To enjoy higher quality images, connect an S video cord (not supplied) instead of the recorder. Hookups and Settings Step 3: Connecting to Your TV Connect the supplied audio/video cord to the S VIDEO OUT and yellow LINE OUT (VIDEO...
Operating Instructions
Page 16
...has an HDMI input jack Connect the HDMI* OUT jack using a certified HDMI cord (not supplied). Be sure to HDMI OUT HDMI OUT DVD recorder SETTOP HDMI OUT BOX CONTROL AUDIO OUT COMPONENT VIDEO OUT S VIDEO OUT LINE 1 IN LINE OUT L Y VIDEO VIDEO R PB L PR ...OPTICAL COAXIAL DIGITAL AUDIO OUT R AUDIO AUDIO : Signal flow * This DVD recorder incorporates High-Definition Multimedia Interface (HDMI™) technology. HDMI, the HDMI logo and High-Definition Multimedia Interface are not HDCP compliant (e.g., DVI jacks on ...
...has an HDMI input jack Connect the HDMI* OUT jack using a certified HDMI cord (not supplied). Be sure to HDMI OUT HDMI OUT DVD recorder SETTOP HDMI OUT BOX CONTROL AUDIO OUT COMPONENT VIDEO OUT S VIDEO OUT LINE 1 IN LINE OUT L Y VIDEO VIDEO R PB L PR ...OPTICAL COAXIAL DIGITAL AUDIO OUT R AUDIO AUDIO : Signal flow * This DVD recorder incorporates High-Definition Multimedia Interface (HDMI™) technology. HDMI, the HDMI logo and High-Definition Multimedia Interface are not HDCP compliant (e.g., DVI jacks on ...

Operating Instructions
Page 17
...LINE OUT VIDEO L (white) R AUDIO (red) to "On" in the "Setup" display (page 78). The "PROGRESSIVE" indicator lights up when the recorder outputs progressive signals. When using a component video cord (not supplied) or three video cords (not supplied) of "Video" to LINE OUT (AUDIO L/R) SETTOP... VIDEO OUT S VIDEO OUT LINE 1 IN LINE OUT L Y VIDEO VIDEO R PB L PR OPTICAL COAXIAL DIGITAL AUDIO OUT R AUDIO AUDIO DVD recorder : Signal flow 17 Hookups and Settings If your TV accepts progressive 480p format signals, you must use this connection, be sure to connect the ...
...LINE OUT VIDEO L (white) R AUDIO (red) to "On" in the "Setup" display (page 78). The "PROGRESSIVE" indicator lights up when the recorder outputs progressive signals. When using a component video cord (not supplied) or three video cords (not supplied) of "Video" to LINE OUT (AUDIO L/R) SETTOP... VIDEO OUT S VIDEO OUT LINE 1 IN LINE OUT L Y VIDEO VIDEO R PB L PR OPTICAL COAXIAL DIGITAL AUDIO OUT R AUDIO AUDIO DVD recorder : Signal flow 17 Hookups and Settings If your TV accepts progressive 480p format signals, you must use this connection, be sure to connect the ...
Operating Instructions
Page 18
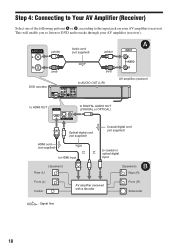
AUDIO OUT L (white) R (red) Audio cord (not supplied) (white) (red) DVD recorder to AUDIO OUT (L/R) SETTOP HDMI OUT BOX CONTROL AUDIO OUT COMPONENT VIDEO OUT S VIDEO OUT LINE 1 IN LINE OUT L Y VIDEO VIDEO R PB L PR OPTICAL ... optical digital input [Speakers] B Rear (R) Front (L) Center AV amplifier (receiver) with a decoder Front (R) Subwoofer : Signal flow 18 This will enable you to listen to DVD audio tracks through your AV amplifier (receiver). Step 4: Connecting to Your AV Amplifier (Receiver) Select one of the following patterns A or B, according to the input...
AUDIO OUT L (white) R (red) Audio cord (not supplied) (white) (red) DVD recorder to AUDIO OUT (L/R) SETTOP HDMI OUT BOX CONTROL AUDIO OUT COMPONENT VIDEO OUT S VIDEO OUT LINE 1 IN LINE OUT L Y VIDEO VIDEO R PB L PR OPTICAL ... optical digital input [Speakers] B Rear (R) Front (L) Center AV amplifier (receiver) with a decoder Front (R) Subwoofer : Signal flow 18 This will enable you to listen to DVD audio tracks through your AV amplifier (receiver). Step 4: Connecting to Your AV Amplifier (Receiver) Select one of the following patterns A or B, according to the input...

Operating Instructions
Page 19
... has a Dolby*1 Digital or DTS*2 decoder and a digital input jack. Connect the AV amplifier (receiver) to a digital audio input jack Use this recorder. • When outputting from Dolby Laboratories. You can enjoy the surround effect of the following: - Surround 1 B Connecting to the TV with the ... connection, make the appropriate settings under license from the DIGITAL AUDIO OUT jacks, you cannot switch the bilingual sounds on a DVD-RW (VR mode) or DVD-R (VR mode) by pressing AUDIO. • When you cannot use the virtual surround effects of this connection if your ...
... has a Dolby*1 Digital or DTS*2 decoder and a digital input jack. Connect the AV amplifier (receiver) to a digital audio input jack Use this recorder. • When outputting from Dolby Laboratories. You can enjoy the surround effect of the following: - Surround 1 B Connecting to the TV with the ... connection, make the appropriate settings under license from the DIGITAL AUDIO OUT jacks, you cannot switch the bilingual sounds on a DVD-RW (VR mode) or DVD-R (VR mode) by pressing AUDIO. • When you cannot use the virtual surround effects of this connection if your ...
Operating Instructions
Page 20
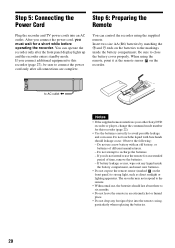
...# ends on the batteries to AC outlet < Notes • If the supplied remote interferes your other Sony DVD recorder or player, change the command mode number for a short while before operating the recorder. LINE OUT VIDEO L R AUDIO to the markings inside the battery compartment, and insert new batteries. ...• Do not expose the remote sensor (marked on the recorder. You can control the recorder using the remote, point it at the remote sensor on the front panel) to avoid possible leakage and corrosion. Step 5:...
...# ends on the batteries to AC outlet < Notes • If the supplied remote interferes your other Sony DVD recorder or player, change the command mode number for a short while before operating the recorder. LINE OUT VIDEO L R AUDIO to the markings inside the battery compartment, and insert new batteries. ...• Do not expose the remote sensor (marked on the recorder. You can control the recorder using the remote, point it at the remote sensor on the front panel) to avoid possible leakage and corrosion. Step 5:...

Operating Instructions
Page 22
..., 04, 12 12 14, 15 If you have a Sony DVD player or more than one Sony DVD recorder If the supplied remote interferes with your other Sony DVD recorder or player, set the command mode number for this recorder and the supplied remote to one that differs from the other Sony DVD recorder or player after you have completed "Step 7: Easy Setup...
..., 04, 12 12 14, 15 If you have a Sony DVD player or more than one Sony DVD recorder If the supplied remote interferes with your other Sony DVD recorder or player, set the command mode number for this recorder and the supplied remote to one that differs from the other Sony DVD recorder or player after you have completed "Step 7: Easy Setup...
Operating Instructions
Page 24
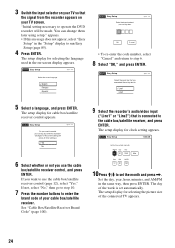
...number buttons to control your TV screen. See "Cable Box/Satellite Receiver Brand Code" (page 100). 9 Select the recorder's audio/video input ("Line1" or "Line2") that the signal from the recorder appears on -screen display appears. Set the day, year, hour, minutes, and AM/PM in the on your ...press ENTER. You can change them later using setup." The setup display for selecting the picture size of the week is connected to operate the DVD recorder will erase all timer settings.) Yes No 6 Select whether or not you connected the set the month and press ,. OK Cancel • To...
...number buttons to control your TV screen. See "Cable Box/Satellite Receiver Brand Code" (page 100). 9 Select the recorder's audio/video input ("Line1" or "Line2") that the signal from the recorder appears on -screen display appears. Set the day, year, hour, minutes, and AM/PM in the on your ...press ENTER. You can change them later using setup." The setup display for selecting the picture size of the week is connected to operate the DVD recorder will erase all timer settings.) Yes No 6 Select whether or not you connected the set the month and press ,. OK Cancel • To...


