Limited Warranty (U.S. Only)
Page 1
... if the factory-applied serial number has been altered or removed from the product. DURATION OF IMPLIED WARRANTIES: EXCEPT TO THE EXTENT PROHIBITED BY APPLICABLE LAW, ANY IMPLIED WARRANTY OF MERCHANTABILITY OR FITNESS FOR A PARTICULAR PURPOSE ON THIS PRODUCT IS LIMITED IN DURATION TO THE DURATION OF THIS WARRANTY. 4-557-172-03 General Stereo/Hifi Components/Tape Decks ® CD Players/Mini Disc Players/Audio Systems Hifi Audio LIMITED...
... if the factory-applied serial number has been altered or removed from the product. DURATION OF IMPLIED WARRANTIES: EXCEPT TO THE EXTENT PROHIBITED BY APPLICABLE LAW, ANY IMPLIED WARRANTY OF MERCHANTABILITY OR FITNESS FOR A PARTICULAR PURPOSE ON THIS PRODUCT IS LIMITED IN DURATION TO THE DURATION OF THIS WARRANTY. 4-557-172-03 General Stereo/Hifi Components/Tape Decks ® CD Players/Mini Disc Players/Audio Systems Hifi Audio LIMITED...
Operating Instructions
Page 2
... turned off. The main switch is intended to alert the user to disconnect the unit from the mains as long as lighted candles on the rear of the unit. The following indications are located on the apparatus. As the main plug is used to the presence of important operating and maintenance (servicing) instructions in the United States Owner's Record The model and serial numbers...
... turned off. The main switch is intended to alert the user to disconnect the unit from the mains as long as lighted candles on the rear of the unit. The following indications are located on the apparatus. As the main plug is used to the presence of important operating and maintenance (servicing) instructions in the United States Owner's Record The model and serial numbers...

Operating Instructions
Page 3
... to comply with the limits for a Class B digital device, pursuant to Part 15 of the polarized or grounding-type plug. Install in this manual could void your safety. Reorient or relocate the receiving antenna. - Consult the dealer or an experienced radio/ TV technician for replacement of the obsolete outlet. 10) Protect the power cord from being walked on or pinched particularly at...
... to comply with the limits for a Class B digital device, pursuant to Part 15 of the polarized or grounding-type plug. Install in this manual could void your safety. Reorient or relocate the receiving antenna. - Consult the dealer or an experienced radio/ TV technician for replacement of the obsolete outlet. 10) Protect the power cord from being walked on or pinched particularly at...

Operating Instructions
Page 4
... music of a USB device 13 Playing the iPod 15 Using optional audio components 16 Adjusting the sound 17 Controlling the Speaker Light Illumination 17 Changing the display 18 Additional Information Troubleshooting 18 Messages 22 Precautions 23 Specifications 23 Compatible USB devices with this manual, TM and ® marks are registered trademarks of Sony Corporation. In this unit 26 Compatible iPod models with safety and regulatory standards. Table of Contents Guide to parts and controls.......... 5 Getting Started Hooking up the system securely 9 Operations...
... music of a USB device 13 Playing the iPod 15 Using optional audio components 16 Adjusting the sound 17 Controlling the Speaker Light Illumination 17 Changing the display 18 Additional Information Troubleshooting 18 Messages 22 Precautions 23 Specifications 23 Compatible USB devices with this manual, TM and ® marks are registered trademarks of Sony Corporation. In this unit 26 Compatible iPod models with safety and regulatory standards. Table of Contents Guide to parts and controls.......... 5 Getting Started Hooking up the system securely 9 Operations...

Operating Instructions
Page 6
... in standby mode. H NX (play/pause) (page 12, 14, 15, 16, 20, 22) Press to select a function. B Display (page 18) C Remote sensor (page 19) D Standby indicator (except North American model) Lights up when the unit is turned off the AC power. G FUNCTION (page 12, 14, 15, 16) Press to start or pause playback. E (USB) port (page 13, 14, 19, 20, 22) Connect an optional USB device...
... in standby mode. H NX (play/pause) (page 12, 14, 15, 16, 20, 22) Press to select a function. B Display (page 18) C Remote sensor (page 19) D Standby indicator (except North American model) Lights up when the unit is turned off the AC power. G FUNCTION (page 12, 14, 15, 16) Press to start or pause playback. E (USB) port (page 13, 14, 19, 20, 22) Connect an optional USB device...

Operating Instructions
Page 7
... l 7GB Guide to select the FM reception mode (monaural or stereo). RM-AMU098 (North American model only) - C FM MODE (page 12, 21) Press to parts and controls J VOLUME (page 12, 14, 15, 16, 19) Turn to turn on or off the speaker light when the unit is turned on . Remote - K SPEAKER LIGHT (North American model only) (page 17) Press to adjust the volume. B TUNING MODE (page 12, 13) Press to tune in standby mode. TUNING...
... l 7GB Guide to select the FM reception mode (monaural or stereo). RM-AMU098 (North American model only) - C FM MODE (page 12, 21) Press to parts and controls J VOLUME (page 12, 14, 15, 16, 19) Turn to turn on or off the speaker light when the unit is turned on . Remote - K SPEAKER LIGHT (North American model only) (page 17) Press to adjust the volume. B TUNING MODE (page 12, 13) Press to tune in standby mode. TUNING...

Operating Instructions
Page 10
... jack. Make sure the subwoofer cable is unlikely to enhance the bass. C SUBWOOFER OUT jack (FST-GTK2i only) Use a supplied subwoofer cable to this unit. Notes • Be sure to use the subwoofer to occur. - away from the wall. - B AUDIO IN L/R jacks Use an audio cord (not supplied) to connect the audio output of the optional audio component to avoid generating a standing wave. 10GB E Power Connect the power cord to adjust the level. The subwoofer turns on and the power indicator lights up. 3 Turn SUBWOOFER...
... jack. Make sure the subwoofer cable is unlikely to enhance the bass. C SUBWOOFER OUT jack (FST-GTK2i only) Use a supplied subwoofer cable to this unit. Notes • Be sure to use the subwoofer to occur. - away from the wall. - B AUDIO IN L/R jacks Use an audio cord (not supplied) to connect the audio output of the optional audio component to avoid generating a standing wave. 10GB E Power Connect the power cord to adjust the level. The subwoofer turns on and the power indicator lights up. 3 Turn SUBWOOFER...

Operating Instructions
Page 12
... 9 kHz (or 10 kHz for the operation. 1 Press FUNCTION repeatedly to tune in the display. Use the buttons on a weak FM stereo station Press FM MODE repeatedly until "AUTO" lights up in the station you change the AM tuning interval The factory setting for AM tuning interval is tuned in, and then "TUNED" and "ST" (for FM stereo programs only) lights up in the display. Use the buttons on the unit). "9K STEP" or...
... 9 kHz (or 10 kHz for the operation. 1 Press FUNCTION repeatedly to tune in the display. Use the buttons on a weak FM stereo station Press FM MODE repeatedly until "AUTO" lights up in the station you change the AM tuning interval The factory setting for AM tuning interval is tuned in, and then "TUNED" and "ST" (for FM stereo programs only) lights up in the display. Use the buttons on the unit). "9K STEP" or...

Operating Instructions
Page 13
... to the operating instructions supplied with the USB device to select the preset number you want . Listening to music of a USB device You can preset up to 20 FM and 10 AM stations. 6 To call up a preset radio station, press TUNING MODE repeatedly until "PRESET" lights up in the display. • It may take about 10 seconds before "READING" appears depending on the type of USB device connected. • When the USB device is connected, the...
... to the operating instructions supplied with the USB device to select the preset number you want . Listening to music of a USB device You can preset up to 20 FM and 10 AM stations. 6 To call up a preset radio station, press TUNING MODE repeatedly until "PRESET" lights up in the display. • It may take about 10 seconds before "READING" appears depending on the type of USB device connected. • When the USB device is connected, the...

Operating Instructions
Page 15
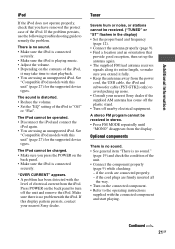
... not change the volume level, use m or M while playing video. Other operations You can listen to audio contents stored in the event that of the iPod connector on the unit and do not twist or sway the iPod to iPod is designed for iPod only. Do not connect any other portable audio players to the iPod connector. • To use an iPod, refer to the operating instructions of your iPod. • Sony cannot...
... not change the volume level, use m or M while playing video. Other operations You can listen to audio contents stored in the event that of the iPod connector on the unit and do not twist or sway the iPod to iPod is designed for iPod only. Do not connect any other portable audio players to the iPod connector. • To use an iPod, refer to the operating instructions of your iPod. • Sony cannot...

Operating Instructions
Page 16
... adjust the volume. 16GB To Select the iPod menu item Return to previous menu Turn off the power of the component before making any connections. The charging begins when the iPod is output from an optional audio component through the speakers of your iPod. Press MENU or B. The charging status appears in the iPod display. For details, refer to the operating instructions supplied with the connected component. 1 Connect an optional audio component to the AUDIO IN L/R jacks using an audio cord (not supplied). 2 Turn...
... adjust the volume. 16GB To Select the iPod menu item Return to previous menu Turn off the power of the component before making any connections. The charging begins when the iPod is output from an optional audio component through the speakers of your iPod. Press MENU or B. The charging status appears in the iPod display. For details, refer to the operating instructions supplied with the connected component. 1 Connect an optional audio component to the AUDIO IN L/R jacks using an audio cord (not supplied). 2 Turn...
Operating Instructions
Page 17
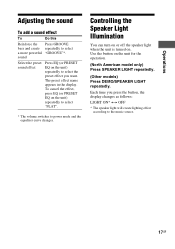
.... Operations Adjusting the sound To add a sound effect To Do this Reinforce the bass and create a more powerful sound Press GROOVE repeatedly to the music source. 17GB Select the preset sound effect Press EQ (or PRESET EQ on the unit for the operation. (North American model only) Press SPEAKER LIGHT repeatedly. (Other models) Press DEMO/SPEAKER LIGHT repeatedly. Use the button on the unit) repeatedly to select the preset effect you press the button, the display changes...
.... Operations Adjusting the sound To add a sound effect To Do this Reinforce the bass and create a more powerful sound Press GROOVE repeatedly to the music source. 17GB Select the preset sound effect Press EQ (or PRESET EQ on the unit for the operation. (North American model only) Press SPEAKER LIGHT repeatedly. (Other models) Press DEMO/SPEAKER LIGHT repeatedly. Use the button on the unit) repeatedly to select the preset effect you press the button, the display changes...

Operating Instructions
Page 18
... display Changing the display mode (Except North American model) Press DEMO/SPEAKER LIGHT on the back panel to turn on the display information • Characters that cannot be displayed appear as follows: • track or file number • track name (" ") • file name (" ") • artist name (" ") • album name (" ") • folder name (" ") Notes on the unit. Then perform the following : 1 Make sure the power cord and subwoofer cable...
... display Changing the display mode (Except North American model) Press DEMO/SPEAKER LIGHT on the back panel to turn on the display information • Characters that cannot be displayed appear as follows: • track or file number • track name (" ") • file name (" ") • artist name (" ") • album name (" ") • folder name (" ") Notes on the unit. Then perform the following : 1 Make sure the power cord and subwoofer cable...

Operating Instructions
Page 19
... batteries. • Move the unit away from the subwoofer. • Adjust the subwoofer level to turn on the unit and check if "USB MEMORY" lights up in the power cord even though you have not press ?/1 to the appropriate level. • Check that the subwoofer cable and power cord are not displayed on the subwoofer. A distorted sound is no sound. • Make sure you connect an unsupported USB device, the following problems...
... batteries. • Move the unit away from the subwoofer. • Adjust the subwoofer level to turn on the unit and check if "USB MEMORY" lights up in the power cord even though you have not press ?/1 to the appropriate level. • Check that the subwoofer cable and power cord are not displayed on the subwoofer. A distorted sound is no sound. • Make sure you connect an unsupported USB device, the following problems...

Operating Instructions
Page 20
...; The character codes that are many folders or files on USB device: 100 or less (including "ROOT" folder) - Playback does not start. • Press POWER on the back panel to turn off the unit and reconnect the USB device, then turn on the unit. • Connect the supported USB device (page 26). • The USB device does not work properly. cannot be played back. * This unit supports FAT16 and...
...; The character codes that are many folders or files on USB device: 100 or less (including "ROOT" folder) - Playback does not start. • Press POWER on the back panel to turn off the unit and reconnect the USB device, then turn on the unit. • Connect the supported USB device (page 26). • The USB device does not work properly. cannot be played back. * This unit supports FAT16 and...
Operating Instructions
Page 21
... iPod again. • You are using an unsupported iPod. See "Compatible iPod models with the connected component and start playback. • You are using an unsupported iPod. See "Compatible iPod models with the level of the iPod to the operating instructions supplied with this unit" (page 27) for the supported device types. A stereo FM program cannot be received. ("TUNED" or "ST" flashes in stereo. • Press FM MODE repeatedly until "MONO" disappears from the power cord, the USB cable, the iPod and subwoofer cable...
... iPod again. • You are using an unsupported iPod. See "Compatible iPod models with the connected component and start playback. • You are using an unsupported iPod. See "Compatible iPod models with the level of the iPod to the operating instructions supplied with this unit" (page 27) for the supported device types. A stereo FM program cannot be received. ("TUNED" or "ST" flashes in stereo. • Press FM MODE repeatedly until "MONO" disappears from the power cord, the USB cable, the iPod and subwoofer cable...

Operating Instructions
Page 22
... troubles not described above occur, reset the unit as the preset stations. NO TRACK No playable audio file is reading information of the USB device could not be set to turn on the unit. 4 Press and hold NX and GROOVE at the same time for the operation. 1 Press POWER on the back panel to turn off the AC power. 2 Press POWER again to turn on the AC power...
... troubles not described above occur, reset the unit as the preset stations. NO TRACK No playable audio file is reading information of the USB device could not be set to turn on the unit. 4 Press and hold NX and GROOVE at the same time for the operation. 1 Press POWER on the back panel to turn off the AC power. 2 Press POWER again to turn on the AC power...

Operating Instructions
Page 23
.... Specifications AUDIO POWER SPECIFICATIONS POWER OUTPUT AND TOTAL HARMONIC DISTORTION: RDH-GTK1i USA model only With 6-ohm loads, both channels driven, from the TV. Amplifier section FST-GTK2i The following are unable to rated output. On placement • Do not place the system in an inclined position or in United States and Canada only) One blade of time. On the speaker system This speaker system is...
.... Specifications AUDIO POWER SPECIFICATIONS POWER OUTPUT AND TOTAL HARMONIC DISTORTION: RDH-GTK1i USA model only With 6-ohm loads, both channels driven, from the TV. Amplifier section FST-GTK2i The following are unable to rated output. On placement • Do not place the system in an inclined position or in United States and Canada only) One blade of time. On the speaker system This speaker system is...

Operating Instructions
Page 27
... display) iPod 4th generation iPod mini Notes • This unit is not compatible with iPhone. 27GB Update your iPod. Otherwise, a compatible Dock Adapter will need to be purchased separately from Apple Inc. • This product has been designed specifically to work with iPod and has been certified to meet Apple performance standards. • This unit is designed for iPod only. You cannot connect any other portable audio players. • Sony...
... display) iPod 4th generation iPod mini Notes • This unit is not compatible with iPhone. 27GB Update your iPod. Otherwise, a compatible Dock Adapter will need to be purchased separately from Apple Inc. • This product has been designed specifically to work with iPod and has been certified to meet Apple performance standards. • This unit is designed for iPod only. You cannot connect any other portable audio players. • Sony...

Marketing Specifications
Page 1
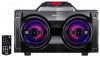
... enhance the audio experience. Specifications Carton Weight and Weight (kg) 26.7 x 17.7 x 18.5 in (680 x 452 x 470mm) 33 lbs. (15kg) Remote Commander Power Battery AAA/ Size Manganese General Model Number RM-AMU098 USB Port(s) Decoding Format(s) for iPod Allows you to play & control music and video content stored on your iPod® while docked • RCA Audio in for use with MP3 Players, PCs and other audio sources • Speaker light illumination to...
... enhance the audio experience. Specifications Carton Weight and Weight (kg) 26.7 x 17.7 x 18.5 in (680 x 452 x 470mm) 33 lbs. (15kg) Remote Commander Power Battery AAA/ Size Manganese General Model Number RM-AMU098 USB Port(s) Decoding Format(s) for iPod Allows you to play & control music and video content stored on your iPod® while docked • RCA Audio in for use with MP3 Players, PCs and other audio sources • Speaker light illumination to...


