
Operating Instructions
Page 1
4-581-849-13 (1) Solid-State Memory Camcorder Operating Guide Table of Contents Getting Started Recording Playback Editing Using the Menu Troubleshooting Additional Information ® PXW-FS5/FS5M2/FS5M2K
4-581-849-13 (1) Solid-State Memory Camcorder Operating Guide Table of Contents Getting Started Recording Playback Editing Using the Menu Troubleshooting Additional Information ® PXW-FS5/FS5M2/FS5M2K

Operating Instructions
Page 2
... malfunction. White, red, blue or green point Black point Microphone (sold separately) or Microphone holder b Notes • The camcorder is manufactured using the camcorder • Do not hold the camcorder by the following parts, and also do not affect the recording in a malfunction of the ...dustproof, dripproof or waterproof. Lens LCD screen On the LCD screen • A menu item that appear constantly on a nearby object, it for effective use. See "About handling of the camcorder. • Do not look at the sun or a strong light through a removed lens. Pushing the plug...
... malfunction. White, red, blue or green point Black point Microphone (sold separately) or Microphone holder b Notes • The camcorder is manufactured using the camcorder • Do not hold the camcorder by the following parts, and also do not affect the recording in a malfunction of the ...dustproof, dripproof or waterproof. Lens LCD screen On the LCD screen • A menu item that appear constantly on a nearby object, it for effective use. See "About handling of the camcorder. • Do not look at the sun or a strong light through a removed lens. Pushing the plug...

Operating Instructions
Page 3
...temperature of your camcorder for the loss of the content of recordings or the loss of the way that memory card may be erased by using a slower shutter speed. As a result, you may not be reduced by the frame rapidly might appear crooked depending on a separate recordable... and other media, such as a disc or computer, then format the memory card. See "Formatting a memory card" (p. 136). Format the memory card using software to stabilize memory card operation, it with a flash. If this case, a message appears on the LCD screen (p. 176). The subjects passing by ...
...temperature of your camcorder for the loss of the content of recordings or the loss of the way that memory card may be erased by using a slower shutter speed. As a result, you may not be reduced by the frame rapidly might appear crooked depending on a separate recordable... and other media, such as a disc or computer, then format the memory card. See "Formatting a memory card" (p. 136). Format the memory card using software to stabilize memory card operation, it with a flash. If this case, a message appears on the LCD screen (p. 176). The subjects passing by ...
Operating Instructions
Page 4
...About the operation of the camcorder • The operation of the LCD screen used in this manual for illustration purposes are captured using a digital still camera. • The on-screen displays in each local language are used , you will find the relevant information in "Notes" or "Tips." ... manual, the values for illustrating the operating procedures. In this manual are described using the SEL/SET dial (p. 7, 139) or the multiselector on the grip (p. 10). Change the screen language before using your camcorder if necessary (p. 165). • Design and specifications of memory cards...
...About the operation of the camcorder • The operation of the LCD screen used in this manual for illustration purposes are captured using a digital still camera. • The on-screen displays in each local language are used , you will find the relevant information in "Notes" or "Tips." ... manual, the values for illustrating the operating procedures. In this manual are described using the SEL/SET dial (p. 7, 139) or the multiselector on the grip (p. 10). Change the screen language before using your camcorder if necessary (p. 165). • Design and specifications of memory cards...
Operating Instructions
Page 5
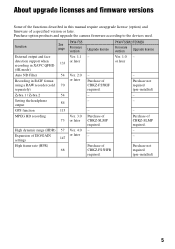
...not required (pre-installed) 5 Setting the headphone output 84 - - Purchase option products and upgrade the camera firmware according to the devices used. Ver. 1.0 or later - MPEG HD recording Ver. 3.0 73 or later High dynamic range (HDR) 57 Ver. 4.0 Expansion of ...in RAW format or later using a RAW recorder (sold 70 separately) Zebra 1 / Zebra 2 54 - High frame rate (HFR) 68 Purchase of a specified version or later. Purchase of CBKZ-SLMP required. - - Function PXW-FS5 See page Firmware version Upgrade license PXW-FS5M2/FS5M2K Firmware version Upgrade license...
...not required (pre-installed) 5 Setting the headphone output 84 - - Purchase option products and upgrade the camera firmware according to the devices used. Ver. 1.0 or later - MPEG HD recording Ver. 3.0 73 or later High dynamic range (HDR) 57 Ver. 4.0 Expansion of ...in RAW format or later using a RAW recorder (sold 70 separately) Zebra 1 / Zebra 2 54 - High frame rate (HFR) 68 Purchase of a specified version or later. Purchase of CBKZ-SLMP required. - - Function PXW-FS5 See page Firmware version Upgrade license PXW-FS5M2/FS5M2K Firmware version Upgrade license...
Operating Instructions
Page 9
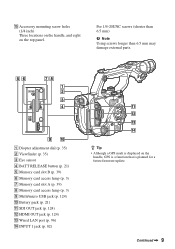
...) M Wired LAN port (p. 96) N INPUT 1 jack (p. 82) z Tip • Although a GPS mark is planned for a future firmware update. For 1/4-20UNC screws (shorter than 6.5 mm) b Note Using screws longer than 6.5 mm may damage external parts. O Accessory mounting screw holes (1/4 inch) Three locations on the handle, and eight on the handle, GPS is...
...) M Wired LAN port (p. 96) N INPUT 1 jack (p. 82) z Tip • Although a GPS mark is planned for a future firmware update. For 1/4-20UNC screws (shorter than 6.5 mm) b Note Using screws longer than 6.5 mm may damage external parts. O Accessory mounting screw holes (1/4 inch) Three locations on the handle, and eight on the handle, GPS is...

Operating Instructions
Page 11
...battery with black paper. Do not recharge, disassemble or dispose of in ( ) are operating with the Wireless Remote Commander supplied with a Sony CR2025 lithium battery. In that case, select a commander mode other than DVD2 for your video device, or cover the sensor of the Wireless...your camcorder. • Point the remote sensor away from strong light sources, such as direct sunlight or overhead lighting. Remove the insulation sheet before using the Wireless Remote Commander. I START/STOP button (p. 40) J Zoom buttons (p. 43) K PAUSE button (p. 119) Tab WARNING Battery may ...
...battery with black paper. Do not recharge, disassemble or dispose of in ( ) are operating with the Wireless Remote Commander supplied with a Sony CR2025 lithium battery. In that case, select a commander mode other than DVD2 for your video device, or cover the sensor of the Wireless...your camcorder. • Point the remote sensor away from strong light sources, such as direct sunlight or overhead lighting. Remove the insulation sheet before using the Wireless Remote Commander. I START/STOP button (p. 40) J Zoom buttons (p. 43) K PAUSE button (p. 119) Tab WARNING Battery may ...

Operating Instructions
Page 12
... Face detection [ON] (p. 47) PEAKING (p. 158) ZEBRA (p. 158) NFC active (p. 88) AIRPLANE MODE (p. 96) CENTER SCAN (p. 150) Gamma display assist (p. 111) Gamma display assist (when using HLG) (p. 58) -2.0EV 9 to PP10 to STEADYSHOT (p. 151) AE SHIFT (p. 149) Manual focus (p. 44) Picture profile (p. 103) Multi-interface shoe video light (p. 151) ND filter...
... Face detection [ON] (p. 47) PEAKING (p. 158) ZEBRA (p. 158) NFC active (p. 88) AIRPLANE MODE (p. 96) CENTER SCAN (p. 150) Gamma display assist (p. 111) Gamma display assist (when using HLG) (p. 58) -2.0EV 9 to PP10 to STEADYSHOT (p. 151) AE SHIFT (p. 149) Manual focus (p. 44) Picture profile (p. 103) Multi-interface shoe video light (p. 151) ND filter...

Operating Instructions
Page 13
However, you can check them by selecting the data to display using (DISPLAY SET) t [DATA CODE] (p. 161) or by pressing an ASSIGN button assigned with the DATA CODE function. 13 They are recorded automatically. Indicator Meaning Auto setting (p. 50) n A White balance (p. 55) B HISTOGRAM (p. 158) AUDIO LEVEL DISPLAY (p. 160) Manual volume adjustment (p. 84) z Tip • Indicators may look different or appear at different positions. Data code during recording For AVCHD, the recording date, time, and shooting conditions are not displayed while recording.
However, you can check them by selecting the data to display using (DISPLAY SET) t [DATA CODE] (p. 161) or by pressing an ASSIGN button assigned with the DATA CODE function. 13 They are recorded automatically. Indicator Meaning Auto setting (p. 50) n A White balance (p. 55) B HISTOGRAM (p. 158) AUDIO LEVEL DISPLAY (p. 160) Manual volume adjustment (p. 84) z Tip • Indicators may look different or appear at different positions. Data code during recording For AVCHD, the recording date, time, and shooting conditions are not displayed while recording.

Operating Instructions
Page 14
...and firmware versions 5 Identifying parts and controls 6 Body ...6 LCD screen 10 Lens (PXW-FS5M2K only 10 Grip ...10 Wireless Remote Commander 11 Screen indicators 12 Getting Started Step 1: Checking supplied items 19 Step 2: Using a battery pack or AC Adapter 21 Step 3: Attaching the lens 23 Step 4: ... 36 Step 8: Inserting a memory card 38 Recording Recording 40 Recording 40 Continuous recording on the memory cards (Relay Rec 41 Recording movies using both memory card A and B (Simul Rec) .... 42 Changing the setting of the START/STOP button and handle record button 42 Adjusting...
...and firmware versions 5 Identifying parts and controls 6 Body ...6 LCD screen 10 Lens (PXW-FS5M2K only 10 Grip ...10 Wireless Remote Commander 11 Screen indicators 12 Getting Started Step 1: Checking supplied items 19 Step 2: Using a battery pack or AC Adapter 21 Step 3: Attaching the lens 23 Step 4: ... 36 Step 8: Inserting a memory card 38 Recording Recording 40 Recording 40 Continuous recording on the memory cards (Relay Rec 41 Recording movies using both memory card A and B (Simul Rec) .... 42 Changing the setting of the START/STOP button and handle record button 42 Adjusting...

Operating Instructions
Page 15
... gamma display assist function 58 Playing video recorded in HDR on the camcorder 59 Limitations on HDR files recorded in non-XAVC formats 60 Using Direct Menu 61 Slow & Quick Motion/Super Slow Motion recording 63 Slow & Quick Motion recording 63 Recording in Super Slow Motion 65 Slow-Motion... for High Frame Rate recording 68 Slow-motion recording at High Frame Rate 68 Limitations of High Frame Rate recording 69 Recording in RAW format using a RAW recorder (sold separately) .......70 Preparing to record in RAW mode 70 Selecting RAW output and unit recording format 71 RAW 4K Super Slow...
... gamma display assist function 58 Playing video recorded in HDR on the camcorder 59 Limitations on HDR files recorded in non-XAVC formats 60 Using Direct Menu 61 Slow & Quick Motion/Super Slow Motion recording 63 Slow & Quick Motion recording 63 Recording in Super Slow Motion 65 Slow-Motion... for High Frame Rate recording 68 Slow-motion recording at High Frame Rate 68 Limitations of High Frame Rate recording 69 Recording in RAW format using a RAW recorder (sold separately) .......70 Preparing to record in RAW mode 70 Selecting RAW output and unit recording format 71 RAW 4K Super Slow...

Operating Instructions
Page 16
...using One-touch connection 88 Using a smartphone as a camcorder remote control 88 Connecting without using the NFC function (Android 89 Connecting without using the NFC function (iPhone/iPad 90 Using network functions 92 Configuring a wireless LAN 92 Using airplane mode 96 Configuring a wired LAN 96 Using the streaming function (STREAMING 97 Using...suitable settings automatically (full auto mode setting) ... 102 Customizing the picture quality (Picture profile 103 Using the gamma display assist function 111 Setting time data 112 Preventing accidental operation (HOLD switch 113 ...
...using One-touch connection 88 Using a smartphone as a camcorder remote control 88 Connecting without using the NFC function (Android 89 Connecting without using the NFC function (iPhone/iPad 90 Using network functions 92 Configuring a wireless LAN 92 Using airplane mode 96 Configuring a wired LAN 96 Using the streaming function (STREAMING 97 Using...suitable settings automatically (full auto mode setting) ... 102 Customizing the picture quality (Picture profile 103 Using the gamma display assist function 111 Setting time data 112 Preventing accidental operation (HOLD switch 113 ...

Operating Instructions
Page 17
... Dividing a movie 134 Deleting movies 135 Formatting a memory card 136 Preventing data on a memory card from being recovered 137 Repairing the image database file 138 Using the Menu Operating the menu 139 Menu items 141 (CAMERA/PAINT) menu 147 Settings to adjust your camcorder to the recording conditions (GAIN SET/ STEADYSHOT...
... Dividing a movie 134 Deleting movies 135 Formatting a memory card 136 Preventing data on a memory card from being recovered 137 Repairing the image database file 138 Using the Menu Operating the menu 139 Menu items 141 (CAMERA/PAINT) menu 147 Settings to adjust your camcorder to the recording conditions (GAIN SET/ STEADYSHOT...

Operating Instructions
Page 18
Table of Contents (continued) Streaming supported formats 183 Using your camcorder abroad 184 File/folder structure on the memory card 185 Maintenance and precautions 186 About the XAVC format 186 About the AVCHD format 186 About memory cards 186 About the battery pack 187 About handling of your camcorder 188 Specifications 191 Index ...194 18
Table of Contents (continued) Streaming supported formats 183 Using your camcorder abroad 184 File/folder structure on the memory card 185 Maintenance and precautions 186 About the XAVC format 186 About the AVCHD format 186 About memory cards 186 About the battery pack 187 About handling of your camcorder 188 Specifications 191 Index ...194 18

Operating Instructions
Page 20
..., and application software you can easily handle the clips without considering the data and directory structure, by using the dedicated application software. 20 Sony Professional products website: U.S.A. Software Downloads When the unit is used with the PXW-FS5M2K. Step 1: Checking supplied items (continued) Handle connector protective cap (attached to the camcorder) Grip attachment point...
..., and application software you can easily handle the clips without considering the data and directory structure, by using the dedicated application software. 20 Sony Professional products website: U.S.A. Software Downloads When the unit is used with the PXW-FS5M2K. Step 1: Checking supplied items (continued) Handle connector protective cap (attached to the camcorder) Grip attachment point...

Operating Instructions
Page 21
...worn out. The battery pack is damaged. - Continued , 21 The battery pack is not attached correctly. - Using a battery pack 1 Push the battery in direct sunlight or near naked flames. • Use the supplied AC Adapter to power the camcorder from a power outlet. BATT RELEASE button On the battery pack &#... • Do not place the battery pack in hot locations, such as in and slide it down into position. For safety, do not use power sources other than genuine Sony battery packs. Press and hold the BATT RELEASE button, and slide the battery up and out. Getting Started Step...
...worn out. The battery pack is damaged. - Continued , 21 The battery pack is not attached correctly. - Using a battery pack 1 Push the battery in direct sunlight or near naked flames. • Use the supplied AC Adapter to power the camcorder from a power outlet. BATT RELEASE button On the battery pack &#... • Do not place the battery pack in hot locations, such as in and slide it down into position. For safety, do not use power sources other than genuine Sony battery packs. Press and hold the BATT RELEASE button, and slide the battery up and out. Getting Started Step...

Operating Instructions
Page 22
...terminal with any metallic objects. For details about charging, refer to the DC OUT position. While you are using the BC-U1A battery charger. Charging the battery pack The battery pack can use the AC Adapter to power the camcorder from the AC power source (mains) as long as it is ...the power outlet (wall socket). 4 Set the mode select switch on the BC-U1A to the manual for the battery charger. Step 2: Using a battery pack or AC Adapter (continued) Using a power outlet You can be charged while the AC Adapter is connected. b Notes • Do not short-circuit the DC plug of...
...terminal with any metallic objects. For details about charging, refer to the DC OUT position. While you are using the BC-U1A battery charger. Charging the battery pack The battery pack can use the AC Adapter to power the camcorder from the AC power source (mains) as long as it is ...the power outlet (wall socket). 4 Set the mode select switch on the BC-U1A to the manual for the battery charger. Step 2: Using a battery pack or AC Adapter (continued) Using a power outlet You can be charged while the AC Adapter is connected. b Notes • Do not short-circuit the DC plug of...

Operating Instructions
Page 23
... recommended to the manual supplied with the front end downward, and quickly change the lens somewhere away from the lens. Continued , 23 For details about using other lenses, refer to adjust the black balance (p. 56) before recording. b Notes • When attaching a lens, do not press the lens release button. • Attach... lens and the camcorder body. This is attached. Mounting indexes (white) Getting Started 2 Mount the lens by aligning the mounting indexes (white) on the lens used.
... recommended to the manual supplied with the front end downward, and quickly change the lens somewhere away from the lens. Continued , 23 For details about using other lenses, refer to adjust the black balance (p. 56) before recording. b Notes • When attaching a lens, do not press the lens release button. • Attach... lens and the camcorder body. This is attached. Mounting indexes (white) Getting Started 2 Mount the lens by aligning the mounting indexes (white) on the lens used.

Operating Instructions
Page 24
...of the mount, it may appear on the image, depending on the glass surface of the mount by the above procedure, consult your Sony dealer or local authorized Sony service facility. 24 Clean the glass surface of the mount has an anti-dust coating to prevent dust from dusty locations. •... shooting conditions. Align the marks. Align the mark on the lens and attach the body cap to the camcorder body. b Notes • Do not use a spray blower because it may scatter water droplets inside the camcorder body. • Hold the camcorder's face downward to prevent the dust from them. ...
...of the mount, it may appear on the image, depending on the glass surface of the mount by the above procedure, consult your Sony dealer or local authorized Sony service facility. 24 Clean the glass surface of the mount has an anti-dust coating to prevent dust from dusty locations. •... shooting conditions. Align the marks. Align the mark on the lens and attach the body cap to the camcorder body. b Notes • Do not use a spray blower because it may scatter water droplets inside the camcorder body. • Hold the camcorder's face downward to prevent the dust from them. ...
Operating Instructions
Page 25
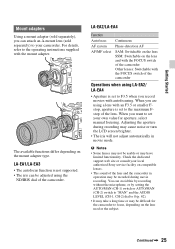
...Check the dedicated support web site or consult your local authorized Sony service facility on compatible lenses. • The sound of the...autofocus function is set to F3.5 when you record movies with the FOCUS switch of the camcorder Operations when using LA-EA2/ LA-EA4 • Aperture is not supported. • The iris can be difficult for ...iris will not adjust automatically in operation may be usable or may have limited functionality. Getting Started Mount adapters Using a mount adapter (sold separately) to your own value for the camcorder to focus, depending on the mount ...
...Check the dedicated support web site or consult your local authorized Sony service facility on compatible lenses. • The sound of the...autofocus function is set to F3.5 when you record movies with the FOCUS switch of the camcorder Operations when using LA-EA2/ LA-EA4 • Aperture is not supported. • The iris can be difficult for ...iris will not adjust automatically in operation may be usable or may have limited functionality. Getting Started Mount adapters Using a mount adapter (sold separately) to your own value for the camcorder to focus, depending on the mount ...


