Primary User Manual
Page 1
3-864-750-11(1) Stereo Turntable System Operating Instructions PS-LX350H © 1998 by Sony Corporation 1
3-864-750-11(1) Stereo Turntable System Operating Instructions PS-LX350H © 1998 by Sony Corporation 1

Primary User Manual
Page 3
TABLE OF CONTENTS Getting Started Unpacking 3 Assembling the Turntable 4 Hooking up the Turntable 5 Adjusting the Turntable 6 Operations Playing a Record 7 Additional Information Maintenance 8 Troubleshooting 9 Specifications 9 Parts and Controls 10 Unpacking Check that you for purchasing the Sony Stereo Turntable System. Thank you received the following icon is used in this manual thoroughly and retain it for making the task...
TABLE OF CONTENTS Getting Started Unpacking 3 Assembling the Turntable 4 Hooking up the Turntable 5 Adjusting the Turntable 6 Operations Playing a Record 7 Additional Information Maintenance 8 Troubleshooting 9 Specifications 9 Parts and Controls 10 Unpacking Check that you for purchasing the Sony Stereo Turntable System. Thank you received the following icon is used in this manual thoroughly and retain it for making the task...
Primary User Manual
Page 4
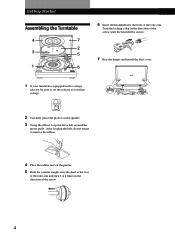
... the headshell into the front of the arrow until the headshell is secure. 7 Rise the hinges and install the dust cover. 1 If your turntable is equipped with a voltage selector, be sure to set the selector to remove the ribbon. 4 Place the rubber mat on the spindle. 3 Using the ribbon, ...
... the headshell into the front of the arrow until the headshell is secure. 7 Rise the hinges and install the dust cover. 1 If your turntable is equipped with a voltage selector, be sure to set the selector to remove the ribbon. 4 Place the rubber mat on the spindle. 3 Using the ribbon, ...
Primary User Manual
Page 5
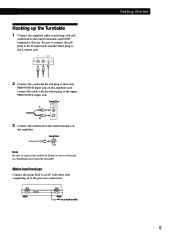
... completing all of the previous connections. / to connect the earth lead. Failure to the output terminals and GND terminal at the rear. Hooking up the Turntable 1 Connect the supplied audio connecting cord and earth lead to do so will result in a humming noise from the...
... completing all of the previous connections. / to connect the earth lead. Failure to the output terminals and GND terminal at the rear. Hooking up the Turntable 1 Connect the supplied audio connecting cord and earth lead to do so will result in a humming noise from the...
Primary User Manual
Page 6
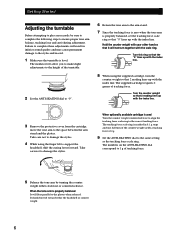
...cartridge is used Turn the counter weight counterclockwise to align the tracking force scale ring to the stylus and record. 1 Make sure the turntable is marked in inferior sound quality and may cause permanent damage to the correct tracking force. Take care not to damage the stylus. 4... level. Hold the counter weight with your other hand so that "0" lines up with the index line. Getting Started 1 A 2 3 Adjusting the turntable Before attempting to play any records, be sure to complete the following steps to support the headshell, shift the cueing lever forward. Take care not...
...cartridge is used Turn the counter weight counterclockwise to align the tracking force scale ring to the stylus and record. 1 Make sure the turntable is marked in inferior sound quality and may cause permanent damage to the correct tracking force. Take care not to damage the stylus. 4... level. Hold the counter weight with your other hand so that "0" lines up with the index line. Getting Started 1 A 2 3 Adjusting the turntable Before attempting to play any records, be sure to complete the following steps to support the headshell, shift the cueing lever forward. Take care not...
Primary User Manual
Page 7
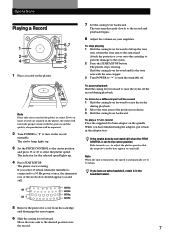
.... 6 Shift the cueing lever forward. To pause playback Shift the cueing lever forward to the record and playback begins. 8 Adjust the volume on the record turntable. Operations Playing a Record 1 2 4 1 Place a record on the platter. 6,7 5 3 6 3 5 Note Place only one record on the spindle. The tone arm ..., the speed is set to select the platter speed. to adjust the platter speed so that the respective strobo dots appear to turn the turntable off the record during playback. 2 Move the tone arm to the position you desire. 3 Shift the cueing lever backward. To listen to...
.... 6 Shift the cueing lever forward. To pause playback Shift the cueing lever forward to the record and playback begins. 8 Adjust the volume on the record turntable. Operations Playing a Record 1 2 4 1 Place a record on the platter. 6,7 5 3 6 3 5 Note Place only one record on the spindle. The tone arm ..., the speed is set to select the platter speed. to adjust the platter speed so that the respective strobo dots appear to turn the turntable off the record during playback. 2 Move the tone arm to the position you desire. 3 Shift the cueing lever backward. To listen to...

Primary User Manual
Page 8
To replace the stylus 1 Turn off the turntable and amplifier. 2 Turn the locking collar and remove the cartridge from the tone arm. 3 Grasp the stylus holder and pull it away from the body ... stylus by pulling on the shell terminals. Additional replacement styli (ATN3600LX) are available from your records, wipe thoroughly using a soft dry cloth. To clean your Sony dealer. 3 Check the location and polarity of each of the lead wires on the new cartridge and connect the lead wires accordingly. Replacing the Stylus...
To replace the stylus 1 Turn off the turntable and amplifier. 2 Turn the locking collar and remove the cartridge from the tone arm. 3 Grasp the stylus holder and pull it away from the body ... stylus by pulling on the shell terminals. Additional replacement styli (ATN3600LX) are available from your records, wipe thoroughly using a soft dry cloth. To clean your Sony dealer. 3 Check the location and polarity of each of the lead wires on the new cartridge and connect the lead wires accordingly. Replacing the Stylus...
Primary User Manual
Page 9
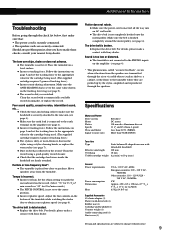
... strobo dots to change without notice. 9 The drive belt is not completely hooked onto the motor pulley. Specifications Motor and Platter Drive system Motor Platter Speeds Wow and flutter Signal to the tone arm (see page 4). b Incorrect tracking force. b Check the tone arm ...wall outlet. Should any problem persist after you have made these checks, consult your nearest Sony dealer. b Make sure the power cord is deteriorated. b The turntable is too low or distorted. Place the turntable on the bottom of tracking force.) b The stylus is securely connected. • The...
... strobo dots to change without notice. 9 The drive belt is not completely hooked onto the motor pulley. Specifications Motor and Platter Drive system Motor Platter Speeds Wow and flutter Signal to the tone arm (see page 4). b Incorrect tracking force. b Check the tone arm ...wall outlet. Should any problem persist after you have made these checks, consult your nearest Sony dealer. b Make sure the power cord is deteriorated. b The turntable is too low or distorted. Place the turntable on the bottom of tracking force.) b The stylus is securely connected. • The...

