
Primary User Manual
Page 3
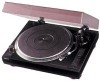
...! Thank you received the following icon is used in this manual thoroughly and retain it for purchasing the Sony Stereo Turntable System. Convention The following items with your turntable: • Platter (with drive belt) (1) • Rubber mat (1) • Dust cover (with hinges) (1) • Counter weight (1) • Cartridge and headshell (1) • 45 r/min adaptor (1) • Audio connecting cord...
...! Thank you received the following icon is used in this manual thoroughly and retain it for purchasing the Sony Stereo Turntable System. Convention The following items with your turntable: • Platter (with drive belt) (1) • Rubber mat (1) • Dust cover (with hinges) (1) • Counter weight (1) • Cartridge and headshell (1) • 45 r/min adaptor (1) • Audio connecting cord...
Primary User Manual
Page 4
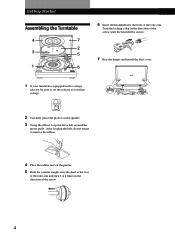
... the platter on the platter. 5 Slide the counter weight onto the shaft at the rear of the tone arm and turn 3 or 4 times in the direction of the arrow until the headshell is secure. 7 Rise the hinges and install the dust cover. 1 If your turntable is equipped with a voltage selector, be sure to... the ribbon, loop the drive belt around the motor pully. Turn the locking collar in the direction of the tone arm. Getting Started Assembling the Turntable 4 7 2 3 5 1 6 6 Insert the headshell into the front of the arrow. 4
... the platter on the platter. 5 Slide the counter weight onto the shaft at the rear of the tone arm and turn 3 or 4 times in the direction of the arrow until the headshell is secure. 7 Rise the hinges and install the dust cover. 1 If your turntable is equipped with a voltage selector, be sure to... the ribbon, loop the drive belt around the motor pully. Turn the locking collar in the direction of the tone arm. Getting Started Assembling the Turntable 4 7 2 3 5 1 6 6 Insert the headshell into the front of the arrow. 4
Primary User Manual
Page 6
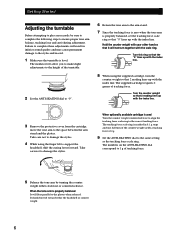
...I 4 5 Balance the tone arm by turning the counter weight either the headshell or counter weight. 6 When the tone arm is marked in inferior sound quality and may cause permanent damage to the correct tracking force. Getting Started 1 A 2 3 Adjusting the turntable Before attempting to play any records, be sure to complete... arm is level. When optionally available cartridge is used Turn the counter weight counterclockwise to align the tracking force scale ring to the stylus and record. 1 Make sure the turntable is properly balanced, set the tracking force scale ring so that ...
...I 4 5 Balance the tone arm by turning the counter weight either the headshell or counter weight. 6 When the tone arm is marked in inferior sound quality and may cause permanent damage to the correct tracking force. Getting Started 1 A 2 3 Adjusting the turntable Before attempting to play any records, be sure to complete... arm is level. When optionally available cartridge is used Turn the counter weight counterclockwise to align the tracking force scale ring to the stylus and record. 1 Make sure the turntable is properly balanced, set the tracking force scale ring so that ...
Primary User Manual
Page 9
...turntable is deteriorated. Set the r/min setting to the appropriate value for the cartridge being used . (The supplied cartridge requires 2 grams of tracking force.) b Incorrect anti-skating adjustment. Specifications Motor and Platter Drive system...Replace the drive belt. For details, please make a contact with Sony dealer. b Check the tone arm locking collar to the center ...turntable. b The turntable is securely attached to obtain correct platter speed (see page 4). Clean the record with drive belt) (1) Rubber mat (1) Cartridge and headshell (1) Counter weight...
...turntable is deteriorated. Set the r/min setting to the appropriate value for the cartridge being used . (The supplied cartridge requires 2 grams of tracking force.) b Incorrect anti-skating adjustment. Specifications Motor and Platter Drive system...Replace the drive belt. For details, please make a contact with Sony dealer. b Check the tone arm locking collar to the center ...turntable. b The turntable is securely attached to obtain correct platter speed (see page 4). Clean the record with drive belt) (1) Rubber mat (1) Cartridge and headshell (1) Counter weight...
Primary User Manual
Page 10
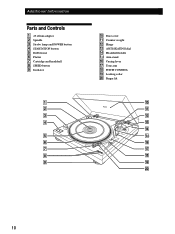
Additional Information Parts and Controls 1 45 r/min adaptor 2 Spindle 3 Strobo lamp and POWER button 4 START/STOP button 5 Rubber mat 6 Platter 7 Cartridge and headshell 8 SPEED button 9 Insulator 1 2 3 4 5 6 7 8 9 !º Dust cover !¡ Counter weight !™ Hinge !£ ANTI-SKATING dial !¢ Headshell holder !∞ Arm stand !§ Cueing lever !¶ Tone arm !• PITCH CONTROL !ª Locking collar @º Finger lift 10
Additional Information Parts and Controls 1 45 r/min adaptor 2 Spindle 3 Strobo lamp and POWER button 4 START/STOP button 5 Rubber mat 6 Platter 7 Cartridge and headshell 8 SPEED button 9 Insulator 1 2 3 4 5 6 7 8 9 !º Dust cover !¡ Counter weight !™ Hinge !£ ANTI-SKATING dial !¢ Headshell holder !∞ Arm stand !§ Cueing lever !¶ Tone arm !• PITCH CONTROL !ª Locking collar @º Finger lift 10