
Operating Instructions
Page 5
... a Fixed Shutter Mode 46 Shooting in Slow Shutter Mode 47 Adjusting the Iris 48 Adjusting the Zoom 48 Adjusting the Focus 49 Reducing Flickers 50 Setting the Time Data 51 Running Modes of the Timecode 51 Setting the Timecode 51 Setting the User Bits 52 Displaying the Time Data 52 Recording Audio Signals 53 Adjusting the Audio Recording Levels 53 Monitoring the Audio 54 Outputting the Color Bars and Reference Tone 55 Recording Shot Marks 56 Adding the OK Mark 56 Rec Review 57 Changing Functions...
... a Fixed Shutter Mode 46 Shooting in Slow Shutter Mode 47 Adjusting the Iris 48 Adjusting the Zoom 48 Adjusting the Focus 49 Reducing Flickers 50 Setting the Time Data 51 Running Modes of the Timecode 51 Setting the Timecode 51 Setting the User Bits 52 Displaying the Time Data 52 Recording Audio Signals 53 Adjusting the Audio Recording Levels 53 Monitoring the Audio 54 Outputting the Color Bars and Reference Tone 55 Recording Shot Marks 56 Adding the OK Mark 56 Rec Review 57 Changing Functions...
Operating Instructions
Page 8
... Device (i.LINK Connection) ....... 128 Recording the Camcorder Picture on an External Device 128 Nonlinear Editing 129 Recording External Input Signals 129 About i.LINK 130 External Synchronization 131 Appendixes Important Notes on Operation 133 Backup Battery 135 Troubleshooting 137 Operating Power 137 Recording/Playback 137 External Devices 138 Error/Warning Indications 139 Error Indications 139 Warning Indications 139 MPEG-2 Video Patent Portfolio License 142 Specifications 142 General 142 Camera Block 143 Audio Block 143 Displays 143 Media Block 143 Inputs/Outputs...
... Device (i.LINK Connection) ....... 128 Recording the Camcorder Picture on an External Device 128 Nonlinear Editing 129 Recording External Input Signals 129 About i.LINK 130 External Synchronization 131 Appendixes Important Notes on Operation 133 Backup Battery 135 Troubleshooting 137 Operating Power 137 Recording/Playback 137 External Devices 138 Error/Warning Indications 139 Error Indications 139 Warning Indications 139 MPEG-2 Video Patent Portfolio License 142 Specifications 142 General 142 Camera Block 143 Audio Block 143 Displays 143 Media Block 143 Inputs/Outputs...
Operating Instructions
Page 9
... PMW-F3K/F3L records 1920 × 1080 HD images using "MPEG-2 Long GOP" codec compression. Dual-Link output function Signals of the memory cards. IT friendly The file-based recording in MP4 format allows material to be handled with "Expand" function Each time a recording is started and stopped on a single 64-GB SxS memory card. High-quality uncompressed audio recording In addition to HD video recording, the PMWF3K/F3L can be...
... PMW-F3K/F3L records 1920 × 1080 HD images using "MPEG-2 Long GOP" codec compression. Dual-Link output function Signals of the memory cards. IT friendly The file-based recording in MP4 format allows material to be handled with "Expand" function Each time a recording is started and stopped on a single 64-GB SxS memory card. High-quality uncompressed audio recording In addition to HD video recording, the PMWF3K/F3L can be...
Operating Instructions
Page 10
...-F3K. Focus-assistance functions Functions for on-screen displays and metadata recording. Slow & Quick Motion function The PMW-F3K/F3L offers a Slow & Quick Motion function, commonly known as the type, serial number, iris setting, and focus position, may be operated from the RM-B750/B150 Remote Control Unit. 1) Sony, XDCAM, XDCAM EX, SxS, i.LINK, Exmor, CineAlta, and Remote Commander are trademarks of Sony Corporation. Slow Shutter function The PMW-F3K/F3L offers a Slow Shutter function for clay-animation shooting. Picture Cache function The unit...
...-F3K. Focus-assistance functions Functions for on-screen displays and metadata recording. Slow & Quick Motion function The PMW-F3K/F3L offers a Slow & Quick Motion function, commonly known as the type, serial number, iris setting, and focus position, may be operated from the RM-B750/B150 Remote Control Unit. 1) Sony, XDCAM, XDCAM EX, SxS, i.LINK, Exmor, CineAlta, and Remote Commander are trademarks of Sony Corporation. Slow Shutter function The PMW-F3K/F3L offers a Slow Shutter function for clay-animation shooting. Picture Cache function The unit...

Operating Instructions
Page 26
... be switched between color and monochrome modes For the viewfinder screen, color or monochrome display can switch between color and monochrome by pressing the button. Caution Do not leave the camcorder with the corresponding LCD menu items: Color, Contrast, and Brightness For details on menu operations, see "Basic Menu Operations" on page 100. Change the "Power" setting from "Auto" to one of the assignable buttons (see "Basic Menu Operations" on page 100. 26 Adjusting the LCD...
... be switched between color and monochrome modes For the viewfinder screen, color or monochrome display can switch between color and monochrome by pressing the button. Caution Do not leave the camcorder with the corresponding LCD menu items: Color, Contrast, and Brightness For details on menu operations, see "Basic Menu Operations" on page 100. Change the "Power" setting from "Auto" to one of the assignable buttons (see "Basic Menu Operations" on page 100. 26 Adjusting the LCD...

Operating Instructions
Page 32
... turn off the power while formatting, reading or writing data. -If you recorded. • Do not apply a label sheet in places other than the label space. Notes on SxS memory cards (optional) inserted in the card slots. This camcorder records audio and video on using a PC. • Remove or reinsert the case card with memory cards other than SxS PRO and SxS-1. Handling SxS Memory Cards • Verify the correct direction...
... turn off the power while formatting, reading or writing data. -If you recorded. • Do not apply a label sheet in places other than the label space. Notes on SxS memory cards (optional) inserted in the card slots. This camcorder records audio and video on using a PC. • Remove or reinsert the case card with memory cards other than SxS PRO and SxS-1. Handling SxS Memory Cards • Verify the correct direction...
Operating Instructions
Page 36
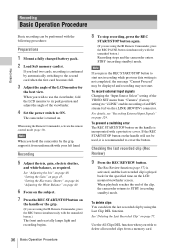
.... To prevent a switching error The REC START/STOP button on . For details, see "Recording External Input Signals" on the LCD monitor/viewfinder screen. When you press the REC START/STOP button to the second card when the first card becomes full. 3 Adjust the angle of the VIDEO SET menu from a memory card. 36 Basic Operation Procedure The Rec Review function (page 57) is activated, and the last recorded clip is played back for the best view. Use the All...
.... To prevent a switching error The REC START/STOP button on . For details, see "Recording External Input Signals" on the LCD monitor/viewfinder screen. When you press the REC START/STOP button to the second card when the first card becomes full. 3 Adjust the angle of the VIDEO SET menu from a memory card. 36 Basic Operation Procedure The Rec Review function (page 57) is activated, and the last recorded clip is played back for the best view. Use the All...
Operating Instructions
Page 51
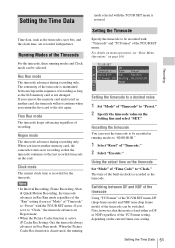
... Recording, Slow & Quick Motion Recording, the timecode advances in the sequence of recording. Rec Run mode The timecode advances during recording only. Using the actual time as the timecodes, user bits, and the clock time, are recorded with the TC/UB SET menu. When you insert another card, the timecode will not continue when you remove the memory card and record on another memory card, the camcorder starts next recording so that the mode is restored. Free...
... Recording, Slow & Quick Motion Recording, the timecode advances in the sequence of recording. Rec Run mode The timecode advances during recording only. Using the actual time as the timecodes, user bits, and the clock time, are recorded with the TC/UB SET menu. When you insert another card, the timecode will not continue when you remove the memory card and record on another memory card, the camcorder starts next recording so that the mode is restored. Free...
Operating Instructions
Page 66
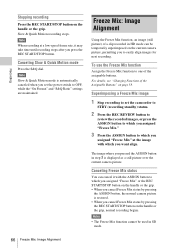
..." at a low-speed frame rate, it with which you assigned "Freeze Mix" or the REC START/STOP button on the current camera picture, permitting you press the REC START/STOP button. Note When recording at the image with the ASSIGN button to OFF, while the "On Format" and "S&Q Ratio" settings are maintained. Canceling Slow & Quick Motion mode Press the S&Q dial. Superimposing a Freeze Mix image 1 Stop recording to set the power switch to which you...
..." at a low-speed frame rate, it with which you assigned "Freeze Mix" or the REC START/STOP button on the current camera picture, permitting you press the REC START/STOP button. Note When recording at the image with the ASSIGN button to OFF, while the "On Format" and "S&Q Ratio" settings are maintained. Canceling Slow & Quick Motion mode Press the S&Q dial. Superimposing a Freeze Mix image 1 Stop recording to set the power switch to which you...

Operating Instructions
Page 83
... MONITOR VOLUME buttons With the headphones connected to play at 4 times, 15 times or 24 times normal speed in speaker is canceled, showing the E-E picture or any external input. To return to adjust the sound volume. Press the MONITOR VOLUME buttons to normal playback Press the PLAY/PAUSE button. You can stop playback with "Audio Output" (page 107) of the following operations: Press the THUMBNAIL button. Each time you press the button, the playback speed switches between 4 times, 15 times and 24 times normal speed...
... MONITOR VOLUME buttons With the headphones connected to play at 4 times, 15 times or 24 times normal speed in speaker is canceled, showing the E-E picture or any external input. To return to adjust the sound volume. Press the MONITOR VOLUME buttons to normal playback Press the PLAY/PAUSE button. You can stop playback with "Audio Output" (page 107) of the following operations: Press the THUMBNAIL button. Each time you press the button, the playback speed switches between 4 times, 15 times and 24 times normal speed...
Operating Instructions
Page 94
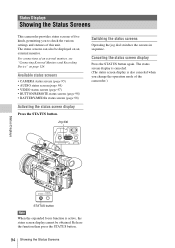
... the camcorder.) MENU SEL/SET CANCEL AB PICTURE PROF Status Displays TC/U-BIT/ STATUS DURATION STATUS button Note When the expanded focus function is also canceled when you change the operation mode of this unit. Available status screens • CAMERA status screen (page 95) • AUDIO status screen (page 96) • VIDEO status screen (page 97) • BUTTON/REMOTE status screen (page 98) • BATTERY/MEDIA status screen (page 98) Activating the status screen display Press...
... the camcorder.) MENU SEL/SET CANCEL AB PICTURE PROF Status Displays TC/U-BIT/ STATUS DURATION STATUS button Note When the expanded focus function is also canceled when you change the operation mode of this unit. Available status screens • CAMERA status screen (page 95) • AUDIO status screen (page 96) • VIDEO status screen (page 97) • BUTTON/REMOTE status screen (page 98) • BATTERY/MEDIA status screen (page 98) Activating the status screen display Press...
Operating Instructions
Page 99
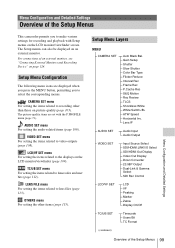
... user bits (page 112). For connections of an external monitor, see "Connecting External Monitors and Recording Device" on an external monitor. Setup Menu Layers MENU CAMERA SET Auto Black Bal. Menu Configuration and Detailed Settings Overview of the Setup Menus This camcorder permits you to select the corresponding menus. Lens IF AUDIO SET Audio Input Audio Output VIDEO SET Input Source Select SDI/HDMI/i.LINK I/O Select SDI/HDMI Out Display Video Out Display Down Converter 23.98P Output Dual-Link & Gamma Select SDI Rec Control LCD...
... user bits (page 112). For connections of an external monitor, see "Connecting External Monitors and Recording Device" on an external monitor. Setup Menu Layers MENU CAMERA SET Auto Black Bal. Menu Configuration and Detailed Settings Overview of the Setup Menus This camcorder permits you to select the corresponding menus. Lens IF AUDIO SET Audio Input Audio Output VIDEO SET Input Source Select SDI/HDMI/i.LINK I/O Select SDI/HDMI Out Display Video Out Display Down Converter 23.98P Output Dual-Link & Gamma Select SDI Rec Control LCD...
Operating Instructions
Page 103
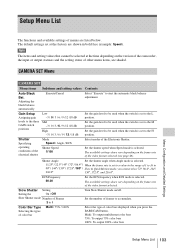
.... Slow Shutter Setting Setting the On / Off Slow Shutter mode Number of Frames 2 to 8 Turn Slow Shutter mode on the version of the camcorder, the input or output statuses and the setting status of 1 to 16 in the range of other menu items, are listed below. Color Bar Type Selecting the types of color bar Multi / 75% / 100% Select the type of the video format selected. CAMERA SET Menu CAMERA SET Menu items Subitems and setting values Contents Auto Black Bal. Adjusting the black balance automatically...
.... Slow Shutter Setting Setting the On / Off Slow Shutter mode Number of Frames 2 to 8 Turn Slow Shutter mode on the version of the camcorder, the input or output statuses and the setting status of 1 to 16 in the range of other menu items, are listed below. Color Bar Type Selecting the types of color bar Multi / 75% / 100% Select the type of the video format selected. CAMERA SET Menu CAMERA SET Menu items Subitems and setting values Contents Auto Black Bal. Adjusting the black balance automatically...
Operating Instructions
Page 105
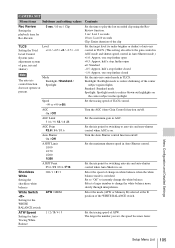
CAMERA SET Menu items Subitems and setting values Contents Rec Review Setting the playback time for Rec-Review 3 sec / 10 sec / Clip Set the time to play the last recorded clip using the RecReview function. 3 sec: Last 3 seconds 10 sec: Last 10 seconds Clip: Entire duration of the clip TLCS Level Setting the Total +1.0 / +0.5 / ±0 / -0.5 / -1.0 Level Control System (auto adjustment system of auto iris control in TLCS. (This setting also affects the gain control in AGC mode and shutter-speed control in...
CAMERA SET Menu items Subitems and setting values Contents Rec Review Setting the playback time for Rec-Review 3 sec / 10 sec / Clip Set the time to play the last recorded clip using the RecReview function. 3 sec: Last 3 seconds 10 sec: Last 10 seconds Clip: Entire duration of the clip TLCS Level Setting the Total +1.0 / +0.5 / ±0 / -0.5 / -1.0 Level Control System (auto adjustment system of auto iris control in TLCS. (This setting also affects the gain control in AGC mode and shutter-speed control in...
Operating Instructions
Page 113
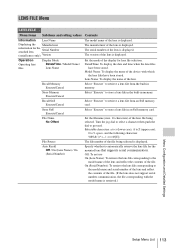
... support serial number communication, the file corresponding with which the lens files have been stored. Specify whether to proceed. The serial number of the lens is displayed. The manufacturer of the lens is displayed. Select "Execute" to 9, space, and the following characters The file number of the file being selected. LENS FILE Menu LENS FILE Menu items Subitems and setting values Information Lens Name Displaying the Manufacturer information for the Serial Number attached lens (serial lenses only) Version Operation Operating lens files Display Mode Date&Time / Model...
... support serial number communication, the file corresponding with which the lens files have been stored. Specify whether to proceed. The serial number of the lens is displayed. The manufacturer of the lens is displayed. Select "Execute" to 9, space, and the following characters The file number of the file being selected. LENS FILE Menu LENS FILE Menu items Subitems and setting values Information Lens Name Displaying the Manufacturer information for the Serial Number attached lens (serial lenses only) Version Operation Operating lens files Display Mode Date&Time / Model...
Operating Instructions
Page 125
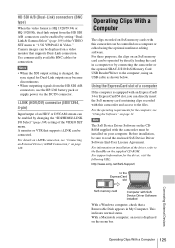
... slot, you can be connected. Camera images can be enabled by connecting the camcorder or the optional SBAC-US10 SxS Memory Card USB Reader/Writer to "1.5G YPbPr422 & Video." For these purposes, the clips on SxS memory cards with this camcorder and access to the files. Before installation, be installed on the menu bar. Notes • When the SDI output setting is displayed on your computer. Connecting External Devices Operating Clips With a Computer 125...
... slot, you can be connected. Camera images can be enabled by connecting the camcorder or the optional SBAC-US10 SxS Memory Card USB Reader/Writer to "1.5G YPbPr422 & Video." For these purposes, the clips on SxS memory cards with this camcorder and access to the files. Before installation, be installed on the menu bar. Notes • When the SDI output setting is displayed on your computer. Connecting External Devices Operating Clips With a Computer 125...

Operating Instructions
Page 127
... clips to Trash. Connecting External Devices Operating Clips With a Computer 127 Macintosh Drag the SxS memory card icon on the desktop to files that it conforms to the recording formats used with this camcorder is located on Finder, click on the eject icon on page 11 or refer to your computer in the CD-ROM. copy the clips on the HDD of Apple Inc. Be...
... clips to Trash. Connecting External Devices Operating Clips With a Computer 127 Macintosh Drag the SxS memory card icon on the desktop to files that it conforms to the recording formats used with this camcorder is located on Finder, click on the eject icon on page 11 or refer to your computer in the CD-ROM. copy the clips on the HDD of Apple Inc. Be...
Operating Instructions
Page 139
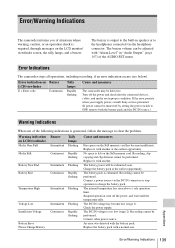
... internal temperature has risen above a safe operation limit. If the error persists when you of the AUDIO SET menu. The buzzer is required, through messages on the LCD monitor/ viewfinder screen, the tally lamps, and a buzzer. Connect other power source. Replace the battery pack with another . Error/Warning Indications The camcorder informs you reapply power, consult Sony service personnel. (If power cannot be turned off by setting the power switch to OFF, remove both...
... internal temperature has risen above a safe operation limit. If the error persists when you of the AUDIO SET menu. The buzzer is required, through messages on the LCD monitor/ viewfinder screen, the tally lamps, and a buzzer. Connect other power source. Replace the battery pack with another . Error/Warning Indications The camcorder informs you reapply power, consult Sony service personnel. (If power cannot be turned off by setting the power switch to OFF, remove both...
Operating Instructions
Page 140
Unknown Media(A)1) Please Change. Cannot Record Media Error Playback Halted Media(A)1) Error HDD A2) Battery Near Intermittent Flashing End HDD A2) Battery End Continuous Rapidly flashing Not Enough Capacity Change Media (A)1) Reached Duplication Limit Change Media (A)1) Cause and measures The remaining power of the external signal. Remove it . Replace it with this camcorder. Check the input signal. Change the battery at the earliest opportunity. Replace the card with another card or format it is a DVCAM stream. A partitioned memory card or one . No more clip...
Unknown Media(A)1) Please Change. Cannot Record Media Error Playback Halted Media(A)1) Error HDD A2) Battery Near Intermittent Flashing End HDD A2) Battery End Continuous Rapidly flashing Not Enough Capacity Change Media (A)1) Reached Duplication Limit Change Media (A)1) Cause and measures The remaining power of the external signal. Remove it . Replace it with this camcorder. Check the input signal. Change the battery at the earliest opportunity. Replace the card with another card or format it is a DVCAM stream. A partitioned memory card or one . No more clip...
Operating Instructions
Page 145
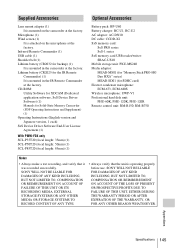
... REASON WHATSOEVER. CD-ROM: Utility Software for XDCAM (Dedicated application software, SxS Device Driver Software) (1) Manuals for Solid-State Memory Camcorder (PDF Operating Instructions and Supplement) (1) Operating Instructions (English version and Japanese version, 1 each) SxS Device Driver Software End-User License Agreement (1) With PMW-F3K only SCL-P35T20 (focal length: 35mm) (1) SCL-P50T20 (focal length: 50mm) (1) SCL-P85T20 (focal length: 85mm) (1) Optional Accessories Battery pack: BP-U60 Battery charger: BC-U1, BC...
... REASON WHATSOEVER. CD-ROM: Utility Software for XDCAM (Dedicated application software, SxS Device Driver Software) (1) Manuals for Solid-State Memory Camcorder (PDF Operating Instructions and Supplement) (1) Operating Instructions (English version and Japanese version, 1 each) SxS Device Driver Software End-User License Agreement (1) With PMW-F3K only SCL-P35T20 (focal length: 35mm) (1) SCL-P50T20 (focal length: 50mm) (1) SCL-P85T20 (focal length: 85mm) (1) Optional Accessories Battery pack: BP-U60 Battery charger: BC-U1, BC...

