
Operating Instructions
Page 2
... the instructions, may be determined by turning the equipment off and on, the user is encouraged to try to provide reasonable protection against harmful interference in a residential installation. Owner's Record The model and serial numbers are designed to correct the interference by one or more of the personal component system. PMC-202 Serial No. 2 Introduction DO NOT REMOVE COVER (OR BACK). CAUTION The use...
... the instructions, may be determined by turning the equipment off and on, the user is encouraged to try to provide reasonable protection against harmful interference in a residential installation. Owner's Record The model and serial numbers are designed to correct the interference by one or more of the personal component system. PMC-202 Serial No. 2 Introduction DO NOT REMOVE COVER (OR BACK). CAUTION The use...
Operating Instructions
Page 3
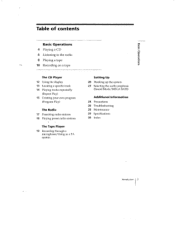
...Table of contents Basic Operations 4 Playing a CD 6 Listening to the radio 8 Playing a tape 10 Recording on a tape The CD Player 12 Using the display 13 Locating a specific track 14 Playing tracks repeatedly (Repeat Play) 15 Creating your own program (Program Play) The Radio 17 Presetting radio stations 18 Playing preset radio stations The Tape Player 19 Recording through a microphone/Using as a PA system Setting Up 20 Hooking up the system 23 Selecting the audio emphasis (Sound Mode/MEGA BASS) Additional Information 24 Precautions 26 Troubleshooting 28 Maintenance 29 Specifications 30 Index...
...Table of contents Basic Operations 4 Playing a CD 6 Listening to the radio 8 Playing a tape 10 Recording on a tape The CD Player 12 Using the display 13 Locating a specific track 14 Playing tracks repeatedly (Repeat Play) 15 Creating your own program (Program Play) The Radio 17 Presetting radio stations 18 Playing preset radio stations The Tape Player 19 Recording through a microphone/Using as a PA system Setting Up 20 Hooking up the system 23 Selecting the audio emphasis (Sound Mode/MEGA BASS) Additional Information 24 Precautions 26 Troubleshooting 28 Maintenance 29 Specifications 30 Index...

Operating Instructions
Page 4
Display L 1.-Pu OCII CODIJ Track number Playing time 4 I Basic Operations The player plays all the tracks once. Bask Operations Playing a CD 1, 2 0 00 00 0 0 CI)b J!D) 1 PUSH OPEN For hookup instructions, see pages 20 - 22. r Press PHI (direct power-on the disc compartment. PUSH OPEN With the label side up Close the lid of the disc compartment. Press It PUSH OPEN down to open the disc compartment and place the disc on ).
Display L 1.-Pu OCII CODIJ Track number Playing time 4 I Basic Operations The player plays all the tracks once. Bask Operations Playing a CD 1, 2 0 00 00 0 0 CI)b J!D) 1 PUSH OPEN For hookup instructions, see pages 20 - 22. r Press PHI (direct power-on the disc compartment. PUSH OPEN With the label side up Close the lid of the disc compartment. Press It PUSH OPEN down to open the disc compartment and place the disc on ).

Operating Instructions
Page 5
Tip Next time you want to listen to a CD, just press The player turns on /off the player Press VOLUME +/■ Press again to the previous track Remove the CD Turn on automatically and starts playing the CD. VOLUME +/- To Adjust the volume Stop playback Pause playback Go to the next track Go back to resume play after pause. ►►1 144 PUSH OPEN POWER Basic Operations Use these buttons for additional operations POWER • t PUSH OPEN O O O OO O0 OO -
Tip Next time you want to listen to a CD, just press The player turns on /off the player Press VOLUME +/■ Press again to the previous track Remove the CD Turn on automatically and starts playing the CD. VOLUME +/- To Adjust the volume Stop playback Pause playback Go to the next track Go back to resume play after pause. ►►1 144 PUSH OPEN POWER Basic Operations Use these buttons for additional operations POWER • t PUSH OPEN O O O OO O0 OO -

Operating Instructions
Page 6
The player automatically scans the radio frequencies and stops when it finds a clear station. Indicates an FM stereo broadcast. L0 mI C0 LI VOL 6 Basic Operations Listening to change in the display (direct power-on). until the band you can't tune in a station, press the button once at a time. Press BAND until the frequency digits begin to the radio 2 1 0 O 0 0 ( C) OO OO O 11 13ANO For hookup instructions, see pages 20 - 22. If you want appears in the display. Display 0/ I C D"Iun 2 TUNING + Oc Hold down TUNING+/-
The player automatically scans the radio frequencies and stops when it finds a clear station. Indicates an FM stereo broadcast. L0 mI C0 LI VOL 6 Basic Operations Listening to change in the display (direct power-on). until the band you can't tune in a station, press the button once at a time. Press BAND until the frequency digits begin to the radio 2 1 0 O 0 0 ( C) OO OO O 11 13ANO For hookup instructions, see pages 20 - 22. If you want appears in the display. Display 0/ I C D"Iun 2 TUNING + Oc Hold down TUNING+/-

Operating Instructions
Page 7
Use these buttons for additional operations POWER VOLUME +/- POWER Basic Operations The player turns on /off the radio Press VOLUME +/- co tL 0 n' 0 O O fD 00 O 00 00 Tips • If the FM broadcast is noisy, press PLAY MODE/MONO/ST until "Mono" appears in the display and the radio will play in monaural. • Next time you want to listen to the radio, just press the BAND button. To Adjust the volume Turn on automzItically.and starts playing the previous station.
Use these buttons for additional operations POWER VOLUME +/- POWER Basic Operations The player turns on /off the radio Press VOLUME +/- co tL 0 n' 0 O O fD 00 O 00 00 Tips • If the FM broadcast is noisy, press PLAY MODE/MONO/ST until "Mono" appears in the display and the radio will play in monaural. • Next time you want to listen to the radio, just press the BAND button. To Adjust the volume Turn on automzItically.and starts playing the previous station.

Operating Instructions
Page 10
... ip, For hookup instructions, see pages 20 - 22. is depressed automatically.) 10 1 Basic Operations Press Set to open the tape compartment and insert a blank tape. c.: c•.3 COMMOC100)0301 vot J BAND To record from the CD player, insert a CD (see page 6.) 120 :M I (normal) and TYPE II (high position) tapes only. IL. Display To record from the radio, press BAND and tune in the station you want (see page...
... ip, For hookup instructions, see pages 20 - 22. is depressed automatically.) 10 1 Basic Operations Press Set to open the tape compartment and insert a blank tape. c.: c•.3 COMMOC100)0301 vot J BAND To record from the CD player, insert a CD (see page 6.) 120 :M I (normal) and TYPE II (high position) tapes only. IL. Display To record from the radio, press BAND and tune in the station you want (see page...

Operating Instructions
Page 11
... recording Turn on the remote until "TAPE" appears in step 3, move the AM loop aerial connected to the player as far away as follows: I Disconnect the microphone if connected at the MIX MIC jack. 2 Turn on the power and then press FUNCTION on /off the player Press 11 Press the button again to resume recording. POWER Basic Operations 11 suoReJeclo p!sea Note if the AM program makes a whistling sound...
... recording Turn on the remote until "TAPE" appears in step 3, move the AM loop aerial connected to the player as far away as follows: I Disconnect the microphone if connected at the MIX MIC jack. 2 Turn on the power and then press FUNCTION on /off the player Press 11 Press the button again to resume recording. POWER Basic Operations 11 suoReJeclo p!sea Note if the AM program makes a whistling sound...

Operating Instructions
Page 13
... CD Player 13 You can quickly locate any track using the number buttons. POWER SOUNDMMUS'S RINCTIO3 -ZO/RA 10 CY CY T •CY 0CY. Example: To play if "PGM" or "SHUF REP" is lit in pause and hold down until you find the point. To locate a specific track directly a point while listening to the sound a point while observing the display Press a number button of the track...
... CD Player 13 You can quickly locate any track using the number buttons. POWER SOUNDMMUS'S RINCTIO3 -ZO/RA 10 CY CY T •CY 0CY. Example: To play if "PGM" or "SHUF REP" is lit in pause and hold down until you find the point. To locate a specific track directly a point while listening to the sound a point while observing the display Press a number button of the track...

Operating Instructions
Page 14
... SHUF REP l'GM REP and then program tracks (see step 3 on page 15). 3 Do either of the following to start repeat play modes (see pages 15 - 16.) 1POWER ) SOUND/AMA/ASS FUNCTION Number buttons MODE Pr- TUNE VOL Playing tracks repeatedly 1 Press M. To repeat a single track all the tracks tracks in the display. 2 Press MODE until the repeat mode you 've selected REP ALL, SHUF REP or PGM REP, press 14 The CD Player
... SHUF REP l'GM REP and then program tracks (see step 3 on page 15). 3 Do either of the following to start repeat play modes (see pages 15 - 16.) 1POWER ) SOUND/AMA/ASS FUNCTION Number buttons MODE Pr- TUNE VOL Playing tracks repeatedly 1 Press M. To repeat a single track all the tracks tracks in the display. 2 Press MODE until the repeat mode you 've selected REP ALL, SHUF REP or PGM REP, press 14 The CD Player

Operating Instructions
Page 15
... saved until "PGM" appears in the display. 3 Press the number buttons for the tracks you want to program in the order you want them to be played. I open the disc compartment or turn off the power. • You can program up to 20 tracks in the order you want . continued The CD Player 15 JaAeld CD a41 Creating your own program. You can record your own program (Program Play) You can make a program...
... saved until "PGM" appears in the display. 3 Press the number buttons for the tracks you want to program in the order you want them to be played. I open the disc compartment or turn off the power. • You can program up to 20 tracks in the order you want . continued The CD Player 15 JaAeld CD a41 Creating your own program. You can record your own program (Program Play) You can make a program...

Operating Instructions
Page 17
... want appears in the display. 2 Tune in any order. To select the preset number over 10, press >10 first, then the corresponding number buttons. You can store radio stations into the player's memory. POWER ) SOUNDMEGA/MS FUNCTION ,DIRADIO CD. 0. The Radio Presetting radio stations You can preset up to 24 radio stations, 12 for each band in a station you want to preset the new station for about 2 seconds.) The new station replaces the old one.
... want appears in the display. 2 Tune in any order. To select the preset number over 10, press >10 first, then the corresponding number buttons. You can store radio stations into the player's memory. POWER ) SOUNDMEGA/MS FUNCTION ,DIRADIO CD. 0. The Radio Presetting radio stations You can preset up to 24 radio stations, 12 for each band in a station you want to preset the new station for about 2 seconds.) The new station replaces the old one.
Operating Instructions
Page 18
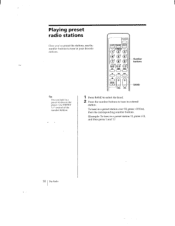
Playing preset radio stations Once you've preset the stations, use the number buttons to tune in a stored station. f POWER \ ) SOUND WARMS FNMA cr1i ;2125C::) T ® C3 CY CI 40) oir) )( $44 ) cD C am) ) Number buttons BAND (.) TUNE VOL BAND Tip You can tune in a preset station 11, press >10, and then press 1 and 1.) 18 The Radio instead of the number buttons. 1 Press BAND to select the band. 2 Press the number buttons to tune in your favorite...
Playing preset radio stations Once you've preset the stations, use the number buttons to tune in a stored station. f POWER \ ) SOUND WARMS FNMA cr1i ;2125C::) T ® C3 CY CI 40) oir) )( $44 ) cD C am) ) Number buttons BAND (.) TUNE VOL BAND Tip You can tune in a preset station 11, press >10, and then press 1 and 1.) 18 The Radio instead of the number buttons. 1 Press BAND to select the band. 2 Press the number buttons to tune in your favorite...

Operating Instructions
Page 19
... the speaker. The Tape Player 19 Recording through the microphone. JaAeld adel et41 The Tape Player Recording through a microphone/Using as a PA system You can mix CD or radio sounds and record them by adding your voice or other audio through a microphone 1 Plug the microphone into the microphone and adjust the volume. Notes • Acoustic feedback (howling) tends to start recording. Using as a public address system. ED c". 00 2 Turn on the microphone if it has a power switch. POWER C SOUND MRIA BASS...
... the speaker. The Tape Player 19 Recording through the microphone. JaAeld adel et41 The Tape Player Recording through a microphone/Using as a PA system You can mix CD or radio sounds and record them by adding your voice or other audio through a microphone 1 Plug the microphone into the microphone and adjust the volume. Notes • Acoustic feedback (howling) tends to start recording. Using as a public address system. ED c". 00 2 Turn on the microphone if it has a power switch. POWER C SOUND MRIA BASS...
Operating Instructions
Page 22
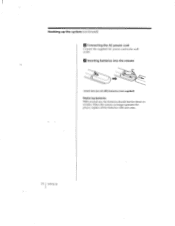
Hooking up the system (continued) Connecting the AC power cord Connect the supplied AC power cord to the wall outlet. 4 Inserting batteries into the remote Insert two size AA (R6) batteries (not supplied) Replacing batteries With normal use, the batteries should last for about six months. When the remote no longer operates the player, replace all the batteries with new ones. 22 I Setting Up
Hooking up the system (continued) Connecting the AC power cord Connect the supplied AC power cord to the wall outlet. 4 Inserting batteries into the remote Insert two size AA (R6) batteries (not supplied) Replacing batteries With normal use, the batteries should last for about six months. When the remote no longer operates the player, replace all the batteries with new ones. 22 I Setting Up
Operating Instructions
Page 24
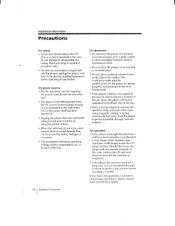
... any solid object or liquid fall into the player, unplug the player, and have it checked by battery leakage or corrosion. • The nameplate indicating operating voltage, power consumption, etc. is located at the rear. Additional Information Precautions On safety • As the laser beam used in the CD player section is harmful to the eyes, do not use the supplied AC power cord;
... any solid object or liquid fall into the player, unplug the player, and have it checked by battery leakage or corrosion. • The nameplate indicating operating voltage, power consumption, etc. is located at the rear. Additional Information Precautions On safety • As the laser beam used in the CD player section is harmful to the eyes, do not use the supplied AC power cord;
Operating Instructions
Page 26
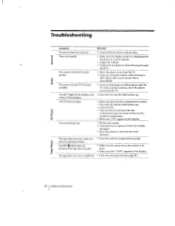
... player in the display. "no audio. The tape does not move the player away from the TV. when a CD is no disc" lights in the display even • Insert the CD with the label surface up . • Clean the CD. • Take out the CD and leave the disc compartment open for about an hour to operate. • Adjust the volume. • Unplug the headphones when listening through speakers. Troubleshooting...
... player in the display. "no audio. The tape does not move the player away from the TV. when a CD is no disc" lights in the display even • Insert the CD with the label surface up . • Clean the CD. • Take out the CD and leave the disc compartment open for about an hour to operate. • Adjust the volume. • Unplug the headphones when listening through speakers. Troubleshooting...
Operating Instructions
Page 27
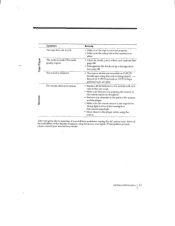
... cassette is being played. -• Record on TYPE IV (metal) tape using the remote. Additional Information 27 The audio is weak/The audio • quality is distorted. F- If the problem persists, please consult your nearest Sony dealer. The remote does not function. 4OS% cc Remedy • Make sure the tape is inserted properly. • Make sure the safety tab of the remote and the player. • Make sure the remote...
... cassette is being played. -• Record on TYPE IV (metal) tape using the remote. Additional Information 27 The audio is weak/The audio • quality is distorted. F- If the problem persists, please consult your nearest Sony dealer. The remote does not function. 4OS% cc Remedy • Make sure the tape is inserted properly. • Make sure the safety tab of the remote and the player. • Make sure the remote...
Operating Instructions
Page 29
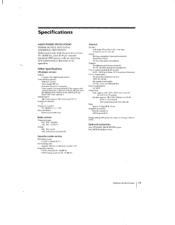
... impedance microphone Outputs Headphones jack (stereo ininnack) For 16 - 68 ohms impedance headphones Power output (excluding US model) 30 W + 30 W (at a distance of about 20(1 min from 70 - 20,000 I lz +1/-2 dB Wow and flutter Below measurable limit Radio section Frequency range FM: 87.6 - 108 1'.441z AM: 530 - 1,710 kl lz Aerials FM: Wire aerial AM: External aerial terminals Cassette-corder section Recording system 4-track 2 channel stereo Fast winding time Approx. Specifications AUDIO POWER SPECIFICATIONS POWER OUTPUT...
... impedance microphone Outputs Headphones jack (stereo ininnack) For 16 - 68 ohms impedance headphones Power output (excluding US model) 30 W + 30 W (at a distance of about 20(1 min from 70 - 20,000 I lz +1/-2 dB Wow and flutter Below measurable limit Radio section Frequency range FM: 87.6 - 108 1'.441z AM: 530 - 1,710 kl lz Aerials FM: Wire aerial AM: External aerial terminals Cassette-corder section Recording system 4-track 2 channel stereo Fast winding time Approx. Specifications AUDIO POWER SPECIFICATIONS POWER OUTPUT...
Operating Instructions
Page 30
... system R Radio stations playing 18 presetting 17 Recording on a tape 10 through a microphone 19 Repeat Play 14 Selecting audio emphasis 23 tracks 13 Setting up power cord 22 speakers 20 I,J,K Improving broadcast reception 21 L Listening to the radio 6 Locating a specific track 13 M, N, O MEGA BASS 23 Microphone 19 Q PA system 19 Playing a CD 4 a tape 8 preset radio stations 18 tracks repeatedly 14 Presetting radio stations 17 Program Play 15 Public address system. Hooking up 20 Sound mode 23 T Tape player 19 Troubleshooting 26 U, V, W, X, Y, Z Using as a l'A system 19 the display 12 30...
... system R Radio stations playing 18 presetting 17 Recording on a tape 10 through a microphone 19 Repeat Play 14 Selecting audio emphasis 23 tracks 13 Setting up power cord 22 speakers 20 I,J,K Improving broadcast reception 21 L Listening to the radio 6 Locating a specific track 13 M, N, O MEGA BASS 23 Microphone 19 Q PA system 19 Playing a CD 4 a tape 8 preset radio stations 18 tracks repeatedly 14 Presetting radio stations 17 Program Play 15 Public address system. Hooking up 20 Sound mode 23 T Tape player 19 Troubleshooting 26 U, V, W, X, Y, Z Using as a l'A system 19 the display 12 30...


