CLIE Handbook
Page 3
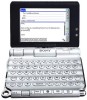
...É handheld. • This manual supports PEG-UX50 and PEG-UX40. - Refer to the following : • Setting up your CLIÉ handheld and computer • Basic operations • What you can do with the applications Be sure to read the supplied "Safety & Regulations Guide" to use of your CLIÉ handheld are explained in detail. ‰ When you have problems Troubleshooting Q&A Helps...
...É handheld. • This manual supports PEG-UX50 and PEG-UX40. - Refer to the following : • Setting up your CLIÉ handheld and computer • Basic operations • What you can do with the applications Be sure to read the supplied "Safety & Regulations Guide" to use of your CLIÉ handheld are explained in detail. ‰ When you have problems Troubleshooting Q&A Helps...
CLIE Handbook
Page 6
... PEG-UX50 only 79 Setting a wireless LAN access point manually 79 Searching and setting a wireless LAN access point manually . . . . 81 Connecting your CLIÉ handheld to a wireless LAN access point automatically 82 Checking the wireless LAN communication status 83 Using the SSID menu 84 Setting the Network preferences for your provider and dial-up server . . . 85 Selecting a service template . . . 85 Entering a user name 85 Entering a password 86...
... PEG-UX50 only 79 Setting a wireless LAN access point manually 79 Searching and setting a wireless LAN access point manually . . . . 81 Connecting your CLIÉ handheld to a wireless LAN access point automatically 82 Checking the wireless LAN communication status 83 Using the SSID menu 84 Setting the Network preferences for your provider and dial-up server . . . 85 Selecting a service template . . . 85 Entering a user name 85 Entering a password 86...

CLIE Handbook
Page 7
... and updating files/data using the HotSync® operation (Other HotSync® operations) Customizing HotSync® application settings (Conduit 112 Synchronizing with external data (File Link 114 Customizing HotSync® Manager startup and HotSync® setup options 115 Performing the HotSync® operation via a wireless LAN (for PEG-UX50 only 116 Performing the HotSync® operation using the Bluetooth® function . . . 119 Performing the IR HotSync...
... and updating files/data using the HotSync® operation (Other HotSync® operations) Customizing HotSync® application settings (Conduit 112 Synchronizing with external data (File Link 114 Customizing HotSync® Manager startup and HotSync® setup options 115 Performing the HotSync® operation via a wireless LAN (for PEG-UX50 only 116 Performing the HotSync® operation using the Bluetooth® function . . . 119 Performing the IR HotSync...
CLIE Handbook
Page 8
... 186 Installing from the Internet. . . . 186 Deleting installed add-on applications 187 Transferring data from another CLIÉ™ handheld Transferring data from another CLIÉ™ handheld 189 Transferring data using Palm™ Desktop for CLI 189 INDEX 193 Entering personal information . . . 174 Locking your CLIÉ handheld with a password (Data protection 176 Turning off your CLIÉ handheld after locking 176 Setting...
... 186 Installing from the Internet. . . . 186 Deleting installed add-on applications 187 Transferring data from another CLIÉ™ handheld Transferring data from another CLIÉ™ handheld 189 Transferring data using Palm™ Desktop for CLI 189 INDEX 193 Entering personal information . . . 174 Locking your CLIÉ handheld with a password (Data protection 176 Turning off your CLIÉ handheld after locking 176 Setting...
CLIE Handbook
Page 26
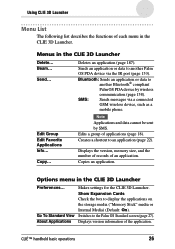
... CLIE 3D Launcher. Makes settings for the CLIE 3D Launcher. Using CLIE 3D Launcher Menu List The following list describes the functions of each menu in the CLIE ...Cards Check the box to an application (page 22). Copy... Bluetooth: Sends an application or data to the Palm OS Standard screen (page 27). Go To Standard View Switches to another Palm OS PDA device via a connected GSM wireless... device, such as a mobile phone. Note Applications and data cannot be sent by wireless SMS: communication (page ...
... CLIE 3D Launcher. Makes settings for the CLIE 3D Launcher. Using CLIE 3D Launcher Menu List The following list describes the functions of each menu in the CLIE ...Cards Check the box to an application (page 22). Copy... Bluetooth: Sends an application or data to the Palm OS Standard screen (page 27). Go To Standard View Switches to another Palm OS PDA device via a connected GSM wireless... device, such as a mobile phone. Note Applications and data cannot be sent by wireless SMS: communication (page ...
CLIE Handbook
Page 79
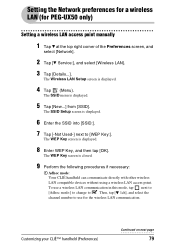
...É handheld can communicate directly with other wireless LAN compatible devices without using a wireless LAN access point. To use a wireless LAN communication in this mode, tap next to [Adhoc mode:] to change to use for PEG-UX50 only) Setting a wireless LAN access point manually 1 Tap V at the top right corner of the Preferences screen, and select [Network]. 2 Tap [V Service:], and select [Wireless LAN...
...É handheld can communicate directly with other wireless LAN compatible devices without using a wireless LAN access point. To use a wireless LAN communication in this mode, tap next to [Adhoc mode:] to change to use for PEG-UX50 only) Setting a wireless LAN access point manually 1 Tap V at the top right corner of the Preferences screen, and select [Network]. 2 Tap [V Service:], and select [Wireless LAN...

CLIE Handbook
Page 80
...É™ handheld (Preferences) 80 In this setup is treated as one for PEG-UX50 only) 2 Power Save: The Power Save function is connected to a wireless LAN access point automatically (refer to . 10 Tap [OK]. The Wireless LAN Setup screen is closed , and the Wireless LAN Setup screen which added the new SSID setting under [SSID:] is displayed and you can manually set up an...
...É™ handheld (Preferences) 80 In this setup is treated as one for PEG-UX50 only) 2 Power Save: The Power Save function is connected to a wireless LAN access point automatically (refer to . 10 Tap [OK]. The Wireless LAN Setup screen is closed , and the Wireless LAN Setup screen which added the new SSID setting under [SSID:] is displayed and you can manually set up an...
CLIE Handbook
Page 81
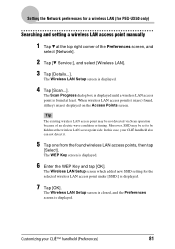
... because of the Preferences screen, and select [Network]. 2 Tap [V Service:], and select [Wireless LAN]. 3 Tap [Details...]. In this case, your CLIÉ™ handheld (Preferences) 81 The WEP Key screen is displayed. 7 Tap [OK]. The Wireless LAN Setup screen which added new SSID setting for PEG-UX50 only) Searching and setting a wireless LAN access point manually 1 Tap V at the top right corner...
... because of the Preferences screen, and select [Network]. 2 Tap [V Service:], and select [Wireless LAN]. 3 Tap [Details...]. In this case, your CLIÉ™ handheld (Preferences) 81 The WEP Key screen is displayed. 7 Tap [OK]. The Wireless LAN Setup screen which added new SSID setting for PEG-UX50 only) Searching and setting a wireless LAN access point manually 1 Tap V at the top right corner...
CLIE Handbook
Page 82
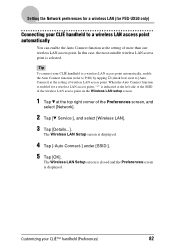
Setting the Network preferences for a wireless LAN (for a wireless LAN access point, "*" is selected. The Wireless LAN Setup screen is displayed. The Wireless LAN Setup screen is closed and the Preferences screen is displayed. 4 Tap [-Auto Connect-] under [SSID:]. 5 Tap [OK]. When the Auto Connect function is enabled for PEG-UX50 only) Connecting your CLIÉ handheld to [Auto Connect] at the top right corner of...
Setting the Network preferences for a wireless LAN (for a wireless LAN access point, "*" is selected. The Wireless LAN Setup screen is displayed. The Wireless LAN Setup screen is closed and the Preferences screen is displayed. 4 Tap [-Auto Connect-] under [SSID:]. 5 Tap [OK]. When the Auto Connect function is enabled for PEG-UX50 only) Connecting your CLIÉ handheld to [Auto Connect] at the top right corner of...

CLIE Handbook
Page 83
Setting the Network preferences for a wireless LAN (for PEG-UX50 only) Checking the wireless LAN communication status Tip If you need a MAC address, check [MAC Addr:] in the Link Status screen by the following method. 1 Tap V at the top right corner of the Preferences screen, and select [Network]. 2 Tap [V Service:], and select [Wireless LAN]. 3 Tap [Details...]. The Link Status screen is displayed. 4 Tap [Status...]. To return to the Wireless LAN Setup screen, tap [OK]. Customizing your CLIÉ™ handheld (Preferences) 83 The Wireless LAN Setup screen is displayed.
Setting the Network preferences for a wireless LAN (for PEG-UX50 only) Checking the wireless LAN communication status Tip If you need a MAC address, check [MAC Addr:] in the Link Status screen by the following method. 1 Tap V at the top right corner of the Preferences screen, and select [Network]. 2 Tap [V Service:], and select [Wireless LAN]. 3 Tap [Details...]. The Link Status screen is displayed. 4 Tap [Status...]. To return to the Wireless LAN Setup screen, tap [OK]. Customizing your CLIÉ™ handheld (Preferences) 83 The Wireless LAN Setup screen is displayed.
CLIE Handbook
Page 84
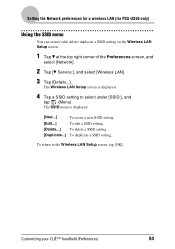
Setting the Network preferences for a wireless LAN (for PEG-UX50 only) Using the SSID menu You can create/ edit/ delete/ duplicate a SSID setting on the Wireless LAN Setup screen. 1 Tap V at the top right corner of the Preferences screen, and select [Network]. 2 Tap [V Service:], and select [Wireless LAN]. 3 Tap [Details...]. The SSID menu is displayed. 4 Tap a SSID setting to the Wireless LAN Setup screen, tap...
Setting the Network preferences for a wireless LAN (for PEG-UX50 only) Using the SSID menu You can create/ edit/ delete/ duplicate a SSID setting on the Wireless LAN Setup screen. 1 Tap V at the top right corner of the Preferences screen, and select [Network]. 2 Tap [V Service:], and select [Wireless LAN]. 3 Tap [Details...]. The SSID menu is displayed. 4 Tap a SSID setting to the Wireless LAN Setup screen, tap...
CLIE Handbook
Page 85
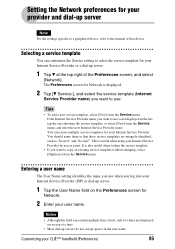
.... This is not displayed in the user name. Customizing your Internet Service Provider by access point. Setting the Network preferences for your provider and dial-up server Note For the settings specific to a peripheral device, refer to the manual of that those service templates are displayed on the Preferences screen for Network. 2 Enter your user name. You should name them so...
.... This is not displayed in the user name. Customizing your Internet Service Provider by access point. Setting the Network preferences for your provider and dial-up server Note For the settings specific to a peripheral device, refer to the manual of that those service templates are displayed on the Preferences screen for Network. 2 Enter your user name. You should name them so...

CLIE Handbook
Page 98
...you want to leave your CLIÉ handheld battery. By default, your CLIÉ™ handheld (Preferences) 98 The Preferences screen for the automatic power-off feature. Tips • [Auto-off After:] is selected [2 minutes] by the default. • [Stay on in Cradle:] is by the default. You can ... [Auto-off After:], and select the desired time. Setting the automatic power-off time Your CLIÉ handheld has an automatic power-off feature that turns off after two minutes of inactivity and will remain on when connected to the charger cradle. 1 Tap V at the top right of inactivity to...
...you want to leave your CLIÉ handheld battery. By default, your CLIÉ™ handheld (Preferences) 98 The Preferences screen for the automatic power-off feature. Tips • [Auto-off After:] is selected [2 minutes] by the default. • [Stay on in Cradle:] is by the default. You can ... [Auto-off After:], and select the desired time. Setting the automatic power-off time Your CLIÉ handheld has an automatic power-off feature that turns off after two minutes of inactivity and will remain on when connected to the charger cradle. 1 Tap V at the top right of inactivity to...
CLIE Handbook
Page 116
... via a wireless LAN (for HotSync. 5 Click [OK]. 6 Connect your CLIÉ handheld to your office, depending on next page 116 For details, contact the System Administrator of the computer window once again, and select [Setup] from the shortcut menu. 2 Click (HotSync) in the Windows task tray (Notification area) at the bottom right of the computer window, and select [Network] from...
... via a wireless LAN (for HotSync. 5 Click [OK]. 6 Connect your CLIÉ handheld to your office, depending on next page 116 For details, contact the System Administrator of the computer window once again, and select [Setup] from the shortcut menu. 2 Click (HotSync) in the Windows task tray (Notification area) at the bottom right of the computer window, and select [Network] from...
CLIE Handbook
Page 117
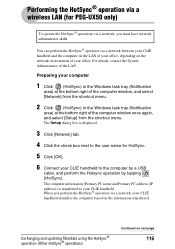
... via a wireless LAN (for PEG-UX50 only) Preparing your CLIÉ handheld Follow the steps below to set up your CLIÉ handheld for the HotSync® operation via a network. 1 Rotate the Jog Dial™ navigator to display the HotSync screen. 2 Tap [Modem]. 3 Tap (Menu). Tip You can also tap (HotSync) to select (HotSync) on next page 117 The Modem Sync Preferences...
... via a wireless LAN (for PEG-UX50 only) Preparing your CLIÉ handheld Follow the steps below to set up your CLIÉ handheld for the HotSync® operation via a network. 1 Rotate the Jog Dial™ navigator to display the HotSync screen. 2 Tap [Modem]. 3 Tap (Menu). Tip You can also tap (HotSync) to select (HotSync) on next page 117 The Modem Sync Preferences...
CLIE Handbook
Page 118
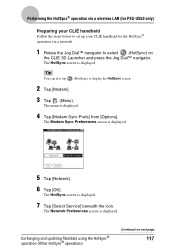
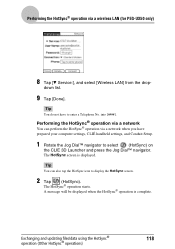
... have prepared your computer settings, CLIÉ handheld settings, and Conduit Setup. 1 Rotate the Jog Dial™ navigator to select (HotSync) on the CLIE 3D Launcher and press the Jog Dial™ navigator. The HotSync screen is complete. into [####]. Tip You can perform the HotSync® operation via a wireless LAN (for PEG-UX50 only) 8 Tap [V Service:], and select [Wireless LAN] from the drop...
... have prepared your computer settings, CLIÉ handheld settings, and Conduit Setup. 1 Rotate the Jog Dial™ navigator to select (HotSync) on the CLIE 3D Launcher and press the Jog Dial™ navigator. The HotSync screen is complete. into [####]. Tip You can perform the HotSync® operation via a wireless LAN (for PEG-UX50 only) 8 Tap [V Service:], and select [Wireless LAN] from the drop...

CLIE Handbook
Page 126
... (HotSync) in the charger cradle connected to the HotSync cable correctly and the charger cradle is placed in the Windows task tray (Notification area) at the bottom right of the computer window once again, and select [Setup] from the shortcut menu. The Setup dialog box is displayed. 3 Click [Network] tab. 4 Click the check box next to the user name for CLIÉ is installed...
... (HotSync) in the charger cradle connected to the HotSync cable correctly and the charger cradle is placed in the Windows task tray (Notification area) at the bottom right of the computer window once again, and select [Setup] from the shortcut menu. The Setup dialog box is displayed. 3 Click [Network] tab. 4 Click the check box next to the user name for CLIÉ is installed...

CLIE Handbook
Page 132
...or overwrite. You can only read and write files/data on the "Memory Stick" media. Using storage media such as "Memory Stick™" media • If the battery power of your CLIÉ handheld is running low, an error message is displayed. Using storage media such as "Memory...To use in your CLIÉ handheld, follow the instructions to format the "Memory Stick" media you cannot exchange files/data with "Memory Stick" media. If this occurs, connect your CLIÉ handheld to the charger cradle or fully charge your CLIÉ handheld. • Use CLIE Files to format it is displayed...
...or overwrite. You can only read and write files/data on the "Memory Stick" media. Using storage media such as "Memory Stick™" media • If the battery power of your CLIÉ handheld is running low, an error message is displayed. Using storage media such as "Memory...To use in your CLIÉ handheld, follow the instructions to format the "Memory Stick" media you cannot exchange files/data with "Memory Stick" media. If this occurs, connect your CLIÉ handheld to the charger cradle or fully charge your CLIÉ handheld. • Use CLIE Files to format it is displayed...

CLIE Handbook
Page 140
... as a backup file. Note that any added or edited information in your CLIÉ handheld will be overwritten with CLIE Files. Tip When you need to charge your CLIÉ handheld or connect the AC power adapter to your CLIÉ handheld. If this case, retry copying or moving data. In this case, connect your CLIÉ handheld to the charger cradle. •...
... as a backup file. Note that any added or edited information in your CLIÉ handheld will be overwritten with CLIE Files. Tip When you need to charge your CLIÉ handheld or connect the AC power adapter to your CLIÉ handheld. If this case, retry copying or moving data. In this case, connect your CLIÉ handheld to the charger cradle. •...

CLIE Handbook
Page 173
Protecting your data with a password This chapter explains how to manage your personal details using the various applications of your CLIÉ handheld and how to protect your data with a password (Data protection 176 Turning off your CLIÉ handheld after locking 176 Setting your CLIÉ handheld with a password. Entering personal information 174 Locking your CLIÉ handheld to be locked automatically 178 Protecting data 179 Assigning a password 179 Changing or deleting a password 180 Hiding or masking private data 181
Protecting your data with a password This chapter explains how to manage your personal details using the various applications of your CLIÉ handheld and how to protect your data with a password (Data protection 176 Turning off your CLIÉ handheld after locking 176 Setting your CLIÉ handheld with a password. Entering personal information 174 Locking your CLIÉ handheld to be locked automatically 178 Protecting data 179 Assigning a password 179 Changing or deleting a password 180 Hiding or masking private data 181


