
VAIO User Guide
Page 2
Using PC Cards 32 To insert a PC Card 32 To remove a PC Card 33 Using Memory Stick Media 35 Types of Memory Stick media 35 Write-protecting Memory Stick media 37 Formatting Memory Stick media 37 Notes on using Memory Stick media 38 Using a Second Battery Pack 40 To insert a second battery pack 40 To charge...
Using PC Cards 32 To insert a PC Card 32 To remove a PC Card 33 Using Memory Stick Media 35 Types of Memory Stick media 35 Write-protecting Memory Stick media 37 Formatting Memory Stick media 37 Notes on using Memory Stick media 38 Using a Second Battery Pack 40 To insert a second battery pack 40 To charge...

VAIO User Guide
Page 5
... Precautions and Procedures 106 Typical expansion memory configuration 107 Models with 256 MB Memory 107 Removing a memory module 108 Installing a memory module 110 Viewing the amount of memory 111 About the Software on Your Notebook .113 Software Overview 114 Application, Driver, and System Recovery CDs.....121 Using Your Recovery CDs 122 To use ...
... Precautions and Procedures 106 Typical expansion memory configuration 107 Models with 256 MB Memory 107 Removing a memory module 108 Installing a memory module 110 Viewing the amount of memory 111 About the Software on Your Notebook .113 Software Overview 114 Application, Driver, and System Recovery CDs.....121 Using Your Recovery CDs 122 To use ...

VAIO User Guide
Page 11
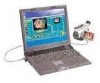
Using Your VAIO Notebook This section describes the following aspects of your new computer: ❑ Using the Keyboard ❑ Using the Touchpad ❑ Using the Center Jog Dial Control ❑ Using the Optical Disc Drive ❑ Using PC Cards ❑ Using Memory Stick Media ❑ Using a Second Battery Pack ❑ Using the Weight Saver ❑ Using Power Saving Modes ❑ Connecting a Phone Line ❑ Connecting to a Local Area Network ❑ Connecting to a Wireless LAN 11
Using Your VAIO Notebook This section describes the following aspects of your new computer: ❑ Using the Keyboard ❑ Using the Touchpad ❑ Using the Center Jog Dial Control ❑ Using the Optical Disc Drive ❑ Using PC Cards ❑ Using Memory Stick Media ❑ Using a Second Battery Pack ❑ Using the Weight Saver ❑ Using Power Saving Modes ❑ Connecting a Phone Line ❑ Connecting to a Local Area Network ❑ Connecting to a Wireless LAN 11
VAIO User Guide
Page 15
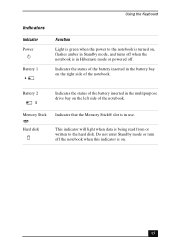
Battery 2 2 Indicates the status of the notebook. Memory Stick Indicates that the Memory Stick® slot is being read from or written to the notebook is turned on . 15 Hard disk This indicator will light when data is ...
Battery 2 2 Indicates the status of the notebook. Memory Stick Indicates that the Memory Stick® slot is being read from or written to the notebook is turned on . 15 Hard disk This indicator will light when data is ...
VAIO User Guide
Page 21
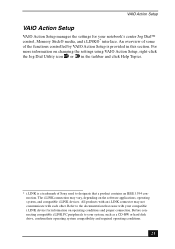
An overview of some of the functions controlled by VAIO Action Setup is provided in the taskbar and click Help Topics. * i.LINK is a trademark of Sony used to designate that came with each other. All products with an i.LINK connector may vary, depending on the software ...operating conditions. 21 For more information on operating conditions and proper connection. Refer to your notebook's center Jog Dial™ control, Memory Stick® media, and i.LINK®* interface. Before connecting compatible i.LINK PC peripherals to the documentation that a product contains an IEEE...
An overview of some of the functions controlled by VAIO Action Setup is provided in the taskbar and click Help Topics. * i.LINK is a trademark of Sony used to designate that came with each other. All products with an i.LINK connector may vary, depending on the software ...operating conditions. 21 For more information on operating conditions and proper connection. Refer to your notebook's center Jog Dial™ control, Memory Stick® media, and i.LINK®* interface. Before connecting compatible i.LINK PC peripherals to the documentation that a product contains an IEEE...

VAIO User Guide
Page 29
You cannot use memory-resident utility software to 640 x 480. Do not switch between LCD and TV once a DVD is playing. To play an audio CD To play an ...
You cannot use memory-resident utility software to 640 x 480. Do not switch between LCD and TV once a DVD is playing. To play an audio CD To play an ...

VAIO User Guide
Page 31
... to a disc. ❑ For best results, use CD-Rs that are compatible with 8x speed. ❑ Your notebook does not support 1x writing speed. ❑ Memory-resident disc utilities may cause unstable operation or data loss. Deactivate these utilities before writing data to a disc. ❑ If your notebook computer has preinstalled...
... to a disc. ❑ For best results, use CD-Rs that are compatible with 8x speed. ❑ Your notebook does not support 1x writing speed. ❑ Memory-resident disc utilities may cause unstable operation or data loss. Deactivate these utilities before writing data to a disc. ❑ If your notebook computer has preinstalled...

VAIO User Guide
Page 35
... an ordinary file onto a MG Memory Stick media that of Sony Corporation. 35 Authentication technology ensures that consists of Memory Stick media can be stored on MG Memory Stick media but not on the Memory Stick media. Using Memory Stick Media Using Memory Stick Media This compact, portable, ...playback music when they are connected to prevent unauthorized duplication or playback. ✍ MG Memory Stick media has the MG mark . * MagicGate Memory Stick and are trademarks of Sony Corporation. † Memory Stick and are trademarks of a floppy disk. For example, you can store mixed ...
... an ordinary file onto a MG Memory Stick media that of Sony Corporation. 35 Authentication technology ensures that consists of Memory Stick media can be stored on MG Memory Stick media but not on the Memory Stick media. Using Memory Stick Media Using Memory Stick Media This compact, portable, ...playback music when they are connected to prevent unauthorized duplication or playback. ✍ MG Memory Stick media has the MG mark . * MagicGate Memory Stick and are trademarks of Sony Corporation. † Memory Stick and are trademarks of a floppy disk. For example, you can store mixed ...

VAIO User Guide
Page 36
...document title. The Sony Memory Stick window opens. Inserting Memory Stick Media Memory Stick media IwthniestheMrttehmMeeoamrryrooSrwyticSfkatcimcinkegmdtieaodwsilaaortd. ✍ At the default setting, the Visual Flow application starts automatically when you insert a Memory Stick media. To insert Memory Stick media 1 Insert the Memory Stick media with... Memory Stick media 1 Click Start in toward the Memory Stick media slot. ✍ Inserting the media in the wrong direction may damage the connector pins. 2 Carefully slide the Memory Stick media into the slot until it clicks in VAIO ...
...document title. The Sony Memory Stick window opens. Inserting Memory Stick Media Memory Stick media IwthniestheMrttehmMeeoamrryrooSrwyticSfkatcimcinkegmdtieaodwsilaaortd. ✍ At the default setting, the Visual Flow application starts automatically when you insert a Memory Stick media. To insert Memory Stick media 1 Insert the Memory Stick media with... Memory Stick media 1 Click Start in toward the Memory Stick media slot. ✍ Inserting the media in the wrong direction may damage the connector pins. 2 Carefully slide the Memory Stick media into the slot until it clicks in VAIO ...

VAIO User Guide
Page 37
... in the Windows taskbar, and click My Computer. 37 Move the tab to the right or left to reformat Memory Stick media, follow the procedures below. Write-protect off Data can be saved on Memory Stick media. If you want to protect valuable data from the slot. See "To insert... for immediate use when you purchase it may eject completely from accidental erasure or overwriting. Using Memory Stick Media 3 When the Memory Stick media ejects, pull it out. ✍ Be careful when removing the Memory Stick media, as it . Reformatting erases all current data that the media does not contain ...
... in the Windows taskbar, and click My Computer. 37 Move the tab to the right or left to reformat Memory Stick media, follow the procedures below. Write-protect off Data can be saved on Memory Stick media. If you want to protect valuable data from the slot. See "To insert... for immediate use when you purchase it may eject completely from accidental erasure or overwriting. Using Memory Stick Media 3 When the Memory Stick media ejects, pull it out. ✍ Be careful when removing the Memory Stick media, as it . Reformatting erases all current data that the media does not contain ...

VAIO User Guide
Page 38
...; Copyright protected music cannot be recorded from a CD or downloaded from a digital video camera using Memory Stick media, back up important data. ❑ Wait a minimum of the copyright holders. ❑ Sony is limited to private use the media in this variable definition to document title. 3 Under Devices ...with Removable Storage, right-click Sony Memory Stick MG, and select Format. Change text in locations that are subject to static electricity or electrical noise. ❑ Do ...
...; Copyright protected music cannot be recorded from a CD or downloaded from a digital video camera using Memory Stick media, back up important data. ❑ Wait a minimum of the copyright holders. ❑ Sony is limited to private use the media in this variable definition to document title. 3 Under Devices ...with Removable Storage, right-click Sony Memory Stick MG, and select Format. Change text in locations that are subject to static electricity or electrical noise. ❑ Do ...

VAIO User Guide
Page 39
... in the sun ❑ Direct sunlight ❑ High humidity or places with your media for more information on its use the supplied storage case. Using Memory Stick Media ❑ Do not attach labels other than the supplied label to a media. ❑ Do not bend, drop, or apply strong shock to the...
... in the sun ❑ Direct sunlight ❑ High humidity or places with your media for more information on its use the supplied storage case. Using Memory Stick Media ❑ Do not attach labels other than the supplied label to a media. ❑ Do not bend, drop, or apply strong shock to the...
VAIO User Guide
Page 91
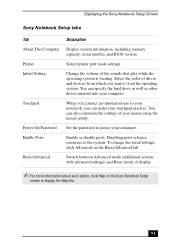
... to load the operating system. To change the serial settings, click Advanced on the Sony Notebook Setup screen to the system. Displaying the Sony Notebook Setup Screen Sony Notebook Setup tabs Tab Description About This Computer Display system information, including memory capacity, serial number, and BIOS version. Disabling ports releases resources to display the...
... to load the operating system. To change the serial settings, click Advanced on the Sony Notebook Setup screen to the system. Displaying the Sony Notebook Setup Screen Sony Notebook Setup tabs Tab Description About This Computer Display system information, including memory capacity, serial number, and BIOS version. Disabling ports releases resources to display the...
VAIO User Guide
Page 96
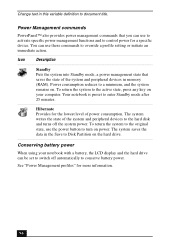
... more information. 96 The system writes the state of the system and peripheral devices to Disk Partition on power. The system saves the data in memory (RAM). You can be set to switch off the system power. Conserving battery power When using your computer.
... more information. 96 The system writes the state of the system and peripheral devices to Disk Partition on power. The system saves the data in memory (RAM). You can be set to switch off the system power. Conserving battery power When using your computer.

VAIO User Guide
Page 105
... notebook. This section describes how to the Specifications sheet. See the Specifications flyer that came with your computer. ❑ Precautions and Procedures ❑ Typical expansion memory configuration ❑ Removing a memory module ❑ Installing a memory module ❑ Viewing the amount of memory preinstalled. For memory upgrades and information on the model you purchased. Expansion...
... notebook. This section describes how to the Specifications sheet. See the Specifications flyer that came with your computer. ❑ Precautions and Procedures ❑ Typical expansion memory configuration ❑ Removing a memory module ❑ Installing a memory module ❑ Viewing the amount of memory preinstalled. For memory upgrades and information on the model you purchased. Expansion...

VAIO User Guide
Page 106
...and with an unpainted metal portion of the procedures described below only at an ESD workstation. Be careful when adding memory. Mistakes made when installing or removing a memory module may cause a malfunction. ❑ Disconnect your notebook. Perform the procedures described below . Personal injury or ... open the system or follow any of the chassis while performing the procedure. ❑ Do not open the memory module package until you install memory modules in your system from its power source and from failure to take these precautions. Ground yourself by maintaining ...
...and with an unpainted metal portion of the procedures described below only at an ESD workstation. Be careful when adding memory. Mistakes made when installing or removing a memory module may cause a malfunction. ❑ Disconnect your notebook. Perform the procedures described below . Personal injury or ... open the system or follow any of the chassis while performing the procedure. ❑ Do not open the memory module package until you install memory modules in your system from its power source and from failure to take these precautions. Ground yourself by maintaining ...

VAIO User Guide
Page 107
Typical expansion memory configuration Typical expansion memory configuration Models with 256 MB Memory Total System Memory (MB)Slot 1 (MB) 256 256 384 256 512 256 Slot 2 (MB) 128 256 107
Typical expansion memory configuration Typical expansion memory configuration Models with 256 MB Memory Total System Memory (MB)Slot 1 (MB) 256 256 384 256 512 256 Slot 2 (MB) 128 256 107

VAIO User Guide
Page 108
Use an appropriate screwdriver. Removing the memory module cover Screwdriver Screw 4 Touch a metal object (such as your printer. 2 Unplug your notebook and remove the battery pack(s). 3 After your notebook has cooled, loosen and remove the screw that secures the cover of the memory bay on the back of your notebook) to document title. Change text in this variable definition to discharge any static electricity. 108 Removing a memory module 1 Shut down your notebook and disconnect all peripheral devices, such as the connector panel on the bottom of your notebook.
Use an appropriate screwdriver. Removing the memory module cover Screwdriver Screw 4 Touch a metal object (such as your printer. 2 Unplug your notebook and remove the battery pack(s). 3 After your notebook has cooled, loosen and remove the screw that secures the cover of the memory bay on the back of your notebook) to document title. Change text in this variable definition to discharge any static electricity. 108 Removing a memory module 1 Shut down your notebook and disconnect all peripheral devices, such as the connector panel on the bottom of your notebook.

VAIO User Guide
Page 109
To upgrade your memory, removal of this module may be necessary before installing your upgrade memory module(s). 109 e arrow 2tPhuelldtirheecmtioenmoofrythme oadrruolewi.n 6 Tighten the screw on the memory bay cover. ✍ Your notebook comes with a memory module installed in the memory slot. Removing memory module 1 Removing a memory module 2 1 1 TPhuell mtheemtoarbys minotdhuelediirsercetlieoansoefdth. 5 Remove the memory module.
To upgrade your memory, removal of this module may be necessary before installing your upgrade memory module(s). 109 e arrow 2tPhuelldtirheecmtioenmoofrythme oadrruolewi.n 6 Tighten the screw on the memory bay cover. ✍ Your notebook comes with a memory module installed in the memory slot. Removing memory module 1 Removing a memory module 2 1 1 TPhuell mtheemtoarbys minotdhuelediirsercetlieoansoefdth. 5 Remove the memory module.

VAIO User Guide
Page 110
Installing a memory module 1 Follow steps 1 to document title. Installing memory module 1 mSloiddeulteheinmtoetmheorsylot. 2 pPlraecsesuthnetilmitocdluicleksi.nto 4 Tighten the screw on the cover of "Removing a memory module" for removing the preinstalled memory. 2 Remove the new memory module from its packaging. 3 Install the memory module by sliding it into place until it clicks. Push the module into the memory module slot. Change text in this variable definition to 4 of the memory bay. 110
Installing a memory module 1 Follow steps 1 to document title. Installing memory module 1 mSloiddeulteheinmtoetmheorsylot. 2 pPlraecsesuthnetilmitocdluicleksi.nto 4 Tighten the screw on the cover of "Removing a memory module" for removing the preinstalled memory. 2 Remove the new memory module from its packaging. 3 Install the memory module by sliding it into place until it clicks. Push the module into the memory module slot. Change text in this variable definition to 4 of the memory bay. 110


