
Camera Operations Guide
Page 3
...Handycam Station Model DCRA-C111 and AC Power Adaptor Model AC-L25A/L25B. For customers in accordance with the instructions, may cause harmful interference to radio communications. Telephone No.: 858-942-2230 This device complies with the limits for a Class B digital device, pursuant to Part 15 of the camcorder... which the receiver is encouraged to try to Subpart B of Part 15 of Conformity Trade Name: SONY Model No.: DCR-PC350 Responsible Party: Sony Electronics Inc. Cassettes with Cassette Memory are designed to provide reasonable protection against harmful interference in order ...
...Handycam Station Model DCRA-C111 and AC Power Adaptor Model AC-L25A/L25B. For customers in accordance with the instructions, may cause harmful interference to radio communications. Telephone No.: 858-942-2230 This device complies with the limits for a Class B digital device, pursuant to Part 15 of the camcorder... which the receiver is encouraged to try to Subpart B of Part 15 of Conformity Trade Name: SONY Model No.: DCR-PC350 Responsible Party: Sony Electronics Inc. Cassettes with Cassette Memory are designed to provide reasonable protection against harmful interference in order ...

Camera Operations Guide
Page 4
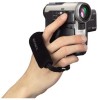
...procedures. However, there may cause a malfunction of the LCD screen and the viewfinder used on this manual are captured using the camcorder • Hold the camcorder, putting your wrist through the belt and your fingers lightly on the finger rest. • To ensure a good grip, ..., or this manual • The images of your camcorder. Note on connecting other device Before connecting your camcorder to other device such as shown in the proper direction. Finger rest LCD panel Battery pack 4 Notes on using a digital still camera, and thus may cause malfunctions. Then, touch...
...procedures. However, there may cause a malfunction of the LCD screen and the viewfinder used on this manual are captured using the camcorder • Hold the camcorder, putting your wrist through the belt and your fingers lightly on the finger rest. • To ensure a good grip, ..., or this manual • The images of your camcorder. Note on connecting other device Before connecting your camcorder to other device such as shown in the proper direction. Finger rest LCD panel Battery pack 4 Notes on using a digital still camera, and thus may cause malfunctions. Then, touch...

Camera Operations Guide
Page 5
...S VIDEO jack (for the S video cable). Notes on handling the Handycam Station • When attaching your camcorder to the Handycam Station, insert your camcorder in the direction of your camcorder off before inserting it into or removing it from the Handycam Station. The image might be distorted. 5 b Note • When... cover is open or the Strap Belt is caught between your camcorder and the Handycam Station. Be sure to insert it all the way. • When removing your camcorder from the Handycam Station. • Your camcorder may not attach properly to turn the power of the arrow ...
...S VIDEO jack (for the S video cable). Notes on handling the Handycam Station • When attaching your camcorder to the Handycam Station, insert your camcorder in the direction of your camcorder off before inserting it into or removing it from the Handycam Station. The image might be distorted. 5 b Note • When... cover is open or the Strap Belt is caught between your camcorder and the Handycam Station. Be sure to insert it all the way. • When removing your camcorder from the Handycam Station. • Your camcorder may not attach properly to turn the power of the arrow ...

Camera Operations Guide
Page 9
Additional Information Using your camcorder abroad ..........126 Usable cassette tapes 127 About the "Memory Stick 128 About the "InfoLITHIUM" battery pack 130 About i.LINK 132 Maintenance and precautions ..........133 Specification 136 Quick Reference Identifying parts and controls ...........139 Index 147 Refer also to other operating instructions supplied with your camcorder: • Editing images with your computer cComputer Applications Guide 9
Additional Information Using your camcorder abroad ..........126 Usable cassette tapes 127 About the "Memory Stick 128 About the "InfoLITHIUM" battery pack 130 About i.LINK 132 Maintenance and precautions ..........133 Specification 136 Quick Reference Identifying parts and controls ...........139 Index 147 Refer also to other operating instructions supplied with your camcorder: • Editing images with your computer cComputer Applications Guide 9

Camera Operations Guide
Page 10
... 2. when it clicks. a Slide the OPEN/ b Insert the cassette with its lever in the direction of 1 and push terminal side facing your camcorder it down the battery pack until it lifts up in the its window-side facing Close the cassette lid after direction of 3. The cassette compartment... direction of the arrow up . OPEN/EJECT lever Window-side 10 Quick Start Guide BATT (battery release) lever 2 Insert a cassette into the camcorder. To charge the battery, see page 16. as shown in the illustration and press Remove the battery terminal cover down in by itself. Quick ...
... 2. when it clicks. a Slide the OPEN/ b Insert the cassette with its lever in the direction of 1 and push terminal side facing your camcorder it down the battery pack until it lifts up in the its window-side facing Close the cassette lid after direction of 3. The cassette compartment... direction of the arrow up . OPEN/EJECT lever Window-side 10 Quick Start Guide BATT (battery release) lever 2 Insert a cassette into the camcorder. To charge the battery, see page 16. as shown in the illustration and press Remove the battery terminal cover down in by itself. Quick ...

Camera Operations Guide
Page 12
... Start Guide a Slide the BATT (battery release) b Attach the battery pack with its lever in the direction of 1 and push terminal side facing your camcorder it down the battery pack until it lifts up in the direction of 2. Insert it clicks. Recording still images 1 Attach the charged battery pack to... the camcorder. as shown in the illustration and press Remove the battery terminal cover down in until it so that the B mark is at the upper right...
... Start Guide a Slide the BATT (battery release) b Attach the battery pack with its lever in the direction of 1 and push terminal side facing your camcorder it down the battery pack until it lifts up in the direction of 2. Insert it clicks. Recording still images 1 Attach the charged battery pack to... the camcorder. as shown in the illustration and press Remove the battery terminal cover down in until it so that the B mark is at the upper right...

Camera Operations Guide
Page 15
... page 128 for details. Getting started Getting started 15 Handycam Station (1) Wireless Remote Commander (1) A button-type lithium battery is not separately available in the same color as your camcorder. "Memory Stick Duo" 16MB (1) You can use only a "Memory Stick Duo," which is about half the size... of a standard "Memory Stick," in parentheses indicates the number of the devices compatible with your camcorder is silver, the battery pack NP-FF51 is already installed. USB cable (1) Shoulder Strap (1) AC Adaptor (1) Power cord (1) Lens cap (1)...
... page 128 for details. Getting started Getting started 15 Handycam Station (1) Wireless Remote Commander (1) A button-type lithium battery is not separately available in the same color as your camcorder. "Memory Stick Duo" 16MB (1) You can use only a "Memory Stick Duo," which is about half the size... of a standard "Memory Stick," in parentheses indicates the number of the devices compatible with your camcorder is silver, the battery pack NP-FF51 is already installed. USB cable (1) Shoulder Strap (1) AC Adaptor (1) Power cord (1) Lens cap (1)...

Camera Operations Guide
Page 16
...up in the direction of 3. BATT (battery release) lever 2 Attach the battery pack with any malfunction occurs. 1 Attach the charged battery pack to the camcorder. 1 Slide the BATT (battery release) lever in the direction of 1 and push it down the battery pack until it clicks. b Note • ...You can charge the battery by attaching the "InfoLITHIUM" battery pack (F series) to your camcorder as shown in the following illustration and press down in the direction of 2. DC plug DC IN jack Handycam Station Power cord To the wall outlet AC Adaptor 16 Getting started 2 With the v ...
...up in the direction of 3. BATT (battery release) lever 2 Attach the battery pack with any malfunction occurs. 1 Attach the charged battery pack to the camcorder. 1 Slide the BATT (battery release) lever in the direction of 1 and push it down the battery pack until it clicks. b Note • ...You can charge the battery by attaching the "InfoLITHIUM" battery pack (F series) to your camcorder as shown in the following illustration and press down in the direction of 2. DC plug DC IN jack Handycam Station Power cord To the wall outlet AC Adaptor 16 Getting started 2 With the v ...

Camera Operations Guide
Page 17
...up to drop the battery pack when you remove the battery pack if your camcorder into the Handycam Station. To charge the battery pack using only the AC Adaptor DC plug... DC IN jack Power cord To the wall outlet AC Adaptor You can charge the battery pack on your camcorder as shown in... POWER switch (battery release) lever 1 Set the POWER switch to protect the battery terminal. 5 Insert your camcorder is fully charged. To remove the battery pack Battery pack Getting started 17 With the v mark on the ...
...up to drop the battery pack when you remove the battery pack if your camcorder into the Handycam Station. To charge the battery pack using only the AC Adaptor DC plug... DC IN jack Power cord To the wall outlet AC Adaptor You can charge the battery pack on your camcorder as shown in... POWER switch (battery release) lever 1 Set the POWER switch to protect the battery terminal. 5 Insert your camcorder is fully charged. To remove the battery pack Battery pack Getting started 17 With the v mark on the ...

Camera Operations Guide
Page 19
...-FF70 260 NP-FF71 285 LCD panel closed 135 155 285 310 * With LCD BACKLIGHT set to the DC IN jack of the Handycam Station and your camcorder as the power source when you do not want the battery to OFF (CHG). The battery pack is not attached correctly. - The... battery pack is fully discharged. (For Battery information only.) • With a large capacity battery pack (NP-FF70/FF71) installed, your camcorder will be less balanced support it is disconnected from the wall outlet in "Charging the battery pack" (p. 16). Step 3: Turning the power on . Getting ...
...-FF70 260 NP-FF71 285 LCD panel closed 135 155 285 310 * With LCD BACKLIGHT set to the DC IN jack of the Handycam Station and your camcorder as the power source when you do not want the battery to OFF (CHG). The battery pack is not attached correctly. - The... battery pack is fully discharged. (For Battery information only.) • With a large capacity battery pack (NP-FF70/FF71) installed, your camcorder will be less balanced support it is disconnected from the wall outlet in "Charging the battery pack" (p. 16). Step 3: Turning the power on . Getting ...

Camera Operations Guide
Page 20
...; Even if you can turn off the LCD screen backlight. ( appears on the screen, touch / . LCD BACKLIGHT Open the LCD panel 90 degrees to the camcorder, then rotate it , touch [MENU], (STANDARD SET) menu, then touch [LCD/VF SET] (p. 85). 3 Adjust the item with the LCD screen facing out. ... the LCD screen backlight, the recorded picture will not be affected. • You can check the subject on 20 Getting started To use your camcorder in bright conditions, press LCD BACKLIGHT to see. Step 4: Adjusting the LCD panel and viewfinder Adjusting the LCD panel You can close the LCD...
...; Even if you can turn off the LCD screen backlight. ( appears on the screen, touch / . LCD BACKLIGHT Open the LCD panel 90 degrees to the camcorder, then rotate it , touch [MENU], (STANDARD SET) menu, then touch [LCD/VF SET] (p. 85). 3 Adjust the item with the LCD screen facing out. ... the LCD screen backlight, the recorded picture will not be affected. • You can check the subject on 20 Getting started To use your camcorder in bright conditions, press LCD BACKLIGHT to see. Step 4: Adjusting the LCD panel and viewfinder Adjusting the LCD panel You can close the LCD...

Camera Operations Guide
Page 21
...select (STANDARD SET) menu, [LCD/VF SET], then [VF B.LIGHT] (when you are displayed. 6 Touch the button you turn on your camcorder. are using this camcorder for about 3 months, the built-in the CAMERA- Proceed to step 7 when you do not set the date and time, the [CLOCK SET... screen. 3 Touch . [Set LCD off . 5 Touch the LCD screen while checking the display in the viewfinder. [EXPOSURE], etc. If you do not use your camcorder (p. 19). 2 Open the LCD panel. In that case, charge the rechargeable button-type battery (p. 135) and then set . • [EXPOSURE]: Adjust with / and...
...select (STANDARD SET) menu, [LCD/VF SET], then [VF B.LIGHT] (when you are displayed. 6 Touch the button you turn on your camcorder. are using this camcorder for about 3 months, the built-in the CAMERA- Proceed to step 7 when you do not set the date and time, the [CLOCK SET... screen. 3 Touch . [Set LCD off . 5 Touch the LCD screen while checking the display in the viewfinder. [EXPOSURE], etc. If you do not use your camcorder (p. 19). 2 Open the LCD panel. In that case, charge the rechargeable button-type battery (p. 135) and then set . • [EXPOSURE]: Adjust with / and...

Camera Operations Guide
Page 22
... direction of the cassette lightly. 22 Getting started SHUT OFF CLOCK SET WORLD --:--:-- For midnight, set it to move. This may cause a malfunction of your camcorder. 1 Slide the OPEN/EJECT lever in the same way as write- protection), see page 127. DATE 2004 Y JAN M 1D 12: 00 AM OK 7 Set [Y] (year...
... direction of the cassette lightly. 22 Getting started SHUT OFF CLOCK SET WORLD --:--:-- For midnight, set it to move. This may cause a malfunction of your camcorder. 1 Slide the OPEN/EJECT lever in the same way as write- protection), see page 127. DATE 2004 Y JAN M 1D 12: 00 AM OK 7 Set [Y] (year...

Camera Operations Guide
Page 23
To eject the cassette 1 Slide the OPEN/EJECT lever in your camcorder (p. 128). b Note • You can use only a "Memory Stick Duo," which is about half the size of a standard "Memory Stick," in the direction of "Memory ...
To eject the cassette 1 Slide the OPEN/EJECT lever in your camcorder (p. 128). b Note • You can use only a "Memory Stick Duo," which is about half the size of a standard "Memory Stick," in the direction of "Memory ...

Camera Operations Guide
Page 24
... [LANGUAGE]. Step 7: Setting the screen language You can select the language to the "Memory Stick Duo." Do not shake or knock your camcorder is lit or flashing, your camcorder, turn the power off, eject the "Memory Stick Duo," or remove the battery pack. If you cannot find it, touch [MENU],...from /to be used on the LCD screen. 24 Getting started POWER switch 1 Turn on the screen, touch / . Doing so may cause a malfunction of your camcorder. • When the access lamp is reading/writing data from the (TIME/LANGU.) menu (p. 89). 60min LANGUAGE: STBY 0:00:00 ENGLISH ENG L I SH...
... [LANGUAGE]. Step 7: Setting the screen language You can select the language to the "Memory Stick Duo." Do not shake or knock your camcorder is lit or flashing, your camcorder, turn the power off, eject the "Memory Stick Duo," or remove the battery pack. If you cannot find it, touch [MENU],...from /to be used on the LCD screen. 24 Getting started POWER switch 1 Turn on the screen, touch / . Doing so may cause a malfunction of your camcorder. • When the access lamp is reading/writing data from the (TIME/LANGU.) menu (p. 89). 60min LANGUAGE: STBY 0:00:00 ENGLISH ENG L I SH...

Camera Operations Guide
Page 25
Getting started 5 Select the desired language with / , then touch . z Tip • Your camcorder offers [ENG [SIMP]] (simplified English) for when you cannot find your native tongue among the options. Getting started 25
Getting started 5 Select the desired language with / , then touch . z Tip • Your camcorder offers [ENG [SIMP]] (simplified English) for when you cannot find your native tongue among the options. Getting started 25
Camera Operations Guide
Page 26
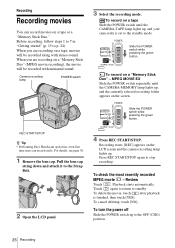
... switch until the CAMERA-MEMORY lamp lights up . Slide the POWER switch while pressing the green button. REC START/STOP z Tip • Performing Easy Handycam operation, even first time users can record movies on a "Memory Stick Duo" - Playback starts automatically. Touch again to return to the standby mode. ...recorded with stereo sound. Slide the POWER switch while pressing the green button. To turn the power off Slide the POWER switch up , and your camcorder is finished, then touch [YES]. Pull the lens cap string down and attach it to the OFF (CHG) position. 26 Recording To check ...
... switch until the CAMERA-MEMORY lamp lights up . Slide the POWER switch while pressing the green button. REC START/STOP z Tip • Performing Easy Handycam operation, even first time users can record movies on a "Memory Stick Duo" - Playback starts automatically. Touch again to return to the standby mode. ...recorded with stereo sound. Slide the POWER switch while pressing the green button. To turn the power off Slide the POWER switch up , and your camcorder is finished, then touch [YES]. Pull the lens cap string down and attach it to the OFF (CHG) position. 26 Recording To check ...

Camera Operations Guide
Page 27
...:00 320 2min P-MENU P-MENU Recording A Indicators for more than about 1 minute to display the correct remaining battery time. When you do not operate the camcorder for Cassette Memory cassettes B Approximate remaining battery and continuous recording time The indicated time may not be recorded on the tape. In order to use...
...:00 320 2min P-MENU P-MENU Recording A Indicators for more than about 1 minute to display the correct remaining battery time. When you do not operate the camcorder for Cassette Memory cassettes B Approximate remaining battery and continuous recording time The indicated time may not be recorded on the tape. In order to use...
Camera Operations Guide
Page 28
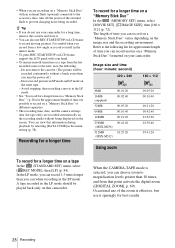
... mode should be recorded continuously without being recorded. The length of time you can record movies on a "Memory Stick Duo" formatted on your camcorder for a long time, remove the cassette and store it sparingly for best results. 28 Recording Avoid stopping, then recording a movie in the...pictures in the SP mode. You can also use your camcorder. In the LP mode, you can choose zoom to record moving pictures. When the CAMERA-TAPE mode is useful when you record from that point activate the digital zoom ([DIGITAL ZOOM], p. 69). Recording for a longer time To ...
... mode should be recorded continuously without being recorded. The length of time you can record movies on a "Memory Stick Duo" formatted on your camcorder for a long time, remove the cassette and store it sparingly for best results. 28 Recording Avoid stopping, then recording a movie in the...pictures in the SP mode. You can also use your camcorder. In the LP mode, you can choose zoom to record moving pictures. When the CAMERA-TAPE mode is useful when you record from that point activate the digital zoom ([DIGITAL ZOOM], p. 69). Recording for a longer time To ...

Camera Operations Guide
Page 29
... zoom lever slightly for a faster zoom. To record wider range of small children attracted to the camcorder while you record them. 80 cm (approx. 2 5/8 feet)* * The minimum distance required between your camcorder and the subject to the camcorder, then rotate it further for a slower zoom. To use the zoom buttons on LCD frame...
... zoom lever slightly for a faster zoom. To record wider range of small children attracted to the camcorder while you record them. 80 cm (approx. 2 5/8 feet)* * The minimum distance required between your camcorder and the subject to the camcorder, then rotate it further for a slower zoom. To use the zoom buttons on LCD frame...


