α Handbook
Page 2
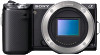
... for information in a listing of menu items. Search for a function you want to the corresponding page. Operate the camera in this handbook In this handbook Click on a button at upper right on using the camera How to use . Marks and notations used in the order indicated. Table of contents Sample photo...
... for information in a listing of menu items. Search for a function you want to the corresponding page. Operate the camera in this handbook In this handbook Click on a button at upper right on using the camera How to use . Marks and notations used in the order indicated. Table of contents Sample photo...

α Handbook
Page 6
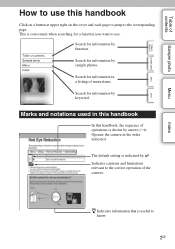
Table of operation. Click the desired sample photo. See the pages in parentheses for details of contents Sample photo Menu Index Sample photo "This is the scene I want to ... I do?" Shooting people (page 7) Shooting macro photos (page 8) Shooting landscapes (page 9) Shooting sunset/night scenes (page 10) Shooting fast moving subjects (page 11) If you click on the screen of photo. Refer to the page describing the function recommended for shooting that kind of the camera. You may find the answer...
Table of operation. Click the desired sample photo. See the pages in parentheses for details of contents Sample photo Menu Index Sample photo "This is the scene I want to ... I do?" Shooting people (page 7) Shooting macro photos (page 8) Shooting landscapes (page 9) Shooting sunset/night scenes (page 10) Shooting fast moving subjects (page 11) If you click on the screen of photo. Refer to the page describing the function recommended for shooting that kind of the camera. You may find the answer...

α Handbook
Page 55
..., the shutter speed is slower, so using a tripod is recommended to prevent the image from blurring. • In the [Hand-held Twilight] mode, the shutter clicks six times and an image is recorded. • If you select [Hand-held Twilight] with [RAW] or [RAW & JPEG], the image quality becomes [Fine] temporarily...
..., the shutter speed is slower, so using a tripod is recommended to prevent the image from blurring. • In the [Hand-held Twilight] mode, the shutter clicks six times and an image is recorded. • If you select [Hand-held Twilight] with [RAW] or [RAW & JPEG], the image quality becomes [Fine] temporarily...

α Handbook
Page 56
... water falls. • When using the flash, to the camera. - Subjects with [RAW] or [RAW & JPEG], the image quality becomes [Fine] temporarily. • The shutter clicks six times and an image is recorded. • Reducing blur is reduced while preventing noise. The camera combines six shots at high sensitivity into one...
... water falls. • When using the flash, to the camera. - Subjects with [RAW] or [RAW & JPEG], the image quality becomes [Fine] temporarily. • The shutter clicks six times and an image is recorded. • Reducing blur is reduced while preventing noise. The camera combines six shots at high sensitivity into one...
α Handbook
Page 57
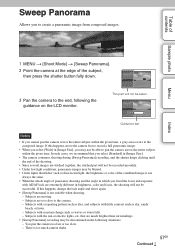
... be blurred. • Under lights that you select [Standard] in [Image Size]. • The camera continues shooting during [Sweep Panorama] recording, and the shutter keeps clicking until the end of the shooting. • Since several images are much camera shake. 57GB Continued r In such cases, we recommend that flicker such as...
... be blurred. • Under lights that you select [Standard] in [Image Size]. • The camera continues shooting during [Sweep Panorama] recording, and the shutter keeps clicking until the end of the shooting. • Since several images are much camera shake. 57GB Continued r In such cases, we recommend that flicker such as...

α Handbook
Page 59
... instructions of the connected device or the software used with W side. • The camera continues shooting during [3D Sweep Panorama] recording, and the shutter keeps clicking until the end of the shooting. • Since several images are stitched together, the stitched part will not be recorded smoothly. • Under low light...
... instructions of the connected device or the software used with W side. • The camera continues shooting during [3D Sweep Panorama] recording, and the shutter keeps clicking until the end of the shooting. • Since several images are stitched together, the stitched part will not be recorded smoothly. • Under low light...

α Handbook
Page 89
...] t [White Balance] t desired mode. 2 As necessary, Option t adjust the color temperature by turning the control wheel or touching the item on the screen. The shutter clicks and the calibrated values (color temperature and color filter) are displayed. 3 To call the custom white balance setting, MENU t [Brightness/Color] t [White Balance] t [Custom]. Table...
...] t [White Balance] t desired mode. 2 As necessary, Option t adjust the color temperature by turning the control wheel or touching the item on the screen. The shutter clicks and the calibrated values (color temperature and color filter) are displayed. 3 To call the custom white balance setting, MENU t [Brightness/Color] t [White Balance] t [Custom]. Table...

α Handbook
Page 167
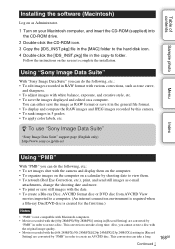
Make sure that both "Sony Image Data Suite" and "PMB" are checked and follow the instructions ...computer during the procedure following software is complete. The installation menu screen appears. • If it does not appear, double-click [Computer] (For Windows XP: [My Computer]) t (SONYPMB) t [Install.exe]. • If the AutoPlay screen appears... and follow the instructions on the screen. • Connect the camera to proceed with the installation. 2 Click [Install]. Double-click the "PMB Launcher" short-cut icon on the computer screen to use some functions may not work, such ...
Make sure that both "Sony Image Data Suite" and "PMB" are checked and follow the instructions ...computer during the procedure following software is complete. The installation menu screen appears. • If it does not appear, double-click [Computer] (For Windows XP: [My Computer]) t (SONYPMB) t [Install.exe]. • If the AutoPlay screen appears... and follow the instructions on the screen. • Connect the camera to proceed with the installation. 2 Click [Install]. Double-click the "PMB Launcher" short-cut icon on the computer screen to use some functions may not work, such ...
α Handbook
Page 168
... Data Suite" support page (English only) http://www.sony.co.jp/ids-se/ Menu Index Using "PMB" With "PMB" you can do the following , etc... on your Macintosh computer, and insert the CD-ROM (supplied) into the CD-ROM drive. 2 Double-click the CD-ROM icon. 3 Copy the [IDS_INST.pkg] file in the [MAC] folder to the hard disk icon. 4 Double...-click the [IDS_INST.pkg] file in the copy-to create a disc. Using "Sony Image Data Suite" With "Sony Image Data Suite" you cannot create a disc with the original image quality. • ...
... Data Suite" support page (English only) http://www.sony.co.jp/ids-se/ Menu Index Using "PMB" With "PMB" you can do the following , etc... on your Macintosh computer, and insert the CD-ROM (supplied) into the CD-ROM drive. 2 Double-click the CD-ROM icon. 3 Copy the [IDS_INST.pkg] file in the [MAC] folder to the hard disk icon. 4 Double...-click the [IDS_INST.pkg] file in the copy-to create a disc. Using "Sony Image Data Suite" With "Sony Image Data Suite" you cannot create a disc with the original image quality. • ...
α Handbook
Page 169
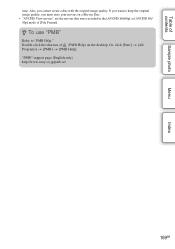
Also, you must store your movies on the desktop. If you want to "PMB Help." z To use "PMB" Refer to keep the original image quality, you cannot create a disc with the original image quality. Double-click the shortcut of (PMB Help) on a Blu-ray Disc. • "AVCHD View movies" are the movies that were recorded in the [AVCHD 60i/60p] or [AVCHD 50i/ 50p] mode of contents Sample photo Menu Index time. "PMB" support page (English only) http://www.sony.co.jp/pmb-se/ 169GB Or, click [Start] t [All Programs] t [PMB] t [PMB Help]. Table of [File Format].
Also, you must store your movies on the desktop. If you want to "PMB Help." z To use "PMB" Refer to keep the original image quality, you cannot create a disc with the original image quality. Double-click the shortcut of (PMB Help) on a Blu-ray Disc. • "AVCHD View movies" are the movies that were recorded in the [AVCHD 60i/60p] or [AVCHD 50i/ 50p] mode of contents Sample photo Menu Index time. "PMB" support page (English only) http://www.sony.co.jp/pmb-se/ 169GB Or, click [Start] t [All Programs] t [PMB] t [PMB Help]. Table of [File Format].

α Handbook
Page 170
...camera to a wall computer outlet (wall socket) using "PMB" When the AutoPlay Wizard appears after making a USB connection between the camera and a computer, click [Open folder to view files] t [OK] t [DCIM] or [MP_ROOT] t copy the desired images to recognize the camera. Continued r 170GB Wait ... "PMB" functions, see the "PMB Help." For details on the camera and the computer. 3 Connect the camera to your computer. Sony is established for consequences resulting from the computer. Table of contents Sample photo Connecting the camera to the computer 1 Insert a sufficiently charged...
...camera to a wall computer outlet (wall socket) using "PMB" When the AutoPlay Wizard appears after making a USB connection between the camera and a computer, click [Open folder to view files] t [OK] t [DCIM] or [MP_ROOT] t copy the desired images to recognize the camera. Continued r 170GB Wait ... "PMB" functions, see the "PMB Help." For details on the camera and the computer. 3 Connect the camera to your computer. Sony is established for consequences resulting from the computer. Table of contents Sample photo Connecting the camera to the computer 1 Insert a sufficiently charged...

α Handbook
Page 171
...; Disconnecting the USB cable. • Removing the memory card. • Turning off the camera. 1 Double-click the disconnect icon on the tasktray. 2 Click (USB Mass Storage Device) t [Stop]. 3 Confirm the device on the confirmation window, then click [OK]. Disconnect icon Windows Vista Windows XP Note • Drag and drop the icon of contents...
...; Disconnecting the USB cable. • Removing the memory card. • Turning off the camera. 1 Double-click the disconnect icon on the tasktray. 2 Click (USB Mass Storage Device) t [Stop]. 3 Confirm the device on the confirmation window, then click [OK]. Disconnect icon Windows Vista Windows XP Note • Drag and drop the icon of contents...

α Handbook
Page 174
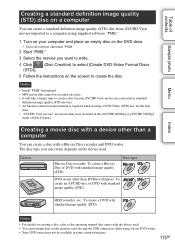
... place an empty disc on the DVD drive. 2 Start "PMB." 3 Select the AVCHD View movies you cannot create a disc with "PMB." To start the software, click on [Start] t [All Programs] t [PMB] t [PMB Launcher] t [View] t [Player for details. Connect your movies on a Blu-ray Disc. Also, you want...)/50i 24M (FX)]/[24p 24M (FX)/25p 24M (FX)] setting in [Record Setting] are movies that is installed together with the original image quality. Click [BD Add-on Software] on the installation screen of "PMB," and install this plug-in according to a computer. This conversion can take a long...
... place an empty disc on the DVD drive. 2 Start "PMB." 3 Select the AVCHD View movies you cannot create a disc with "PMB." To start the software, click on [Start] t [All Programs] t [PMB] t [PMB Launcher] t [View] t [Player for details. Connect your movies on a Blu-ray Disc. Also, you want...)/50i 24M (FX)]/[24p 24M (FX)/25p 24M (FX)] setting in [Record Setting] are movies that is installed together with the original image quality. Click [BD Add-on Software] on the installation screen of "PMB," and install this plug-in according to a computer. This conversion can take a long...
α Handbook
Page 175
... quality (STD) Index Notes • For details on creating a disc, refer to create the disc. The disc type you want to write. 4 Click (Disc Creation) to select [Create DVD-Video Format Discs (STD)]. 5 Follow the instructions on the screen to the operating manual that were recorded in...(STD) disc on a computer You can create a standard definition image quality (STD) disc from AVCHD View movies imported to a computer using a Sony DVD writer. • Sony DVD writer may not be recorded on a disc. • It will take a longer time to create a disc because AVCHD View movies are ...
... quality (STD) Index Notes • For details on creating a disc, refer to create the disc. The disc type you want to write. 4 Click (Disc Creation) to select [Create DVD-Video Format Discs (STD)]. 5 Follow the instructions on the screen to the operating manual that were recorded in...(STD) disc on a computer You can create a standard definition image quality (STD) disc from AVCHD View movies imported to a computer using a Sony DVD writer. • Sony DVD writer may not be recorded on a disc. • It will take a longer time to create a disc because AVCHD View movies are ...
Instruction Manual
Page 15
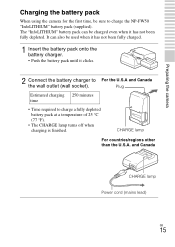
It can be charged even when it clicks. 2 Connect the battery charger to charge the NP-FW50 "InfoLITHIUM" battery pack (supplied). Preparing the camera Charging the battery pack When using the camera for ...
It can be charged even when it clicks. 2 Connect the battery charger to charge the NP-FW50 "InfoLITHIUM" battery pack (supplied). Preparing the camera Charging the battery pack When using the camera for ...

Instruction Manual
Page 19
...'s face downward to prevent the dust from entering into the camera. 3 While pushing the lens lightly toward the camera, turn the lens clockwise until it clicks into the locked position. • Be sure to put the lens on straight. Preparing the camera Attaching/removing the lens Set the power switch of...
...'s face downward to prevent the dust from entering into the camera. 3 While pushing the lens lightly toward the camera, turn the lens clockwise until it clicks into the locked position. • Be sure to put the lens on straight. Preparing the camera Attaching/removing the lens Set the power switch of...

Instruction Manual
Page 21
Preparing the camera 2 Insert a memory card. • Insert the memory card until it clicks as illustrated. 3 Close the cover. x Memory cards that you can use You can use MultiMediaCard. However, proper operation cannot be guaranteed for all types of ...
Preparing the camera 2 Insert a memory card. • Insert the memory card until it clicks as illustrated. 3 Close the cover. x Memory cards that you can use You can use MultiMediaCard. However, proper operation cannot be guaranteed for all types of ...

Instruction Manual
Page 46
Shows the displayed area of the shooting. Guidance bar Note • The camera continues shooting during [Sweep Panorama] recording, and the shutter keeps clicking until the end of the whole panoramic GB image. 46 Press it again to the end, following the guidance on the screen. • Panoramic images ...
Shows the displayed area of the shooting. Guidance bar Note • The camera continues shooting during [Sweep Panorama] recording, and the shutter keeps clicking until the end of the whole panoramic GB image. 46 Press it again to the end, following the guidance on the screen. • Panoramic images ...

Instruction Manual
Page 66
... shortcut icons appear on the system environment of your computer, and insert the CD-ROM (supplied) into the CD-ROM drive. 2 Double-click the CD-ROM icon. OS (pre-installed) "Image Data Converter" USB Connection: Mac OS X (v10.3 to the computer during the ...the restarting confirmation message appears, restart the computer following computer environment is recommended. GB 66 The installation menu screen appears. 2 Click [Install]. • Make sure that both "Sony Image Data Suite" and "PMB" are checked and follow the instructions on the screen. • Connect the camera to v10...
... shortcut icons appear on the system environment of your computer, and insert the CD-ROM (supplied) into the CD-ROM drive. 2 Double-click the CD-ROM icon. OS (pre-installed) "Image Data Converter" USB Connection: Mac OS X (v10.3 to the computer during the ...the restarting confirmation message appears, restart the computer following computer environment is recommended. GB 66 The installation menu screen appears. 2 Click [Install]. • Make sure that both "Sony Image Data Suite" and "PMB" are checked and follow the instructions on the screen. • Connect the camera to v10...
Instruction Manual
Page 67
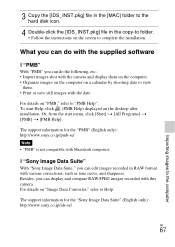
...refer to "PMB Help". The support information for the "PMB" (English only): http://www.sony.co.jp/pmb-se/ Note • "PMB" is not compatible with this camera. Or, from the start Help, click (PMB Help) displayed on the screen to complete the installation. For details on "Image ....jp/ids-se/ GB 67 Importing images to the computer x "Sony Image Data Suite" With "Sony Image Data Suite," you can edit images recorded in the copy-to folder. • Follow the instructions on the desktop after installation. To start menu, click [Start] t [All Programs] t [PMB] t [PMB Help]. 3 Copy...
...refer to "PMB Help". The support information for the "PMB" (English only): http://www.sony.co.jp/pmb-se/ Note • "PMB" is not compatible with this camera. Or, from the start Help, click (PMB Help) displayed on the screen to complete the installation. For details on "Image ....jp/ids-se/ GB 67 Importing images to the computer x "Sony Image Data Suite" With "Sony Image Data Suite," you can edit images recorded in the copy-to folder. • Follow the instructions on the desktop after installation. To start menu, click [Start] t [All Programs] t [PMB] t [PMB Help]. 3 Copy...