α Handbook
Page 1
4-288-171-11(1) Interchangeable Lens Digital Camera α Handbook Table of contents Sample photo Menu Index NEX-5N GB © 2011 Sony Corporation
4-288-171-11(1) Interchangeable Lens Digital Camera α Handbook Table of contents Sample photo Menu Index NEX-5N GB © 2011 Sony Corporation
α Handbook
Page 12
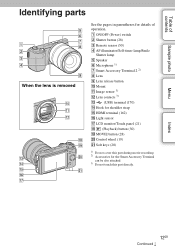
... button (28) C Remote sensor (50) D AF illuminator/Self-timer lamp/Smile Shutter lamp E Speaker F Microphone 1) G Smart Accessory Terminal 2 2) H Lens I Lens release button J Mount K Image sensor 3) L Lens contacts 3) M (USB) terminal (170) N Hook for shoulder strap O HDMI terminal (162) P Light sensor Q LCD monitor/Touch panel (21) R ...) 1) Do not cover this part during movie recording. 2) Accessories for details of contents Sample photo Identifying parts When the lens is removed See the pages in parentheses for the Smart Accessory Terminal can be also attached. 3) Do not touch this part...
... button (28) C Remote sensor (50) D AF illuminator/Self-timer lamp/Smile Shutter lamp E Speaker F Microphone 1) G Smart Accessory Terminal 2 2) H Lens I Lens release button J Mount K Image sensor 3) L Lens contacts 3) M (USB) terminal (170) N Hook for shoulder strap O HDMI terminal (162) P Light sensor Q LCD monitor/Touch panel (21) R ...) 1) Do not cover this part during movie recording. 2) Accessories for details of contents Sample photo Identifying parts When the lens is removed See the pages in parentheses for the Smart Accessory Terminal can be also attached. 3) Do not touch this part...
α Handbook
Page 14
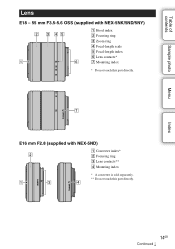
Table of contents Sample photo Menu Index Lens E18 - 55 mm F3.5-5.6 OSS (supplied with NEX-5ND) A Converter index* B Focusing ring C Lens contacts** D Mounting index * A converter is sold separately. ** Do not touch this part directly. E16 mm F2.8 (supplied with NEX-5NK/5ND/5NY) A Hood index B Focusing ring C Zoom ring D Focal-length scale E Focal-length index F Lens contacts* G Mounting index * Do not touch this part directly. 14GB Continued r
Table of contents Sample photo Menu Index Lens E18 - 55 mm F3.5-5.6 OSS (supplied with NEX-5ND) A Converter index* B Focusing ring C Lens contacts** D Mounting index * A converter is sold separately. ** Do not touch this part directly. E16 mm F2.8 (supplied with NEX-5NK/5ND/5NY) A Hood index B Focusing ring C Zoom ring D Focal-length scale E Focal-length index F Lens contacts* G Mounting index * Do not touch this part directly. 14GB Continued r
α Handbook
Page 15
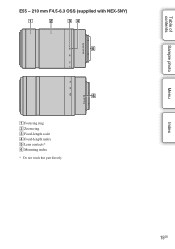
E55 - 210 mm F4.5-6.3 OSS (supplied with NEX-5NY) Table of contents Sample photo Menu Index A Focusing ring B Zoom ring C Focal-length scale D Focal-length index E Lens contacts* F Mounting index * Do not touch this part directly. 15GB
E55 - 210 mm F4.5-6.3 OSS (supplied with NEX-5NY) Table of contents Sample photo Menu Index A Focusing ring B Zoom ring C Focal-length scale D Focal-length index E Lens contacts* F Mounting index * Do not touch this part directly. 15GB

α Handbook
Page 26
... Auto Review Grid Line Peaking Level Peaking Color MF Assist MF Assist Time Color Space SteadyShot Release w/o Lens Eye-Start AF Front Curtain Shutter Long Exposure NR High ISO NR Lens Comp.: Shading Lens Comp.: Chro. Main Settings Menu start Sets the AF illuminator to prevent eyes from the top menu ....: Distortion Movie Audio Rec Wind Noise Reduct. on the grid line that helps you to release the shutter when there is no lens. Sets whether or not to adjust the composition of images. Sets the noise reduction processing for long exposure shootings. Continued r 26GB Turns on the...
... Auto Review Grid Line Peaking Level Peaking Color MF Assist MF Assist Time Color Space SteadyShot Release w/o Lens Eye-Start AF Front Curtain Shutter Long Exposure NR High ISO NR Lens Comp.: Shading Lens Comp.: Chro. Main Settings Menu start Sets the AF illuminator to prevent eyes from the top menu ....: Distortion Movie Audio Rec Wind Noise Reduct. on the grid line that helps you to release the shutter when there is no lens. Sets whether or not to adjust the composition of images. Sets the noise reduction processing for long exposure shootings. Continued r 26GB Turns on the...
α Handbook
Page 27
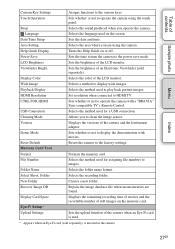
... Card Tool Format Formats the memory card. Date/Time Setup Sets the date and time. LCD Brightness Sets the brightness of the camera and the lens/mount adaptor. Wide Image Selects a method to the various keys. Demo Mode Sets whether or not to images. Language Selects the language used to operate...
... Card Tool Format Formats the memory card. Date/Time Setup Sets the date and time. LCD Brightness Sets the brightness of the camera and the lens/mount adaptor. Wide Image Selects a method to the various keys. Demo Mode Sets whether or not to images. Language Selects the language used to operate...
α Handbook
Page 33
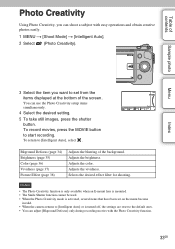
... is turned off, the settings are reset to start recording. Adjusts the brightness. Notes • The Photo Creativity function is only available when an E-mount lens is mounted. • The Smile Shutter function cannot be used. • When the Photo Creativity mode is activated, several items that have been set from...
... is turned off, the settings are reset to start recording. Adjusts the brightness. Notes • The Photo Creativity function is only available when an E-mount lens is mounted. • The Smile Shutter function cannot be used. • When the Photo Creativity mode is activated, several items that have been set from...

α Handbook
Page 34
... of Background Defocus • Move closer to make the subject stand out, while checking the defocusing effect on the distance from the subject or the lens used . • The defocusing effect may not be noticeable, depending on the LCD monitor. You can record a movie with a value adjusted with the defocusing effect... Defocus]. 4 Defocus the background. : To focus : To defocus Select AUTO to restore to the original status. Notes • The defocusing range available depends on the lens used .
... of Background Defocus • Move closer to make the subject stand out, while checking the defocusing effect on the distance from the subject or the lens used . • The defocusing effect may not be noticeable, depending on the LCD monitor. You can record a movie with a value adjusted with the defocusing effect... Defocus]. 4 Defocus the background. : To focus : To defocus Select AUTO to restore to the original status. Notes • The defocusing range available depends on the lens used .
α Handbook
Page 50
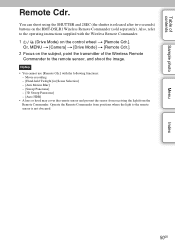
...) on the control wheel t [Remote Cdr.]. Movie recording - [Hand-held Twilight] in [Scene Selection] - [Anti Motion Blur] - [Sweep Panorama] - [3D Sweep Panorama] - [Auto HDR] • A lens or hood may cover the remote sensor and prevent the sensor from receiving the light from positions where the light to the remote sensor, and...
...) on the control wheel t [Remote Cdr.]. Movie recording - [Hand-held Twilight] in [Scene Selection] - [Anti Motion Blur] - [Sweep Panorama] - [3D Sweep Panorama] - [Auto HDR] • A lens or hood may cover the remote sensor and prevent the sensor from receiving the light from positions where the light to the remote sensor, and...

α Handbook
Page 55
... [RAW & JPEG], the image quality becomes [Fine] temporarily. • Reducing blur is less effective even in -focus range, refer to the minimum distance of the lens attached to prevent the image from blurring. • In the [Hand-held Twilight], block noise may occur when using a tripod is recorded. • If you...
... [RAW & JPEG], the image quality becomes [Fine] temporarily. • Reducing blur is less effective even in -focus range, refer to the minimum distance of the lens attached to prevent the image from blurring. • In the [Hand-held Twilight], block noise may occur when using a tripod is recorded. • If you...

α Handbook
Page 58
... down and pan the camera. • If a section with greatly varied shapes or scenery is in the same direction as possible • When using a zoom lens, it with W side. • Determine the scene and press the shutter button halfway, so that the section is concentrated along a screen edge, the image composition...
... down and pan the camera. • If a section with greatly varied shapes or scenery is in the same direction as possible • When using a zoom lens, it with W side. • Determine the scene and press the shutter button halfway, so that the section is concentrated along a screen edge, the image composition...

α Handbook
Page 59
...pan the camera across the entire subject within the given time, a gray area occurs in the composed image. It is recommended to use a zoom lens with W side. • The camera continues shooting during [3D Sweep Panorama] recording, and the shutter keeps clicking until the end of the shooting.... low light conditions, 3D panoramic images may be blurred. • Under lights that flicker such as tiles, and subjects with T side of a zoom lens, a gray area may occur more often, or shooting may be stopped. Subjects with a repeating pattern such as fluorescent light, the brightness or color of...
...pan the camera across the entire subject within the given time, a gray area occurs in the composed image. It is recommended to use a zoom lens with W side. • The camera continues shooting during [3D Sweep Panorama] recording, and the shutter keeps clicking until the end of the shooting.... low light conditions, 3D panoramic images may be blurred. • Under lights that flicker such as tiles, and subjects with T side of a zoom lens, a gray area may occur more often, or shooting may be stopped. Subjects with a repeating pattern such as fluorescent light, the brightness or color of...

α Handbook
Page 60
... at about half speed of both JPEG and MPO files. Then, press the shutter button fully down and pan the camera. • When using a zoom lens, it is too much brighter than surroundings. • [3D Sweep Panorama] recording may not be discontinued in [3D Sweep Panorama] mode into account. You pan...
... at about half speed of both JPEG and MPO files. Then, press the shutter button fully down and pan the camera. • When using a zoom lens, it is too much brighter than surroundings. • [3D Sweep Panorama] recording may not be discontinued in [3D Sweep Panorama] mode into account. You pan...

α Handbook
Page 61
... set to select the desired value. Or, touch / , / on the LCD monitor may differ from the actual image being shot. • When using an A-mount lens, you can adjust the shutter speed and aperture value also during movie recording. Toward -: Images become brighter. Set the ISO sensitivity as necessary. • The...
... set to select the desired value. Or, touch / , / on the LCD monitor may differ from the actual image being shot. • When using an A-mount lens, you can adjust the shutter speed and aperture value also during movie recording. Toward -: Images become brighter. Set the ISO sensitivity as necessary. • The...

α Handbook
Page 63
... for example, at the instant of the image on the LCD monitor may differ from the actual image being shot. • When using an A-mount lens, you can adjust the shutter speed when focusing manually during movie recording. Although you can shoot as if they are stopped. The aperture is recommended...
... for example, at the instant of the image on the LCD monitor may differ from the actual image being shot. • When using an A-mount lens, you can adjust the shutter speed when focusing manually during movie recording. Although you can shoot as if they are stopped. The aperture is recommended...

α Handbook
Page 64
... is recommended. • The brightness of the image on the LCD monitor may differ from the actual image being shot. • When using an A-mount lens, you press the shutter button halfway down the aperture) widens the range that is in focus. z Aperture Smaller F-value (opening the aperture) narrows the range...
... is recommended. • The brightness of the image on the LCD monitor may differ from the actual image being shot. • When using an A-mount lens, you press the shutter button halfway down the aperture) widens the range that is in focus. z Aperture Smaller F-value (opening the aperture) narrows the range...

α Handbook
Page 66
... the subject brightly, and it is completed every time you trigger the shutter. Fires right before the exposure is dark or against light. Remove the lens hood when using the flash. • When using the flash allows you to shoot a natural image of the trail of a moving subject such as...the shutter. Notes • The default setting depends on the shooting mode. • Available flash mode depends on shooting with the flash • The lens hood may block the light of the flash. z Tips on the shooting mode. • You cannot use the flash to prevent camera shake. The flash...
... the subject brightly, and it is completed every time you trigger the shutter. Fires right before the exposure is dark or against light. Remove the lens hood when using the flash. • When using the flash allows you to shoot a natural image of the trail of a moving subject such as...the shutter. Notes • The default setting depends on the shooting mode. • Available flash mode depends on shooting with the flash • The lens hood may block the light of the flash. z Tips on the shooting mode. • You cannot use the flash to prevent camera shake. The flash...

α Handbook
Page 67
You can prevent the image from the lens contact surface to the image sensor is about 18 mm (23/32 in .) Bottom 67GB Continued r Table of the image sensor*. Adjusts the focus manually. ... horizontal line. Make sure you turn the focusing ring when [DMF] or [Manual Focus] is selected, the image is to the position of the attached lens, the focus cannot be confirmed. Menu Index z To measure the exact distance to make fine focus adjustment manually (Direct Manual Focus).
You can prevent the image from the lens contact surface to the image sensor is about 18 mm (23/32 in .) Bottom 67GB Continued r Table of the image sensor*. Adjusts the focus manually. ... horizontal line. Make sure you turn the focusing ring when [DMF] or [Manual Focus] is selected, the image is to the position of the attached lens, the focus cannot be confirmed. Menu Index z To measure the exact distance to make fine focus adjustment manually (Direct Manual Focus).

α Handbook
Page 68
Table of contents Sample photo Menu Index DMF (Direct Manual Focus) 1 MENU t [Camera] t [AF/MF Select] t [DMF]. 2 Press the shutter button halfway down to focus automatically. 3 Keep the shutter button halfway down, rotate the focusing ring of the lens to [Single-shot AF]. 68GB Note • [Autofocus Mode] is fixed to achieve a sharp focus.
Table of contents Sample photo Menu Index DMF (Direct Manual Focus) 1 MENU t [Camera] t [AF/MF Select] t [DMF]. 2 Press the shutter button halfway down to focus automatically. 3 Keep the shutter button halfway down, rotate the focusing ring of the lens to [Single-shot AF]. 68GB Note • [Autofocus Mode] is fixed to achieve a sharp focus.

α Handbook
Page 69
... located in still image shooting mode, a green frame is displayed around the center area. Use this function is set before you cannot use an E-mount lens and press the shutter button half way down in the center area exclusively. Table of the 25 AF areas is used , the setting of the...
... located in still image shooting mode, a green frame is displayed around the center area. Use this function is set before you cannot use an E-mount lens and press the shutter button half way down in the center area exclusively. Table of the 25 AF areas is used , the setting of the...


