
α Handbook
Page 21
Sample photo Menu Index When options are indicated by turning or pressing the top/bottom/ right/left parts of the control wheel following the on-screen display, you can select...21GB The assigned role (function) of each soft key is determined when you can assign the functions to make your choice. You can turn or press the top/bottom/right/left parts of the control wheel. The arrow means you press the center of the control wheel. To...In this case, soft key A works as the MENU (Menu) button, and soft C key B as (Shoot. Table of contents When you turn the control wheel.
Sample photo Menu Index When options are indicated by turning or pressing the top/bottom/ right/left parts of the control wheel following the on-screen display, you can select...21GB The assigned role (function) of each soft key is determined when you can assign the functions to make your choice. You can turn or press the top/bottom/right/left parts of the control wheel. The arrow means you press the center of the control wheel. To...In this case, soft key A works as the MENU (Menu) button, and soft C key B as (Shoot. Table of contents When you turn the control wheel.

α Handbook
Page 25
... focusing manually. Main Settings Menu start MOVIE Button Custom Key Settings Beep Language Date/Time Setup Area Setting Help Guide Display Power Save Turns on or off. Sets the noise reduction processing for long exposure shootings. Sets whether to activate the MOVIE button. Finely adjusts the ... the power saving feature. Reduces wind noise during tracking focus. Sets whether or not to adjust the composition of in movie recording. Turns the Help Guide on the grid line that helps you are using the LA-EA2 Mount Adaptor (sold separately). Sets the level of...
... focusing manually. Main Settings Menu start MOVIE Button Custom Key Settings Beep Language Date/Time Setup Area Setting Help Guide Display Power Save Turns on or off. Sets the noise reduction processing for long exposure shootings. Sets whether to activate the MOVIE button. Finely adjusts the ... the power saving feature. Reduces wind noise during tracking focus. Sets whether or not to adjust the composition of in movie recording. Turns the Help Guide on the grid line that helps you are using the LA-EA2 Mount Adaptor (sold separately). Sets the level of...

α Handbook
Page 26
... is stored. USB LUN Setting Enhances the compatibility by limiting the functions of contents Sample photo Menu Power Saving Start Time Sets the time to turn the camera to use [Multi]. Table of USB connection. LCD Brightness Sets the brightness of still images on the memory card. File Number Selects the...
... is stored. USB LUN Setting Enhances the compatibility by limiting the functions of contents Sample photo Menu Power Saving Start Time Sets the time to turn the camera to use [Multi]. Table of USB connection. LCD Brightness Sets the brightness of still images on the memory card. File Number Selects the...

α Handbook
Page 29
...3 To play back panoramic images or movies, press the center of the control wheel. Notes • Panoramic images shot on the left , or turn the control wheel clockwise. Menu Index 29GB Continued r Press the left of the image index screen (page 51), and then press the top/ bottom ...parts of the control wheel. Turn counterclockwise during pause. You can switch between still image playback and movie playback by -frame. Turn clockwise during pause. Press the bottom t top/bottom. * The movie is played back frame-by ...
...3 To play back panoramic images or movies, press the center of the control wheel. Notes • Panoramic images shot on the left , or turn the control wheel clockwise. Menu Index 29GB Continued r Press the left of the image index screen (page 51), and then press the top/ bottom ...parts of the control wheel. Turn counterclockwise during pause. You can switch between still image playback and movie playback by -frame. Turn clockwise during pause. Press the bottom t top/bottom. * The movie is played back frame-by ...

α Handbook
Page 30
... from the menu (page 101). 1 Display the image you want to enlarge and then slide the W/T (zoom) lever to the T ( ) side. 2 Adjust the scaling by turning the control wheel. 3 Select the portion you want to check the focus condition of the control wheel. 4 To cancel the enlarged playback, select . Image size...
... from the menu (page 101). 1 Display the image you want to enlarge and then slide the W/T (zoom) lever to the T ( ) side. 2 Adjust the scaling by turning the control wheel. 3 Select the portion you want to check the focus condition of the control wheel. 4 To cancel the enlarged playback, select . Image size...
α Handbook
Page 32
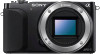
... items displayed at the bottom of the screen. Sample photo Menu Index 3 Select the item you turn on the menu become invalid. • When the camera returns to [Intelligent Auto] or [Superior Auto], or is turned off, the settings are reset to the default ones. • You can adjust [Bkground Defocus] only...
... items displayed at the bottom of the screen. Sample photo Menu Index 3 Select the item you turn on the menu become invalid. • When the camera returns to [Intelligent Auto] or [Superior Auto], or is turned off, the settings are reset to the default ones. • You can adjust [Bkground Defocus] only...

α Handbook
Page 58
... pan the camera across the entire subject within the given time, a gray area occurs in motion. - Sample photo Menu Index 1 MENU t [Shoot Mode] t [Sweep Panorama]. 2 Turn the control wheel to create a panoramic image from composed images.
... pan the camera across the entire subject within the given time, a gray area occurs in motion. - Sample photo Menu Index 1 MENU t [Shoot Mode] t [Sweep Panorama]. 2 Turn the control wheel to create a panoramic image from composed images.

α Handbook
Page 60
... want to select shutter speed/aperture value. When you press the bottom of the control wheel, it switches betweeen the shutter speed and aperture value. 3 Turn the control wheel to fire the flash, raise the flash by pressing (Flash pop-up) button. Check the exposure value at "MM" (metered manual). Index...
... want to select shutter speed/aperture value. When you press the bottom of the control wheel, it switches betweeen the shutter speed and aperture value. 3 Turn the control wheel to fire the flash, raise the flash by pressing (Flash pop-up) button. Check the exposure value at "MM" (metered manual). Index...

α Handbook
Page 61
... duration of the shooting. As long as fireworks. 1 MENU t [Shoot Mode] t [Manual Exposure]. 2 Select the shutter speed by pressing the bottom of the control wheel. 3 Turn the control wheel counterclockwise until [BULB] is temporarily set to 30 seconds. 61GB Notes • Since the shutter speed becomes slow and the camera-shake...
... duration of the shooting. As long as fireworks. 1 MENU t [Shoot Mode] t [Manual Exposure]. 2 Select the shutter speed by pressing the bottom of the control wheel. 3 Turn the control wheel counterclockwise until [BULB] is temporarily set to 30 seconds. 61GB Notes • Since the shutter speed becomes slow and the camera-shake...

α Handbook
Page 62
..., depending on the shooting screen blinks. When you cannot shoot any more while noise reduction is captured to fire the flash, raise the flash by turning the control wheel. 3 Adjust the focus and shoot the subject. However, you do not fire the flash, push down the flash. • The (SteadyShot warning...
..., depending on the shooting screen blinks. When you cannot shoot any more while noise reduction is captured to fire the flash, raise the flash by turning the control wheel. 3 Adjust the focus and shoot the subject. However, you do not fire the flash, push down the flash. • The (SteadyShot warning...
α Handbook
Page 63
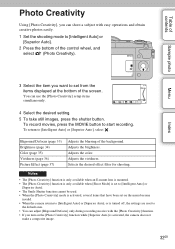
...] in focus. This allows you can adjust the aperture when focusing manually during movie recording. 1 MENU t [Shoot Mode] t [Aperture Priority]. 2 Select the desired value by turning the control wheel. Table of the image on the shooting screen blinks.
...] in focus. This allows you can adjust the aperture when focusing manually during movie recording. 1 MENU t [Shoot Mode] t [Aperture Priority]. 2 Select the desired value by turning the control wheel. Table of the image on the shooting screen blinks.

α Handbook
Page 64
... sensitivity, Creative Style, D-Range optimizer. 1 MENU t [Shoot Mode] t [Program Auto]. 2 Set the shooting functions to your desired settings. 3 Adjust the focus and shoot the subject. Turn the control wheel to select the shutter speed and aperture (F-value) combination. • The recording mode indicator changes from P to P*. 64GB z Program Shift You can...
... sensitivity, Creative Style, D-Range optimizer. 1 MENU t [Shoot Mode] t [Program Auto]. 2 Set the shooting functions to your desired settings. 3 Adjust the focus and shoot the subject. Turn the control wheel to select the shutter speed and aperture (F-value) combination. • The recording mode indicator changes from P to P*. 64GB z Program Shift You can...

α Handbook
Page 66
Adjusts the focus manually. Turn the focusing ring right or left to make fine focus adjustment manually (Direct Manual Focus). z Measuring the exact distance to pass. After focusing automatically, make ... minimum shooting distance of the horizontal line. z Using manual focusing effectively "Focus fixing" is enlarged automatically to check focus area easier. Notes • If you turn the focusing ring when [DMF] or [Manual Focus] is selected, the image is convenient when you to enable you can fix the focus in .) position...
Adjusts the focus manually. Turn the focusing ring right or left to make fine focus adjustment manually (Direct Manual Focus). z Measuring the exact distance to pass. After focusing automatically, make ... minimum shooting distance of the horizontal line. z Using manual focusing effectively "Focus fixing" is enlarged automatically to check focus area easier. Notes • If you turn the focusing ring when [DMF] or [Manual Focus] is selected, the image is convenient when you to enable you can fix the focus in .) position...

α Handbook
Page 71
... button halfway down. The magenta frame appears on a face that is not the face with the priority focus. The frame for the main subject will turn white. Does not use [Face Detection] with [Face Registration]. 1 MENU t [Camera] t [Face Detection] t desired mode. (On (Regist. Faces)] even if... it is set to [On (Regist. Selects the face which is the main subject and set will turn green by priority. Index 71GB Face Detection frame (white) When the camera detects more than 1 subject, the camera will judge which the camera ...
... button halfway down. The magenta frame appears on a face that is not the face with the priority focus. The frame for the main subject will turn white. Does not use [Face Detection] with [Face Registration]. 1 MENU t [Camera] t [Face Detection] t desired mode. (On (Regist. Faces)] even if... it is set to [On (Regist. Selects the face which is the main subject and set will turn green by priority. Index 71GB Face Detection frame (white) When the camera detects more than 1 subject, the camera will judge which the camera ...

α Handbook
Page 73
... on the indicator, the camera records images automatically. Index 73GB Continued r When the smile level exceeds the b point on the conditions. • The [Drive Mode] turns to [Smile Shutter] mode. 4 To exit [Smile Shutter] mode, MENU t [Camera] t [Smile Shutter] t [Off]. (Off) (On) Does not use [Smile Shutter] with OPTION. (On: Big...
... on the indicator, the camera records images automatically. Index 73GB Continued r When the smile level exceeds the b point on the conditions. • The [Drive Mode] turns to [Smile Shutter] mode. 4 To exit [Smile Shutter] mode, MENU t [Camera] t [Smile Shutter] t [Off]. (Off) (On) Does not use [Smile Shutter] with OPTION. (On: Big...
α Handbook
Page 75
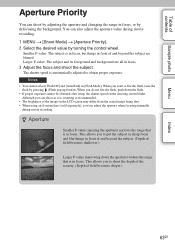
... cannot use the [Auto Object Framing] function. (The camera saves only the original image.) Uses the [Auto Object Framing] function. The icon on the screen turns green when the camera decides that an image being captured can be the best possible composition, depending on the auto review screen. (Off) (Auto) Does...
... cannot use the [Auto Object Framing] function. (The camera saves only the original image.) Uses the [Auto Object Framing] function. The icon on the screen turns green when the camera decides that an image being captured can be the best possible composition, depending on the auto review screen. (Off) (Auto) Does...

α Handbook
Page 77
Turn the control wheel to search through all shooting tips in the camera. 1 MENU t [Camera] t [Shooting Tip List]. 2 Search for the desired shooting tip. Table of contents Sample photo Menu Index Shooting Tip List Allows you to scroll the text up and down. 77GB
Turn the control wheel to search through all shooting tips in the camera. 1 MENU t [Camera] t [Shooting Tip List]. 2 Search for the desired shooting tip. Table of contents Sample photo Menu Index Shooting Tip List Allows you to scroll the text up and down. 77GB

α Handbook
Page 87
... wheel. The higher the number, the more reddish the image, and the lower the number, the more bluish the image. 3 Adjust the color temperature by turning the control wheel. Weather/ lighting Characteristics of the control wheel. Index 87GB Continued r You can adjust color temperature manually using the [White Balance] function. The...
... wheel. The higher the number, the more reddish the image, and the lower the number, the more bluish the image. 3 Adjust the color temperature by turning the control wheel. Weather/ lighting Characteristics of the control wheel. Index 87GB Continued r You can adjust color temperature manually using the [White Balance] function. The...
α Handbook
Page 88
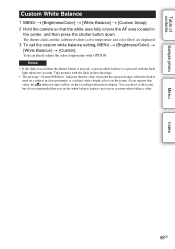
... covers the AF area located in close proximity or a subject with a bright color is registered with OPTION. You can shoot at this value, the indicator turns yellow on a subject in the center, and then press the shutter button down. The shutter clicks and the calibrated values (color temperature and color filter...
... covers the AF area located in close proximity or a subject with a bright color is registered with OPTION. You can shoot at this value, the indicator turns yellow on a subject in the center, and then press the shutter button down. The shutter clicks and the calibrated values (color temperature and color filter...

α Handbook
Page 101
... contents Sample photo Enlarge Image You can check the focus by enlarging a portion of the playback image. 1 MENU t [Playback] t [ Enlarge Image]. 2 Adjust the scaling by turning the control wheel. 3 Select the portion you want to see by pressing the top/bottom/right/left side of the control wheel. 4 To cancel the...
... contents Sample photo Enlarge Image You can check the focus by enlarging a portion of the playback image. 1 MENU t [Playback] t [ Enlarge Image]. 2 Adjust the scaling by turning the control wheel. 3 Select the portion you want to see by pressing the top/bottom/right/left side of the control wheel. 4 To cancel the...
