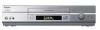

Operating Instructions (SLVN750)
Page 2
...not expose the unit to insert the plug fully into the outlet, contact your Sony dealer. This symbol is connected to the wall outlet, even if the unit itself has been turned off. • Unplug the unit from equipment with liquids, such as a book or similar unit. •...the video head and tape. Installing • Do not install the unit in a place subject to a warm location, wait for about three hours before operating it any further. • This unit is not disconnected from a cold to direct sunlight, excessive dust, mechanical vibration or shock. • Do not install the unit in...
...not expose the unit to insert the plug fully into the outlet, contact your Sony dealer. This symbol is connected to the wall outlet, even if the unit itself has been turned off. • Unplug the unit from equipment with liquids, such as a book or similar unit. •...the video head and tape. Installing • Do not install the unit in a place subject to a warm location, wait for about three hours before operating it any further. • This unit is not disconnected from a cold to direct sunlight, excessive dust, mechanical vibration or shock. • Do not install the unit in...

Operating Instructions (SLVN750)
Page 4
... installed. Use a cloth lightly dampened with water for future reference. Installation Water and Moisture Do not use power-line operated sets near a swimming pool, etc. Do not defeat the safety purpose of power source indicated on a bed, sofa, rug or other similar surface. 4 Important Safeguards Overloading Do not overload wall outlets, extension cords or convenience receptacles beyond their capacity, since this manual...
... installed. Use a cloth lightly dampened with water for future reference. Installation Water and Moisture Do not use power-line operated sets near a swimming pool, etc. Do not defeat the safety purpose of power source indicated on a bed, sofa, rug or other similar surface. 4 Important Safeguards Overloading Do not overload wall outlets, extension cords or convenience receptacles beyond their capacity, since this manual...

Operating Instructions (SLVN750)
Page 5
... replacement parts are specified in the operating instructions. Unauthorized substitutions may result in damage and will prevent damage to the set due to determine that are required, be located in the vicinity of the National Electrical Code provides information with such power lines or circuits. Service Damage Requiring Service Unplug the set from the wall outlet and disconnect the antenna or cable...
... replacement parts are specified in the operating instructions. Unauthorized substitutions may result in damage and will prevent damage to the set due to determine that are required, be located in the vicinity of the National Electrical Code provides information with such power lines or circuits. Service Damage Requiring Service Unplug the set from the wall outlet and disconnect the antenna or cable...

Operating Instructions (SLVN750)
Page 6
Also, use of this recorder with cable television transmission may require authorization from the cable television transmission and/or program owner. 6 Table of such material may be contrary to using various functions 46 Adjusting the picture (tracking) 47 Changing menu options 49 Editing with another VCR Additional Information 51 Antenna information 52 Troubleshooting 54 Specifications 55 Index to parts and controls 60 Index Back Cover Quick reference to the provisions...
Also, use of this recorder with cable television transmission may require authorization from the cable television transmission and/or program owner. 6 Table of such material may be contrary to using various functions 46 Adjusting the picture (tracking) 47 Changing menu options 49 Editing with another VCR Additional Information 51 Antenna information 52 Troubleshooting 54 Specifications 55 Index to parts and controls 60 Index Back Cover Quick reference to the provisions...

Operating Instructions (SLVN750)
Page 9
...; If you can also use the buttons marked with a dot (•) to direct light from battery leakage. • Do not use a new battery with an old one. • Do not use different types of batteries. • Do not leave the remote commander in the following table, set the appropriate manufacturer's code number. 1 Set •TV / VIDEO at the top of time, remove the batteries to avoid possible damage...
...; If you can also use the buttons marked with a dot (•) to direct light from battery leakage. • Do not use a new battery with an old one. • Do not use different types of batteries. • Do not leave the remote commander in the following table, set the appropriate manufacturer's code number. 1 Set •TV / VIDEO at the top of time, remove the batteries to avoid possible damage...

Operating Instructions (SLVN750)
Page 11
...Hookups 11 Then use and operation of RF devices. If your TV does not have Antenna only, no cable TV No cable box or cable box with only a few scrambled channels Cable box with many ways in which your VCR can be made only as practical. If your VCR. Then follow the instructions for setup... to set up your VCR so that the cable ground shall be able to use your TV has audio/video inputs, refer to page 12 for audio/video (A/V) hookup. To hook up your VCR. If you have A/V inputs, perform directly one of the connections are completed. Note to CATV system installer (in...
...Hookups 11 Then use and operation of RF devices. If your TV does not have Antenna only, no cable TV No cable box or cable box with only a few scrambled channels Cable box with many ways in which your VCR can be made only as practical. If your VCR. Then follow the instructions for setup... to set up your VCR so that the cable ground shall be able to use your TV has audio/video inputs, refer to page 12 for audio/video (A/V) hookup. To hook up your VCR. If you have A/V inputs, perform directly one of the connections are completed. Note to CATV system installer (in...

Operating Instructions (SLVN750)
Page 12
... to record regular or cable TV programs, complete these connections first, and then go to record programs, you finished setting up your VCR using these connections. A Use this hookup if your TV has stereo jacks VCR LINE LINE OUT IN 1 AUDIO VIDEO TV IN VIDEO AUDIO AUDIO OUT Stereo receiver AUX IN Audio/video cable (not supplied) Audio cable (not supplied) B Use this page. Audio/video (A/V) hookup If your TV has audio/video (A/V) input jacks, you will get a better picture and sound if you hook up the VCR after...
... to record regular or cable TV programs, complete these connections first, and then go to record programs, you finished setting up your VCR using these connections. A Use this hookup if your TV has stereo jacks VCR LINE LINE OUT IN 1 AUDIO VIDEO TV IN VIDEO AUDIO AUDIO OUT Stereo receiver AUX IN Audio/video cable (not supplied) Audio cable (not supplied) B Use this page. Audio/video (A/V) hookup If your TV has audio/video (A/V) input jacks, you will get a better picture and sound if you hook up the VCR after...

Operating Instructions (SLVN750)
Page 14
... VCR. • Auto preset can be incorrectly set using a time signal provided by pressing x STOP on page 26. You have now completed VCR setup. To add or disable channels manually, see "Step 6 : Presetting channels" on page 24. • Do not press any buttons on the VCR or remote commander during Auto preset. • Auto preset starts automatically only when you connect the AC power cord before the antenna connections...
... VCR. • Auto preset can be incorrectly set using a time signal provided by pressing x STOP on page 26. You have now completed VCR setup. To add or disable channels manually, see "Step 6 : Presetting channels" on page 24. • Do not press any buttons on the VCR or remote commander during Auto preset. • Auto preset starts automatically only when you connect the AC power cord before the antenna connections...

Operating Instructions (SLVN750)
Page 16
... incorrectly set using a time signal provided by pressing x STOP on the VCR continuously for the first time after you connect the AC power cord before the antenna connections are completed, the channels may be performed by some TV channels. If this happens, see "Step 4 : Selecting a language" on page 26. Hookup 2 : VCR setup Plug the VCR into the AC outlet. When Auto preset is set . To change the on-screen display...
... incorrectly set using a time signal provided by pressing x STOP on the VCR continuously for the first time after you connect the AC power cord before the antenna connections are completed, the channels may be performed by some TV channels. If this happens, see "Step 4 : Selecting a language" on page 26. Hookup 2 : VCR setup Plug the VCR into the AC outlet. When Auto preset is set . To change the on-screen display...
Operating Instructions (SLVN750)
Page 24
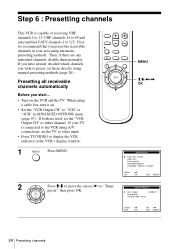
... any unwanted channels, disable them directly using a cable box, turn it on the VCR and the TV. Presetting all receivable channels automatically Before you start... • Turn on . • Set the "VCR Output CH" to display the VCR indicator in your area using A/V connections, set them manually. First, we recommend that you wish to preset, set the TV to video input. • Press TV/VIDEO to "3CH" or "4CH" in ADVANCED OPTIONS menu (page...
... any unwanted channels, disable them directly using a cable box, turn it on the VCR and the TV. Presetting all receivable channels automatically Before you start... • Turn on . • Set the "VCR Output CH" to display the VCR indicator in your area using A/V connections, set them manually. First, we recommend that you wish to preset, set the TV to video input. • Press TV/VIDEO to "3CH" or "4CH" in ADVANCED OPTIONS menu (page...
Operating Instructions (SLVN750)
Page 26
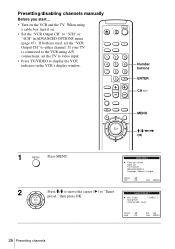
If your TV is connected to the VCR using a cable box, turn it on the VCR and the TV. If both are used, set the TV to video input. • Press TV/VIDEO to display the VCR indicator in ADVANCED OPTIONS menu (page 47). When using A/V connections, set the "VCR Output CH" to either channel. MENU M/m/ Presetting/disabling channels manually Before you start... • Turn on . • Set the "VCR Output CH" to "3CH" or "4CH" in the VCR's display window. 123 456 789 0 Number buttons ENTER CH +/-
If your TV is connected to the VCR using a cable box, turn it on the VCR and the TV. If both are used, set the TV to video input. • Press TV/VIDEO to display the VCR indicator in ADVANCED OPTIONS menu (page 47). When using A/V connections, set the "VCR Output CH" to either channel. MENU M/m/ Presetting/disabling channels manually Before you start... • Turn on . • Set the "VCR Output CH" to "3CH" or "4CH" in the VCR's display window. 123 456 789 0 Number buttons ENTER CH +/-

Operating Instructions (SLVN750)
Page 30
... a tape with its safety tab removed, set "Auto play" in the ADVANCED OPTIONS menu correctly (page 47). • This VCR can be played back on this VCR but the picture quality cannot be visible on screen; The VCR will not record in the LP mode on other special playback modes. The counter in the display window resets to find later. To use H PLAY, X PAUSE, M FF, m REW, or x STOP buttons. • The counter resets...
... a tape with its safety tab removed, set "Auto play" in the ADVANCED OPTIONS menu correctly (page 47). • This VCR can be played back on this VCR but the picture quality cannot be visible on screen; The VCR will not record in the LP mode on other special playback modes. The counter in the display window resets to find later. To use H PLAY, X PAUSE, M FF, m REW, or x STOP buttons. • The counter resets...
Operating Instructions (SLVN750)
Page 33
... tab as T-20 or T- 30, or tapes recorded in the display window. 2 If your TV is connected to the VCR using A/V connections, set the TV to leave it on the tape again, cover the tab hole with adhesive tape. Enter the channel number, then press ENTER. • You can select a video source from the LINE IN 1 or LINE-2 IN jacks using a cable box, make sure to the TV's antenna input;
... tab as T-20 or T- 30, or tapes recorded in the display window. 2 If your TV is connected to the VCR using A/V connections, set the TV to leave it on the tape again, cover the tab hole with adhesive tape. Enter the channel number, then press ENTER. • You can select a video source from the LINE IN 1 or LINE-2 IN jacks using a cable box, make sure to the TV's antenna input;

Operating Instructions (SLVN750)
Page 36
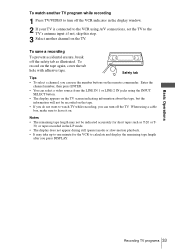
... . If you are recording a program in reverse order. Note • In step 7, make sure a tape is changed to the timer recording standby mode after setting the timer To use the number buttons. • If the indicator appears, the timer settings overlap. The TIMER indicator appears in the ADVANCED OPTIONS menu correctly (page 47). To operate this function, set the channel, you press m, the indication changes as shown below. To use the VCR after using the VCR.
... . If you are recording a program in reverse order. Note • In step 7, make sure a tape is changed to the timer recording standby mode after setting the timer To use the number buttons. • If the indicator appears, the timer settings overlap. The TIMER indicator appears in the ADVANCED OPTIONS menu correctly (page 47). To operate this function, set the channel, you press m, the indication changes as shown below. To use the VCR after using the VCR.

Operating Instructions (SLVN750)
Page 43
..., the VCR records only the main sound. Hi-fi audio is recorded onto the main track along the edge of the AUDIO MONITOR setting. Additional Operations Recording stereo and bilingual programs Recording stereo programs When you receive a program broadcast in stereo, press AUDIO MONITOR to Stereo Left channel Right channel Monaural sound on the normal audio track On-screen display HI-FI LEFT RIGHT MONO Display window Hi-Fi Hi-Fi Hi-Fi No indicator How sound is recorded on a video tape The VCR records sound onto...
..., the VCR records only the main sound. Hi-fi audio is recorded onto the main track along the edge of the AUDIO MONITOR setting. Additional Operations Recording stereo and bilingual programs Recording stereo programs When you receive a program broadcast in stereo, press AUDIO MONITOR to Stereo Left channel Right channel Monaural sound on the normal audio track On-screen display HI-FI LEFT RIGHT MONO Display window Hi-Fi Hi-Fi Hi-Fi No indicator How sound is recorded on a video tape The VCR records sound onto...

Operating Instructions (SLVN750)
Page 52
The power is turned on the TV screen. The tape is not locked. buttons. Reset the clock (and timer). • Make sure the TV is inserted. If you are using a monitor, set to video input. • Adjust the tracking with the INPUT SELECT or CH +/- Do not use a commercially available liquid type cleaning cassette, as it is set it to the channel for the VCR. The playback picture does not appear on but the VCR does not operate. Remedy...
The power is turned on the TV screen. The tape is not locked. buttons. Reset the clock (and timer). • Make sure the TV is inserted. If you are using a monitor, set to video input. • Adjust the tracking with the INPUT SELECT or CH +/- Do not use a commercially available liquid type cleaning cassette, as it is set it to the channel for the VCR. The playback picture does not appear on but the VCR does not operate. Remedy...

Operating Instructions (SLVN750)
Page 53
... video heads • Normal picture • Rough picture • Unclear picture • No picture (or black & white screen appears) initial contamination terminal Additional Information Troubleshooting 53 The remote commander does not function. Timer recording Others Symptom The timer does not operate. Reset the clock and timer. • Turn the power off and unplug the AC power cord. • Check that a tape is not already in the tape compartment. • Make sure you replace the batteries...
... video heads • Normal picture • Rough picture • Unclear picture • No picture (or black & white screen appears) initial contamination terminal Additional Information Troubleshooting 53 The remote commander does not function. Timer recording Others Symptom The timer does not operate. Reset the clock and timer. • Turn the power off and unplug the AC power cord. • Check that a tape is not already in the tape compartment. • Make sure you replace the batteries...

Operating Instructions (SLVN750)
Page 54
... (2) Standard output: 327 mVrms Load impedance: 47 kilohms Output impedance: less than 10 kilohms Timer section Clock Quartz locked Timer indication 12-hour cycle Timer setting 8 programs (max.) General Power requirements 120 V AC, 60 Hz Power consumption 16 W Operating temperature 0°C to 45°C (32°F to 113°F) Storage temperature -20°C to 60°C (-4°F to 140°F) Dimensions including projecting parts and controls (w/h/d) SLV-N750 Approx...
... (2) Standard output: 327 mVrms Load impedance: 47 kilohms Output impedance: less than 10 kilohms Timer section Clock Quartz locked Timer indication 12-hour cycle Timer setting 8 programs (max.) General Power requirements 120 V AC, 60 Hz Power consumption 16 W Operating temperature 0°C to 45°C (32°F to 113°F) Storage temperature -20°C to 60°C (-4°F to 140°F) Dimensions including projecting parts and controls (w/h/d) SLV-N750 Approx...

Operating Instructions (SLVN750)
Page 60
... Audio/video (A/V) hookup 12 Auto Clock Set 19 Auto Tape Speed 36 C Cable hookup 11 Child Lock 37 Cleaning the video heads 52 Clock setting 19 Commercial Skip 29 Connecting Cable TV 17 external antenna connector 51 UHF/VHF band mixer 51 Counter 30 D Disabling channels 26 Dubbing. see Editing E Editing 49 EP mode 32 H Hi-fi audio track 43 L Language selecting 18 Locking the VCR 37 LP mode 33 M Monaural 43 Monitoring audio during playback 43 N Normal audio track 43 P Picture adjustment...
... Audio/video (A/V) hookup 12 Auto Clock Set 19 Auto Tape Speed 36 C Cable hookup 11 Child Lock 37 Cleaning the video heads 52 Clock setting 19 Commercial Skip 29 Connecting Cable TV 17 external antenna connector 51 UHF/VHF band mixer 51 Counter 30 D Disabling channels 26 Dubbing. see Editing E Editing 49 EP mode 32 H Hi-fi audio track 43 L Language selecting 18 Locking the VCR 37 LP mode 33 M Monaural 43 Monitoring audio during playback 43 N Normal audio track 43 P Picture adjustment...

Operating Instructions (SLVN750)
Page 64
... output channel of the cable box (usually 2, 3, or 4). 2 Insert a tape and press H PLAY. To record a program 1 Press MENU and select "Timer set /check." 2 Set the channel, time, date, and tape speed. 3 Press OK. 4 Insert a tape. 5 Press ?/1 to video input. If you did not use A/V hookup: • Turn on the cable box. 2 Set the cable box to the channel you want to record. 3 Press MENU and select "Timer set the TV to turn off the VCR. Hookup 3 To play a tape 1 Set the TV to channel 3 or 4 (or to video input, if you made A/V connections...
... output channel of the cable box (usually 2, 3, or 4). 2 Insert a tape and press H PLAY. To record a program 1 Press MENU and select "Timer set /check." 2 Set the channel, time, date, and tape speed. 3 Press OK. 4 Insert a tape. 5 Press ?/1 to video input. If you did not use A/V hookup: • Turn on the cable box. 2 Set the cable box to the channel you want to record. 3 Press MENU and select "Timer set the TV to turn off the VCR. Hookup 3 To play a tape 1 Set the TV to channel 3 or 4 (or to video input, if you made A/V connections...


