
Users Guide
Page 2
... accompanying the appliance. This symbol is intended to alert the user to persons. These limits are cautioned that any further. • The use the deck for a long time, be determined by turning the equipment off and on the nameplate at the qualified service shop. Record the serial number in a residential installation. MXD-D3 Serial No For the customers in temperature inside the car...
... accompanying the appliance. This symbol is intended to alert the user to persons. These limits are cautioned that any further. • The use the deck for a long time, be determined by turning the equipment off and on the nameplate at the qualified service shop. Record the serial number in a residential installation. MXD-D3 Serial No For the customers in temperature inside the car...
Users Guide
Page 3
... any type of the unit. Recording a CD to an MD at High Speed (High-Speed CD SynchroRecording 23 Synchro-Recording With an External Audio Equipment (Music Synchro-Recording 24 Starting Recording With Prestored Audio Data (Time Machine Recording 24 About This Manual Fading In and Out (Fader 25 Conventions • Before operating the deck, connect Editing Recorded MDs 26 Notes on Editing 26 your nearest Sony dealer. Erasing Recordings 26 Erasing a Part of the remote. z Indicates...
... any type of the unit. Recording a CD to an MD at High Speed (High-Speed CD SynchroRecording 23 Synchro-Recording With an External Audio Equipment (Music Synchro-Recording 24 Starting Recording With Prestored Audio Data (Time Machine Recording 24 About This Manual Fading In and Out (Fader 25 Conventions • Before operating the deck, connect Editing Recorded MDs 26 Notes on Editing 26 your nearest Sony dealer. Erasing Recordings 26 Erasing a Part of the remote. z Indicates...
Users Guide
Page 4
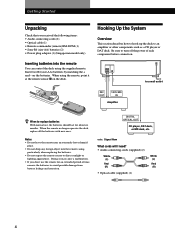
... received the following items: • Audio connecting cords (2) • Optical cable (1) • Remote commander (remote) RM-D37M (1) • Sony R6 (size-AA) batteries (2) • Power plug adaptor (1) (Singaporian model only) Inserting batteries into the remote casing, particularly when replacing the batteries. • Do not expose the remote sensor to avoid possible damage from battery leakage and corrosion. Be sure to turn off the power of time, remove the batteries to direct sunlight or lighting...
... received the following items: • Audio connecting cords (2) • Optical cable (1) • Remote commander (remote) RM-D37M (1) • Sony R6 (size-AA) batteries (2) • Power plug adaptor (1) (Singaporian model only) Inserting batteries into the remote casing, particularly when replacing the batteries. • Do not expose the remote sensor to avoid possible damage from battery leakage and corrosion. Be sure to turn off the power of time, remove the batteries to direct sunlight or lighting...
Users Guide
Page 5
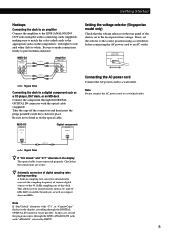
... "Cannot Copy" flashes in the display, recording through the DIGITAL OPTICAL IN connector is not possible. This allows you to record sources such as compact discs and MDs. In this deck. Getting Started Hookups Connecting the deck to an amplifier Connect the amplifier to the LINE (ANALOG) IN/ OUT jacks using the audio connecting cords (supplied), making sure to match the color-coded cords to the appropriate jacks on...
... "Cannot Copy" flashes in the display, recording through the DIGITAL OPTICAL IN connector is not possible. This allows you to record sources such as compact discs and MDs. In this deck. Getting Started Hookups Connecting the deck to an amplifier Connect the amplifier to the LINE (ANALOG) IN/ OUT jacks using the audio connecting cords (supplied), making sure to match the color-coded cords to the appropriate jacks on...

Users Guide
Page 6
...;P p CLEAR PUSH ENTER TIME PLAY MODE CD DISPLAY INPUT PLAY MODE TIME/CHAR MD CLEAR PUSH ENTER ·P p PHONE LEVEL MIN MAX PHONES When using the controls on the deck Use the CD player controls located to the left of the Turn AMS counterclockwise (or press = on the current track or the remote). Go to the beginning of the front panel. Connect the headphones. The STANDBY indicator turns off. 3 Press §...
...;P p CLEAR PUSH ENTER TIME PLAY MODE CD DISPLAY INPUT PLAY MODE TIME/CHAR MD CLEAR PUSH ENTER ·P p PHONE LEVEL MIN MAX PHONES When using the controls on the deck Use the CD player controls located to the left of the Turn AMS counterclockwise (or press = on the current track or the remote). Go to the beginning of the front panel. Connect the headphones. The STANDBY indicator turns off. 3 Press §...
Users Guide
Page 7
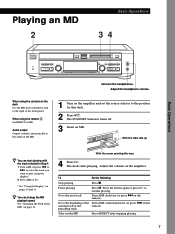
... volume. Playing an MD 2 Basic Operations 34 Basic Operations STANDBY ? 1/u § OPEN/CLOSE NORMAL CD SYNCHRO HIGH § EJECT 0 ) REC-IT ≠ AMS ± MENU/ NO YES ≠ AMS ± 0 ) REC r ·P p CLEAR PUSH ENTER TIME PLAY MODE CD DISPLAY INPUT PLAY MODE TIME/CHAR MD CLEAR PUSH ENTER ·P p PHONE LEVEL MIN MAX PHONES Connect the headphones. With the label side up z You can change the MD playback speed See "Changing...
... volume. Playing an MD 2 Basic Operations 34 Basic Operations STANDBY ? 1/u § OPEN/CLOSE NORMAL CD SYNCHRO HIGH § EJECT 0 ) REC-IT ≠ AMS ± MENU/ NO YES ≠ AMS ± 0 ) REC r ·P p CLEAR PUSH ENTER TIME PLAY MODE CD DISPLAY INPUT PLAY MODE TIME/CHAR MD CLEAR PUSH ENTER ·P p PHONE LEVEL MIN MAX PHONES Connect the headphones. With the label side up z You can change the MD playback speed See "Changing...

Users Guide
Page 8
... stop after recording. Basic Operations Recording a CD to an MD (CD Synchro-Recording) 1 35 2 STANDBY ? 1/u § OPEN/CLOSE NORMAL CD SYNCHRO HIGH § EJECT 0 ) REC-IT ≠ AMS ± MENU/ NO YES ≠ AMS ± 0 ) REC r ·P p CLEAR PUSH ENTER TIME PLAY MODE CD DISPLAY INPUT PLAY MODE TIME/CHAR MD CLEAR PUSH ENTER ·P p PHONE LEVEL MIN MAX PHONES 6 You can play back tracks just recorded If "TRACK" lights up in the display...
... stop after recording. Basic Operations Recording a CD to an MD (CD Synchro-Recording) 1 35 2 STANDBY ? 1/u § OPEN/CLOSE NORMAL CD SYNCHRO HIGH § EJECT 0 ) REC-IT ≠ AMS ± MENU/ NO YES ≠ AMS ± 0 ) REC r ·P p CLEAR PUSH ENTER TIME PLAY MODE CD DISPLAY INPUT PLAY MODE TIME/CHAR MD CLEAR PUSH ENTER ·P p PHONE LEVEL MIN MAX PHONES 6 You can play back tracks just recorded If "TRACK" lights up in the display...

Users Guide
Page 12
... you find the track. A specific track by using the AMS (Automatic Music Sensor) control on the deck, = and + buttons on the remote, or number buttons on the remote. Turn AMS counterclockwise (or press =) or press 0 to go quickly to the beginning of the last track Turn AMS counterclockwise (or press =) while the display shows the total track number, total disc playing time or remaining recordable time of the disc (recordable MD only), or disc name (see...
... you find the track. A specific track by using the AMS (Automatic Music Sensor) control on the deck, = and + buttons on the remote, or number buttons on the remote. Turn AMS counterclockwise (or press =) or press 0 to go quickly to the beginning of the last track Turn AMS counterclockwise (or press =) while the display shows the total track number, total disc playing time or remaining recordable time of the disc (recordable MD only), or disc name (see...

Users Guide
Page 15
... program flashes after Program Play ends When you press ·, you program over 10, use the >10 button (see "Changing the track order" on the deck Turn AMS until the track number you enter the wrong track number Press 0 or ) until the wrong track number flashes, then turn off the deck or disconnect the AC power cord. 15 z You can continue turning the AMS to enter other track in the display. Erase the unnecessary tracks...
... program flashes after Program Play ends When you press ·, you program over 10, use the >10 button (see "Changing the track order" on the deck Turn AMS until the track number you enter the wrong track number Press 0 or ) until the wrong track number flashes, then turn off the deck or disconnect the AC power cord. 15 z You can continue turning the AMS to enter other track in the display. Erase the unnecessary tracks...

Users Guide
Page 17
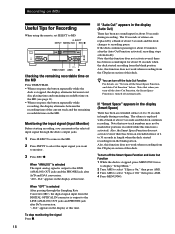
... the display The deck is repeated two or more tracks with "OPT" selected by the INPUT button, the deck automatically marks a track number whenever the sampling frequency of the input signal changes regardless of MDs recorded through the DIGITAL OPTICAL IN connector. 17 Do not move the deck or pull out the AC power cord. by pressing the 1/u switch. The deck uses the SCMS (Serial Copy Management...
... the display The deck is repeated two or more tracks with "OPT" selected by the INPUT button, the deck automatically marks a track number whenever the sampling frequency of the input signal changes regardless of MDs recorded through the DIGITAL OPTICAL IN connector. 17 Do not move the deck or pull out the AC power cord. by pressing the 1/u switch. The deck uses the SCMS (Serial Copy Management...
Users Guide
Page 18
... no sound input for Recording When using the remote, set SELECT to MD. § EJECT INPUT MENU/NO REC r § ? 1/u 0 ) ·P p ≠ ± § ≠ ± 0 ) r ·P p · TIME/CHAR AMS p Checking the remaining recordable time on the MD (see "To turn off the Auto Cut Function For details, see page 11). • When you press the button repeatedly while recording, the display alternates between total disc playing time and remaining recordable time...
... no sound input for Recording When using the remote, set SELECT to MD. § EJECT INPUT MENU/NO REC r § ? 1/u 0 ) ·P p ≠ ± § ≠ ± 0 ) r ·P p · TIME/CHAR AMS p Checking the remaining recordable time on the MD (see "To turn off the Auto Cut Function For details, see page 11). • When you press the button repeatedly while recording, the display alternates between total disc playing time and remaining recordable time...
Users Guide
Page 19
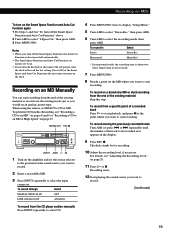
... display "Setup Menu." 5 Turn AMS to select "Stereo Rec," then press AMS. 6 Turn AMS to select the recording mode, then press AMS. To record in Select Stereo Stereo Rec Monoaural Mono Rec* * In monoaural mode, the recording time is also turned off the Smart Space Function and Auto Cut Function" above. 2 Turn AMS to CD or MD. Recording starts. 12 Start playing the sound source you want to the position for recording. 10 Adjust the recording level, if necessary. When using the remote, set...
... display "Setup Menu." 5 Turn AMS to select "Stereo Rec," then press AMS. 6 Turn AMS to select the recording mode, then press AMS. To record in Select Stereo Stereo Rec Monoaural Mono Rec* * In monoaural mode, the recording time is also turned off the Smart Space Function and Auto Cut Function" above. 2 Turn AMS to CD or MD. Recording starts. 12 Start playing the sound source you want to the position for recording. 10 Adjust the recording level, if necessary. When using the remote, set...
Users Guide
Page 20
... Manually" on MDs To pause recording Press P. To stop recording Press p. LEVEL +/- 1 Do Steps 1 to select the program source. For example, if you pause recording, the track number increases by for recording with "OPT" or "ANALOG" selected with the strongest signal level. 3 Press MENU/NO twice to display "Setup Menu." 4 Turn AMS to 9 in the display. • You cannot change the recording mode setting during recording or recording pause. • You cannot operate the CD player...
... Manually" on MDs To pause recording Press P. To stop recording Press p. LEVEL +/- 1 Do Steps 1 to select the program source. For example, if you pause recording, the track number increases by for recording with "OPT" or "ANALOG" selected with the strongest signal level. 3 Press MENU/NO twice to display "Setup Menu." 4 Turn AMS to 9 in the display. • You cannot change the recording mode setting during recording or recording pause. • You cannot operate the CD player...
Users Guide
Page 21
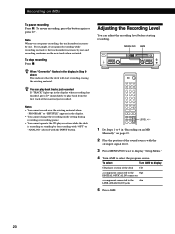
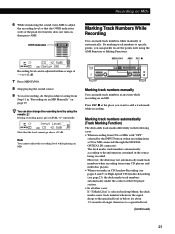
... track numbers manually You can mark track numbers at any time while recording on page 19. z You can also change the recording level by the INPUT button (when recording from some CD players and multi disc players. • When you can mark track numbers either manually or automatically. Marking track numbers automatically (Track Marking Function) The deck adds track marks differently in the source being recorded. Marking Track Numbers While Recording You can quickly locate the points later using the remote...
... track numbers manually You can mark track numbers at any time while recording on page 19. z You can also change the recording level by the INPUT button (when recording from some CD players and multi disc players. • When you can mark track numbers either manually or automatically. Marking track numbers automatically (Track Marking Function) The deck adds track marks differently in the source being recorded. Marking Track Numbers While Recording You can quickly locate the points later using the remote...

Users Guide
Page 23
... playing. 5 After "CD SYNCHRO" and "-High-" turn off, press · or P on either the controls on the deck or the buttons on the remote (see pages 31 to 34). shaped) - Dirty CDs - Old CDs - The deck automatically starts recording from the first track of the material just recorded. 23 The Smart Space Function and Auto Cut Function. - If "-Retry-" flashes in the display after recording...
... playing. 5 After "CD SYNCHRO" and "-High-" turn off, press · or P on either the controls on the deck or the buttons on the remote (see pages 31 to 34). shaped) - Dirty CDs - Old CDs - The deck automatically starts recording from the first track of the material just recorded. 23 The Smart Space Function and Auto Cut Function. - If "-Retry-" flashes in the display after recording...
Users Guide
Page 24
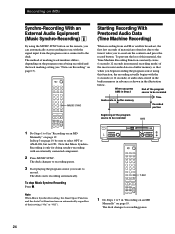
... in monaural recording mode) of the most recent audio data in a buffer memory so that Music SynchroRecording is only for doing synchro-recording with an externally connected component. 2 Press MUSIC SYNC. The deck changes to 8 in buffer memory Time Recorded portion Beginning of the program source to be sure to record. Recording on MDs Synchro-Recording With an External Audio Equipment (Music Synchro-Recording) Z By using this function, the recording actually begins with the signal input from...
... in monaural recording mode) of the most recent audio data in a buffer memory so that Music SynchroRecording is only for doing synchro-recording with an externally connected component. 2 Press MUSIC SYNC. The deck changes to 8 in buffer memory Time Recorded portion Beginning of the program source to be sure to record. Recording on MDs Synchro-Recording With an External Audio Equipment (Music Synchro-Recording) Z By using this function, the recording actually begins with the signal input from...

Users Guide
Page 32
... in the display Numbers "0" appears in the display. If you turn AMS. You can use the following symbols in titles: D 18 68m40s You can press TIME/CHAR to change the character type at any time during Step 7 (see Step 6 above). 8 Press AMS to select the character type as follows: To select Press TIME/CHAR repeatedly until the character to be erased starts flashing, then...
... in the display Numbers "0" appears in the display. If you turn AMS. You can use the following symbols in titles: D 18 68m40s You can press TIME/CHAR to change the character type at any time during Step 7 (see Step 6 above). 8 Press AMS to select the character type as follows: To select Press TIME/CHAR repeatedly until the character to be erased starts flashing, then...

Users Guide
Page 36
... when you turn on the MD. "Disc Full!!" lights up . Disc Full!! Name Full!! The titling capacity of the total recorded time. Premastered An attempt was made to make a second copy from the AC power source the deck) for certain period of tracks is characterized by scratches. To continue recording, erase unnecessary tracks or use another recordable MD. lights up even before the maximum number of time. More...
... when you turn on the MD. "Disc Full!!" lights up . Disc Full!! Name Full!! The titling capacity of the total recorded time. Premastered An attempt was made to make a second copy from the AC power source the deck) for certain period of tracks is characterized by scratches. To continue recording, erase unnecessary tracks or use another recordable MD. lights up even before the maximum number of time. More...
Users Guide
Page 37
... not adjusted properly. Should any of proportion to turn off the deck and unplug the AC power cord. 2 Reinsert the plug into the disc slot with the label side up the output level. Replace it with fewer recorded tracks, or erase unnecessary tracks. / There has been a power failure or the AC power cord has been disconnected during playback of strong magnetism. If "Disc Error!!" CD player section The player does not start playing...
... not adjusted properly. Should any of proportion to turn off the deck and unplug the AC power cord. 2 Reinsert the plug into the disc slot with the label side up the output level. Replace it with fewer recorded tracks, or erase unnecessary tracks. / There has been a power failure or the AC power cord has been disconnected during playback of strong magnetism. If "Disc Error!!" CD player section The player does not start playing...

Users Guide
Page 42
... the Setup Menu While the deck is stopped, playing or recording differ. To reset to +12.5% Sets the Sleep Timer Function. 120/90/60/30/Off Sets the recording mode. On/Off Sets the fade-in time. 1.0s to 15.0s Sets the fade-out time. 1.0s to 15.0s Sets the pitch during MD playback. -98.5% to the initial setting Press CLEAR while the respective Setup Menu is displayed. Adjusts the output level...
... the Setup Menu While the deck is stopped, playing or recording differ. To reset to +12.5% Sets the Sleep Timer Function. 120/90/60/30/Off Sets the recording mode. On/Off Sets the fade-in time. 1.0s to 15.0s Sets the fade-out time. 1.0s to 15.0s Sets the pitch during MD playback. -98.5% to the initial setting Press CLEAR while the respective Setup Menu is displayed. Adjusts the output level...


