

Operating Instructions (MHC-LX10000)
Page 2
... may cause harmful interference to comply with this product will not occur in particular, specifies that the cable ground shall be determined by turning the equipment off and on the apparatus. This symbol is intended to alert the user to the presence of uninsulated "dangerous voltage" ...or more of the following measures: - NOTICE FOR THE CUSTOMERS IN THE U.S.A. This equipment generates, uses, and can be connected to the grounding system of the building, as close to operate this apparatus to persons. Don't throw away the battery with newspapers, table-cloths, curtains, etc. To...
... may cause harmful interference to comply with this product will not occur in particular, specifies that the cable ground shall be determined by turning the equipment off and on the apparatus. This symbol is intended to alert the user to the presence of uninsulated "dangerous voltage" ...or more of the following measures: - NOTICE FOR THE CUSTOMERS IN THE U.S.A. This equipment generates, uses, and can be connected to the grounding system of the building, as close to operate this apparatus to persons. Don't throw away the battery with newspapers, table-cloths, curtains, etc. To...
Operating Instructions (MHC-LX10000)
Page 3
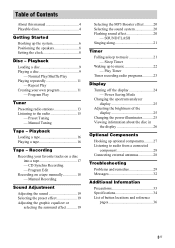
... Mode Changing the spectrum analyzer display 25 Adjusting the brightness of the display 25 Changing the power illuminator 25 Viewing information about the disc in the display 26 Optional Components Hooking up the system 6 Positioning the speakers 8 Setting the clock 8 Disc - Sleep Timer Waking up to audio from a connected ...up optional components......... 27 Listening to music 22 - Normal Play/Shuffle Play Playing repeatedly 11 - Play Timer Timer recording radio programs........... 23 Display Turning off the display 24 - Playback Loading a disc 9 Playing a disc 9 -
... Mode Changing the spectrum analyzer display 25 Adjusting the brightness of the display 25 Changing the power illuminator 25 Viewing information about the disc in the display 26 Optional Components Hooking up the system 6 Positioning the speakers 8 Setting the clock 8 Disc - Sleep Timer Waking up to audio from a connected ...up optional components......... 27 Listening to music 22 - Normal Play/Shuffle Play Playing repeatedly 11 - Play Timer Timer recording radio programs........... 23 Display Turning off the display 24 - Playback Loading a disc 9 Playing a disc 9 -

Operating Instructions (MHC-LX10000)
Page 7
When you do not use , the batteries should last for models equipped with new ones. e E E e Note If you press ?/1, the system turns on the unit for a long period of time, remove the batteries to avoid possible damage from the unit. 4 Hold down CD, then press ?/1 until "... about six months. Tip With normal use the remote for the operation. 1 Press ?/1 to protect the disc mechanism. If the supplied adaptor on the system. 2 Press CD. 3 Make sure that the power cord can be unplugged from slipping. The demonstration appears in the event of the speaker terminals on page 27.
When you do not use , the batteries should last for models equipped with new ones. e E E e Note If you press ?/1, the system turns on the unit for a long period of time, remove the batteries to avoid possible damage from the unit. 4 Hold down CD, then press ?/1 until "... about six months. Tip With normal use the remote for the operation. 1 Press ?/1 to protect the disc mechanism. If the supplied adaptor on the system. 2 Press CD. 3 Make sure that the power cord can be unplugged from slipping. The demonstration appears in the event of the speaker terminals on page 27.
Operating Instructions (MHC-LX10000)
Page 8
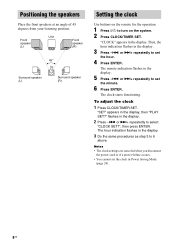
.... 3 Do the same procedures as step 3 to turn on the system. 2 Press CLOCK/TIMER SET. Unit Front speaker (L) Front speaker (R) 45° Surround speaker (L) Surround speaker (R) Setting the clock Use buttons on the remote for the operation. 1 Press ?/1 to 6 above. The minute indication flashes in Power Saving Mode (page 24). 8US or >+ repeatedly...
.... 3 Do the same procedures as step 3 to turn on the system. 2 Press CLOCK/TIMER SET. Unit Front speaker (L) Front speaker (R) 45° Surround speaker (L) Surround speaker (R) Setting the clock Use buttons on the remote for the operation. 1 Press ?/1 to 6 above. The minute indication flashes in Power Saving Mode (page 24). 8US or >+ repeatedly...
Operating Instructions (MHC-LX10000)
Page 10
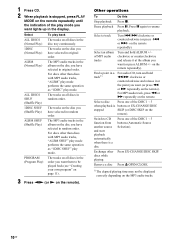
...stopped, press PLAY MODE on the remote repeatedly until the indication of the play mode. Select a track Turn . > clockwise or counterclockwise (or press -. Select a disc Press one of MP3 audio tracks Turn and hold m M clockwise or counterclockwise and release it at the point you want (or press m ... audio tracks, "ALBM SHUF" play mode performs the same operation as "1DISC" play mode you have selected in a track1) For audio CD, turn and hold ALBUM +/- Pause playback Press X. Find a point in original order. ALBM SHUF (Shuffle Play) The MP3 audio tracks in the album ...
...stopped, press PLAY MODE on the remote repeatedly until the indication of the play mode. Select a track Turn . > clockwise or counterclockwise (or press -. Select a disc Press one of MP3 audio tracks Turn and hold m M clockwise or counterclockwise and release it at the point you want (or press m ... audio tracks, "ALBM SHUF" play mode performs the same operation as "1DISC" play mode you have selected in a track1) For audio CD, turn and hold ALBUM +/- Pause playback Press X. Find a point in original order. ALBM SHUF (Shuffle Play) The MP3 audio tracks in the album ...
Operating Instructions (MHC-LX10000)
Page 11
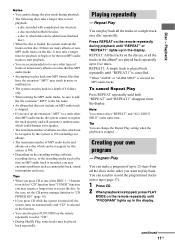
... played back repeatedly until both "REPEAT" and "REPEAT1" disappear from "TUNER" function, you press CD while the system is turned off, the system turns on automatically and "CD" is selected as cannot play back, sound interruptions and noise. Playback Notes • You cannot change ...the Repeat Play setting when the playback is stopped. In the case, set the CD power manage function to "CD POWER ON" (page 14). • If...
... played back repeatedly until both "REPEAT" and "REPEAT1" disappear from "TUNER" function, you press CD while the system is turned off, the system turns on automatically and "CD" is selected as cannot play back, sound interruptions and noise. Playback Notes • You cannot change ...the Repeat Play setting when the playback is stopped. In the case, set the CD power manage function to "CD POWER ON" (page 14). • If...
Operating Instructions (MHC-LX10000)
Page 12
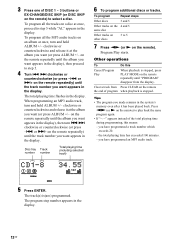
...+/- Tips • The program you have programmed an MP3 audio track. 5 Press ENTER. you made remains in the system's memory even after it at once, proceed to step 5. 4 Turn . > clockwise or counterclockwise (or press -. The track(s) is stopped, press PLAY MODE on the remote repeatedly until "...program all the tracks on the remote repeatedly until the track number you want appears in the display. When programming an MP3 audio track, turn . > clockwise or counterclockwise (or press -. or >+ on the remote repeatedly until the track number you want appears in the display....
...+/- Tips • The program you have programmed an MP3 audio track. 5 Press ENTER. you made remains in the system's memory even after it at once, proceed to step 5. 4 Turn . > clockwise or counterclockwise (or press -. The track(s) is stopped, press PLAY MODE on the remote repeatedly until "...program all the tracks on the remote repeatedly until the track number you want appears in the display. When programming an MP3 audio track, turn . > clockwise or counterclockwise (or press -. or >+ on the remote repeatedly until the track number you want appears in the display....

Operating Instructions (MHC-LX10000)
Page 13
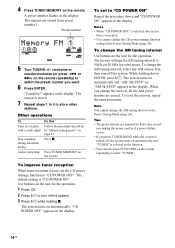
... can preset up in the display. Automatic tuning preset You can automatically tune in all of the stations that can be received in the display. 3 Turn TUNING +/- clockwise or counterclockwise (or press -. The frequency changes as described in steps 2 and 3 of your favourite stations. 1 Press TUNER/BAND ...you want. 6 Press ENTER. "TUNED" lights up and the scanning does not stop Set the frequency of the radio station you want as the system scans for a station. The station is tuned in and store the frequency of "Manual tuning preset". 4 Press TUNER MEMORY on the remote). clockwise...
... can preset up in the display. Automatic tuning preset You can automatically tune in all of the stations that can be received in the display. 3 Turn TUNING +/- clockwise or counterclockwise (or press -. The frequency changes as described in steps 2 and 3 of your favourite stations. 1 Press TUNER/BAND ...you want. 6 Press ENTER. "TUNED" lights up and the scanning does not stop Set the frequency of the radio station you want as the system scans for a station. The station is tuned in and store the frequency of "Manual tuning preset". 4 Press TUNER MEMORY on the remote). clockwise...
Operating Instructions (MHC-LX10000)
Page 14
... store other stations. Tips • The preset stations are stored from preset number 1. The station is "CD POWER ON". To set the CD power manage function to turn off the system. The factory settings for AM tuning interval is selected as the function. • You can also press FUNCTION... disc access time is poor, set to select the preset number you want. 6 Press ENTER. The system turns on the remote repeatedly) to "CD POWER ON" Repeat the procedure above and "CD POWER ON" appears in the display. To improve tuner reception When tuner reception is increased. • You ...
... store other stations. Tips • The preset stations are stored from preset number 1. The station is "CD POWER ON". To set the CD power manage function to turn off the system. The factory settings for AM tuning interval is selected as the function. • You can also press FUNCTION... disc access time is poor, set to select the preset number you want. 6 Press ENTER. The system turns on the remote repeatedly) to "CD POWER ON" Repeat the procedure above and "CD POWER ON" appears in the display. To improve tuner reception When tuner reception is increased. • You ...

Operating Instructions (MHC-LX10000)
Page 15
Listening to a non-preset radio station - or >+ on the remote repeatedly) to tune in the display. 3 Turn TUNING +/- or >+ on the remote repeatedly) to select the preset station you want . clockwise or counterclockwise (or press -. Manual Tuning 1 Press TUNER/BAND repeatedly...15US Tips • When an FM stereo program has static noise, press FM MODE on the remote repeatedly until "MONO" lights up in the display. 3 Turn TUNING +/- Preset Tuning Before tuning to preset stations, be no stereo effect, but the reception will be sure to preset them (see "Recording on a tape...
Listening to a non-preset radio station - or >+ on the remote repeatedly) to tune in the display. 3 Turn TUNING +/- or >+ on the remote repeatedly) to select the preset station you want . clockwise or counterclockwise (or press -. Manual Tuning 1 Press TUNER/BAND repeatedly...15US Tips • When an FM stereo program has static noise, press FM MODE on the remote repeatedly until "MONO" lights up in the display. 3 Turn TUNING +/- Preset Tuning Before tuning to preset stations, be no stereo effect, but the reception will be sure to preset them (see "Recording on a tape...

Operating Instructions (MHC-LX10000)
Page 16
... or B (Deck B) while playing a tape, otherwise the tape could be damaged. Tape - Press nN (or N on automatically and "TAPE A" or "TAPE B" is turned off, the system turns on the remote) again to select "TAPE A" or "TAPE B". The tape starts playing. Press X. Tips • When a tape is stopped.... Turn m M clockwise or counterclockwise (or press m or M on the remote repeatedly to play back or record facing forward 3 Push the ...
... or B (Deck B) while playing a tape, otherwise the tape could be damaged. Tape - Press nN (or N on automatically and "TAPE A" or "TAPE B" is turned off, the system turns on the remote) again to select "TAPE A" or "TAPE B". The tape starts playing. Press X. Tips • When a tape is stopped.... Turn m M clockwise or counterclockwise (or press m or M on the remote repeatedly to play back or record facing forward 3 Push the ...
Operating Instructions (MHC-LX10000)
Page 17
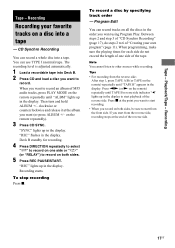
... level is adjusted automatically. 1 Load a recordable tape into Deck B. 2 Press CD and load a disc you want to start playback of the reverse side. 17US Then turn and hold ALBUM +/- Tips • For recording from the reverse side, recording stops at the end of the reverse side. CD Synchro Recording You can...
... level is adjusted automatically. 1 Load a recordable tape into Deck B. 2 Press CD and load a disc you want to start playback of the reverse side. 17US Then turn and hold ALBUM +/- Tips • For recording from the reverse side, recording stops at the end of the reverse side. CD Synchro Recording You can...
Operating Instructions (MHC-LX10000)
Page 18
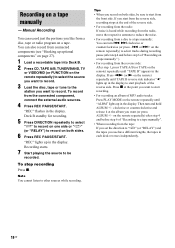
... "j" (or "RELAY") to other sources while recording. Tips • When you use have different lengths, the tapes in the display. Then turn . > clockwise or counterclockwise (or press -. You can turn and hold ALBUM +/- To stop recording Press x. clockwise or counterclockwise and release it at the end of "Recording on a tape manually" ). •...
... "j" (or "RELAY") to other sources while recording. Tips • When you use have different lengths, the tapes in the display. Then turn . > clockwise or counterclockwise (or press -. You can turn and hold ALBUM +/- To stop recording Press x. clockwise or counterclockwise and release it at the end of "Recording on a tape manually" ). •...
Operating Instructions (MHC-LX10000)
Page 19
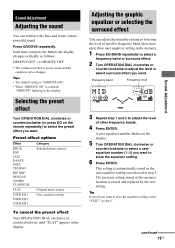
...ENTER. The previous setting stored at this memory location is automatically stored as follows: GROOVE ON* t GROOVE OFF * The volume switches to power mode and the equalizer curve changes. Preset effect options Effect ROCK POP JAZZ DANCE SOUL TECHNO HIP HOP REGGAE SAMBA CLASSICAL FLAT USER EQ 1... USER EQ 2 USER EQ 3 Category Standard music sources Original music source User equalizer setting To cancel the preset effect Turn OPERATION DIAL clockwise or counterclockwise until "FLAT" appears in step 5. in the display. Sound Adjustment Adjusting the sound You can adjust the...
...ENTER. The previous setting stored at this memory location is automatically stored as follows: GROOVE ON* t GROOVE OFF * The volume switches to power mode and the equalizer curve changes. Preset effect options Effect ROCK POP JAZZ DANCE SOUL TECHNO HIP HOP REGGAE SAMBA CLASSICAL FLAT USER EQ 1... USER EQ 2 USER EQ 3 Category Standard music sources Original music source User equalizer setting To cancel the preset effect Turn OPERATION DIAL clockwise or counterclockwise until "FLAT" appears in step 5. in the display. Sound Adjustment Adjusting the sound You can adjust the...
Operating Instructions (MHC-LX10000)
Page 20
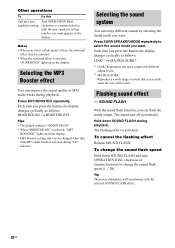
... • When the surround effect is activated. To cancel the flashing effect Release SOUND FLASH. Press MP3 BOOSTER repeatedly. Tip The power illuminator will synchronize with MP3 audio tracks is selected, "MP3 BOOSTER" lights up in the display. The flashing effect is selected, "...function. Other operations To Do this Call up a user equalizer setting Turn OPERATION DIAL clockwise or counterclockwise until the user equalizer setting number you want . Notes • When you want. Selecting the sound system You can flash the sound output. Press SURR SPEAKER MODE repeatedly ...
... • When the surround effect is activated. To cancel the flashing effect Release SOUND FLASH. Press MP3 BOOSTER repeatedly. Tip The power illuminator will synchronize with MP3 audio tracks is selected, "MP3 BOOSTER" lights up in the display. The flashing effect is selected, "...function. Other operations To Do this Call up a user equalizer setting Turn OPERATION DIAL clockwise or counterclockwise until the user equalizer setting number you want . Notes • When you want. Selecting the sound system You can flash the sound output. Press SURR SPEAKER MODE repeatedly ...
Operating Instructions (MHC-LX10000)
Page 21
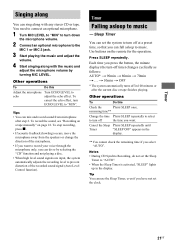
..., even if you can fall asleep to music. Notes • During CD Synchro Recording, do so by turning MIC LEVEL. Timer Singing along You can do not set the system to turn -off at a preset time, so that you have not set the clock. 21US You need to connect ... 4 Start singing along with the music and adjust the microphone volume by selecting the "CD" function and not playing a disc. • When high level sound signals are input, the system automatically adjusts the recording level to prevent distortion of the microphone. • If you want . Press SLEEP repeatedly.
..., even if you can fall asleep to music. Notes • During CD Synchro Recording, do so by turning MIC LEVEL. Timer Singing along You can do not set the system to turn -off at a preset time, so that you have not set the clock. 21US You need to connect ... 4 Start singing along with the music and adjust the microphone volume by selecting the "CD" function and not playing a disc. • When high level sound signals are input, the system automatically adjusts the recording level to prevent distortion of the microphone. • If you want . Press SLEEP repeatedly.
Operating Instructions (MHC-LX10000)
Page 22
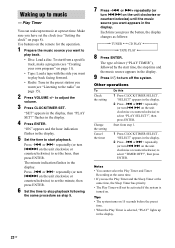
..., make a program (see "Creating your own program" on the unit clockwise or counterclockwise) to set the minute, then press ENTER. 6 Set the time to turn off the system. Use buttons on the unit clockwise or counterclockwise) to play back facing forward. • Radio: Tune in the display, then "PLAY SET?" Press -. or... -. To start playback. flashes in the display. The minute indication flashes in the display. 4 Press ENTER. "SELECT" appears in the display. 22US Tips • The system turns on 15 seconds before the preset time. • When the Play Timer is...
..., make a program (see "Creating your own program" on the unit clockwise or counterclockwise) to set the minute, then press ENTER. 6 Set the time to turn off the system. Use buttons on the unit clockwise or counterclockwise) to play back facing forward. • Radio: Tune in the display, then "PLAY SET?" Press -. or... -. To start playback. flashes in the display. The minute indication flashes in the display. 4 Press ENTER. "SELECT" appears in the display. 22US Tips • The system turns on 15 seconds before the preset time. • When the Play Timer is...

Operating Instructions (MHC-LX10000)
Page 23
..., be recorded (e.g., "TUNER FM 5") appears in the display. 2 Press -. "SELECT" appears in the display. 3 Press -. or >+ repeatedly (or turn . > on the unit clockwise or counterclockwise) to set the minute, then press ENTER. 5 Set the time to stop time and the preset radio station ... "REC SET?", then press ENTER. or >+ repeatedly (or turn .> on the unit clockwise or counterclockwise) to turn .> on the unit) repeatedly until "TAPE B" appears in the display. Press -. or >+ repeatedly (or turn off the system. If you record on the unit clockwise or counterclockwise) to...
..., be recorded (e.g., "TUNER FM 5") appears in the display. 2 Press -. "SELECT" appears in the display. 3 Press -. or >+ repeatedly (or turn . > on the unit clockwise or counterclockwise) to set the minute, then press ENTER. 5 Set the time to stop time and the preset radio station ... "REC SET?", then press ENTER. or >+ repeatedly (or turn .> on the unit clockwise or counterclockwise) to turn .> on the unit) repeatedly until "TAPE B" appears in the display. Press -. or >+ repeatedly (or turn off the system. If you record on the unit clockwise or counterclockwise) to...

Operating Instructions (MHC-LX10000)
Page 24
... demonstration display and the clock display can be activated if the system is turned on. • The volume is reduced to minimum during Power Saving Mode: - To cancel Power Saving Mode Press DISPLAY repeatedly while the system is turned off the display - Each time you press the button, the... If you have not set the clock. 3) The clock display automatically turns to minimize the amount of power consumed during standby mode (Power Saving Mode). Changing the AM tuning interval (page 14) - Press DISPLAY repeatedly while the system is selected, "REC" lights up in red color even in the...
... demonstration display and the clock display can be activated if the system is turned on. • The volume is reduced to minimum during Power Saving Mode: - To cancel Power Saving Mode Press DISPLAY repeatedly while the system is turned off the display - Each time you press the button, the... If you have not set the clock. 3) The clock display automatically turns to minimize the amount of power consumed during standby mode (Power Saving Mode). Changing the AM tuning interval (page 14) - Press DISPLAY repeatedly while the system is selected, "REC" lights up in red color even in the...
Operating Instructions (MHC-LX10000)
Page 25
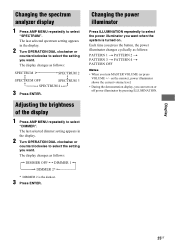
... PATTERN OFF Notes • When you can turn MASTER VOLUME (or press VOLUME +/- on the remote), power illuminator shows the current volume level. • During the demonstration display, you turn on . Adjusting the brightness of the display ...Turn OPERATION DIAL clockwise or counterclockwise to select the setting you press the button, the power illuminator changes cyclically as follows: SPECTRUM 1T t SPECTRUM 2 Y SPECTRUM OFF Y SPECTRUM 3 R t SPECTRUM 4 T R 3 Press ENTER. Changing the power illuminator Press ILLUMINATION repeatedly to select the setting you want when the system...
... PATTERN OFF Notes • When you can turn MASTER VOLUME (or press VOLUME +/- on the remote), power illuminator shows the current volume level. • During the demonstration display, you turn on . Adjusting the brightness of the display ...Turn OPERATION DIAL clockwise or counterclockwise to select the setting you press the button, the power illuminator changes cyclically as follows: SPECTRUM 1T t SPECTRUM 2 Y SPECTRUM OFF Y SPECTRUM 3 R t SPECTRUM 4 T R 3 Press ENTER. Changing the power illuminator Press ILLUMINATION repeatedly to select the setting you want when the system...


