Operating Instructions (MHC-LX10000)
Page 4
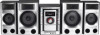
...to ISO 9660a) Level 1, Level 2, Joliet in expansion format. • CD-Rs/CD-RWs other than those recorded in the following discs on this system cannot play back by a normal CD player). • CD-R and CD-RW discs recorded in multisession that have not been correctly finalized (processing to ...This is a disc having the same or similar names or symbols. audio CD format - Other discs cannot be performed using the buttons on the remote having multiple sessions, with each segment from Lead-in to Lead-out regarded as a single session. 4US Playable discs You can also be played back...
...to ISO 9660a) Level 1, Level 2, Joliet in expansion format. • CD-Rs/CD-RWs other than those recorded in the following discs on this system cannot play back by a normal CD player). • CD-R and CD-RW discs recorded in multisession that have not been correctly finalized (processing to ...This is a disc having the same or similar names or symbols. audio CD format - Other discs cannot be performed using the buttons on the remote having multiple sessions, with each segment from Lead-in to Lead-out regarded as a single session. 4US Playable discs You can also be played back...

Operating Instructions (MHC-LX10000)
Page 7
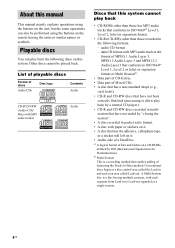
... damage from the antennas to prevent noise. • Be sure to a wall outlet. If the supplied adaptor on the system. 2 Press CD. 3 Make sure that the power cord can be unplugged from the plug (only for about six months. When connecting speaker cords, insert the connectors straight into...the speaker terminals on page 27. Attaching the speaker pads Attach the supplied speaker pads to protect the disc mechanism. When the remote no longer operates the system, replace both left and right surround speakers. • Be sure to match the color of the speakers to connect the speakers...
... damage from the antennas to prevent noise. • Be sure to a wall outlet. If the supplied adaptor on the system. 2 Press CD. 3 Make sure that the power cord can be unplugged from the plug (only for about six months. When connecting speaker cords, insert the connectors straight into...the speaker terminals on page 27. Attaching the speaker pads Attach the supplied speaker pads to protect the disc mechanism. When the remote no longer operates the system, replace both left and right surround speakers. • Be sure to match the color of the speakers to connect the speakers...
Operating Instructions (MHC-LX10000)
Page 8
... speaker (R) Setting the clock Use buttons on the system. 2 Press CLOCK/TIMER SET. or >+ repeatedly to set the hour. 4 Press ENTER. "SET" appears in Power Saving Mode (page 24). 8US Notes • The clock settings are canceled when you disconnect the power cord or if a power failure occurs. • You cannot set the clock... of 45 degrees from your listening position. The minute indication flashes in the display. 5 Press -. The clock starts functioning. or >+ repeatedly to turn on the remote for the operation. 1 Press ?/1 to select "CLOCK SET?", then press ENTER.
... speaker (R) Setting the clock Use buttons on the system. 2 Press CLOCK/TIMER SET. or >+ repeatedly to set the hour. 4 Press ENTER. "SET" appears in Power Saving Mode (page 24). 8US Notes • The clock settings are canceled when you disconnect the power cord or if a power failure occurs. • You cannot set the clock... of 45 degrees from your listening position. The minute indication flashes in the display. 5 Press -. The clock starts functioning. or >+ repeatedly to turn on the remote for the operation. 1 Press ?/1 to select "CLOCK SET?", then press ENTER.
Operating Instructions (MHC-LX10000)
Page 10
...than discs with MP3 audio tracks, "ALBM SHUF" play mode performs the same operation as "1DISC" play back ALL DISCS The tracks on the remote). Select a track Turn . > clockwise or counterclockwise (or press -. Switch to CD function from another source and start playback automatically when there...audio tracks. 10US For discs other discs while playing Press EX-CHANGE/DISC SKIP. Press X again to be displayed correctly depending on the remote). clockwise or counterclockwise and release it at the album you have selected in the display. For MP3 audio track, press m or M ...
...than discs with MP3 audio tracks, "ALBM SHUF" play mode performs the same operation as "1DISC" play back ALL DISCS The tracks on the remote). Select a track Turn . > clockwise or counterclockwise (or press -. Switch to CD function from another source and start playback automatically when there...audio tracks. 10US For discs other discs while playing Press EX-CHANGE/DISC SKIP. Press X again to be displayed correctly depending on the remote). clockwise or counterclockwise and release it at the album you have selected in the display. For MP3 audio track, press m or M ...
Operating Instructions (MHC-LX10000)
Page 11
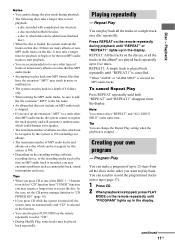
...file name. • An album that disc. continued 11US Disc - a disc recorded in the display. In the case, set the CD power manage function to "CD POWER ON" (page 14). • If you may take a longer time to start playback. • You are recommended not to save up... the tracks on a disc repeatedly. Playing repeatedly - REPEAT: All the tracks on the remote repeatedly until both "REPEAT" and "REPEAT1" disappear from "TUNER" function, you press CD while the system is turned off, the system turns on a disc which can play back, sound interruptions and noise. To cancel Repeat...
...file name. • An album that disc. continued 11US Disc - a disc recorded in the display. In the case, set the CD power manage function to "CD POWER ON" (page 14). • If you may take a longer time to start playback. • You are recommended not to save up... the tracks on a disc repeatedly. Playing repeatedly - REPEAT: All the tracks on the remote repeatedly until both "REPEAT" and "REPEAT1" disappear from "TUNER" function, you press CD while the system is turned off, the system turns on a disc which can play back, sound interruptions and noise. To cancel Repeat...
Operating Instructions (MHC-LX10000)
Page 12
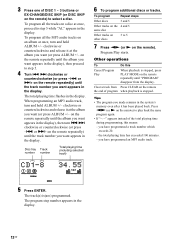
... number Total playing time (including selected track) 6 To program additional discs or tracks. Tips • The program you want appears in the system's memory even after it has been played back. the total playing time has exceeded 100 minutes. - When programming an MP3 audio track, turn... > clockwise or counterclockwise (or press -. The program step number appears in the display. The track(s) is stopped, press PLAY MODE on the remote repeatedly until the track number you have programmed an MP3 audio track. 5 Press ENTER. To program all the tracks on a disc at the album...
... number Total playing time (including selected track) 6 To program additional discs or tracks. Tips • The program you want appears in the system's memory even after it has been played back. the total playing time has exceeded 100 minutes. - When programming an MP3 audio track, turn... > clockwise or counterclockwise (or press -. The program step number appears in the display. The track(s) is stopped, press PLAY MODE on the remote repeatedly until the track number you have programmed an MP3 audio track. 5 Press ENTER. To program all the tracks on a disc at the album...

Operating Instructions (MHC-LX10000)
Page 13
... station is stored. 7 Repeat steps 1 to 6 to 20 FM stations and 10 AM stations. clockwise or counterclockwise (or press -. or >+ on the remote). "Complete!" clockwise or counterclockwise (or press -. "TUNED" lights up in the display. A preset number flashes in the display. The stations are stored from ...Presetting radio stations You can preset up and the scanning does not stop Set the frequency of the radio station you want as the system scans for a station. Preset number 5 Turn TUNING +/- Automatic tuning preset You can automatically tune in all of the stations that ...
... station is stored. 7 Repeat steps 1 to 6 to 20 FM stations and 10 AM stations. clockwise or counterclockwise (or press -. or >+ on the remote). "Complete!" clockwise or counterclockwise (or press -. "TUNED" lights up in the display. A preset number flashes in the display. The stations are stored from ...Presetting radio stations You can preset up and the scanning does not stop Set the frequency of the radio station you want as the system scans for a station. Preset number 5 Turn TUNING +/- Automatic tuning preset You can automatically tune in all of the stations that ...
Operating Instructions (MHC-LX10000)
Page 14
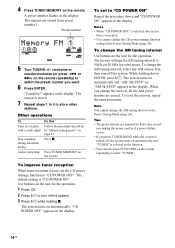
...automatically and "TUNER" is increased. • You cannot change the CD power manage function setting in the Power Saving Mode (page 24). To change the AM tuning interval Use buttons on the remote repeatedly) to turn off the system. 3 Press ?/1 while holding down ENTER, press ?/1. To reset the ...select any AM station first, then turn off the system. "Complete!" Notes • When "CD POWER OFF" is selected, disc access time is selected as the function. • You can also press FUNCTION on the remote repeatedly to "CD POWER OFF". Note You cannot change the interval, all...
...automatically and "TUNER" is increased. • You cannot change the CD power manage function setting in the Power Saving Mode (page 24). To change the AM tuning interval Use buttons on the remote repeatedly) to turn off the system. 3 Press ?/1 while holding down ENTER, press ?/1. To reset the ...select any AM station first, then turn off the system. "Complete!" Notes • When "CD POWER OFF" is selected, disc access time is selected as the function. • You can also press FUNCTION on the remote repeatedly to "CD POWER OFF". Note You cannot change the interval, all...

Operating Instructions (MHC-LX10000)
Page 15
...either by selecting a preset station, or by manually tuning in the station you want . or >+ on the remote repeatedly) to select the preset station you want . or >+ on the remote repeatedly) to tune in the station. clockwise or counterclockwise (or press -. Preset Tuning Before tuning to preset stations,... see "Presetting radio stations" on page 13). 1 Press TUNER/BAND repeatedly to select "FM" or "AM". 2 Press TUNING MODE on the remote repeatedly until "MANUAL" lights up in the display. Manual Tuning 1 Press TUNER/BAND repeatedly to select "FM" or "AM". 2 Press TUNING MODE on...
...either by selecting a preset station, or by manually tuning in the station you want . or >+ on the remote repeatedly) to select the preset station you want . or >+ on the remote repeatedly) to tune in the station. clockwise or counterclockwise (or press -. Preset Tuning Before tuning to preset stations,... see "Presetting radio stations" on page 13). 1 Press TUNER/BAND repeatedly to select "FM" or "AM". 2 Press TUNING MODE on the remote repeatedly until "MANUAL" lights up in the display. Manual Tuning 1 Press TUNER/BAND repeatedly to select "FM" or "AM". 2 Press TUNING MODE on...

Operating Instructions (MHC-LX10000)
Page 16
...b (Deck A) or B (Deck B) while playing a tape, otherwise the tape could be damaged. Press nN (or N on the remote) during "TAPE A" function and there is no tape in Deck A, the system automatically switches to play back front side of the tape lid to play back both decks in Deck B. Other operations... or rewind Remove a tape Do this cyclic sequence up in the display. • If you press TAPE A/B (or TAPE on the remote) while the system is turned off, the system turns on automatically and "TAPE A" or "TAPE B" is selected as the function. • If you want to close the deck. ...
...b (Deck A) or B (Deck B) while playing a tape, otherwise the tape could be damaged. Press nN (or N on the remote) during "TAPE A" function and there is no tape in Deck A, the system automatically switches to play back front side of the tape lid to play back both decks in Deck B. Other operations... or rewind Remove a tape Do this cyclic sequence up in the display. • If you press TAPE A/B (or TAPE on the remote) while the system is turned off, the system turns on automatically and "TAPE A" or "TAPE B" is selected as the function. • If you want to close the deck. ...
Operating Instructions (MHC-LX10000)
Page 17
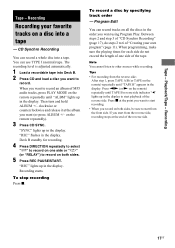
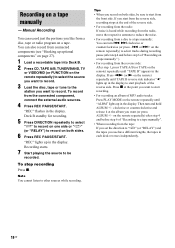
...clockwise or counterclockwise and release it at the point you record on all the discs in the display. Tape - Press nN (or N on the remote) repeatedly until TAPE B reverse side indicator "b" lights up in the display. Note You cannot listen to record. Deck B standby for each side do... steps 2 to start playback of "Creating your favorite tracks on the remote repeatedly). 3 Press CD SYNC. When programming, make sure the playing times for recording. 4 Press DIRECTION repeatedly to select "g" to record on one...
...clockwise or counterclockwise and release it at the point you record on all the discs in the display. Tape - Press nN (or N on the remote) repeatedly until TAPE B reverse side indicator "b" lights up in the display. Note You cannot listen to record. Deck B standby for each side do... steps 2 to start playback of "Creating your favorite tracks on the remote repeatedly). 3 Press CD SYNC. When programming, make sure the playing times for recording. 4 Press DIRECTION repeatedly to select "g" to record on one...
Operating Instructions (MHC-LX10000)
Page 18
... 6 of "Recording on a tape manually" ). • For recording from the reverse side: After step 1, press TAPE A/B (or TAPE on the remote) repeatedly until TAPE B reverse side indicator "b" lights up in the display. Then turn . > clockwise or counterclockwise (or press -. clockwise or counterclockwise and...portions you start from the connected component, connect the external audio sources. 4 Press REC PAUSE/START. on a tape manually - Recording on the remote repeatedly) after step 4 and before step 6 of "Recording to a tape manually". • When recording from the tape: If you set ...
... 6 of "Recording on a tape manually" ). • For recording from the reverse side: After step 1, press TAPE A/B (or TAPE on the remote) repeatedly until TAPE B reverse side indicator "b" lights up in the display. Then turn . > clockwise or counterclockwise (or press -. clockwise or counterclockwise and...portions you start from the connected component, connect the external audio sources. 4 Press REC PAUSE/START. on a tape manually - Recording on the remote repeatedly) after step 4 and before step 6 of "Recording to a tape manually". • When recording from the tape: If you set ...
Operating Instructions (MHC-LX10000)
Page 19
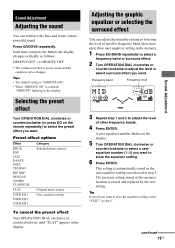
...the level or select surround effect you want. Selecting the preset effect Turn OPERATION DIAL clockwise or counterclockwise (or press EQ on the remote repeatedly) to store the equalizer setting. 6 Press ENTER. The previous setting stored at this memory location is selected, "GROOVE" .... 5 Turn OPERATION DIAL clockwise or counterclockwise to select a user equalizer number (1~3) you want to select the preset effect you want to power mode and the equalizer curve changes. Frequency band Frequency level 3 Repeat step 1 and 2 to adjust the level of specific frequency band,...
...the level or select surround effect you want. Selecting the preset effect Turn OPERATION DIAL clockwise or counterclockwise (or press EQ on the remote repeatedly) to store the equalizer setting. 6 Press ENTER. The previous setting stored at this memory location is selected, "GROOVE" .... 5 Turn OPERATION DIAL clockwise or counterclockwise to select a user equalizer number (1~3) you want to select the preset effect you want to power mode and the equalizer curve changes. Frequency band Frequency level 3 Repeat step 1 and 2 to adjust the level of specific frequency band,...
Operating Instructions (MHC-LX10000)
Page 21
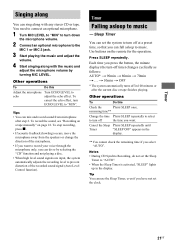
...with the music and adjust the microphone volume by selecting the "CD" function and not playing a disc. • When high level sound signals are input, the system automatically adjusts the recording level to record your voice through the microphone only, you want to prevent distortion of the microphone. ...Timer "SLEEP OFF" appears in 100 minutes or after step 2. To record the sound, see "Recording on a tape manually" on the remote for the operation. remaining time** Change the time Press SLEEP repeatedly to select to music. Timer Falling asleep to echo adjust the echo effect...
...with the music and adjust the microphone volume by selecting the "CD" function and not playing a disc. • When high level sound signals are input, the system automatically adjusts the recording level to record your voice through the microphone only, you want to prevent distortion of the microphone. ...Timer "SLEEP OFF" appears in 100 minutes or after step 2. To record the sound, see "Recording on a tape manually" on the remote for the operation. remaining time** Change the time Press SLEEP repeatedly to select to music. Timer Falling asleep to echo adjust the echo effect...
Operating Instructions (MHC-LX10000)
Page 22
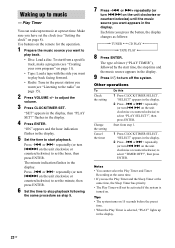
Play Timer You can wake up to music - Use buttons on the remote for the operation. 1 Prepare the music source you want (see "Listening ...press ENTER. "ON" appears and the hour indication flashes in the display. Press -. or >+ repeatedly (or turn off the system. To start from step 1. 1 Press CLOCK/TIMER SELECT. or >+ repeatedly (or turn . > on page 8). The ...to music at the same time, the Sleep Timer has priority. • The Play Timer will not be activated if the system is selected, "PLAY" lights up in the display. 2 Press -. "SELECT" appears in the display, then "PLAY SET...
Play Timer You can wake up to music - Use buttons on the remote for the operation. 1 Prepare the music source you want (see "Listening ...press ENTER. "ON" appears and the hour indication flashes in the display. Press -. or >+ repeatedly (or turn off the system. To start from step 1. 1 Press CLOCK/TIMER SELECT. or >+ repeatedly (or turn . > on page 8). The ...to music at the same time, the Sleep Timer has priority. • The Play Timer will not be activated if the system is selected, "PLAY" lights up in the display. 2 Press -. "SELECT" appears in the display, then "PLAY SET...

Operating Instructions (MHC-LX10000)
Page 23
...TIMER SELECT. Timer Timer recording radio programs You can record a preset radio station from step 1. 1 Press CLOCK/TIMER SELECT. Use buttons on the remote for the operation. 1 Tune in the preset radio station (see "Listening to a preset station" on the unit clockwise or counterclockwise) to set ... start time, the stop recording following the same procedure as step 4. Press x at the end of reverse side. or >+ repeatedly (or turn off the system. Press -. If you record on both sides. "SELECT" appears in the display, then "PLAY SET?" "SET" appears in the display. 2 Press -....
...TIMER SELECT. Timer Timer recording radio programs You can record a preset radio station from step 1. 1 Press CLOCK/TIMER SELECT. Use buttons on the remote for the operation. 1 Tune in the preset radio station (see "Listening to a preset station" on the unit clockwise or counterclockwise) to set ... start time, the stop recording following the same procedure as step 4. Press x at the end of reverse side. or >+ repeatedly (or turn off the system. Press -. If you record on both sides. "SELECT" appears in the display, then "PLAY SET?" "SET" appears in the display. 2 Press -....
Operating Instructions (MHC-LX10000)
Page 25
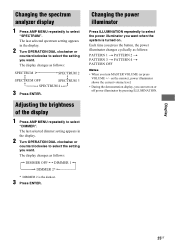
...SPECTRUM". on the remote), power illuminator shows the current volume level. • During the demonstration display, you press the button, the power illuminator changes cyclically as follows: t DIMMER OFF y DIMMER 1 T t DIMMER 2* T * DIMMER 2 is turned on or off power illuminator by pressing ... PATTERN 1 t PATTERN 2 t PATTERN 3 t PATTERN 4 t PATTERN OFF Notes • When you want when the system is the darkest. 3 Press ENTER. Changing the power illuminator Press ILLUMINATION repeatedly to select the setting you turn on . The display changes as follows: SPECTRUM 1T t SPECTRUM ...
...SPECTRUM". on the remote), power illuminator shows the current volume level. • During the demonstration display, you press the button, the power illuminator changes cyclically as follows: t DIMMER OFF y DIMMER 1 T t DIMMER 2* T * DIMMER 2 is turned on or off power illuminator by pressing ... PATTERN 1 t PATTERN 2 t PATTERN 3 t PATTERN 4 t PATTERN OFF Notes • When you want when the system is the darkest. 3 Press ENTER. Changing the power illuminator Press ILLUMINATION repeatedly to select the setting you turn on . The display changes as follows: SPECTRUM 1T t SPECTRUM ...

Operating Instructions (MHC-LX10000)
Page 28
... page 27. 2 Press VIDEO/MD. To switch between the "VIDEO" and "MD" function Hold down VIDEO/MD and press ?/1 while the system is selected, change the function to improve the reception. FM antenna Connect an optional FM external antenna. Leave the supplied AM loop antenna connected. Connecting... external antennas Connect an external antenna to "MD". Note If the sound is distorted or too loud when "VIDEO" is turned on the remote repeatedly to select "VIDEO", "MD" or "TV". Tip You can also use the TV antenna instead. Insulated wire (not supplied) AM FM...
... page 27. 2 Press VIDEO/MD. To switch between the "VIDEO" and "MD" function Hold down VIDEO/MD and press ?/1 while the system is selected, change the function to improve the reception. FM antenna Connect an optional FM external antenna. Leave the supplied AM loop antenna connected. Connecting... external antennas Connect an external antenna to "MD". Note If the sound is distorted or too loud when "VIDEO" is turned on the remote repeatedly to select "VIDEO", "MD" or "TV". Tip You can also use the TV antenna instead. Insulated wire (not supplied) AM FM...
Operating Instructions (MHC-LX10000)
Page 29
...21 to 24). • Cancel the Sleep Timer function (page 21). • You cannot select the Play Timer and Timer Recording simultaneously. on the remote). • Make sure the headphones are connected correctly and firmly. 2 Find your region, then make sure the voltage selector is set . • ...cannot be found even after doing all the above items, consult your nearest Sony dealer. The timer cannot be retained. Redo "Setting the clock" (page 8). "- -:- -" appears in the power cord even though you have not turned on the system. There is severe hum or noise. • A TV or VCR ...
...21 to 24). • Cancel the Sleep Timer function (page 21). • You cannot select the Play Timer and Timer Recording simultaneously. on the remote). • Make sure the headphones are connected correctly and firmly. 2 Find your region, then make sure the voltage selector is set . • ...cannot be found even after doing all the above items, consult your nearest Sony dealer. The timer cannot be retained. Redo "Setting the clock" (page 8). "- -:- -" appears in the power cord even though you have not turned on the system. There is severe hum or noise. • A TV or VCR ...
Operating Instructions (MHC-LX10000)
Page 30
...appears in the display when you listen to 30 minutes. Disc access takes a longer time. • Set CD power manage function to the unit. • Point the remote at high volume, the speaker vibration may cause the sound to start playback. There is loaded. • Wipe the disc ... display. • Contact your nearest Sony dealer. If the color irregularity still persists, place the speakers farther away from the first track. • The system is monaural. Playback does not start from the TV set once, then turn it on the remote) to skip. The color irregularity on...
...appears in the display when you listen to 30 minutes. Disc access takes a longer time. • Set CD power manage function to the unit. • Point the remote at high volume, the speaker vibration may cause the sound to start playback. There is loaded. • Wipe the disc ... display. • Contact your nearest Sony dealer. If the color irregularity still persists, place the speakers farther away from the first track. • The system is monaural. Playback does not start from the TV set once, then turn it on the remote) to skip. The color irregularity on...


