
Operating Instructions
Page 1
... bass reproduction. To tune in a station with copyright protection technologies are lost when you stop , press TUNING MODE repeatedly until "MONO" appears to protect the CD mechanism. 2 Press on the unit) . You need to connect the DIGITAL MEDIA PORT adaptor to a wall socket. Mini HI-FI Component System Operating Instructions MHC-EC98Pi/EC78Pi/ EC68Pi 3-294-665-11(1) © 2008 Sony Corporation Printed in the event of trouble. Install...
... bass reproduction. To tune in a station with copyright protection technologies are lost when you stop , press TUNING MODE repeatedly until "MONO" appears to protect the CD mechanism. 2 Press on the unit) . You need to connect the DIGITAL MEDIA PORT adaptor to a wall socket. Mini HI-FI Component System Operating Instructions MHC-EC98Pi/EC78Pi/ EC68Pi 3-294-665-11(1) © 2008 Sony Corporation Printed in the event of trouble. Install...

Operating Instructions
Page 2
... canceled manually. Other Operations Creating your own CD program (Program Play) Use buttons on the remote to create your own program. 1 Press FUNCTION +/ repeatedly to select the CD function. 2 Press PLAY MODE repeatedly until "PGM" appears while the player is stopped. 3 Press repeatedly until "PGM" disappears while the player is stopped. Presetting radio stations You can fall asleep to music. Troubleshooting 1 Make sure the power cord and speaker cords are deleted. The disc...
... canceled manually. Other Operations Creating your own CD program (Program Play) Use buttons on the remote to create your own program. 1 Press FUNCTION +/ repeatedly to select the CD function. 2 Press PLAY MODE repeatedly until "PGM" appears while the player is stopped. 3 Press repeatedly until "PGM" disappears while the player is stopped. Presetting radio stations You can fall asleep to music. Troubleshooting 1 Make sure the power cord and speaker cords are deleted. The disc...

Limited Warranty (US Only)
Page 1
... a period of the Product, including the antenna. has established telephone numbers for frequently asked questions: To locate the servicer or dealer nearest you must be defective, Sony will supply, at no charge, new or rebuilt replacements in Japan 4-557-172-02 General Stereo/Hifi Components/Tape Decks ® CD Players/Mini Disc Players/Audio Systems Hifi Audio LIMITED WARRANTY Sony Electronics Inc. ("Sony") warrants this Product is valid only in...
... a period of the Product, including the antenna. has established telephone numbers for frequently asked questions: To locate the servicer or dealer nearest you must be defective, Sony will supply, at no charge, new or rebuilt replacements in Japan 4-557-172-02 General Stereo/Hifi Components/Tape Decks ® CD Players/Mini Disc Players/Audio Systems Hifi Audio LIMITED WARRANTY Sony Electronics Inc. ("Sony") warrants this Product is valid only in...
Marketing Specifications
Page 1
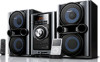
MHC-EC78Pi Made for iPod1 Digital Media Port (included) Single Disc CD Player: CD-R/RW and MP3 Playback2 Audio-in For Use with MP3 Players or PC's AM/FM Stereo Tuner with 30 Station Presets 380W (RMS) Total Power Output(190W x 2) Remote Control with Full iPod Menu Control Mini Hi-Fi Shelf System
MHC-EC78Pi Made for iPod1 Digital Media Port (included) Single Disc CD Player: CD-R/RW and MP3 Playback2 Audio-in For Use with MP3 Players or PC's AM/FM Stereo Tuner with 30 Station Presets 380W (RMS) Total Power Output(190W x 2) Remote Control with Full iPod Menu Control Mini Hi-Fi Shelf System
Marketing Specifications
Page 2
..., 4cm Inputs and Outputs Analog Audio Input(s): Audio Line: 3.5mm Headphone Jack: Yes(3.5mm) Please visit the Dealer Network for simple plug and play of an iPod with Full iPod Menu System Allows you to preset up to 10 of your favorite AM and 20 FM stations. 380W (RMS) Total Power Output 190 Watts per Channel x 2 Remote Control with the included TDM-ip101 . Compatible with digital music players or PC's via a 3.5mm jack. MHC-EC78Pi Features Made...
..., 4cm Inputs and Outputs Analog Audio Input(s): Audio Line: 3.5mm Headphone Jack: Yes(3.5mm) Please visit the Dealer Network for simple plug and play of an iPod with Full iPod Menu System Allows you to preset up to 10 of your favorite AM and 20 FM stations. 380W (RMS) Total Power Output 190 Watts per Channel x 2 Remote Control with the included TDM-ip101 . Compatible with digital music players or PC's via a 3.5mm jack. MHC-EC78Pi Features Made...
Operating Instructions (TDMiP10)
Page 2
... can radiate radio frequency energy and, if not installed and used in accordance with the instructions, may cause harmful interference to provide reasonable protection against harmful interference in this manual could void your authority to correct the interference by turning the equipment off and on, the user is connected. - Increase the separation between the equipment and receiver. - In this manual, ™ and...
... can radiate radio frequency energy and, if not installed and used in accordance with the instructions, may cause harmful interference to provide reasonable protection against harmful interference in this manual could void your authority to correct the interference by turning the equipment off and on, the user is connected. - Increase the separation between the equipment and receiver. - In this manual, ™ and...
Operating Instructions (TDMiP10)
Page 3
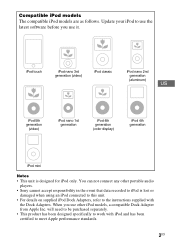
... designed specifically to iPod is designed for iPod only. When you use other portable audio players. • Sony cannot accept responsibility in the event that data recorded to work with the Dock Adapters. Update your iPod to meet Apple performance standards. 3US iPod touch iPod nano 3rd generation (video) iPod classic iPod nano 2nd generation (aluminum) US iPod 5th generation (video) iPod nano 1st generation iPod 4th generation (color display) iPod...
... designed specifically to iPod is designed for iPod only. When you use other portable audio players. • Sony cannot accept responsibility in the event that data recorded to work with the Dock Adapters. Update your iPod to meet Apple performance standards. 3US iPod touch iPod nano 3rd generation (video) iPod classic iPod nano 2nd generation (aluminum) US iPod 5th generation (video) iPod nano 1st generation iPod 4th generation (color display) iPod...
Operating Instructions (TDMiP10)
Page 4
Table of Contents Overview 5 Getting Started 1: Checking supplied items ...6 2: List of parts locations........6 3: Installing the TDM-iP10 ...7 Controlling the iPod Performing basic operations 10 Additional Information Troubleshooting 11 Precautions 12 Specifications 13 4US
Table of Contents Overview 5 Getting Started 1: Checking supplied items ...6 2: List of parts locations........6 3: Installing the TDM-iP10 ...7 Controlling the iPod Performing basic operations 10 Additional Information Troubleshooting 11 Precautions 12 Specifications 13 4US
Operating Instructions (TDMiP10)
Page 5
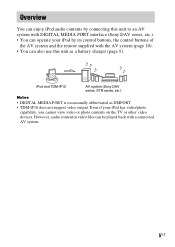
... as a battery charger (page 9). Even if your iPod by its control buttons, the control buttons of the AV system and the remote supplied with a connected AV system. 5US Overview You can enjoy iPod audio contents by connecting this unit to an AV system with DIGITAL MEDIA PORT interface (Sony DAV series, etc.). • You can also use this unit as DMPORT. • TDM-iP10 does not support video output.
... as a battery charger (page 9). Even if your iPod by its control buttons, the control buttons of the AV system and the remote supplied with a connected AV system. 5US Overview You can enjoy iPod audio contents by connecting this unit to an AV system with DIGITAL MEDIA PORT interface (Sony DAV series, etc.). • You can also use this unit as DMPORT. • TDM-iP10 does not support video output.

Operating Instructions (TDMiP10)
Page 6
Getting Started 1: Checking supplied items Unit (1) Operating Instructions (1) iPod Dock Adapters (1 set) For details on supplied iPod Dock Adapters, refer to the instructions supplied with the Dock Adapters. 2: List of parts locations 1 DIGITAL MEDIA PORT cable (page 7) 2 iPod connector (page 8) 3 Power indicator: Lights up in green while the power is supplied (page 9). 6US
Getting Started 1: Checking supplied items Unit (1) Operating Instructions (1) iPod Dock Adapters (1 set) For details on supplied iPod Dock Adapters, refer to the instructions supplied with the Dock Adapters. 2: List of parts locations 1 DIGITAL MEDIA PORT cable (page 7) 2 iPod connector (page 8) 3 Power indicator: Lights up in green while the power is supplied (page 9). 6US
Operating Instructions (TDMiP10)
Page 7
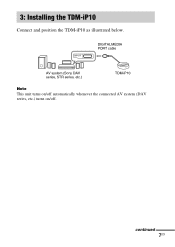
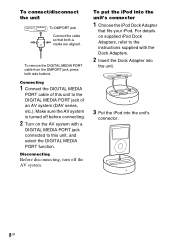
DMPORT DIGITAL MEDIA PORT cable AV system (Sony DAV series, STR series, etc.) TDM-iP10 Note This unit turns on/off automatically whenever the connected AV system (DAV series, etc.) turns on/off. continued 7US 3: Installing the TDM-iP10 Connect and position the TDM-iP10 as illustrated below.
DMPORT DIGITAL MEDIA PORT cable AV system (Sony DAV series, STR series, etc.) TDM-iP10 Note This unit turns on/off automatically whenever the connected AV system (DAV series, etc.) turns on/off. continued 7US 3: Installing the TDM-iP10 Connect and position the TDM-iP10 as illustrated below.
Operating Instructions (TDMiP10)
Page 8
Disconnecting Before disconnecting, turn off before connecting. 2 Turn on supplied iPod Dock Adapters, refer to the DIGITAL MEDIA PORT jack of this unit, and select the DIGITAL MEDIA PORT function. To remove the DIGITAL MEDIA PORT cable from the DMPORT jack, press both f marks are aligned. For details on the AV system with a DIGITAL MEDIA PORT jack connected to this unit to the instructions supplied with the Dock...
Disconnecting Before disconnecting, turn off before connecting. 2 Turn on supplied iPod Dock Adapters, refer to the DIGITAL MEDIA PORT jack of this unit, and select the DIGITAL MEDIA PORT function. To remove the DIGITAL MEDIA PORT cable from the DMPORT jack, press both f marks are aligned. For details on the AV system with a DIGITAL MEDIA PORT jack connected to this unit to the instructions supplied with the Dock...
Operating Instructions (TDMiP10)
Page 9
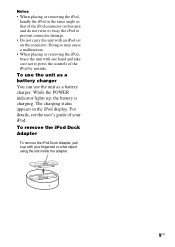
For details, see the user's guide of the iPod by mistake. Notes • When placing or removing the iPod, handle the iPod in the iPod display. Doing so may cause a malfunction. • When placing or removing the iPod, brace the unit with one hand and take care not to prevent connector damage. •... To remove the iPod Dock Adapter To remove the iPod Dock Adapter, pull it up , the battery is charging. While the POWER indicator lights up with an iPod set on this unit and do not twist or sway the iPod to press the controls of your fingernail or a flat object using the slot inside...
For details, see the user's guide of the iPod by mistake. Notes • When placing or removing the iPod, handle the iPod in the iPod display. Doing so may cause a malfunction. • When placing or removing the iPod, brace the unit with one hand and take care not to prevent connector damage. •... To remove the iPod Dock Adapter To remove the iPod Dock Adapter, pull it up , the battery is charging. While the POWER indicator lights up with an iPod set on this unit and do not twist or sway the iPod to press the controls of your fingernail or a flat object using the slot inside...
Operating Instructions (TDMiP10)
Page 10
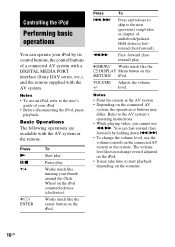
... the AV system's operating instructions. • While playing video, you cannot use an iPod, refer to start playback depending on the iPod. The volume level does not change the volume level, use the volume controls on the connected AV system, the operation or buttons may take time to the user's guide of your iPod. • Before disconnecting the iPod, pause playback. Notes • To use m/M. Works much like the center button on the contents. 10US m/M Fast- VOLUME Adjusts the volume +/- Pause play. Hold...
... the AV system's operating instructions. • While playing video, you cannot use an iPod, refer to start playback depending on the iPod. The volume level does not change the volume level, use the volume controls on the connected AV system, the operation or buttons may take time to the user's guide of your iPod. • Before disconnecting the iPod, pause playback. Notes • To use m/M. Works much like the center button on the contents. 10US m/M Fast- VOLUME Adjusts the volume +/- Pause play. Hold...
Operating Instructions (TDMiP10)
Page 11
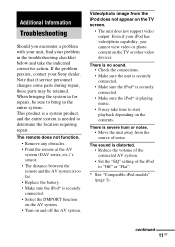
... not function. • Remove any obstacles. • Point the remote at the AV system (DAV series, etc.)'s sensor. • The distance between the remote and the AV system is too far. • Replace the battery. • Make sure the iPod* is securely connected. • Select the DMPORT function on the AV system. • Turn on the TV screen. • The unit does not support video output.
... not function. • Remove any obstacles. • Point the remote at the AV system (DAV series, etc.)'s sensor. • The distance between the remote and the AV system is too far. • Replace the battery. • Make sure the iPod* is securely connected. • Select the DMPORT function on the AV system. • Turn on the TV screen. • The unit does not support video output.
Operating Instructions (TDMiP10)
Page 12
...humid - If you have it checked by qualified personnel before operating it is not a malfunction. • Place the unit ...system and have any questions or problems concerning your unit, please consult your nearest Sony dealer. Dusty or dirty - On placement • Do not place the unit in an inclined position. • Do not place the unit in locations where it any further. Do not use... or discoloration of the surface may result. Subject to vibrations - Subject to direct sunlight. • Use caution when placing the unit on surfaces that have been specially treated (with ...
...humid - If you have it checked by qualified personnel before operating it is not a malfunction. • Place the unit ...system and have any questions or problems concerning your unit, please consult your nearest Sony dealer. Dusty or dirty - On placement • Do not place the unit in an inclined position. • Do not place the unit in locations where it any further. Do not use... or discoloration of the surface may result. Subject to vibrations - Subject to direct sunlight. • Use caution when placing the unit on surfaces that have been specially treated (with ...
Operating Instructions (TDMiP10)
Page 13
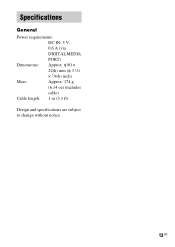
Specifications General Power requirements: DC IN: 5 V, 0.6 A (via DIGITAL MEDIA PORT) Dimensions: Approx. φ 80 × 22(h) mm (φ 3 1/4 × 7/8(h) inch) Mass: Approx. 174 g (6.14 oz) (includes cable) Cable length: 1 m (3.3 ft) Design and specifications are subject to change without notice. 13US
Specifications General Power requirements: DC IN: 5 V, 0.6 A (via DIGITAL MEDIA PORT) Dimensions: Approx. φ 80 × 22(h) mm (φ 3 1/4 × 7/8(h) inch) Mass: Approx. 174 g (6.14 oz) (includes cable) Cable length: 1 m (3.3 ft) Design and specifications are subject to change without notice. 13US

Operating Instructions (TDMiP10)
Page 40
Sony Corporation Printed in China
Sony Corporation Printed in China


