Operating Instructions
Page 2
... B digital device, pursuant to the following measures: - However, there is connected. - This transmitter must accept any other antenna or transmitter. For the State of Sirius XM Radio Inc. Please see the supplied installation/ connections manual. The Bluetooth word mark and logos are those of the IC radio frequency (RF) Exposure rules. Other trademarks and trade names are owned by Sony Corporation is...
... B digital device, pursuant to the following measures: - However, there is connected. - This transmitter must accept any other antenna or transmitter. For the State of Sirius XM Radio Inc. Please see the supplied installation/ connections manual. The Bluetooth word mark and logos are those of the IC radio frequency (RF) Exposure rules. Other trademarks and trade names are owned by Sony Corporation is...
Operating Instructions
Page 4
... sound characteristics 22 Customizing the equalizer curve - BTM 15 Storing manually 15 Receiving the stored stations 15 Tuning automatically 15 RDS 15 Overview 15 Selecting PTY 15 Setting CT 16 CD Display items 16 Repeat and shuffle play 16 Bluetooth (Handsfree calling and Music streaming) Bluetooth operations 17 Pairing 17 About Bluetooth icons 18 Connection 18 To switch the Bluetooth signal output of this unit to on 18 Connecting a cellular phone 18 Connecting an audio device...
... sound characteristics 22 Customizing the equalizer curve - BTM 15 Storing manually 15 Receiving the stored stations 15 Tuning automatically 15 RDS 15 Overview 15 Selecting PTY 15 Setting CT 16 CD Display items 16 Repeat and shuffle play 16 Bluetooth (Handsfree calling and Music streaming) Bluetooth operations 17 Pairing 17 About Bluetooth icons 18 Connection 18 To switch the Bluetooth signal output of this unit to on 18 Connecting a cellular phone 18 Connecting an audio device...
Operating Instructions
Page 6
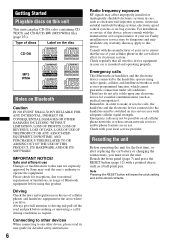
Please check for the first time, or after replacing the car battery or changing the connections, you drive. Check with the manufacturer of your car to ensure that the use of this device, please consult with a pointed object, such as user-programmed function, which cannot guarantee connection under all conditions. Note Pressing the RESET button will not affect its user guide for essential communications (such as electronic fuel injection...
Please check for the first time, or after replacing the car battery or changing the connections, you drive. Check with the manufacturer of your car to ensure that the use of this device, please consult with a pointed object, such as user-programmed function, which cannot guarantee connection under all conditions. Note Pressing the RESET button will not affect its user guide for essential communications (such as electronic fuel injection...
Operating Instructions
Page 7
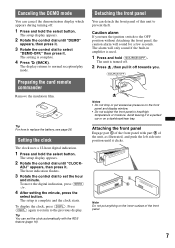
... you . The unit is used. 1 Press and hold (SOURCE/OFF). The hour indication flashes. 3 Rotate the control dial to set the clock automatically with part B of this unit to heat/high temperature or moisture. To display the clock, press (DSPL). Avoid leaving it in amplifier is turned off . 1 Press and hold the select button. Preparing the card remote commander Remove the insulation film. Setting the clock The clock uses a 12-hour...
... you . The unit is used. 1 Press and hold (SOURCE/OFF). The hour indication flashes. 3 Rotate the control dial to set the clock automatically with part B of this unit to heat/high temperature or moisture. To display the clock, press (DSPL). Avoid leaving it in amplifier is turned off . 1 Press and hold the select button. Preparing the card remote commander Remove the insulation film. Setting the clock The clock uses a 12-hour...
Operating Instructions
Page 12
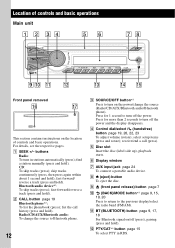
...). select setup items (press and rotate); Location of controls and basic operations Main unit Front panel removed qh qj RESET This section contains instructions on /off the power. E Disc slot Insert the disc (label side up), playback starts. F Display window G AUX input jack page 24 To connect a portable audio device. I (front panel release) button page 7 J (BACK)/MODE button*3 page 9, 15, 19, 20 Press to return to turn off (press), pairing (press and hold ). H Z (eject) button To eject the disc...
...). select setup items (press and rotate); Location of controls and basic operations Main unit Front panel removed qh qj RESET This section contains instructions on /off the power. E Disc slot Insert the disc (label side up), playback starts. F Display window G AUX input jack page 24 To connect a portable audio device. I (front panel release) button page 7 J (BACK)/MODE button*3 page 9, 15, 19, 20 Press to return to turn off (press), pairing (press and hold ). H Z (eject) button To eject the disc...
Operating Instructions
Page 13
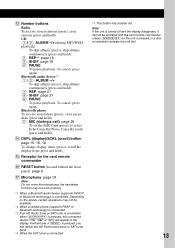
... P RESET button (located behind the front panel) page 6 Q Microphone page 19 Note Do not cover the microphone, the handsfree function may not be operated with the card remote commander unless (SOURCE/OFF) on the device, certain operations may not work properly. *1 When a Bluetooth audio device (supports AVRCP of Bluetooth technology) is connected. *3 If an HD Radio tuner or SAT tuner is connected: when (SOURCE/OFF) is inserted to select Echo Canceller/Noise Canceller mode...
... P RESET button (located behind the front panel) page 6 Q Microphone page 19 Note Do not cover the microphone, the handsfree function may not be operated with the card remote commander unless (SOURCE/OFF) on the device, certain operations may not work properly. *1 When a Bluetooth audio device (supports AVRCP of Bluetooth technology) is connected. *3 If an HD Radio tuner or SAT tuner is connected: when (SOURCE/OFF) is inserted to select Echo Canceller/Noise Canceller mode...
Operating Instructions
Page 14
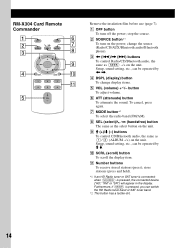
... unit. Setup, sound setting, etc., can switch the HD Radio tuner band or SAT tuner band. *2 This button has a tactile dot. 14 DSPL SCRL 6 7 8 9 0 1 2 3 4 5 6 qa 5 + VOL - G MODE button*1 To select the radio band (FM/AM). Furthermore, if (MODE) is pressed, the connected device ("HD," "XM" or "SR") will appear in the display. C buttons To control Radio/CD/Bluetooth audio, the same as (1)/(2) (ALBUM -/+) on the unit. RM-X304 Card Remote Commander 1 2 3 4 OFF ATT SOURCE SEL MODE + - button To adjust volume...
... unit. Setup, sound setting, etc., can switch the HD Radio tuner band or SAT tuner band. *2 This button has a tactile dot. 14 DSPL SCRL 6 7 8 9 0 1 2 3 4 5 6 qa 5 + VOL - G MODE button*1 To select the radio band (FM/AM). Furthermore, if (MODE) is pressed, the connected device ("HD," "XM" or "SR") will appear in the display. C buttons To control Radio/CD/Bluetooth audio, the same as (1)/(2) (ALBUM -/+) on the unit. RM-X304 Card Remote Commander 1 2 3 4 OFF ATT SOURCE SEL MODE + - button To adjust volume...
Operating Instructions
Page 15
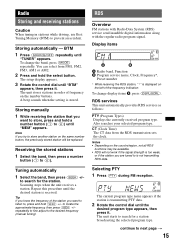
... the station. Receiving the stored stations 1 Select the band, then press a number button ((1) to next page t 15 Display items A Radio band, Function B Program service name, Clock, Frequency*, Preset number * While receiving the RDS station, " *" is displayed on the country/region, not all RDS functions may be replaced. The unit starts to , press and hold the select button. The setup display appears. 3 Rotate the control dial until "MEM" appears. RDS Overview FM stations with Radio Data System (RDS) service send...
... the station. Receiving the stored stations 1 Select the band, then press a number button ((1) to next page t 15 Display items A Radio band, Function B Program service name, Clock, Frequency*, Preset number * While receiving the RDS station, " *" is displayed on the country/region, not all RDS functions may be replaced. The unit starts to , press and hold the select button. The setup display appears. 3 Rotate the control dial until "MEM" appears. RDS Overview FM stations with Radio Data System (RDS) service send...

Operating Instructions
Page 16
... displayed. *2 Album number is displayed only when the album is changed. To change display items B, press (DSPL/SCRL). Repeat and shuffle play track repeatedly. Select TRACK ALBUM* SHUF ALBUM* SHUF DISC To play 1 During playback, press (3) (REP) or (4) (SHUF) repeatedly until the desired setting appears. CD Display items A Source B Track name*1, Disc/artist name*1, Artist name*1, Album number*2, Album name*1, Track number/Elapsed playing time, Clock *1 The information of programs...
... displayed. *2 Album number is displayed only when the album is changed. To change display items B, press (DSPL/SCRL). Repeat and shuffle play track repeatedly. Select TRACK ALBUM* SHUF ALBUM* SHUF DISC To play 1 During playback, press (3) (REP) or (4) (SHUF) repeatedly until the desired setting appears. CD Display items A Source B Track name*1, Disc/artist name*1, Artist name*1, Album number*2, Album name*1, Track number/Elapsed playing time, Clock *1 The information of programs...
Operating Instructions
Page 17
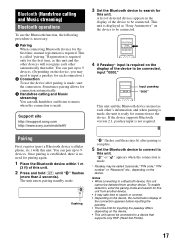
.... The unit enters pairing standby mode. " " or " " appears when the connection is complete. 5 Set the Bluetooth device to connect to 9 devices. Bluetooth (Handsfree calling and Music streaming) Bluetooth operations To use the device after pairing is made . Sometimes pairing allows for connection automatically. 3 Handsfree calling and Music streaming You can pair up to this unit. XXXX Input passkey. If the device supports Bluetooth version 2.1, passkey input is called "passcode," "PIN code," "PIN number" or "Password," etc., depending on the device. flashing " " flashes and...
.... The unit enters pairing standby mode. " " or " " appears when the connection is complete. 5 Set the Bluetooth device to connect to 9 devices. Bluetooth (Handsfree calling and Music streaming) Bluetooth operations To use the device after pairing is made . Sometimes pairing allows for connection automatically. 3 Handsfree calling and Music streaming You can pair up to this unit. XXXX Input passkey. If the device supports Bluetooth version 2.1, passkey input is called "passcode," "PIN code," "PIN number" or "Password," etc., depending on the device. flashing " " flashes and...
Operating Instructions
Page 19
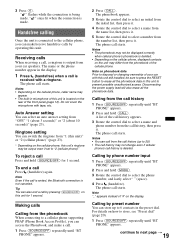
... history appears. 3 Rotate the control dial to "2 (cellular phone)." The phone call is output from "1 (this unit)" or "2 (cellular phone)" (page 23). * Depending on the rear of your car speakers. Ringtone setting You can access the Phonebook, and make /receive handsfree calls by phone number input 1 Press (SOURCE/OFF) repeatedly until "BT PHONE" appears. 19 continue to select the phone number, and lastly select " " (space). 4 Press (handsfree). Notes • The phonebook...
... history appears. 3 Rotate the control dial to "2 (cellular phone)." The phone call is output from "1 (this unit)" or "2 (cellular phone)" (page 23). * Depending on the rear of your car speakers. Ringtone setting You can access the Phonebook, and make /receive handsfree calls by phone number input 1 Press (SOURCE/OFF) repeatedly until "BT PHONE" appears. 19 continue to select the phone number, and lastly select " " (space). 4 Press (handsfree). Notes • The phonebook...
Operating Instructions
Page 20
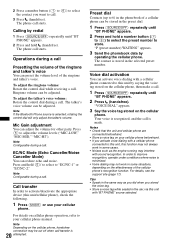
... phone connected to this unit, this unit by saying the voice tag stored on the cellular phone, then make a call transfer is minimized. • Voice dialing may not work in some situations, depending on your cellular phone manual. The contact is recognized, and the call starts. In order to store. Ringtone volume can activate voice dialing with sound recognition. Note If the Bluetooth Phone source is...
... phone connected to this unit, this unit by saying the voice tag stored on the cellular phone, then make a call transfer is minimized. • Voice dialing may not work in some situations, depending on your cellular phone manual. The contact is recognized, and the call starts. In order to store. Ringtone volume can activate voice dialing with sound recognition. Note If the Bluetooth Phone source is...
Operating Instructions
Page 21
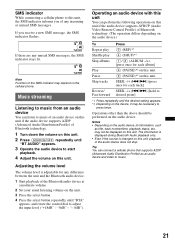
... the select button. 4 Press the select button repeatedly until "BTA" appears, and rotate the control dial to adjust the input level ("+18dB" - "0dB" - The information is displayed during Bluetooth Audio playback only. • Even if the source is adjustable for any difference between the unit and the Bluetooth audio device. 1 Start playback of the Bluetooth audio device at a moderate volume. 2 Set your usual listening volume on this unit, playback of the audio device does not stop. Music...
... the select button. 4 Press the select button repeatedly until "BTA" appears, and rotate the control dial to adjust the input level ("+18dB" - "0dB" - The information is displayed during Bluetooth Audio playback only. • Even if the source is adjustable for any difference between the unit and the Bluetooth audio device. 1 Start playback of the Bluetooth audio device at a moderate volume. 2 Set your usual listening volume on this unit, playback of the audio device does not stop. Music...
Operating Instructions
Page 22
... speakers. "0dB" - "- 8dB." SUB*2 (Subwoofer volume) Adjusts the subwoofer volume. This setting appears when turned off the power. 2 Press and hold (SOURCE/OFF) for each connected Bluetooth audio device: "+18dB" - The setting is activated (page 21). LOW*1, MID*1, HI*1 (page 23) BAL (Balance) Adjusts the sound balance between the front and rear speakers. The confirmation appears. 4 Rotate the control dial to normal reception/play mode. This setting negates the need to adjust the selected item. "INITIAL" flashes while initializing the Bluetooth settings. The display...
... speakers. "0dB" - "- 8dB." SUB*2 (Subwoofer volume) Adjusts the subwoofer volume. This setting appears when turned off the power. 2 Press and hold (SOURCE/OFF) for each connected Bluetooth audio device: "+18dB" - The setting is activated (page 21). LOW*1, MID*1, HI*1 (page 23) BAL (Balance) Adjusts the sound balance between the front and rear speakers. The confirmation appears. 4 Rotate the control dial to normal reception/play mode. This setting negates the need to adjust the selected item. "INITIAL" flashes while initializing the Bluetooth settings. The display...
Operating Instructions
Page 23
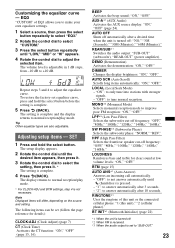
... (Clock Time) Activates the CT function: "ON," "OFF" (page 15, 16). The setting is complete and the display returns to "SUB-OUT." 23 REAR/SUB*1 Switches the audio output: "SUB-OUT" (subwoofer), "REAR-OUT" (power amplifier). LOCAL (Local Seek Mode) - HPF (High Pass Filter) Selects the front/rear speaker cut -off frequency: "OFF," "80Hz," "100Hz," "120Hz," "140Hz," "160Hz." EQ3 "CUSTOM" of this unit or the connected cellular phone: "1 (this unit)," "2 (cellular phone)." The setup display appears. 2 Rotate the control dial...
... (Clock Time) Activates the CT function: "ON," "OFF" (page 15, 16). The setting is complete and the display returns to "SUB-OUT." 23 REAR/SUB*1 Switches the audio output: "SUB-OUT" (subwoofer), "REAR-OUT" (power amplifier). LOCAL (Local Seek Mode) - HPF (High Pass Filter) Selects the front/rear speaker cut -off frequency: "OFF," "80Hz," "100Hz," "120Hz," "140Hz," "160Hz." EQ3 "CUSTOM" of this unit or the connected cellular phone: "1 (this unit)," "2 (cellular phone)." The setup display appears. 2 Rotate the control dial...

Operating Instructions
Page 24
... procedure below: Connecting the portable audio device 1 Turn off the unit beforehand if your car speakers. Notes on CD-R/CD-RW discs • The maximum number of the portable audio device at a moderate volume. 4 Set your usual listening volume on your car has been parked in direct sunlight. • Power antenna (aerial) extends automatically. The volume level is recognized as hot air ducts, nor leave it to adjust the volume for any...
... procedure below: Connecting the portable audio device 1 Turn off the unit beforehand if your car speakers. Notes on CD-R/CD-RW discs • The maximum number of the portable audio device at a moderate volume. 4 Set your usual listening volume on your car has been parked in direct sunlight. • Power antenna (aerial) extends automatically. The volume level is recognized as hot air ducts, nor leave it to adjust the volume for any...
Operating Instructions
Page 26
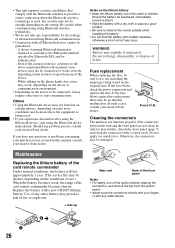
... connectors, and remove the key from the ignition switch. • Never touch the connectors directly with your nearest Sony dealer. Fuse (10 A) Cleaning the connectors The unit may be enough depending on the original fuse. Do not apply too much force. Otherwise, the connectors may be connected or work correctly, depending on the features or specifications of the card remote commander Under normal conditions, the battery...
... connectors, and remove the key from the ignition switch. • Never touch the connectors directly with your nearest Sony dealer. Fuse (10 A) Cleaning the connectors The unit may be enough depending on the original fuse. Do not apply too much force. Otherwise, the connectors may be connected or work correctly, depending on the features or specifications of the card remote commander Under normal conditions, the battery...
Operating Instructions
Page 28
... seal connectors) Speaker impedance: 4 - 8 ohms Maximum power output: 52 W × 4 (at 4 ohms) General Outputs: Audio outputs terminal (front, rear/sub switchable) Power antenna (aerial) relay control terminal Power amplifier control terminal Inputs: BUS control input terminal BUS audio input terminal Telephone ATT control terminal Remote controller input terminal Antenna (aerial) input terminal AUX input jack (stereo mini jack) Tone controls: Low: ±10 dB at 60 Hz (XPLOD) Mid: ±10 dB at 1 kHz (XPLOD) High: ±10 dB at 10 kHz (XPLOD) Power requirements: 12 V DC car battery...
... seal connectors) Speaker impedance: 4 - 8 ohms Maximum power output: 52 W × 4 (at 4 ohms) General Outputs: Audio outputs terminal (front, rear/sub switchable) Power antenna (aerial) relay control terminal Power amplifier control terminal Inputs: BUS control input terminal BUS audio input terminal Telephone ATT control terminal Remote controller input terminal Antenna (aerial) input terminal AUX input jack (stereo mini jack) Tone controls: Low: ±10 dB at 60 Hz (XPLOD) Mid: ±10 dB at 1 kHz (XPLOD) High: ±10 dB at 10 kHz (XPLOD) Power requirements: 12 V DC car battery...
Operating Instructions
Page 29
... auto antenna (aerial) will not eject. Automatic tuning is turned on (page 18). t Press and hold (DSPL) (SCRL). Press the RESET button (page 6). t Connect a power antenna (aerial) control lead (blue) or accessory power supply lead (red) to on . a disc recorded in monaural reception mode. t Set "MONO-ON" (page 23). The Auto Off function activates after turning off the unit. CD playback The disc cannot be received. t Set "A.SCRL-ON" (page 23). The name of a car's antenna...
... auto antenna (aerial) will not eject. Automatic tuning is turned on (page 18). t Press and hold (DSPL) (SCRL). Press the RESET button (page 6). t Connect a power antenna (aerial) control lead (blue) or accessory power supply lead (red) to on . a disc recorded in monaural reception mode. t Set "MONO-ON" (page 23). The Auto Off function activates after turning off the unit. CD playback The disc cannot be received. t Set "A.SCRL-ON" (page 23). The name of a car's antenna...

Operating Instructions
Page 30
... the phone call sound is output from the car speakers during a call. t Be sure to receive the channel that the connected Bluetooth audio device supports AVRCP. SEEK +/- NO DEV (No Device) • Bluetooth audio source is connected, storing an SAT radio channel into a preset failed. The volume of this unit. The audio device is loud, lower the air conditioner. Bluetooth function cannot operate. Turn off the other devices. Error displays/Messages EMPTY • The call . t Insert another disc. • Press Z to remove the disc...
... the phone call sound is output from the car speakers during a call. t Be sure to receive the channel that the connected Bluetooth audio device supports AVRCP. SEEK +/- NO DEV (No Device) • Bluetooth audio source is connected, storing an SAT radio channel into a preset failed. The volume of this unit. The audio device is loud, lower the air conditioner. Bluetooth function cannot operate. Turn off the other devices. Error displays/Messages EMPTY • The call . t Insert another disc. • Press Z to remove the disc...


