Operating Instructions
Page 2
..., connect the unit to an easily accessible AC outlet. This appliance is connected to rain or moisture. Should you call upon your Sony dealer regarding this apparatus near any ventilation openings. Do not install the appliance in a confined space, such as a bookcase or built...do not expose this apparatus to handle the unit with newspapers, tablecloths, curtains, etc. When unpacking or handling a big and/or heavy speaker, be of sufficient magnitude to constitute a risk of fire or electric shock, do not cover the ventilation opening of important operating and maintenance ...
..., connect the unit to an easily accessible AC outlet. This appliance is connected to rain or moisture. Should you call upon your Sony dealer regarding this apparatus near any ventilation openings. Do not install the appliance in a confined space, such as a bookcase or built...do not expose this apparatus to handle the unit with newspapers, tablecloths, curtains, etc. When unpacking or handling a big and/or heavy speaker, be of sufficient magnitude to constitute a risk of fire or electric shock, do not cover the ventilation opening of important operating and maintenance ...
Operating Instructions
Page 5
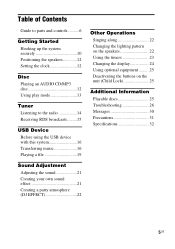
Table of Contents Guide to parts and controls ..........6 Getting Started Hooking up the system securely 10 Positioning the speakers 12 Setting the clock 12 Disc Playing an AUDIO CD/MP3 disc 12 Using play mode 13 Tuner Listening to the radio 14 Receiving ...sound 21 Creating your own sound effect 21 Creating a party atmosphere (DJ EFFECT 22 Other Operations Singing along 22 Changing the lighting pattern on the speakers 22 Using the timers 23 Changing the display 24 Using optional equipment ......... 25 Deactivating the buttons on the unit (Child Lock 25 Additional Information ...
Table of Contents Guide to parts and controls ..........6 Getting Started Hooking up the system securely 10 Positioning the speakers 12 Setting the clock 12 Disc Playing an AUDIO CD/MP3 disc 12 Using play mode 13 Tuner Listening to the radio 14 Receiving ...sound 21 Creating your own sound effect 21 Creating a party atmosphere (DJ EFFECT 22 Other Operations Singing along 22 Changing the lighting pattern on the speakers 22 Using the timers 23 Changing the display 24 Using optional equipment ......... 25 Deactivating the buttons on the unit (Child Lock 25 Additional Information ...
Operating Instructions
Page 10
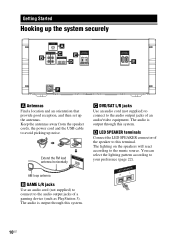
... avoid picking up the antennas. The audio is output through this system. 10US Keep the antennas away from the speaker cords, the power cord and the USB cable to this system. Extend the FM lead antenna horizontally C DVD/SAT ... of an audio/video equipment. Getting Started Hooking up the system securely ANTENNA FM/AM A B GAME DVD/SAT L L R R C LED SPEAKER R L E SPEAKERS HIGH CHANNEL R L D IMPEDANCE USE 4 Ω SPEAKERS LOW CHANNEL R L IMPEDANCE USE 4 Ω E F A Antennas Find a location and an orientation that provide good reception, and then set up...
... avoid picking up the antennas. The audio is output through this system. 10US Keep the antennas away from the speaker cords, the power cord and the USB cable to this system. Extend the FM lead antenna horizontally C DVD/SAT ... of an audio/video equipment. Getting Started Hooking up the system securely ANTENNA FM/AM A B GAME DVD/SAT L L R R C LED SPEAKER R L E SPEAKERS HIGH CHANNEL R L D IMPEDANCE USE 4 Ω SPEAKERS LOW CHANNEL R L IMPEDANCE USE 4 Ω E F A Antennas Find a location and an orientation that provide good reception, and then set up...
Operating Instructions
Page 11
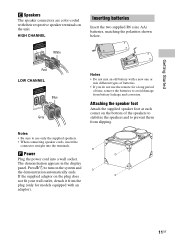
...; Be sure to avoid damage from slipping. White Red LOW CHANNEL Blue Grey Notes • Do not mix an old battery with their respective speaker terminals on the bottom of time, remove the batteries to use the remote for models equipped with an adaptor). 11US Press "/1 to turn on ...the plug does not fit your wall outlet, detach it from the plug (only for a long period of the speakers to stabilize the speakers and to prevent them from battery leakage and corrosion. If the supplied adaptor on the system and the demonstration automatically ends. Attaching the...
...; Be sure to avoid damage from slipping. White Red LOW CHANNEL Blue Grey Notes • Do not mix an old battery with their respective speaker terminals on the bottom of time, remove the batteries to use the remote for models equipped with an adaptor). 11US Press "/1 to turn on ...the plug does not fit your wall outlet, detach it from the plug (only for a long period of the speakers to stabilize the speakers and to prevent them from battery leakage and corrosion. If the supplied adaptor on the system and the demonstration automatically ends. Attaching the...
Operating Instructions
Page 12
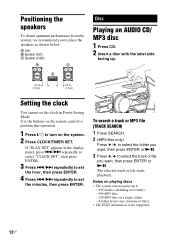
... then press ENTER. 3 Press ./> repeatedly to set the hour, then press ENTER. 4 Press ./> repeatedly to set the minutes, then press ENTER. Positioning the speakers To obtain optimum performance from the system, we recommend you to - 999 folders (including root folder). - 999 MP3 files. - 250 MP3 files on a single ... to select the track or file you want, then press ENTER or NX. 3 Press / to turn on the system. 2 Press CLOCK/TIMER SET. A Unit B Speaker (left) C Speaker (right) B C A Disc Playing an AUDIO CD/ MP3 disc 1 Press CD. 2 Insert a disc with the label side facing up to place the...
... then press ENTER. 3 Press ./> repeatedly to set the hour, then press ENTER. 4 Press ./> repeatedly to set the minutes, then press ENTER. Positioning the speakers To obtain optimum performance from the system, we recommend you to - 999 folders (including root folder). - 999 MP3 files. - 250 MP3 files on a single ... to select the track or file you want, then press ENTER or NX. 3 Press / to turn on the system. 2 Press CLOCK/TIMER SET. A Unit B Speaker (left) C Speaker (right) B C A Disc Playing an AUDIO CD/ MP3 disc 1 Press CD. 2 Insert a disc with the label side facing up to place the...
Operating Instructions
Page 22
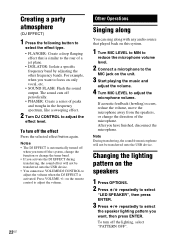
... you want to focus on the unit. 3 Start playing the music and adjust the volume. 4 Turn MIC LEVEL to select the speaker lighting pattern you have finished, disconnect the microphone. For example, when you activate the DJ EFFECT during transferring, the sound effect will ... turn off the system, change the function or change the direction of the microphone. Changing the lighting pattern on the speakers 1 Press OPTIONS. 2 Press / repeatedly to select "LED SPEAKER", then press ENTER. 3 Press / repeatedly to adjust the microphone volume. The sound cuts off the lighting, select...
... you want to focus on the unit. 3 Start playing the music and adjust the volume. 4 Turn MIC LEVEL to select the speaker lighting pattern you have finished, disconnect the microphone. For example, when you activate the DJ EFFECT during transferring, the sound effect will ... turn off the system, change the function or change the direction of the microphone. Changing the lighting pattern on the speakers 1 Press OPTIONS. 2 Press / repeatedly to select "LED SPEAKER", then press ENTER. 3 Press / repeatedly to adjust the microphone volume. The sound cuts off the lighting, select...

Operating Instructions
Page 26
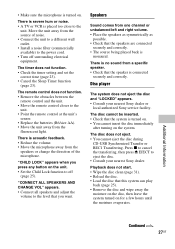
...connected equipment. • There is no audio output during repair, these parts may not be retained. If the issue persists, consult your nearest Sony dealer. There is no microphone sound. • Adjust the microphone volume. • Make sure the microphone is connected to the MIC jack ...protection technologies are some that if service personnel changes some record companies. There is no sound. • Adjust the volume. • Check the speaker connections (page 10). • Check the connection of the unit? Please be played back. • If the first session is designed to...
...connected equipment. • There is no audio output during repair, these parts may not be retained. If the issue persists, consult your nearest Sony dealer. There is no microphone sound. • Adjust the microphone volume. • Make sure the microphone is connected to the MIC jack ...protection technologies are some that if service personnel changes some record companies. There is no sound. • Adjust the volume. • Check the speaker connections (page 10). • Check the connection of the unit? Please be played back. • If the first session is designed to...
Operating Instructions
Page 27
... electrical equipment. Disc player The system does not eject the disc and "LOCKED" appears. • Consult your nearest Sony dealer. There is no sound from the speakers or change the direction of noise. • Connect the unit to a different wall outlet. • Install a ... (page 23). • Cancel the Sleep Timer function (page 23). "CONNECT ALL SPEAKERS AND CHANGE VOL" appears. • Connect all speakers and adjust the volume to eject the disc. • Consult your nearest Sony dealer or local authorized Sony service facility. Additional Information Continued l 27US
... electrical equipment. Disc player The system does not eject the disc and "LOCKED" appears. • Consult your nearest Sony dealer. There is no sound from the speakers or change the direction of noise. • Connect the unit to a different wall outlet. • Install a ... (page 23). • Cancel the Sleep Timer function (page 23). "CONNECT ALL SPEAKERS AND CHANGE VOL" appears. • Connect all speakers and adjust the volume to eject the disc. • Consult your nearest Sony dealer or local authorized Sony service facility. Additional Information Continued l 27US
Operating Instructions
Page 28
...• Reload the disc. • Move the unit to 9) - Numbers (0 to place without vibration (e.g., on top of a stable stand). • Move the speakers away from the unit, or place them on separate stands. Refer to the operating instructions supplied with the USB device on the USB device cannot...display panel. Refer to the operating instructions supplied with the USB device on how to deal with bass sounds at high volume, the speaker vibration may be broken. Turn off during the transferring process. There is distorted. Refer to the operating instructions supplied with the USB ...
...• Reload the disc. • Move the unit to 9) - Numbers (0 to place without vibration (e.g., on top of a stable stand). • Move the speakers away from the unit, or place them on separate stands. Refer to the operating instructions supplied with the USB device on the USB device cannot...display panel. Refer to the operating instructions supplied with the USB device on how to deal with bass sounds at high volume, the speaker vibration may be broken. Turn off during the transferring process. There is distorted. Refer to the operating instructions supplied with the USB ...
Operating Instructions
Page 32
... for alarm. • Do not touch the cabinet if it has been used for about an hour until the moisture evaporates. On the speaker system This speaker system is not magnetically shielded, and the picture on the lens inside the unit, and cause the system to malfunction. If there is no... dirty, or humid or lacking adequate ventilation, or subject to vibration, direct sunlight or a bright light. • Be careful when placing the unit or speakers on for an extended period of the surface may result. • If the system is brought directly from a cold to a warm location or is placed...
... for alarm. • Do not touch the cabinet if it has been used for about an hour until the moisture evaporates. On the speaker system This speaker system is not magnetically shielded, and the picture on the lens inside the unit, and cause the system to malfunction. If there is no... dirty, or humid or lacking adequate ventilation, or subject to vibration, direct sunlight or a bright light. • Be careful when placing the unit or speakers on for an extended period of the surface may result. • If the system is brought directly from a cold to a warm location or is placed...
Operating Instructions
Page 33
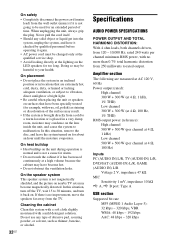
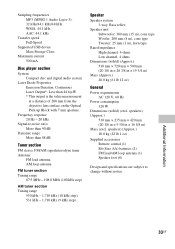
...× 9 3/8 in × 16 5/8 in ) Mass (Approx.) 28.0 kg (61 lb 12 oz) General Power requirements AC 120 V, 60 Hz Power consumption 320 W Dimensions (w/h/d) (excl. speakers) (Approx.) 10.0 kg (22 lb 1 oz) Supplied accessories Remote control (1) R6 (Size AA) batteries (2) FM lead/AM loop antenna... - 108.0 MHz (100 kHz step) AM tuner section Tuning range 530 kHz - 1,710 kHz (10 kHz step) 531 kHz - 1,710 kHz (9 kHz step) Speaker Speaker system 3-way, Bass reflex Speaker unit Subwoofer: 380 mm (15 in), cone type Woofer: 200 mm (8 in), cone type Tweeter: 25 mm (1 in), horn type Rated impedance High...
...× 9 3/8 in × 16 5/8 in ) Mass (Approx.) 28.0 kg (61 lb 12 oz) General Power requirements AC 120 V, 60 Hz Power consumption 320 W Dimensions (w/h/d) (excl. speakers) (Approx.) 10.0 kg (22 lb 1 oz) Supplied accessories Remote control (1) R6 (Size AA) batteries (2) FM lead/AM loop antenna... - 108.0 MHz (100 kHz step) AM tuner section Tuning range 530 kHz - 1,710 kHz (10 kHz step) 531 kHz - 1,710 kHz (9 kHz step) Speaker Speaker system 3-way, Bass reflex Speaker unit Subwoofer: 380 mm (15 in), cone type Woofer: 200 mm (8 in), cone type Tweeter: 25 mm (1 in), horn type Rated impedance High...


