Operating Instructions
Page 5
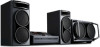
... other side. Speaker System • Front speakers SS-DJ2i • Subwoofer SA-WG2i 5GB Unit HCD-DJ2i - Recently, various music discs encoded with different formats for EMC and product safety is Sony Corporation, 1-7-1 Konan Minato-ku Tokyo, 108-0075 Japan. iPod is a two sided...in the countries applying EU Directives The manufacturer of : - Note on this manual The LBT-DJ2i consists of this product. The Authorized Representative for each session, the format of Sony Corporation. For any service or guarantee matters please refer to the Compact Disc (CD)...
... other side. Speaker System • Front speakers SS-DJ2i • Subwoofer SA-WG2i 5GB Unit HCD-DJ2i - Recently, various music discs encoded with different formats for EMC and product safety is Sony Corporation, 1-7-1 Konan Minato-ku Tokyo, 108-0075 Japan. iPod is a two sided...in the countries applying EU Directives The manufacturer of : - Note on this manual The LBT-DJ2i consists of this product. The Authorized Representative for each session, the format of Sony Corporation. For any service or guarantee matters please refer to the Compact Disc (CD)...
Operating Instructions
Page 6
Table of an USB device 24 Playing the iPod 27 Using optional components ....... 28 Adjusting the sound 29 Creating a party atmosphere...... 30 - Program Play Presetting radio stations 35 Using the Radio Data System (RDS 36 Ajusting the sound effect........... 37 Singing along 37 Using the timer... Compatible devices with this manual 5 Guide to parts and controls.......... 7 Information on the display......... 12 Getting Started Hooking up the system 13 Positioning the speakers 16 Setting the clock 17 Basic Operations Playing a CD/MP3 disc 18 Listening to the radio 20 Transferring...
Table of an USB device 24 Playing the iPod 27 Using optional components ....... 28 Adjusting the sound 29 Creating a party atmosphere...... 30 - Program Play Presetting radio stations 35 Using the Radio Data System (RDS 36 Ajusting the sound effect........... 37 Singing along 37 Using the timer... Compatible devices with this manual 5 Guide to parts and controls.......... 7 Information on the display......... 12 Getting Started Hooking up the system 13 Positioning the speakers 16 Setting the clock 17 Basic Operations Playing a CD/MP3 disc 18 Listening to the radio 20 Transferring...
Operating Instructions
Page 8
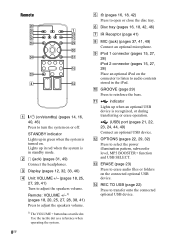
...in standby mode. ef ea qh ed 4 es A "/1 (on/standby) (pages 14, 16, 40, 46) Press to audio contents stored in green when the system is recognized, or during transferring or erase operation. (USB) port (pages 21, 22, 23, 24, 44, 49) Connect an optional USB device. N REC TO... device is turned on the connector to listen to turn the system on the connected optional USB device. I iPod 1 connector (pages 15, 27, 28) iPod 2 connector (pages 15, 27, 28) Place an optional iPod on . Use the tactile dot as a reference when operating the system. 8GB E A (pages 16, 18, 42) Press to ...
...in standby mode. ef ea qh ed 4 es A "/1 (on/standby) (pages 14, 16, 40, 46) Press to audio contents stored in green when the system is recognized, or during transferring or erase operation. (USB) port (pages 21, 22, 23, 24, 44, 49) Connect an optional USB device. N REC TO... device is turned on the connector to listen to turn the system on the connected optional USB device. I iPod 1 connector (pages 15, 27, 28) iPod 2 connector (pages 15, 27, 28) Place an optional iPod on . Use the tactile dot as a reference when operating the system. 8GB E A (pages 16, 18, 42) Press to ...
Operating Instructions
Page 9
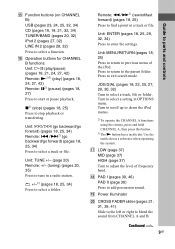
...) (pages 18, 25, 34) Press to blend the sound from CHANNEL A and B. Use the tactile dot as a reference when operating the system. Press to adjust the level of the iPod. Remote: m/M2) (rewind/fast forward) (pages 18, 25) Press to start or pause playback. Q LOW (page 37) MID (page 37... (page 20) Remote: +/- (tuning) (pages 20, 35) Press to tune in a radio station. +/-2) (pages 18, 25, 34) Press to scroll up or down the iPod menus. 2) To operate the CHANNEL A functions using the remote, press and hold CHANNEL A, then press this button. 3) The N button has a tactile dot. Turn to select...
...) (pages 18, 25, 34) Press to blend the sound from CHANNEL A and B. Use the tactile dot as a reference when operating the system. Press to adjust the level of the iPod. Remote: m/M2) (rewind/fast forward) (pages 18, 25) Press to start or pause playback. Q LOW (page 37) MID (page 37... (page 20) Remote: +/- (tuning) (pages 20, 35) Press to tune in a radio station. +/-2) (pages 18, 25, 34) Press to scroll up or down the iPod menus. 2) To operate the CHANNEL A functions using the remote, press and hold CHANNEL A, then press this button. 3) The N button has a tactile dot. Turn to select...
Operating Instructions
Page 10
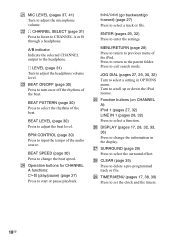
...the surround effect. Turn to the parent folder. MENU/RETURN (page 28) Press to return to select the rhythms of the iPod. Press to return to scroll up or down the iPod menus. A/B indicator Indicate the selected CHANNEL output to exit search mode. BEAT PATTERN (page 30) Press to previous menu ... the microphone volume. i LEVEL (page 31) Turn to delete a pre-programmed track or file. W BEAT ON/OFF (page 30) Press to turn on CHANNEL A): iPod 1 (pages 27, 32) LINE IN 1 (pages 28, 32) Press to input the tempo of the beat. wk CLEAR (page 35) Press to adjust the headphone...
...the surround effect. Turn to the parent folder. MENU/RETURN (page 28) Press to return to select the rhythms of the iPod. Press to return to scroll up or down the iPod menus. A/B indicator Indicate the selected CHANNEL output to exit search mode. BEAT PATTERN (page 30) Press to previous menu ... the microphone volume. i LEVEL (page 31) Turn to delete a pre-programmed track or file. W BEAT ON/OFF (page 30) Press to turn on CHANNEL A): iPod 1 (pages 27, 32) LINE IN 1 (pages 28, 32) Press to input the tempo of the beat. wk CLEAR (page 35) Press to adjust the headphone...
Operating Instructions
Page 11
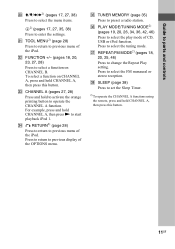
...) (pages 19, 20, 26, 34, 36, 42, 46) Press to start playback iPod 1. Press to select a function on CHANNEL A, press and hold CHANNEL A, then press N to select the play mode of the... iPod. To select a function on CHANNEL B. eg TUNER MEMORY (page 35) Press to change the Repeat...return to previous menu of the OPTIONS menu. ea TOOL MENU2) (page 28) Press to return to previous display of the iPod. ed CHANNEL A (pages 27, 28) Press and hold CHANNEL A, then press this button. ek SLEEP (page 38)...
...) (pages 19, 20, 26, 34, 36, 42, 46) Press to start playback iPod 1. Press to select a function on CHANNEL A, press and hold CHANNEL A, then press N to select the play mode of the... iPod. To select a function on CHANNEL B. eg TUNER MEMORY (page 35) Press to change the Repeat...return to previous menu of the OPTIONS menu. ea TOOL MENU2) (page 28) Press to return to previous display of the iPod. ed CHANNEL A (pages 27, 28) Press and hold CHANNEL A, then press this button. ek SLEEP (page 38)...
Operating Instructions
Page 15
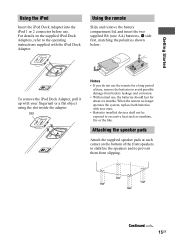
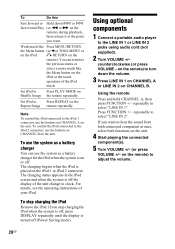
... the batteries should last for a long period of the front speakers to stabilize the speakers and to the operating instructions supplied with the iPod Dock Adapter. Continued l 15GB For details on the bottom of time, remove the batteries to excessive heat such as sunshine, fire or...E side first, matching the polarities shown below. When the remote no longer operates the system, replace both batteries with your fingernail or a flat object using the slot inside the adapter. e E E e To remove the iPod Dock Adapter, pull it up with new ones. • Batteries installed devices shall not...
... the batteries should last for a long period of the front speakers to stabilize the speakers and to the operating instructions supplied with the iPod Dock Adapter. Continued l 15GB For details on the bottom of time, remove the batteries to excessive heat such as sunshine, fire or...E side first, matching the polarities shown below. When the remote no longer operates the system, replace both batteries with your fingernail or a flat object using the slot inside the adapter. e E E e To remove the iPod Dock Adapter, pull it up with new ones. • Batteries installed devices shall not...

Operating Instructions
Page 16
... then press "/1 until "STANDBY" appears in the display. 6 Unplug the AC power cord. A B D C Example 2: This placement suitable for the operation. 1 Press "/1 to turn on the system. 2 Press CD. 3 Press A to open the disc tray and remove the disc. 4 Press A again to disconnect the USB device or...
... then press "/1 until "STANDBY" appears in the display. 6 Unplug the AC power cord. A B D C Example 2: This placement suitable for the operation. 1 Press "/1 to turn on the system. 2 Press CD. 3 Press A to open the disc tray and remove the disc. 4 Press A again to disconnect the USB device or...

Operating Instructions
Page 17
... Setting the clock Use buttons on the system. 2 Press TIMER MENU. The minute indication flashes in the display, press V or v repeatedly to select "CLOCK SET?", then press . 3 Press V or v repeatedly to turn on the remote for a few seconds (except when iPod is connected). When an iPod is displayed. The clock is displayed for...
... Setting the clock Use buttons on the system. 2 Press TIMER MENU. The minute indication flashes in the display, press V or v repeatedly to select "CLOCK SET?", then press . 3 Press V or v repeatedly to turn on the remote for a few seconds (except when iPod is connected). When an iPod is displayed. The clock is displayed for...
Operating Instructions
Page 23
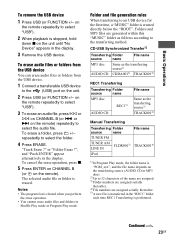
... files are generated within this "MUSIC" folder as the transferring source2) TRACK0014) Manual Transferring Transferring Folder source name TUNER FM TUNER AM FLDR0013) LINE IN iPod File name TRACK0014) 1) In Program Play mode, the folder name is transferred in the display. 3 Remove the USB device. CD-USB Synchronized Transfer1) Transferring Folder...
... files are generated within this "MUSIC" folder as the transferring source2) TRACK0014) Manual Transferring Transferring Folder source name TUNER FM TUNER AM FLDR0013) LINE IN iPod File name TRACK0014) 1) In Program Play mode, the folder name is transferred in the display. 3 Remove the USB device. CD-USB Synchronized Transfer1) Transferring Folder...
Operating Instructions
Page 27
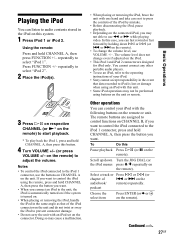
... A, then press the button you can control your iPod. • Sony cannot accept responsibility in the iPod on the remote). on the audiobook/ remote) repeatedly. or > on the remote) to adjust the volume. Playing the iPod You can listen to audio contents stored in the event... CHANNEL A, then press this system. 1 Press iPod 1 or iPod 2. or > on the remote). • To change even if adjusted on the iPod. • This iPod 1 and iPod 2 connector are assigned to control functions on . • When placing or removing the iPod, handle the iPod in the same angle as that...
... A, then press the button you can control your iPod. • Sony cannot accept responsibility in the iPod on the remote). on the audiobook/ remote) repeatedly. or > on the remote) to adjust the volume. Playing the iPod You can listen to audio contents stored in the event... CHANNEL A, then press this system. 1 Press iPod 1 or iPod 2. or > on the remote). • To change even if adjusted on the iPod. • This iPod 1 and iPod 2 connector are assigned to control functions on . • When placing or removing the iPod, handle the iPod in the same angle as that...
Operating Instructions
Page 28
.../RETURN the Menu button (or B or TOOL MENU or on the iPod O RETURN on the remote). Press FUNCTION +/- Set iPod to Press PLAY MODE on the remote) to hear the sound from both connected component at once, select both functions on the unit. 4 Start playing the... on the iPod 1 or iPod 2 connector. The charging begins when the iPod is turned off , press DISPLAY repeatedly until the display is placed on the unit. If you want . Using optional components 1 Connect a portable audio player to select "LINE IN 2". repeatedly to the iPod 1 connector, use the system as a ...
.../RETURN the Menu button (or B or TOOL MENU or on the iPod O RETURN on the remote). Press FUNCTION +/- Set iPod to Press PLAY MODE on the remote) to hear the sound from both connected component at once, select both functions on the unit. 4 Start playing the... on the iPod 1 or iPod 2 connector. The charging begins when the iPod is turned off , press DISPLAY repeatedly until the display is placed on the unit. If you want . Using optional components 1 Connect a portable audio player to select "LINE IN 2". repeatedly to the iPod 1 connector, use the system as a ...

Operating Instructions
Page 32
... returns to clock display when you remove the iPod, the display changes to conserve power. If you connect an iPod.3) 1) When an iPod is being charged. Demonstration1) The display changes and the indicators flash even when the system is turned off . The clock display automatically turns...is turned off the clock display, press DISPLAY (see "To stop charging the iPod" (page 28)). 32GB Turning on the system by pressing the function buttons. 3) The clock is displayed continuously while the iPod is connected, the display change to Power Saving Mode after a few seconds. ...
... returns to clock display when you remove the iPod, the display changes to conserve power. If you connect an iPod.3) 1) When an iPod is being charged. Demonstration1) The display changes and the indicators flash even when the system is turned off . The clock display automatically turns...is turned off the clock display, press DISPLAY (see "To stop charging the iPod" (page 28)). 32GB Turning on the system by pressing the function buttons. 3) The clock is displayed continuously while the iPod is connected, the display change to Power Saving Mode after a few seconds. ...
Operating Instructions
Page 38
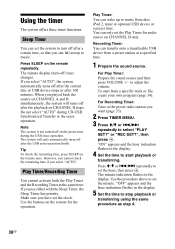
...you can wake up to music. Play Timer: You can fall asleep to music from disc, iPod 2, tuner or optional USB device at the same time. Recording Timer: You can only set the system to turn -off after 100 minutes. For Play Timer: Prepare the sound source and then press... and the hour indication flashes in the display. 5 Set the time to start from a preset station at a specified time. 1 Prepare the sound source. The system will turns off time) changes. However, you cannot check the remaining time if you want (page 35). 2 Press TIMER MENU. 3 Press V/v or ./> repeatedly...
...you can wake up to music. Play Timer: You can fall asleep to music from disc, iPod 2, tuner or optional USB device at the same time. Recording Timer: You can only set the system to turn -off after 100 minutes. For Play Timer: Prepare the sound source and then press... and the hour indication flashes in the display. 5 Set the time to start from a preset station at a specified time. 1 Prepare the sound source. The system will turns off time) changes. However, you cannot check the remaining time if you want (page 35). 2 Press TIMER MENU. 3 Press V/v or ./> repeatedly...
Operating Instructions
Page 39
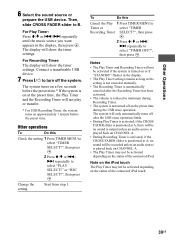
...display will be recorded unless an audio source is not turned off the system. The system turns on a few seconds before the preset time.* If the system is on at A, no sound will show the timer settings. Note on the iPod touch The Play Timer may not be activated depending on the status of..., then press . Then, slide CROSS FADER slider to turn off on the status of the connected iPod touch. 39GB Notes • The Play Timer and Recording Timer will not be activated if the system is positioned at the preset time, the Play Timer and the Recording Timer will be no sound...
...display will be recorded unless an audio source is not turned off the system. The system turns on a few seconds before the preset time.* If the system is on at A, no sound will show the timer settings. Note on the iPod touch The Play Timer may not be activated depending on the status of..., then press . Then, slide CROSS FADER slider to turn off on the status of the connected iPod touch. 39GB Notes • The Play Timer and Recording Timer will not be activated if the system is positioned at the preset time, the Play Timer and the Recording Timer will be no sound...

Operating Instructions
Page 45
..." flashes in MP3/WMA/ AAC format. • USB device formatted with this system" (page 52) for the supported device types. • Check the CROSS FADER slider position (page 31). The iPod cannot be played back. * This system supports FAT16 and FAT32, but some USB device may take time to start playback... start from the speaker cords as possible. • Try turning off the system, then connect the USB device again. • Connect the supported USB device (page 52). • Press HS (or N on the contents of the iPod, it fully. • Locate the antennas as far away from the first...
..." flashes in MP3/WMA/ AAC format. • USB device formatted with this system" (page 52) for the supported device types. • Check the CROSS FADER slider position (page 31). The iPod cannot be played back. * This system supports FAT16 and FAT32, but some USB device may take time to start playback... start from the speaker cords as possible. • Try turning off the system, then connect the USB device again. • Connect the supported USB device (page 52). • Press HS (or N on the contents of the iPod, it fully. • Locate the antennas as far away from the first...

Operating Instructions
Page 50
... WMA: 44.1 kHz AAC: 44.1 kHz Transfer speed Full-Speed Supported USB device Mass Storage Class Maximum current 500 mA iPod section DC5V 500 mA MAX Speakers Front speaker (SS-DJ2i) Speaker system 3-way, 3-driver, Bass reflex Speaker unit Woofer: 130 mm (5 1/2 inches), cone type Subwoofer: 130 mm (5 1/2 inches), cone type Tweeter: 40...
... WMA: 44.1 kHz AAC: 44.1 kHz Transfer speed Full-Speed Supported USB device Mass Storage Class Maximum current 500 mA iPod section DC5V 500 mA MAX Speakers Front speaker (SS-DJ2i) Speaker system 3-way, 3-driver, Bass reflex Speaker unit Woofer: 130 mm (5 1/2 inches), cone type Subwoofer: 130 mm (5 1/2 inches), cone type Tweeter: 40...

Operating Instructions
Page 51
Additional Information Subwoofer (SA-WG2i) Subwoofer system 1-way, 2-driver, Bass reflex Speaker unit Subwoofer: 180 mm (7 inches), cone type Rated impedance 6 ohms Dimensions (w/h/d) Approx. 500 × 306 × 505 mm (19 ...215; 146.8 × 288 mm (15 × 5 7/8 × 11 3/8 inches) Mass (Approx.) HCD-DJ2i: 3.2 kg (7 lb 1 oz) Supplied accessories Remote Commander (1) R6 (size AA) batteries (2) AM loop antenna (1) FM lead antenna (1) Front speaker pads (8) iPod Dock Adapters (5 set) Design and specifications are subject to change without notice. • Standby power consumption: 0.5 W...
Additional Information Subwoofer (SA-WG2i) Subwoofer system 1-way, 2-driver, Bass reflex Speaker unit Subwoofer: 180 mm (7 inches), cone type Rated impedance 6 ohms Dimensions (w/h/d) Approx. 500 × 306 × 505 mm (19 ...215; 146.8 × 288 mm (15 × 5 7/8 × 11 3/8 inches) Mass (Approx.) HCD-DJ2i: 3.2 kg (7 lb 1 oz) Supplied accessories Remote Commander (1) R6 (size AA) batteries (2) AM loop antenna (1) FM lead antenna (1) Front speaker pads (8) iPod Dock Adapters (5 set) Design and specifications are subject to change without notice. • Standby power consumption: 0.5 W...
Operating Instructions
Page 53
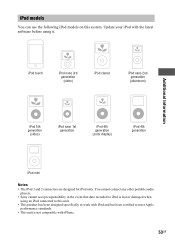
... Sony cannot accept responsibility in the event that data recorded to iPod is lost or damaged when using it. iPod models You can use the following iPod models on this unit. • This product has been designed specifically to work with iPod ...using an iPod connected to this system. Update your iPod with iPhone. 53GB iPod touch iPod nano 3rd generation (video) iPod classic iPod nano 2nd generation (aluminum) Additional Information iPod 5th generation (video) iPod nano 1st generation iPod 4th generation (color display) iPod 4th generation iPod mini Notes • The iPod 1 and...
... Sony cannot accept responsibility in the event that data recorded to iPod is lost or damaged when using it. iPod models You can use the following iPod models on this unit. • This product has been designed specifically to work with iPod ...using an iPod connected to this system. Update your iPod with iPhone. 53GB iPod touch iPod nano 3rd generation (video) iPod classic iPod nano 2nd generation (aluminum) Additional Information iPod 5th generation (video) iPod nano 1st generation iPod 4th generation (color display) iPod 4th generation iPod mini Notes • The iPod 1 and...

Operating Instructions
Page 54
...speed 30 C CD-USB Synchonized Transfer 21 COLD RESET 46 Compatible iPod with this system 53 Compatible USB devices with this system 52 Crossfader 31 D Demonstration 14, 32 Display 12 Display mode 32 F FM MODE 20 H Handling discs 48 Hooking up the system 13 M Manual Transferring 21 Monitor cue 31 MP3 BOOSTER+ 29 Multi...32 P Play mode 19, 26 Playable disc 48 Power Saving Mode 32 Presetting radio station 35 Program Play 34 R Radio station 20 RDS (Radio Data System) 36 REC1 Transferring 21 Remote 8 Repeat Play 18, 25 S Shuffle Play 19, 26 T Timer Play Timer 38 Recording Timer 38 Sleep Timer 38 54GB
...speed 30 C CD-USB Synchonized Transfer 21 COLD RESET 46 Compatible iPod with this system 53 Compatible USB devices with this system 52 Crossfader 31 D Demonstration 14, 32 Display 12 Display mode 32 F FM MODE 20 H Handling discs 48 Hooking up the system 13 M Manual Transferring 21 Monitor cue 31 MP3 BOOSTER+ 29 Multi...32 P Play mode 19, 26 Playable disc 48 Power Saving Mode 32 Presetting radio station 35 Program Play 34 R Radio station 20 RDS (Radio Data System) 36 REC1 Transferring 21 Remote 8 Repeat Play 18, 25 S Shuffle Play 19, 26 T Timer Play Timer 38 Recording Timer 38 Sleep Timer 38 54GB


