
Child Safety: It Makes A Difference Where Your TV Stands
Page 1
... the Home Entertainment Support Safety Committee comprised of the home with furniture and television sets. 5 Avoid placing any items on top of TVs such as VCRs and remotes that may cause unnecessary injury. Many homes, in your furniture to the wall (but never screw anything ...and anchors to secure your home. Use the appropriate furniture that children can become excited while watching a program and can potentially push or pull a TV over and may pique the children's curiosity. 6 Remember that is a Sector of the Electronic Industries Alliance Tune Into Safety 1 One size does...
... the Home Entertainment Support Safety Committee comprised of the home with furniture and television sets. 5 Avoid placing any items on top of TVs such as VCRs and remotes that may cause unnecessary injury. Many homes, in your furniture to the wall (but never screw anything ...and anchors to secure your home. Use the appropriate furniture that children can become excited while watching a program and can potentially push or pull a TV over and may pique the children's curiosity. 6 Remember that is a Sector of the Electronic Industries Alliance Tune Into Safety 1 One size does...
Limited Warranty
Page 1
... service assistance or resolution of the Product, including the antenna. 4-094-133-03 ® XBR LCD COLOR TV LIMITED WARRANTY Sony Electronics Inc. ("Sony") warrants this Product is determined to be defective, Sony will repair or replace the Product with the Sony Partnership within the Warranty period. has established telephone numbers for frequently asked questions: To...
... service assistance or resolution of the Product, including the antenna. 4-094-133-03 ® XBR LCD COLOR TV LIMITED WARRANTY Sony Electronics Inc. ("Sony") warrants this Product is determined to be defective, Sony will repair or replace the Product with the Sony Partnership within the Warranty period. has established telephone numbers for frequently asked questions: To...
Operating Instructions
Page 2
... DVD Player Connections 8 Additional Connections 9 Using Special Sony Features 11 Basic Set Up Inserting Batteries 13 Using the Remote Control Move & Select Buttons 13 Front Panel Menu Control 13 Using your New TV Setting Up the TV Automatically 14 Watching the TV 15 Using Picture-in-Picture - PIP 17 Using the...Using the CHANNEL SET UP Menu ..... 26 Using the PARENTAL CONTROL Menu 30 Operating Video Equipment Programming the Remote Control .......... 32 Operating a Cable Box or SAT Receiver Programming the Remote Control .......... 34 Troubleshooting 35 Specifications 36 Index 38
... DVD Player Connections 8 Additional Connections 9 Using Special Sony Features 11 Basic Set Up Inserting Batteries 13 Using the Remote Control Move & Select Buttons 13 Front Panel Menu Control 13 Using your New TV Setting Up the TV Automatically 14 Watching the TV 15 Using Picture-in-Picture - PIP 17 Using the...Using the CHANNEL SET UP Menu ..... 26 Using the PARENTAL CONTROL Menu 30 Operating Video Equipment Programming the Remote Control .......... 32 Operating a Cable Box or SAT Receiver Programming the Remote Control .......... 34 Troubleshooting 35 Specifications 36 Index 38
Operating Instructions
Page 3
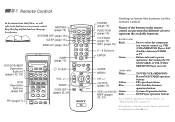
... MUTING (page 15) SYSTEM OFF (page 16) SLEEP (page 15) MUTING POWER VTR/DVD SAT/CABLE TV SYSTEM FUNCTION OFF VTR/DVD SAT/CABLE TV SLEEP DISPLAY ANT TV/VIDEO VCR/DVD/MDP Operation Buttons (pages 32, 33) DVD Operation Buttons (page 33) DISPLAY (page 16) MUTING POWER VTR/DVD SAT/CABLE... TV FUNCTION TV/VTR VTR/DVD SAT/CABLE TV JUMP (page 15) TV/SAT 123 456 7 JUMP 89 ENTER 0 PICTURE MODE TV/SAT SWAP ...
... MUTING (page 15) SYSTEM OFF (page 16) SLEEP (page 15) MUTING POWER VTR/DVD SAT/CABLE TV SYSTEM FUNCTION OFF VTR/DVD SAT/CABLE TV SLEEP DISPLAY ANT TV/VIDEO VCR/DVD/MDP Operation Buttons (pages 32, 33) DVD Operation Buttons (page 33) DISPLAY (page 16) MUTING POWER VTR/DVD SAT/CABLE... TV FUNCTION TV/VTR VTR/DVD SAT/CABLE TV JUMP (page 15) TV/SAT 123 456 7 JUMP 89 ENTER 0 PICTURE MODE TV/SAT SWAP ...
Operating Instructions
Page 4
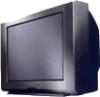
...at a high brightness or contrast setting, the image can radiate radio frequency energy and, if not installed and used in a particular installation. MODELS: KV-32XBR250, 36XBR250 As an ENERGY STAR® Partner, Sony has determined that any changes or modifications not expressly approved in this manual could void your..., may be connected to the grounding system of the building, as close to persons. ENERGY STAR® is left on cleaning the TV Clean the TV with §15.119 of cable entry as thinner or benzine, which might damage the finish of fire or shock hazard, do not...
...at a high brightness or contrast setting, the image can radiate radio frequency energy and, if not installed and used in a particular installation. MODELS: KV-32XBR250, 36XBR250 As an ENERGY STAR® Partner, Sony has determined that any changes or modifications not expressly approved in this manual could void your..., may be connected to the grounding system of the building, as close to persons. ENERGY STAR® is left on cleaning the TV Clean the TV with §15.119 of cable entry as thinner or benzine, which might damage the finish of fire or shock hazard, do not...
Operating Instructions
Page 5
... set off when it is normal for future reference. Always turn the set on or off. Attachments Do not use , and servicing of TV. An appliance and cart combination should be moved with a polarized AC power cord plug This plug will only fit into the set should be...). Alternate Warning For the set . Overloading Do not overload wall outlets, extension cords or convenience receptacles beyond their capacity, since this manual for some TV sets to insert the plug into the outlet, try reversing the plug. Do not use power-line operated sets near a bathtub, washbowl, kitchen sink...
... set off when it is normal for future reference. Always turn the set on or off. Attachments Do not use , and servicing of TV. An appliance and cart combination should be moved with a polarized AC power cord plug This plug will only fit into the set should be...). Alternate Warning For the set . Overloading Do not overload wall outlets, extension cords or convenience receptacles beyond their capacity, since this manual for some TV sets to insert the plug into the outlet, try reversing the plug. Do not use power-line operated sets near a bathtub, washbowl, kitchen sink...
Operating Instructions
Page 7
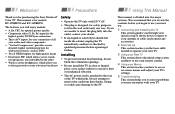
... is designed, for purchasing the Sony Trinitron® Color TV. Installing • To prevent internal heat build-up . This manual is for easy connection of all your TV's settings. 5 Troubleshooting This section helps you to the rear of the TV with hooks. Precautions Using This Manual... • Component video (Y, PB, PR) input for the highest quality DVD Player connection • Three A/V inputs, for models KV-32XBR250 and KV-36XBR250. We recommend that you review the contents before operating it checked by qualified personnel before you begin to use your remote control....
... is designed, for purchasing the Sony Trinitron® Color TV. Installing • To prevent internal heat build-up . This manual is for easy connection of all your TV's settings. 5 Troubleshooting This section helps you to the rear of the TV with hooks. Precautions Using This Manual... • Component video (Y, PB, PR) input for the highest quality DVD Player connection • Three A/V inputs, for models KV-32XBR250 and KV-36XBR250. We recommend that you review the contents before operating it checked by qualified personnel before you begin to use your remote control....

Operating Instructions
Page 8
Connecting and Installing the TV Making Connections Refer to the table below, it will direct you to the diagram suitable to the equipment you will be connecting See page Cable ...
Connecting and Installing the TV Making Connections Refer to the table below, it will direct you to the diagram suitable to the equipment you will be connecting See page Cable ...

Operating Instructions
Page 9
... to OFF and perform the AUTO PROGRAM function, (see B); Note about the AC Power Cord The AC power cord is attached to the rear of TV) AUX (No connection "TO CONVERTER" in this case) Antenna cable TO CONVERTER VHF/UHF Select CABLE or antenna (ANT) mode by pressing ANT on the... the cord in your CABLE to cable or an antenna The connection you may contain both (see C ). 75-ohm coaxial cable C • VHF (Rear of TV) VHF/UHF Antenna connector Cable and antenna If your cable provider does not feature local channels, you choose will probably have 300 -ohm twin lead...
... to OFF and perform the AUTO PROGRAM function, (see B); Note about the AC Power Cord The AC power cord is attached to the rear of TV) AUX (No connection "TO CONVERTER" in this case) Antenna cable TO CONVERTER VHF/UHF Select CABLE or antenna (ANT) mode by pressing ANT on the... the cord in your CABLE to cable or an antenna The connection you may contain both (see C ). 75-ohm coaxial cable C • VHF (Rear of TV) VHF/UHF Antenna connector Cable and antenna If your cable provider does not feature local channels, you choose will probably have 300 -ohm twin lead...

Operating Instructions
Page 10
Cable IN OUT Cable box (Rear of TV) AUX TO CONVERTER 75-ohm coaxial cable (not supplied) (signal) VHF/UHF CATV cable ... cable box, you cannot view the AUX input in the window picture. Notes • Your Sony remote control can switch between the AUX and normal (CATV) input you can be controlling all channels. Cable box...you should consider using the CHANNEL FIX feature, (see page 26). Connecting and Installing the TV (continued) Cable Box Connections Some pay cable TV systems use scrambled or encoded signals that require a cable box to view all channel selection ...
Cable IN OUT Cable box (Rear of TV) AUX TO CONVERTER 75-ohm coaxial cable (not supplied) (signal) VHF/UHF CATV cable ... cable box, you cannot view the AUX input in the window picture. Notes • Your Sony remote control can switch between the AUX and normal (CATV) input you can be controlling all channels. Cable box...you should consider using the CHANNEL FIX feature, (see page 26). Connecting and Installing the TV (continued) Cable Box Connections Some pay cable TV systems use scrambled or encoded signals that require a cable box to view all channel selection ...

Operating Instructions
Page 11
...OUT IN AUDIO R AUDIO L VIDEO LINE OUT 2 3 Coaxial cable VCR OUT IN AUDIO R AUDIO L VIDEO LINE OUT 2 4 Cable 1 OUT IN Cable box (Rear of TV) AUX VIDEO IN 1 3 4 Y TO CONVERTER S VIDEO PB VHF/UHF VIDEO L (MONO) AUDIO R PR L AUDIO R S-LINK CONTROL S OUT AUDIO-R (red) AUDIO-L.... Tip z If you are connecting a monaural VCR, connect only the single white audio output to AUDIO and VIDEO IN on your TV. For optimum picture quality, use S VIDEO instead of TV) VIDEO IN 1 3 4 S VIDEO VIDEO L (MONO) AUDIO R Y PB PR L AUDIO R S-LINK CONTROL S OUT AUDIO-R (red) AUDIO-L (...
...OUT IN AUDIO R AUDIO L VIDEO LINE OUT 2 3 Coaxial cable VCR OUT IN AUDIO R AUDIO L VIDEO LINE OUT 2 4 Cable 1 OUT IN Cable box (Rear of TV) AUX VIDEO IN 1 3 4 Y TO CONVERTER S VIDEO PB VHF/UHF VIDEO L (MONO) AUDIO R PR L AUDIO R S-LINK CONTROL S OUT AUDIO-R (red) AUDIO-L.... Tip z If you are connecting a monaural VCR, connect only the single white audio output to AUDIO and VIDEO IN on your TV. For optimum picture quality, use S VIDEO instead of TV) VIDEO IN 1 3 4 S VIDEO VIDEO L (MONO) AUDIO R Y PB PR L AUDIO R S-LINK CONTROL S OUT AUDIO-R (red) AUDIO-L (...

Operating Instructions
Page 12
Note You cannot record signals from equipment connected to record a program being played by pressing TV/VIDEO. (Rear of this manual. 2 Using A/V connectors, connect AUDIO and VIDEO IN on your TV. set the TV to the video input intended for playback by the primary VCR or to perform tape editing and dubbing. 1 ... MONITOR OUT gives you the ability to use a second VCR to the Y, PB, PR input. To perform tape editing; Connecting and Installing the TV (continued) Connecting two VCRs for recording) AUDIO R AUDIO L VIDEO LINE IN OUT IN AUDIO-R (red) AUDIO-L (white) VIDEO (yellow) 6
Note You cannot record signals from equipment connected to record a program being played by pressing TV/VIDEO. (Rear of this manual. 2 Using A/V connectors, connect AUDIO and VIDEO IN on your TV. set the TV to the video input intended for playback by the primary VCR or to perform tape editing and dubbing. 1 ... MONITOR OUT gives you the ability to use a second VCR to the Y, PB, PR input. To perform tape editing; Connecting and Installing the TV (continued) Connecting two VCRs for recording) AUDIO R AUDIO L VIDEO LINE IN OUT IN AUDIO-R (red) AUDIO-L (white) VIDEO (yellow) 6

Operating Instructions
Page 13
... be connected. 1 Satellite antenna cable Satellite receiver SATELLITE IN AUDIO R AUDIO L VIDEO LINE OUT 3 2 VHF/UHF IN OUT AUX TO CONVERTER VHF/UHF (Rear of TV) VIDEO IN 1 3 4 Y S VIDEO PB VIDEO L (MONO) AUDIO R PR L AUDIO R S-LINK CONTROL S OUT AUDIO-R (red) AUDIO-L (white) VIDEO (yellow) Connecting a satellite ...from your satellite antenna to SATELLITE IN on your receiver. 2 Attach the coaxial connector from your cable or antenna to VHF/UHF on your TV. 3 Using A/V connectors, connect AUDIO and VIDEO OUT on your receiver to view from your cable or antenna to IN on your VCR....
... be connected. 1 Satellite antenna cable Satellite receiver SATELLITE IN AUDIO R AUDIO L VIDEO LINE OUT 3 2 VHF/UHF IN OUT AUX TO CONVERTER VHF/UHF (Rear of TV) VIDEO IN 1 3 4 Y S VIDEO PB VIDEO L (MONO) AUDIO R PR L AUDIO R S-LINK CONTROL S OUT AUDIO-R (red) AUDIO-L (white) VIDEO (yellow) Connecting a satellite ...from your satellite antenna to SATELLITE IN on your receiver. 2 Attach the coaxial connector from your cable or antenna to VHF/UHF on your TV. 3 Using A/V connectors, connect AUDIO and VIDEO OUT on your receiver to view from your cable or antenna to IN on your VCR....

Operating Instructions
Page 14
... connectors, connect AUDIO R and L of the LINE OUT on your DVD player to AUDIO R and L on the VIDEO IN 4 panel at the rear of your TV. 2 Using three VIDEO connectors, connect Y, PB, and PR on the COMPONENT VIDEO OUT on your DVD player to Y, PB, and PR on the VIDEO IN... 4 panel at the rear of TV) VIDEO IN 1 3 4 Y S VIDEO PB VIDEO L (MONO) AUDIO R PR L AUDIO R S-LINK CONTROL S OUT AUDIO-R (red) AUDIO-L (white) Note Some DVD player terminals may be labeled Y, CB...
... connectors, connect AUDIO R and L of the LINE OUT on your DVD player to AUDIO R and L on the VIDEO IN 4 panel at the rear of your TV. 2 Using three VIDEO connectors, connect Y, PB, and PR on the COMPONENT VIDEO OUT on your DVD player to Y, PB, and PR on the VIDEO IN... 4 panel at the rear of TV) VIDEO IN 1 3 4 Y S VIDEO PB VIDEO L (MONO) AUDIO R PR L AUDIO R S-LINK CONTROL S OUT AUDIO-R (red) AUDIO-L (white) Note Some DVD player terminals may be labeled Y, CB...

Operating Instructions
Page 15
...AUDIO-R (red) AUDIO-L (white) VIDEO (yellow) S VIDEO VIDEO L (MONO) AUDIO R VIDEO IN 1 3 4 (Rear of TV) S VIDEO VIDEO L (MONO) AUDIO R VIDEO IN 1 3 4 Y OUT PB TV MONITOR AUDIO (VAR/FIX) PR VIDEO L AUDIO R L (MONO) AUDIO R S-LINK CONTROL S OUT IN AUDIO-L (white) AUDIO-R ...(red) 2 1 Line input HRD Connecting an A/V receiver 1 Using A/V cables, connect TV OUT on your TV to the A/V receiver (VIDEO 1). (see page 23). (Rear of TV) Y OUT PB TV MONITOR AUDIO (VAR/FIX) PR VIDEO L AUDIO R L (MONO) AUDIO R S-LINK CONTROL S OUT IN AUDIO...
...AUDIO-R (red) AUDIO-L (white) VIDEO (yellow) S VIDEO VIDEO L (MONO) AUDIO R VIDEO IN 1 3 4 (Rear of TV) S VIDEO VIDEO L (MONO) AUDIO R VIDEO IN 1 3 4 Y OUT PB TV MONITOR AUDIO (VAR/FIX) PR VIDEO L AUDIO R L (MONO) AUDIO R S-LINK CONTROL S OUT IN AUDIO-L (white) AUDIO-R ...(red) 2 1 Line input HRD Connecting an A/V receiver 1 Using A/V cables, connect TV OUT on your TV to the A/V receiver (VIDEO 1). (see page 23). (Rear of TV) Y OUT PB TV MONITOR AUDIO (VAR/FIX) PR VIDEO L AUDIO R L (MONO) AUDIO R S-LINK CONTROL S OUT IN AUDIO...

Operating Instructions
Page 16
... an S VIDEO equipped camcorder, you are connecting a monaural camcorder, connect only the single white audio output to AUDIO and VIDEO IN on your TV. VIDEO 2 INPUT S VIDEO VIDEO L(MONO)-AUDIO-R AUDIO-R (red) AUDIO-L (white) VIDEO (yellow) A/V output 10 Using A/V connectors, connect ...AUDIO and VIDEO OUT on your camcorder to the left input on your camcorder. Connecting and Installing the TV (continued) Connecting a camcorder This connection is convenient for optimum picture quality. Tip z If you can use an S VIDEO cable for viewing...
... an S VIDEO equipped camcorder, you are connecting a monaural camcorder, connect only the single white audio output to AUDIO and VIDEO IN on your TV. VIDEO 2 INPUT S VIDEO VIDEO L(MONO)-AUDIO-R AUDIO-R (red) AUDIO-L (white) VIDEO (yellow) A/V output 10 Using A/V connectors, connect ...AUDIO and VIDEO OUT on your camcorder to the left input on your camcorder. Connecting and Installing the TV (continued) Connecting a camcorder This connection is convenient for optimum picture quality. Tip z If you can use an S VIDEO cable for viewing...

Operating Instructions
Page 17
... 34). VCR) to CONTROL S OUT on widescreen sources, including selected DVDs. To enjoy this feature, set your TV. Using the Vertical Compression feature These models use a feature called "vertical compression" to operate other Sony equipment with maximum picture quality. (Rear of the picture. The widescreen source will be automatically detected and displayed...
... 34). VCR) to CONTROL S OUT on widescreen sources, including selected DVDs. To enjoy this feature, set your TV. Using the Vertical Compression feature These models use a feature called "vertical compression" to operate other Sony equipment with maximum picture quality. (Rear of the picture. The widescreen source will be automatically detected and displayed...

Operating Instructions
Page 18
... Y PB PR L AUDIO R S-LINK CONTROL S OUT IN Connecting S-Link to a satellite receiver When you power on the satellite receiver , S-Link automatically powers on the TV and switches to the correct video input. 1 Using A/V connectors, connect AUDIO and VIDEO OUT on your satellite receiver to AUDIO and VIDEO IN on your...an S-Link connector (mono mini plug), connect S-LINK on your satellite receiver to S-LINK/CONTROL S-OUT in the same VIDEO IN column on your TV. Note The S-Link feature will override the "SKIP" VIDEO LABEL input, (see page 25). 12 The S-Link connector must be in the same...
... Y PB PR L AUDIO R S-LINK CONTROL S OUT IN Connecting S-Link to a satellite receiver When you power on the satellite receiver , S-Link automatically powers on the TV and switches to the correct video input. 1 Using A/V connectors, connect AUDIO and VIDEO OUT on your satellite receiver to AUDIO and VIDEO IN on your...an S-Link connector (mono mini plug), connect S-LINK on your satellite receiver to S-LINK/CONTROL S-OUT in the same VIDEO IN column on your TV. Note The S-Link feature will override the "SKIP" VIDEO LABEL input, (see page 25). 12 The S-Link connector must be in the same...

Operating Instructions
Page 19
... you anticipate that the remote control will not be programmed to operate most video equipment, (see page 34). Using the Remote Control Move & Select Buttons TV/SAT GUIDE VOL MENU CH Move RESET CODE SET VTR 1 2 3 DVD/MDP RM-Y170 Select Front Panel Menu Control The front panel menu controls allow...
... you anticipate that the remote control will not be programmed to operate most video equipment, (see page 34). Using the Remote Control Move & Select Buttons TV/SAT GUIDE VOL MENU CH Move RESET CODE SET VTR 1 2 3 DVD/MDP RM-Y170 Select Front Panel Menu Control The front panel menu controls allow...
Operating Instructions
Page 20
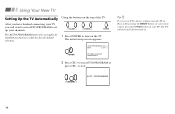
...AUTO PROGRAM or press CH - Using Your New TV Setting Up the TV Automatically Using the buttons on the top of the TV: After you have finished connecting your TV, you will turn itself off, then back on. The initial setup screen appears. to turn the TV on. AUTO PROGRAMMING 14 Tip z To reset ...cable/antenna 2 Press CH + to run AUTO PROGRAM to factory settings, turn on your TV to set up your channels. Then, while pressing the RESET button on your remote control, press the POWER button on the TV. The AUTO PROGRAM feature does not apply for installations that use a cable box for ...
...AUTO PROGRAM or press CH - Using Your New TV Setting Up the TV Automatically Using the buttons on the top of the TV: After you have finished connecting your TV, you will turn itself off, then back on. The initial setup screen appears. to turn the TV on. AUTO PROGRAMMING 14 Tip z To reset ...cable/antenna 2 Press CH + to run AUTO PROGRAM to factory settings, turn on your TV to set up your channels. Then, while pressing the RESET button on your remote control, press the POWER button on the TV. The AUTO PROGRAM feature does not apply for installations that use a cable box for ...


