Warranty Card
Page 1
... operation or maintenance, connection to improper voltage supply, or attempted repair by Sony to any part of the Product, including the antenna. This warranty does not cover Products sold AS IS or WITH ALL FAULTS, or consumables (such as follows: 1. This warranty is provided during the initial 90 day period for one (1) year (color picture tube - This warranty does not cover customer instruction, installation, set...
... operation or maintenance, connection to improper voltage supply, or attempted repair by Sony to any part of the Product, including the antenna. This warranty does not cover Products sold AS IS or WITH ALL FAULTS, or consumables (such as follows: 1. This warranty is provided during the initial 90 day period for one (1) year (color picture tube - This warranty does not cover customer instruction, installation, set...

Operating Instructions
Page 3
... operate this equipment. However, there is a registered mark. Owner's Record The model and serial numbers are registered trademarks of Sony Corporation. WEGA®, FD Trinitron and Caption Vision are located on UHF or VHF or transmitted by qualified personnel before operating it checked by cable companies for safety purposes and will not occur in accordance with the instructions, may be permanently imprinted onto the screen...
... operate this equipment. However, there is a registered mark. Owner's Record The model and serial numbers are registered trademarks of Sony Corporation. WEGA®, FD Trinitron and Caption Vision are located on UHF or VHF or transmitted by qualified personnel before operating it checked by cable companies for safety purposes and will not occur in accordance with the instructions, may be permanently imprinted onto the screen...

Operating Instructions
Page 4
... polishing it in the installation, use a mounting accessory recommended by the manufacturer. User Guide IMPORTANT SAFEGUARDS For your protection, please read these slots and openings must never be blocked or covered. Alternate Warning For the set may touch dangerous voltage points or short out parts that could result in the operating instructions or service manual. Use only a cart or stand recommended by forcing...
... polishing it in the installation, use a mounting accessory recommended by the manufacturer. User Guide IMPORTANT SAFEGUARDS For your protection, please read these slots and openings must never be blocked or covered. Alternate Warning For the set may touch dangerous voltage points or short out parts that could result in the operating instructions or service manual. Use only a cart or stand recommended by forcing...

Operating Instructions
Page 5
... all servicing to the National Electrical Code, ANSI/NFPA 70. Safety Check Upon completion of antenna discharge unit, connection to lightning and power-line surges. this television receiver during a lightning storm, or when it from the wall outlet and refer servicing to rain or water. • If the set does not operate normally when following conditions: • When the power cord or plug is...
... all servicing to the National Electrical Code, ANSI/NFPA 70. Safety Check Upon completion of antenna discharge unit, connection to lightning and power-line surges. this television receiver during a lightning storm, or when it from the wall outlet and refer servicing to rain or water. • If the set does not operate normally when following conditions: • When the power cord or plug is...
Operating Instructions
Page 7
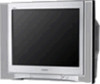
... the FD Trinitron WEGA® Features 1 About this Manual...2 Batteries for the Remote Control 2 Front Panel Menu Controls ...2 Using the Remote Control Remote Control Description...3 Programming the Remote Control 5 Using your Remote Control with Other Equipment 7 Connecting Your TV TV Rear Panel ...9 Basic Connections ...11 Cable Box Connections ...12 Connecting Additional Equipment 14 Using Basic Functions Setting Up the TV...21 Quick Start to the Menus ...22 Using Picture in Picture (PIP) ...24 Connections that affect your ability to use PIP 26 Using the Menus How to Access Menus...
... the FD Trinitron WEGA® Features 1 About this Manual...2 Batteries for the Remote Control 2 Front Panel Menu Controls ...2 Using the Remote Control Remote Control Description...3 Programming the Remote Control 5 Using your Remote Control with Other Equipment 7 Connecting Your TV TV Rear Panel ...9 Basic Connections ...11 Cable Box Connections ...12 Connecting Additional Equipment 14 Using Basic Functions Setting Up the TV...21 Quick Start to the Menus ...22 Using Picture in Picture (PIP) ...24 Connections that affect your ability to use PIP 26 Using the Menus How to Access Menus...
Operating Instructions
Page 9
... the Sony FD Trinitron WEGA®. Meets the Energy Star guidelines for energy efficiency. ❏ Front Panel Controls - Helps parents monitor what their children watch on -screen menus without the use of a button. ❏ Info Banner - Operates your purchase of the current program viewed, if available. ❏ Universal Remote Control - Allows access to the on TV by establishing rating limits. ❏ Picture in Picture (PIP) - Introduction Congratulations on your connected cable box, VCR, digital satellite receiver, or DVD player...
... the Sony FD Trinitron WEGA®. Meets the Energy Star guidelines for energy efficiency. ❏ Front Panel Controls - Helps parents monitor what their children watch on -screen menus without the use of a button. ❏ Info Banner - Operates your purchase of the current program viewed, if available. ❏ Universal Remote Control - Allows access to the on TV by establishing rating limits. ❏ Picture in Picture (PIP) - Introduction Congratulations on your connected cable box, VCR, digital satellite receiver, or DVD player...

Operating Instructions
Page 10
... last up to six months. Front Panel Menu Controls The front Audio/Video panel controls allow you how to connect to an antenna or cable, cable box, VCR, DVD, satellite receiver, stereo system, or camcorder. Operating Instructions About this Manual This manual provides instructions to help you to access the menu without the remote control. ❏ Press to display the on-screen menu. ❏ Use the and buttons on the front Audio/Video panel instead of time, remove the batteries to avoid possible damage...
... last up to six months. Front Panel Menu Controls The front Audio/Video panel controls allow you how to connect to an antenna or cable, cable box, VCR, DVD, satellite receiver, stereo system, or camcorder. Operating Instructions About this Manual This manual provides instructions to help you to access the menu without the remote control. ❏ Press to display the on-screen menu. ❏ Use the and buttons on the front Audio/Video panel instead of time, remove the batteries to avoid possible damage...
Operating Instructions
Page 11
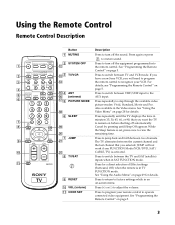
VOL (volume) qa CODE SET Description Press to switch between the current channel and the last channel that you will not work if any FUNCTION Mode (VCR/DVD, SAT/ CABLE, TV) is activated. See "Programming the Remote Control" on page 29 for details. Press to turn off the sound. Press repeatedly until Sleep Off appears. See "Using the Audio Menu" on page 5. See "Programming the Remote Control" on page 5. see "Programming the Remote Control" on page...
VOL (volume) qa CODE SET Description Press to switch between the current channel and the last channel that you will not work if any FUNCTION Mode (VCR/DVD, SAT/ CABLE, TV) is activated. See "Programming the Remote Control" on page 29 for details. Press to turn off the sound. Press repeatedly until Sleep Off appears. See "Using the Audio Menu" on page 5. See "Programming the Remote Control" on page 5. see "Programming the Remote Control" on page...

Operating Instructions
Page 12
... channel changes after two seconds. qd FUNCTION buttons Press to select the equipment (VCR/DVD, SAT/ CABLE, TV) that you want to display the current time (if set) and the program status such as channel number, Channel Label (if set), video input, and Video Label (if set). VCR (operating) Press to operate your satellite antenna. The VCR must be programmed into the remote control. Press to select an option. Operating Instructions Button Description qs POWER buttons Press to turn...
... channel changes after two seconds. qd FUNCTION buttons Press to select the equipment (VCR/DVD, SAT/ CABLE, TV) that you want to display the current time (if set) and the program status such as channel number, Channel Label (if set), video input, and Video Label (if set). VCR (operating) Press to operate your satellite antenna. The VCR must be programmed into the remote control. Press to select an option. Operating Instructions Button Description qs POWER buttons Press to turn...

Operating Instructions
Page 17
... the basic connections and how to view local and cable channels if your TV for the first time. TV Rear Panel 1 2 3 1 3 4 5 Y S VIDEO PB PR AUDIO OUT (VAR/FIX) VIDEO L (MONO) R L (MONO) R 45 6 7 Jack 1AUX Description This input allows you set up your cable provider does not feature local channels. Use this section before setting up your VHF/UHF antenna or cable. 9 You can switch between scrambled channels (through a cable box) and normal cable channels (CATV).
... the basic connections and how to view local and cable channels if your TV for the first time. TV Rear Panel 1 2 3 1 3 4 5 Y S VIDEO PB PR AUDIO OUT (VAR/FIX) VIDEO L (MONO) R L (MONO) R 45 6 7 Jack 1AUX Description This input allows you set up your cable provider does not feature local channels. Use this section before setting up your VHF/UHF antenna or cable. 9 You can switch between scrambled channels (through a cable box) and normal cable channels (CATV).
Operating Instructions
Page 21
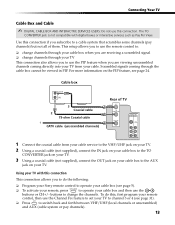
... Per View. Connecting Your TV Cable Box and Cable ✍ DIGITAL CABLE BOX AND INTERACTIVE SERVICES USERS: Do not use this connection This connection allows you to do this connection if you subscribe to a cable system that scrambles some channels (pay channels). 13 Cable box 3 Coaxial cable 2 75-ohm Coaxial cable 1 CATV cable (unscrambled channels) Rear of them. This setup allows you to use the remote control to: ❏ change channels through your cable box when you are receiving a scrambled signal ❏ change the channels. Scrambled signals...
... Per View. Connecting Your TV Cable Box and Cable ✍ DIGITAL CABLE BOX AND INTERACTIVE SERVICES USERS: Do not use this connection This connection allows you to do this connection if you subscribe to a cable system that scrambles some channels (pay channels). 13 Cable box 3 Coaxial cable 2 75-ohm Coaxial cable 1 CATV cable (unscrambled channels) Rear of them. This setup allows you to use the remote control to: ❏ change channels through your cable box when you are receiving a scrambled signal ❏ change the channels. Scrambled signals...

Operating Instructions
Page 22
..., first program your remote control, then use S VIDEO instead of the yellow video cable. Using your TV with video outputs, you still must connect the audio cables. Operating Instructions Connecting Additional Equipment Connecting a TV and VCR Rear of TV 1 From cable/antenna 2 VCR 1 34 5 Y S VIDEO PB PR AUDIO OUT (VAR/FIX) VIDEO L (MONO) R L (MONO) R Video (yellow) Audio L (white) Audio R (red) Optional connection 1 Connect the coaxial cable from your TV antenna or cable service to the IN jack on your VCR. 2 Connect a coaxial cable (not supplied) from AUDIO/VIDEO OUT on...
..., first program your remote control, then use S VIDEO instead of the yellow video cable. Using your TV with video outputs, you still must connect the audio cables. Operating Instructions Connecting Additional Equipment Connecting a TV and VCR Rear of TV 1 From cable/antenna 2 VCR 1 34 5 Y S VIDEO PB PR AUDIO OUT (VAR/FIX) VIDEO L (MONO) R L (MONO) R Video (yellow) Audio L (white) Audio R (red) Optional connection 1 Connect the coaxial cable from your TV antenna or cable service to the IN jack on your VCR. 2 Connect a coaxial cable (not supplied) from AUDIO/VIDEO OUT on...

Operating Instructions
Page 23
... use the PIP feature when you are viewing unscrambled channels coming through the cable box cannot be viewed in PIP. directional splitter that is equipped with your digital cable box. Use this connection if you subscribe to work with video outputs, you can get better picture quality by connecting audio/video cables (not supplied) from your cable. Rear of TV VCR 2b 3 1 Splitter Cable 2a Cable box 1 34 5 Y S VIDEO PB PR AUDIO OUT (VAR/FIX) VIDEO L (MONO) R L (MONO) R Video (yellow) Audio L (white) Audio R (red) 4 1 Connect the single input...
... use the PIP feature when you are viewing unscrambled channels coming through the cable box cannot be viewed in PIP. directional splitter that is equipped with your digital cable box. Use this connection if you subscribe to work with video outputs, you can get better picture quality by connecting audio/video cables (not supplied) from your cable. Rear of TV VCR 2b 3 1 Splitter Cable 2a Cable box 1 34 5 Y S VIDEO PB PR AUDIO OUT (VAR/FIX) VIDEO L (MONO) R L (MONO) R Video (yellow) Audio L (white) Audio R (red) 4 1 Connect the single input...

Operating Instructions
Page 24
... better picture quality, use this connection. Using your TV with digital boxes. To do this connection ❏ Program your Sony remote control to operate your VCR or cable box (see page 31). ❏ Press repeatedly to operate your VCR or to switch between VCR input (VIDEO input), VHF/UHF (local channels or unscrambled), or cable box (cable system or scrambled channels). 16 The TO CONVERTER jack is not compatible with this , first program your remote control, then use the Channel Fix...
... better picture quality, use this connection. Using your TV with digital boxes. To do this connection ❏ Program your Sony remote control to operate your VCR or cable box (see page 31). ❏ Press repeatedly to operate your VCR or to switch between VCR input (VIDEO input), VHF/UHF (local channels or unscrambled), or cable box (cable system or scrambled channels). 16 The TO CONVERTER jack is not compatible with this , first program your remote control, then use the Channel Fix...
Operating Instructions
Page 27
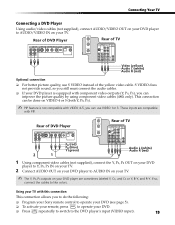
... connect the audio cables. ❏ If your DVD player is not compatible with PIP. Connecting Your TV Connecting a DVD Player Using audio/video cables (not supplied), connect AUDIO/VIDEO OUT on your DVD player to the DVD player's input (VIDEO input). 19 Rear of DVD Player Rear of TV 1 34 5 Y S VIDEO PB PR AUDIO OUT (VAR/FIX) VIDEO L (MONO) R L (MONO) R Video (yellow) Audio L (white) Audio R (red) Optional connection ❏ For better picture quality, use VIDEO 1or 3. S VIDEO does not provide sound, so you to do the following: ❏ Program your Sony remote control...
... connect the audio cables. ❏ If your DVD player is not compatible with PIP. Connecting Your TV Connecting a DVD Player Using audio/video cables (not supplied), connect AUDIO/VIDEO OUT on your DVD player to the DVD player's input (VIDEO input). 19 Rear of DVD Player Rear of TV 1 34 5 Y S VIDEO PB PR AUDIO OUT (VAR/FIX) VIDEO L (MONO) R L (MONO) R Video (yellow) Audio L (white) Audio R (red) Optional connection ❏ For better picture quality, use VIDEO 1or 3. S VIDEO does not provide sound, so you to do the following: ❏ Program your Sony remote control...
Operating Instructions
Page 32
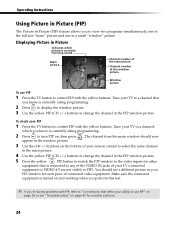
... TV button to control PIP with the yellow buttons. The channel from the main window should see "Troubleshooting" on and working when you perform this test. ✍ If you're having problems with the yellow buttons. Operating Instructions Using Picture in Picture (PIP) The Picture-in-Picture (PIP) feature allows you to view two programs simultaneously, one in the full size "main" picture and one in PIP). To check your TV (connected equipment to VIDEO...
... TV button to control PIP with the yellow buttons. The channel from the main window should see "Troubleshooting" on and working when you perform this test. ✍ If you're having problems with the yellow buttons. Operating Instructions Using Picture in Picture (PIP) The Picture-in-Picture (PIP) feature allows you to view two programs simultaneously, one in the full size "main" picture and one in PIP). To check your TV (connected equipment to VIDEO...
Operating Instructions
Page 39
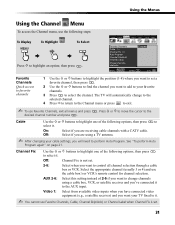
... . Channel Fix Use the F or f buttons to highlight one of 2-6 if you want to exit. ✍ To use Favorite Channels, Cable, Channel Skip/Add, or Channel Label when Channel Fix is not set . 31 Video 1: Select from available video inputs when you have connected video equipment (e.g., a satellite receiver) and you want to change to the selected channel. 4 Press G to return to the Channel menu or press to control all menus and press desired channel number...
... . Channel Fix Use the F or f buttons to highlight one of 2-6 if you want to exit. ✍ To use Favorite Channels, Cable, Channel Skip/Add, or Channel Label when Channel Fix is not set . 31 Video 1: Select from available video inputs when you have connected video equipment (e.g., a satellite receiver) and you want to change to the selected channel. 4 Press G to return to the Channel menu or press to control all menus and press desired channel number...

Operating Instructions
Page 51
... the RESET button on the remote control, press POWER button on the TV. You cannot use the to close the Basic menu, only the Basic menu menus when I am in the Caption Vision option. There is a black box on the TV front panel. Digital cable box does not work with digital cable boxes. ❏ If you are connecting a VCR and digital cable box using the master password, you must use strong solvents such as described in the Setup menu (page...
... the RESET button on the remote control, press POWER button on the TV. You cannot use the to close the Basic menu, only the Basic menu menus when I am in the Caption Vision option. There is a black box on the TV front panel. Digital cable box does not work with digital cable boxes. ❏ If you are connecting a VCR and digital cable box using the master password, you must use strong solvents such as described in the Setup menu (page...

Operating Instructions
Page 53
... into the remote control (page 2). ❏ Try another channel to rule out station trouble. ❏ Adjust the Picture setting in the Video menu (page 28). ❏ Adjust the Brightness setting in the Video menu (page 28). ❏ Check the antenna and/or cable connections (page 11). ❏ Adjust the Color setting in the Video menu (page 28). ❏ Check the Cable setting in the Channel menu (page 31). ❏ Check the antenna and/or cable connections (page 11...
... into the remote control (page 2). ❏ Try another channel to rule out station trouble. ❏ Adjust the Picture setting in the Video menu (page 28). ❏ Adjust the Brightness setting in the Video menu (page 28). ❏ Check the antenna and/or cable connections (page 11). ❏ Adjust the Color setting in the Video menu (page 28). ❏ Check the Cable setting in the Channel menu (page 31). ❏ Check the antenna and/or cable connections (page 11...

Operating Instructions
Page 54
... the rear of this manual. Picture in Picture (PIP) Problem The remote control doesn't work ❏ Make sure Cable is just static I get anything ❏ but TV Be sure that are not presently in the Channel menu (page 31). Try changing channels in PIP Possible Remedies ❏ Press the TV FUNCTION button. Our Customer Information Services Center phone number is set the video in the main picture I cannot receive ❏ higher number ❏ channels...
... the rear of this manual. Picture in Picture (PIP) Problem The remote control doesn't work ❏ Make sure Cable is just static I get anything ❏ but TV Be sure that are not presently in the Channel menu (page 31). Try changing channels in PIP Possible Remedies ❏ Press the TV FUNCTION button. Our Customer Information Services Center phone number is set the video in the main picture I cannot receive ❏ higher number ❏ channels...


