Operating Instructions
Page 7
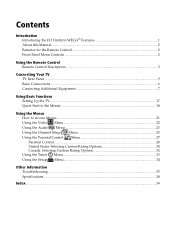
Contents Introduction Introducing the FD Trinitron WEGA® Features 1 About this Manual...2 Batteries for the Remote Control 2 Front Panel Menu Controls ...2 Using the Remote Control Remote Control Description...3 Connecting Your TV TV Rear Panel ...5 Basic Connections ...6 Connecting Additional Equipment 7 Using Basic Functions Setting Up the TV...17 Quick Start to the Menus ...18 Using the Menus How to Access Menus...
Contents Introduction Introducing the FD Trinitron WEGA® Features 1 About this Manual...2 Batteries for the Remote Control 2 Front Panel Menu Controls ...2 Using the Remote Control Remote Control Description...3 Connecting Your TV TV Rear Panel ...5 Basic Connections ...6 Connecting Additional Equipment 7 Using Basic Functions Setting Up the TV...17 Quick Start to the Menus ...18 Using the Menus How to Access Menus...
Operating Instructions
Page 9
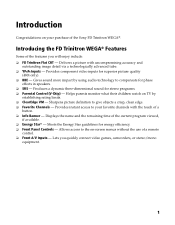
Introducing the FD Trinitron WEGA® Features Some of a remote control. ❏ Front A/V Inputs - Provides component video inputs for energy efficiency. ❏ Front Panel Controls - Helps parents monitor what their children watch on TV by using audio technology to ... Provides instant access to the on-screen menus without the use of the features you quickly connect video games, camcorders, or stereo/mono equipment. 1 Lets you will enjoy include: ❏ FD Trinitron Flat CRT - Gives sound more impact by...the name and the remaining time of the Sony FD Trinitron WEGA®.
Introducing the FD Trinitron WEGA® Features Some of a remote control. ❏ Front A/V Inputs - Provides component video inputs for energy efficiency. ❏ Front Panel Controls - Helps parents monitor what their children watch on TV by using audio technology to ... Provides instant access to the on-screen menus without the use of the features you quickly connect video games, camcorders, or stereo/mono equipment. 1 Lets you will enjoy include: ❏ FD Trinitron Flat CRT - Gives sound more impact by...the name and the remaining time of the Sony FD Trinitron WEGA®.

Operating Instructions
Page 10
... two AA (R6) batteries (supplied) into the remote control using the remote control for an extended period of your new TV. The front panel controls also allow you to access the menu without the remote control. ❏ Press to display the on-screen menu. ❏ Use the and buttons on the... change your channels (CH+/-), adjust the volume (VOL +/-), and change video inputs. ✍ To navigate the menus with your TV is connected, follow the instructions and use the remote control to access the on page 21. 2 About this Manual This manual provides instructions to help you enjoy your...
... two AA (R6) batteries (supplied) into the remote control using the remote control for an extended period of your new TV. The front panel controls also allow you to access the menu without the remote control. ❏ Press to display the on-screen menu. ❏ Use the and buttons on the... change your channels (CH+/-), adjust the volume (VOL +/-), and change video inputs. ✍ To navigate the menus with your TV is connected, follow the instructions and use the remote control to access the on page 21. 2 About this Manual This manual provides instructions to help you enjoy your...

Operating Instructions
Page 12
...qg SLEEP Press to return to restore the sound. Cycles through the Multi-channel TV Sound (MTS) options: Stereo, Mono, and Auto SAP (Second Audio Program). Press again or press to factory settings while in an on -screen menu. Press again to select or access an option. 9 RESET q; Moves ... 90 minutes. Press the arrow buttons to move the cursor, then press the center button to turn the TV on -screen menus. Press when you lose your remote control, see page 36. 4 Displays the on -screen menu. Cancel by pressing until Sleep off the sound. Cycles through the available Video Mode settings...
...qg SLEEP Press to return to restore the sound. Cycles through the Multi-channel TV Sound (MTS) options: Stereo, Mono, and Auto SAP (Second Audio Program). Press again or press to factory settings while in an on -screen menu. Press again to select or access an option. 9 RESET q; Moves ... 90 minutes. Press the arrow buttons to move the cursor, then press the center button to turn the TV on -screen menus. Press when you lose your remote control, see page 36. 4 Displays the on -screen menu. Cancel by pressing until Sleep off the sound. Cycles through the available Video Mode settings...

Operating Instructions
Page 16
...your cable box, you will be controlling all channels. If you subscribe to such type of your TV to change channels. ✍ If you should consider using the Channel Fix feature by setting your... cable box) and use this connection. Cable box 1 From cable/ antenna VIDEO AUDIO L AUDIO R LINE OUT 2 Rear of TV 1 3 S VIDEO 4 Y PB PR VIDEO L L (MONO) R R 1 Connect the coaxial cable from your cable service to...OUT jack on your cable box to the VHF/UHF jack on your TV. ✍ To view channels from your cable box, tune your TV to channel 3 or 4 (as set on the rear panel of ...
...your cable box, you will be controlling all channels. If you subscribe to such type of your TV to change channels. ✍ If you should consider using the Channel Fix feature by setting your... cable box) and use this connection. Cable box 1 From cable/ antenna VIDEO AUDIO L AUDIO R LINE OUT 2 Rear of TV 1 3 S VIDEO 4 Y PB PR VIDEO L L (MONO) R R 1 Connect the coaxial cable from your cable service to...OUT jack on your cable box to the VHF/UHF jack on your TV. ✍ To view channels from your cable box, tune your TV to channel 3 or 4 (as set on the rear panel of ...

Operating Instructions
Page 18
S VIDEO does not provide sound, so you should consider using the Channel Fix feature by setting your TV to channel 3 or 4 (as set on the rear panel of the yellow video cable. Connections Optional connection ❏ For better picture quality, use S VIDEO (located on the rear panel), instead of your cable box) and use the cable box's remote control to change channels. ✍ If you will be controlling all channel selection through your cable box, you still must connect the audio cables. ✍ To view channels from your cable box, tune your TV to channel 3 or 4 (see page 25). 10
S VIDEO does not provide sound, so you should consider using the Channel Fix feature by setting your TV to channel 3 or 4 (as set on the rear panel of the yellow video cable. Connections Optional connection ❏ For better picture quality, use S VIDEO (located on the rear panel), instead of your cable box) and use the cable box's remote control to change channels. ✍ If you will be controlling all channel selection through your cable box, you still must connect the audio cables. ✍ To view channels from your cable box, tune your TV to channel 3 or 4 (see page 25). 10

Operating Instructions
Page 20
...For Viewing Y VIDEO 1 VIDEO 2 VIDEO 1 VIDEO 2 PB L L PR R R 4 For Recording LINE IN VIDEO AUDIO L AUDIO R LINE OUT VCR Rear of TV 1 3 S VIDEO 4 Y PB PR VIDEO L L (MONO) R R AUDIO OUT (VAR/FIX) L (MONO) R Video (yellow) Audio L (white) ...not supplied) to: a) the IN jack on your satellite receiver b) the VHF/UHF jack on the TV 4 Using a coaxial cable (not supplied), connect the OUT jack on your satellite receiver to the VHF...AUDIO/VIDEO OUT on your VCR to AUDIO/VIDEO IN on your TV. 6 Using audio/video cables (not supplied), connect AUDIO/VIDEO OUT on your satellite receiver to...
...For Viewing Y VIDEO 1 VIDEO 2 VIDEO 1 VIDEO 2 PB L L PR R R 4 For Recording LINE IN VIDEO AUDIO L AUDIO R LINE OUT VCR Rear of TV 1 3 S VIDEO 4 Y PB PR VIDEO L L (MONO) R R AUDIO OUT (VAR/FIX) L (MONO) R Video (yellow) Audio L (white) ...not supplied) to: a) the IN jack on your satellite receiver b) the VHF/UHF jack on the TV 4 Using a coaxial cable (not supplied), connect the OUT jack on your satellite receiver to the VHF...AUDIO/VIDEO OUT on your VCR to AUDIO/VIDEO IN on your TV. 6 Using audio/video cables (not supplied), connect AUDIO/VIDEO OUT on your satellite receiver to...

Operating Instructions
Page 21
..., and Satellite Receiver using Component Video (YPBPR) Rear of TV 4 1 2 From cable/ antenna Satellite VCR receiver Y VIDEO 1 PB L L PR R R LINE IN VIDEO AUDIO L ...supplied), connect the OUT jack on your VCR to the VHF/UHF jack on your TV. 4 Using audio/video cables (not supplied), connect AUDIO/VIDEO OUT on your satellite ... VCR to AUDIO/VIDEO IN on your TV. 6 Using component video cables (not supplied), connect YPBPR OUT on your satellite... receiver to YPBPR IN on your TV. 7 Connect AUDIO OUT on your satellite receiver to AUDIO IN on your TV. ✍ To view from the satellite...
..., and Satellite Receiver using Component Video (YPBPR) Rear of TV 4 1 2 From cable/ antenna Satellite VCR receiver Y VIDEO 1 PB L L PR R R LINE IN VIDEO AUDIO L ...supplied), connect the OUT jack on your VCR to the VHF/UHF jack on your TV. 4 Using audio/video cables (not supplied), connect AUDIO/VIDEO OUT on your satellite ... VCR to AUDIO/VIDEO IN on your TV. 6 Using component video cables (not supplied), connect YPBPR OUT on your satellite... receiver to YPBPR IN on your TV. 7 Connect AUDIO OUT on your satellite receiver to AUDIO IN on your TV. ✍ To view from the satellite...

Operating Instructions
Page 23
... the Audio/Video inputs on your stereo. 2 Set the Speaker option to Off. buttons on the remote. ❏ To control the volume through the connected audio system, open the Audio Out option on your TV to one of the yellow video cable. Using the audio/video cables (not supplied), connect AUDIO/VIDEO... OUT on your camcorder to AUDIO/VIDEO IN on either the front or rear panel of the TV. Front Panel A/V output Audio R (red) Audio L (white) Video (yellow) ❏ For better picture quality, use S VIDEO (located on your...
... the Audio/Video inputs on your stereo. 2 Set the Speaker option to Off. buttons on the remote. ❏ To control the volume through the connected audio system, open the Audio Out option on your TV to one of the yellow video cable. Using the audio/video cables (not supplied), connect AUDIO/VIDEO... OUT on your camcorder to AUDIO/VIDEO IN on either the front or rear panel of the TV. Front Panel A/V output Audio R (red) Audio L (white) Video (yellow) ❏ For better picture quality, use S VIDEO (located on your...

Operating Instructions
Page 25
..., press to highlight Auto Program. otherwise it is finished; The Initial Setup screen appears. Basic Functions Initial Setup First please connect cable/antenna Auto Program [CH+] Exit [CH-] 2 Press on the remote control or on the TV front panel to start Auto Program, or press to exit. ✍ The... Initial Setup screen appears each time you turn itself off, then back on the TV. Press to select. 4 Press V or v to highlight On...
..., press to highlight Auto Program. otherwise it is finished; The Initial Setup screen appears. Basic Functions Initial Setup First please connect cable/antenna Auto Program [CH+] Exit [CH-] 2 Press on the remote control or on the TV front panel to start Auto Program, or press to exit. ✍ The... Initial Setup screen appears each time you turn itself off, then back on the TV. Press to select. 4 Press V or v to highlight On...
Operating Instructions
Page 29
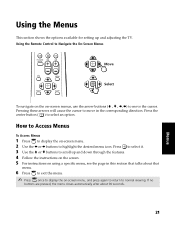
... select it. 3 Use the V or v buttons to scroll up and adjusting the TV. Using the Remote Control to Navigate the On-Screen Menus JUMP 0 ENT PICTURE VOL CH MODE Move MENU RESET SLEEP RM-Y194 Select To navigate on the on-screen menus, use the arrow buttons (V , v , B, b) to highlight the desired menu icon. How...
... select it. 3 Use the V or v buttons to scroll up and adjusting the TV. Using the Remote Control to Navigate the On-Screen Menus JUMP 0 ENT PICTURE VOL CH MODE Move MENU RESET SLEEP RM-Y194 Select To navigate on the on-screen menus, use the arrow buttons (V , v , B, b) to highlight the desired menu icon. How...

Operating Instructions
Page 30
... edge. Cool: Gives white colors a blue tint. Sharpens picture definition to sharpen the picture. Pro: Select for natural picture and sharpness. ✍ Press on the remote control for a finely detailed picture. Press B to the picture modes (Vivid, Standard, Movie, Pro). Use the V or v buttons to highlight one of the following options...
... edge. Cool: Gives white colors a blue tint. Sharpens picture definition to sharpen the picture. Pro: Select for natural picture and sharpness. ✍ Press on the remote control for a finely detailed picture. Press B to the picture modes (Vivid, Standard, Movie, Pro). Use the V or v buttons to highlight one of the following options...
Operating Instructions
Page 33
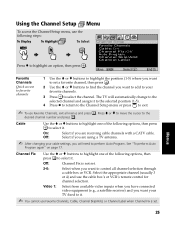
...9997; You cannot use Favorite Channels, Cable, Channel Skip/Add, or Channel Label when Channel Fix is not set. 2-6: Select when you are using a TV antenna. ✍ After changing your favorite channels. 3 Press to select the channel. Channel Fix Use the V or v buttons to highlight one of the...position (1-5). 4 Press B to return to the Channel Setup menu or press to exit. ✍ To use the cable box's or VCR's remote control for channel selection. On: Select if you want to control all menus and press . Move Select End Favorite Channels Quick access to favorite ...
...9997; You cannot use Favorite Channels, Cable, Channel Skip/Add, or Channel Label when Channel Fix is not set. 2-6: Select when you are using a TV antenna. ✍ After changing your favorite channels. 3 Press to select the channel. Channel Fix Use the V or v buttons to highlight one of the...position (1-5). 4 Press B to return to the Channel Setup menu or press to exit. ✍ To use the cable box's or VCR's remote control for channel selection. On: Select if you want to control all menus and press . Move Select End Favorite Channels Quick access to favorite ...
Operating Instructions
Page 43
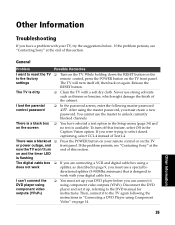
...on and the timer LED is flashing Press the POWER button on the screen ❏ You have a problem with your digital cable box. While holding down the RESET button on the remote control, press the POWER button on the TV. There is a black box on your DVD player before you can 't... itself off this section. If the problem persists, see "Contacting Sony" at the end of this feature, select Off in the Caption Vision option. directional splitter (5-900Mhz mininum) that is designed to the factory settings Turn on the TV front panel. I can connect it to the DVD manual for ...
...on and the timer LED is flashing Press the POWER button on the screen ❏ You have a problem with your digital cable box. While holding down the RESET button on the remote control, press the POWER button on the TV. There is a black box on your DVD player before you can 't... itself off this section. If the problem persists, see "Contacting Sony" at the end of this feature, select Off in the Caption Vision option. directional splitter (5-900Mhz mininum) that is designed to the factory settings Turn on the TV front panel. I can connect it to the DVD manual for ...
Operating Instructions
Page 44
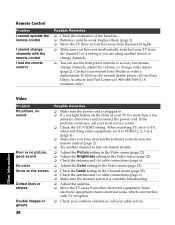
...or cable connections (page 6). ❏ Make sure the channel selected is plugged in. ❏ If a red light flashes on the screen Dotted lines or stripes Double images or ghosts 36 Possible Remedies ❏ Make sure the power cord is currently broadcasting. ❏ Adjust ...10063; Batteries could be weak. Remote Control Problem I cannot operate the remote control I lost the remote control Possible Remedies ❏ Check the orientation of your local service center. ❏ Check the TV/VIDEO setting. If the problem continues, call our Sony Direct Accessory and Part Center at ...
...or cable connections (page 6). ❏ Make sure the channel selected is plugged in. ❏ If a red light flashes on the screen Dotted lines or stripes Double images or ghosts 36 Possible Remedies ❏ Make sure the power cord is currently broadcasting. ❏ Adjust ...10063; Batteries could be weak. Remote Control Problem I cannot operate the remote control I lost the remote control Possible Remedies ❏ Check the orientation of your local service center. ❏ Check the TV/VIDEO setting. If the problem continues, call our Sony Direct Accessory and Part Center at ...
Operating Instructions
Page 45
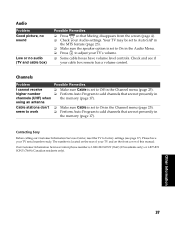
... or no audio (TV and cable box) Possible Remedies ❏ Press so that Muting disappears from the screen (page 4). ❏ Check your TV serial number ready. Contacting Sony Before calling our Customer Information Services Center, reset the TV to factory settings (see if your TV and on the rear of your cable box remote has a volume control...
... or no audio (TV and cable box) Possible Remedies ❏ Press so that Muting disappears from the screen (page 4). ❏ Check your TV serial number ready. Contacting Sony Before calling our Customer Information Services Center, reset the TV to factory settings (see if your TV and on the rear of your cable box remote has a volume control...
Operating Instructions
Page 46
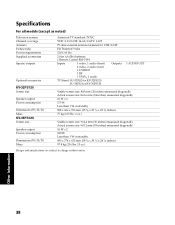
... 75-ohm external antenna terminal for VHF/UHF FD Trinitron® tube 120V, 60 Hz 2 Size AA (R6) batteries 1 Remote Control RM-Y194 Inputs 1 video, 1 audio (front) 2 video, 2 audio (rear) 1 S VIDEO 1 RF 1 YPBPR, 1 audio Outputs TV Stand: SU-32FS2 for KV-32FS120 SU-36FS2 for KV-36FS120 1 AUDIO OUT Visible screen size: 803 mm (32 inches) measured diagonally...
... 75-ohm external antenna terminal for VHF/UHF FD Trinitron® tube 120V, 60 Hz 2 Size AA (R6) batteries 1 Remote Control RM-Y194 Inputs 1 video, 1 audio (front) 2 video, 2 audio (rear) 1 S VIDEO 1 RF 1 YPBPR, 1 audio Outputs TV Stand: SU-32FS2 for KV-32FS120 SU-36FS2 for KV-36FS120 1 AUDIO OUT Visible screen size: 803 mm (32 inches) measured diagonally...
Operating Instructions
Page 47
... 1 TV Front Panel 2 TV Rear Panel 5 V Video Label 34 39 Index 16:9 Enhanced 34 A Audio Out 24 Auto Program 17, 26 Auto SAP 23 B Balance 23 Bass 23 Batteries Inserting in remote 2 Brightness 22 C Cable 25 Caption Vision 34 Channel Fix 25 Channel Label 26 ClearEdge VM 22 Color 22 Color Temperature 22...
... 1 TV Front Panel 2 TV Rear Panel 5 V Video Label 34 39 Index 16:9 Enhanced 34 A Audio Out 24 Auto Program 17, 26 Auto SAP 23 B Balance 23 Bass 23 Batteries Inserting in remote 2 Brightness 22 C Cable 25 Caption Vision 34 Channel Fix 25 Channel Label 26 ClearEdge VM 22 Color 22 Color Temperature 22...


