Operating Instructions
Page 3
...the rear of your warranty because they are registered trademarks of Sony Corporation. SAFETY PRECAUTIONS ❏ Operate the TV only on UHF or VHF or transmitted by one way. To... TV. SRS and the ( )® symbol are registered trademarks of BBE Sound, Inc. WEGA, FD Trinitron and Steady Sound are the results of misuse. REFER SERVICING TO QUALIFIED SERVICE PERSONNEL. CAUTION When using TV ...). This equipment generates, uses, and can cause the imprint of station logos onto the TV screen. Note on a circuit different from that interference will fit into the power outlet only ...
...the rear of your warranty because they are registered trademarks of Sony Corporation. SAFETY PRECAUTIONS ❏ Operate the TV only on UHF or VHF or transmitted by one way. To... TV. SRS and the ( )® symbol are registered trademarks of BBE Sound, Inc. WEGA, FD Trinitron and Steady Sound are the results of misuse. REFER SERVICING TO QUALIFIED SERVICE PERSONNEL. CAUTION When using TV ...). This equipment generates, uses, and can cause the imprint of station logos onto the TV screen. Note on a circuit different from that interference will fit into the power outlet only ...
Operating Instructions
Page 4
...or aerosol cleaners. Accessories Do not place the set . If you are unable to move the set is heavy and the bottom surface is flat. Do not defeat the safety purpose of any kind into a grounding-type power outlet. Always turn the set from the wall outlet before ... with a polarized alternating current line plug (a plug having one way. For those sets designed to improve. Corrosion Use of this can result from a TV set , causing injury. For the set to be used. Turn off when it from unsteady handling. Carefully observe and comply with care. Grounding or...
...or aerosol cleaners. Accessories Do not place the set . If you are unable to move the set is heavy and the bottom surface is flat. Do not defeat the safety purpose of any kind into a grounding-type power outlet. Always turn the set from the wall outlet before ... with a polarized alternating current line plug (a plug having one way. For those sets designed to improve. Corrosion Use of this can result from a TV set , causing injury. For the set to be used. Turn off when it from unsteady handling. Carefully observe and comply with care. Grounding or...
Operating Instructions
Page 7
Contents Introduction Introducing the FD Trinitron WEGA® Features 1 About this Manual...2 Batteries for the Remote Control 2 Front Panel Menu Controls ...2 Using the Remote Control Remote Control Description...3 Connecting Your TV TV Rear Panel ...5 Basic Connections ...6 Connecting Additional Equipment 7 Using Basic Functions Setting Up the TV...17 Quick Start to the Menus ...18 Using the Menus How...
Contents Introduction Introducing the FD Trinitron WEGA® Features 1 About this Manual...2 Batteries for the Remote Control 2 Front Panel Menu Controls ...2 Using the Remote Control Remote Control Description...3 Connecting Your TV TV Rear Panel ...5 Basic Connections ...6 Connecting Additional Equipment 7 Using Basic Functions Setting Up the TV...17 Quick Start to the Menus ...18 Using the Menus How...
Operating Instructions
Page 9
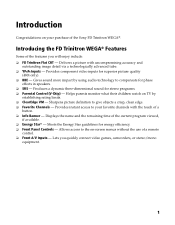
...of the features you quickly connect video games, camcorders, or stereo/mono equipment. 1 Lets you will enjoy include: ❏ FD Trinitron Flat CRT - Provides component video inputs for energy efficiency. ❏ Front Panel Controls - Provides instant access to the on your favorite... on -screen menus without the use of a remote control. ❏ Front A/V Inputs - Gives sound more impact by establishing rating limits. ❏ ClearEdge VM - Allows access to your purchase of the Sony FD Trinitron WEGA®. Helps parents monitor what their children watch on TV by using...
...of the features you quickly connect video games, camcorders, or stereo/mono equipment. 1 Lets you will enjoy include: ❏ FD Trinitron Flat CRT - Provides component video inputs for energy efficiency. ❏ Front Panel Controls - Provides instant access to the on your favorite... on -screen menus without the use of a remote control. ❏ Front A/V Inputs - Gives sound more impact by establishing rating limits. ❏ ClearEdge VM - Allows access to your purchase of the Sony FD Trinitron WEGA®. Helps parents monitor what their children watch on TV by using...

Operating Instructions
Page 10
About this Manual This manual provides instructions to help you enjoy your TV is connected, follow the instructions and use the remote control to access the on-screen menus. It shows you to change your channels (CH+/-), adjust the volume (VOL +/-), and change video inputs. ✍ To navigate the menus with your ... conditions, batteries will not be worn out. ✍ If you to access the menu without the remote control. ❏ Press to display the on-screen menu. ❏ Use the and buttons on the front panel to avoid possible damage from battery leakage. Once your new...
About this Manual This manual provides instructions to help you enjoy your TV is connected, follow the instructions and use the remote control to access the on-screen menus. It shows you to change your channels (CH+/-), adjust the volume (VOL +/-), and change video inputs. ✍ To navigate the menus with your ... conditions, batteries will not be worn out. ✍ If you to access the menu without the remote control. ❏ Press to display the on-screen menu. ❏ Use the and buttons on the front panel to avoid possible damage from battery leakage. Once your new...

Operating Instructions
Page 12
... qd CH (channel) qf MENU qg SLEEP Press to return to turn the TV on -screen menu. Cycles through the available Video Mode settings. Cancel by pressing until Sleep off . Press again to factory settings while in the on -screen menu. Cycles through available video inputs. Displays the on or off. Remote Control...
... qd CH (channel) qf MENU qg SLEEP Press to return to turn the TV on -screen menu. Cycles through the available Video Mode settings. Cancel by pressing until Sleep off . Press again to factory settings while in the on -screen menu. Cycles through available video inputs. Displays the on or off. Remote Control...
Operating Instructions
Page 13
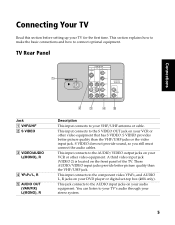
... this section before setting up your VHF/UHF antenna or cable. This section explains how to make the basic connections and how to your TV's audio through your stereo system. 5 S VIDEO does not provide sound, so you still must connect the audio cables. You can listen to connect optional equipment. ... equipment. S VIDEO provides better picture quality than the VHF/UHF jack. This input connects to the AUDIO input jacks on the front panel of the TV. These AUDIO/VIDEO input jacks provide better picture quality than the VHF/UHF jacks or the video input jack...
... this section before setting up your VHF/UHF antenna or cable. This section explains how to make the basic connections and how to your TV's audio through your stereo system. 5 S VIDEO does not provide sound, so you still must connect the audio cables. You can listen to connect optional equipment. ... equipment. S VIDEO provides better picture quality than the VHF/UHF jack. This input connects to the AUDIO input jacks on the front panel of the TV. These AUDIO/VIDEO input jacks provide better picture quality than the VHF/UHF jacks or the video input jack...
Operating Instructions
Page 14
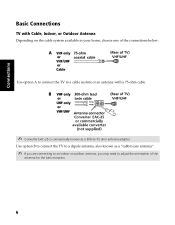
Use option B to connect the TV to a dipole antenna, also known as a 300-to adjust the orientation of the antenna for the best reception. 6 Connections Basic Connections TV with Cable, Indoor, or Outdoor Antenna Depending on the cable system available in your home, choose one of the connections below: Use option A to connect the TV to a cable system or an antenna with a 75-ohm cable. ✍ Converter EAC-25 is commercially known as a "rabbit ears antenna". ✍ If you are connecting to an indoor or outdoor antenna, you may need to -75 ohm antenna adapter.
Use option B to connect the TV to a dipole antenna, also known as a 300-to adjust the orientation of the antenna for the best reception. 6 Connections Basic Connections TV with Cable, Indoor, or Outdoor Antenna Depending on the cable system available in your home, choose one of the connections below: Use option A to connect the TV to a cable system or an antenna with a 75-ohm cable. ✍ Converter EAC-25 is commercially known as a "rabbit ears antenna". ✍ If you are connecting to an indoor or outdoor antenna, you may need to -75 ohm antenna adapter.

Operating Instructions
Page 15
...VIDEO L L (MONO) R R AUDIO OUT (VAR/FIX) L (MONO) R Audio R (red) Audio L (white) Video (yellow) Optional connection 1 Connect the coaxial cable from your TV antenna or cable service to the IN jack on your VCR. 2 Connect a coaxial cable (not supplied) from your VCR, tune your VCR). 7 Optional connection ❏ ... get better picture quality by connecting audio/video cables (not supplied) from AUDIO/VIDEO OUT on your VCR to AUDIO/VIDEO IN on your TV. ❏ For better picture quality, use the button to switch between the VHF/UHF and VIDEO inputs. ✍ To watch video programs...
...VIDEO L L (MONO) R R AUDIO OUT (VAR/FIX) L (MONO) R Audio R (red) Audio L (white) Video (yellow) Optional connection 1 Connect the coaxial cable from your TV antenna or cable service to the IN jack on your VCR. 2 Connect a coaxial cable (not supplied) from your VCR, tune your VCR). 7 Optional connection ❏ ... get better picture quality by connecting audio/video cables (not supplied) from AUDIO/VIDEO OUT on your VCR to AUDIO/VIDEO IN on your TV. ❏ For better picture quality, use the button to switch between the VHF/UHF and VIDEO inputs. ✍ To watch video programs...

Operating Instructions
Page 16
...'s remote control to change channels. ✍ If you will be controlling all channels. Cable box 1 From cable/ antenna VIDEO AUDIO L AUDIO R LINE OUT 2 Rear of TV 1 3 S VIDEO 4 Y PB PR VIDEO L L (MONO) R R 1 Connect the coaxial cable from your cable service to the IN jack on your cable box. 2 Connect a ...coaxial cable (not supplied) from the OUT jack on your cable box to the VHF/UHF jack on your TV. ✍ To view channels from your cable box, tune your TV to channel 3 or 4 (as set on the rear panel of service, use scrambled or encoded signals that require a ...
...'s remote control to change channels. ✍ If you will be controlling all channels. Cable box 1 From cable/ antenna VIDEO AUDIO L AUDIO R LINE OUT 2 Rear of TV 1 3 S VIDEO 4 Y PB PR VIDEO L L (MONO) R R 1 Connect the coaxial cable from your cable service to the IN jack on your cable box. 2 Connect a ...coaxial cable (not supplied) from the OUT jack on your cable box to the VHF/UHF jack on your TV. ✍ To view channels from your cable box, tune your TV to channel 3 or 4 (as set on the rear panel of service, use scrambled or encoded signals that require a ...
Operating Instructions
Page 17
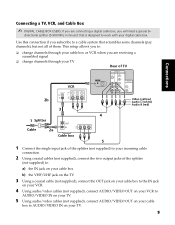
..., and Cable Box ✍ DIGITAL CABLE BOX USERS: If you are receiving a scrambled signal ❏ change channels through your TV Rear of TV Connections 2b VCR LINE IN VIDEO AUDIO L AUDIO R LINE OUT 3 1 Splitter Cable 2a VIDEO AUDIO L AUDIO R LINE OUT Cable box 1 3 S VIDEO 4 Y PB PR VIDEO L L (MONO) R R... channels (pay channels), but not all of the splitter (not supplied) to: a) the IN jack on your cable box b) the VHF/UHF jack on the TV 3 Using a coaxial cable (not supplied), connect the OUT jack on your cable box to the IN jack on your VCR. 4 Using audio/video cables (not...
..., and Cable Box ✍ DIGITAL CABLE BOX USERS: If you are receiving a scrambled signal ❏ change channels through your TV Rear of TV Connections 2b VCR LINE IN VIDEO AUDIO L AUDIO R LINE OUT 3 1 Splitter Cable 2a VIDEO AUDIO L AUDIO R LINE OUT Cable box 1 3 S VIDEO 4 Y PB PR VIDEO L L (MONO) R R... channels (pay channels), but not all of the splitter (not supplied) to: a) the IN jack on your cable box b) the VHF/UHF jack on the TV 3 Using a coaxial cable (not supplied), connect the OUT jack on your cable box to the IN jack on your VCR. 4 Using audio/video cables (not...

Operating Instructions
Page 18
... the rear panel of the yellow video cable. S VIDEO does not provide sound, so you should consider using the Channel Fix feature by setting your TV to channel 3 or 4 (as set on the rear panel), instead of your...
... the rear panel of the yellow video cable. S VIDEO does not provide sound, so you should consider using the Channel Fix feature by setting your TV to channel 3 or 4 (as set on the rear panel), instead of your...
Operating Instructions
Page 19
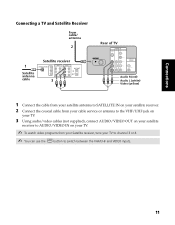
... Satellite Receiver From cable/ antenna 2 1 Satellite antenna cable Satellite receiver Y VIDEO 1 VIDEO 2 VIDEO 1 VIDEO 2 PB L L PR R R 3 Rear of TV 1 3 S VIDEO 4 Y PB PR VIDEO L L (MONO) R R AUDIO OUT (VAR/FIX) L (MONO) R Audio R (red) Audio L (white) Video (yellow) 1 Connect the cable from your satellite antenna ...to SATELLITE IN on your satellite receiver. 2 Connect the coaxial cable from your cable service or antenna to the VHF/UHF jack on your TV. 3 Using audio/video cables (not supplied), connect AUDIO/VIDEO OUT on your satellite receiver to AUDIO/VIDEO IN on your...
... Satellite Receiver From cable/ antenna 2 1 Satellite antenna cable Satellite receiver Y VIDEO 1 VIDEO 2 VIDEO 1 VIDEO 2 PB L L PR R R 3 Rear of TV 1 3 S VIDEO 4 Y PB PR VIDEO L L (MONO) R R AUDIO OUT (VAR/FIX) L (MONO) R Audio R (red) Audio L (white) Video (yellow) 1 Connect the cable from your satellite antenna ...to SATELLITE IN on your satellite receiver. 2 Connect the coaxial cable from your cable service or antenna to the VHF/UHF jack on your TV. 3 Using audio/video cables (not supplied), connect AUDIO/VIDEO OUT on your satellite receiver to AUDIO/VIDEO IN on your...

Operating Instructions
Page 20
... Splitter 3a Satellite receiver 3b For Viewing Y VIDEO 1 VIDEO 2 VIDEO 1 VIDEO 2 PB L L PR R R 4 For Recording LINE IN VIDEO AUDIO L AUDIO R LINE OUT VCR Rear of TV 1 3 S VIDEO 4 Y PB PR VIDEO L L (MONO) R R AUDIO OUT (VAR/FIX) L (MONO) R Video (yellow) Audio L (white) Audio R (red) 6 For Viewing 5 For Playback 1...the two output jacks of the splitter (not supplied) to: a) the IN jack on your satellite receiver b) the VHF/UHF jack on the TV 4 Using a coaxial cable (not supplied), connect the OUT jack on your satellite receiver to the VHF/UHF IN on your VCR. 5 Using ...
... Splitter 3a Satellite receiver 3b For Viewing Y VIDEO 1 VIDEO 2 VIDEO 1 VIDEO 2 PB L L PR R R 4 For Recording LINE IN VIDEO AUDIO L AUDIO R LINE OUT VCR Rear of TV 1 3 S VIDEO 4 Y PB PR VIDEO L L (MONO) R R AUDIO OUT (VAR/FIX) L (MONO) R Video (yellow) Audio L (white) Audio R (red) 6 For Viewing 5 For Playback 1...the two output jacks of the splitter (not supplied) to: a) the IN jack on your satellite receiver b) the VHF/UHF jack on the TV 4 Using a coaxial cable (not supplied), connect the OUT jack on your satellite receiver to the VHF/UHF IN on your VCR. 5 Using ...

Operating Instructions
Page 21
... the IN jack on your VCR. 3 Using a coaxial cables (not supplied), connect the OUT jack on your VCR to the VHF/UHF jack on your TV. 4 Using audio/video cables (not supplied), connect AUDIO/VIDEO OUT on your satellite receiver to AUDIO/VIDEO IN on your VCR. 5 Using audio/video cables... component video cables (not supplied), connect YPBPR OUT on your satellite receiver to YPBPR IN on your TV. 7 Connect AUDIO OUT on your satellite receiver to AUDIO IN on your TV. ✍ To view from the satellite receiver or VCR, select the video input to which your satellite receiver or VCR is...
... the IN jack on your VCR. 3 Using a coaxial cables (not supplied), connect the OUT jack on your VCR to the VHF/UHF jack on your TV. 4 Using audio/video cables (not supplied), connect AUDIO/VIDEO OUT on your satellite receiver to AUDIO/VIDEO IN on your VCR. 5 Using audio/video cables... component video cables (not supplied), connect YPBPR OUT on your satellite receiver to YPBPR IN on your TV. 7 Connect AUDIO OUT on your satellite receiver to AUDIO IN on your TV. ✍ To view from the satellite receiver or VCR, select the video input to which your satellite receiver or VCR is...

Operating Instructions
Page 22
... video cables (not supplied), connect YPBPR OUT on your DVD player to YPBPR IN on your TV. 2 Connect AUDIO OUT on your TV. If so, connect the cables to AUDIO IN on your TV. ✍ The YPBPR outputs on your DVD player to like colors. 14 S VIDEO does not... Player using Component Video (YPBPR/R, L) If your DVD player are sometimes labeled Y, CB, and CR or Y, B-Y, and R-Y. Rear of TV Rear of the yellow video cable. Rear of DVD Player Rear of TV 1 3 S VIDEO 4 Y PB PR VIDEO L L (MONO) R R AUDIO OUT (VAR/FIX) L (MONO) R Optional connection Video (yellow) Audio L (white...
... video cables (not supplied), connect YPBPR OUT on your DVD player to YPBPR IN on your TV. 2 Connect AUDIO OUT on your TV. If so, connect the cables to AUDIO IN on your TV. ✍ The YPBPR outputs on your DVD player to like colors. 14 S VIDEO does not... Player using Component Video (YPBPR/R, L) If your DVD player are sometimes labeled Y, CB, and CR or Y, B-Y, and R-Y. Rear of TV Rear of the yellow video cable. Rear of DVD Player Rear of TV 1 3 S VIDEO 4 Y PB PR VIDEO L L (MONO) R R AUDIO OUT (VAR/FIX) L (MONO) R Optional connection Video (yellow) Audio L (white...

Operating Instructions
Page 23
... system, you can use the front panel controls or the VOL +/- For more instructions, see "Using the Audio Menu" on the rear panel), instead of TV 1 3 S VIDEO 4 Y PB PR VIDEO L L (MONO) R R AUDIO OUT (VAR/FIX) L (MONO) R AUDIO-L (white) AUDIO-R (red) Line input Connecting a Camcorder (for additional ...please refer to your Home Theater manual for playback) To connect your camcorder, you can control the volume level from your TV or audio system. ❏ To control the volume from the TV, use the Audio/Video inputs on your TV. TV, AUX, TAPE2) on your TV to one of the...
... system, you can use the front panel controls or the VOL +/- For more instructions, see "Using the Audio Menu" on the rear panel), instead of TV 1 3 S VIDEO 4 Y PB PR VIDEO L L (MONO) R R AUDIO OUT (VAR/FIX) L (MONO) R AUDIO-L (white) AUDIO-R (red) Line input Connecting a Camcorder (for additional ...please refer to your Home Theater manual for playback) To connect your camcorder, you can control the volume level from your TV or audio system. ❏ To control the volume from the TV, use the Audio/Video inputs on your TV. TV, AUX, TAPE2) on your TV to one of the...

Operating Instructions
Page 24
... VCR (for playback) LINE IN VIDEO AUDIO L AUDIO R LINE OUT 1b or 1a LINE IN VIDEO AUDIO L AUDIO R LINE OUT VCR (for recording) Rear of TV 1 3 S VIDEO 4 Y PB PR VIDEO L L (MONO) R R AUDIO OUT (VAR/FIX) L (MONO) R Audio R (red) Audio L (white) Video (yellow) 2 1 For video tape editing, connect the VCR to the... you are connecting a camcorder, use audio/video cables (not supplied) to connect AUDIO/VIDEO OUT on your first VCR to AUDIO/VIDEO IN on your TV. 16
... VCR (for playback) LINE IN VIDEO AUDIO L AUDIO R LINE OUT 1b or 1a LINE IN VIDEO AUDIO L AUDIO R LINE OUT VCR (for recording) Rear of TV 1 3 S VIDEO 4 Y PB PR VIDEO L L (MONO) R R AUDIO OUT (VAR/FIX) L (MONO) R Audio R (red) Audio L (white) Video (yellow) 2 1 For video tape editing, connect the VCR to the... you are connecting a camcorder, use audio/video cables (not supplied) to connect AUDIO/VIDEO OUT on your first VCR to AUDIO/VIDEO IN on your TV. 16

Operating Instructions
Page 25
... start Auto Program, or press to exit. ✍ The Initial Setup screen appears each time you turn on the TV until it will automatically search for channels. 6 After Auto Program finishes, press to factory settings 1 Turn the TV on. 2 Hold down on the remote control. 3 Press and release ...is finished; Perform Auto Program again to program receivable channels. 1 Press to turn itself off, then back on the TV front panel to set up your TV. The Initial Setup screen appears. Basic Functions Initial Setup First please connect cable/antenna Auto Program [CH+] Exit [CH-] 2 Press on the ...
... start Auto Program, or press to exit. ✍ The Initial Setup screen appears each time you turn on the TV until it will automatically search for channels. 6 After Auto Program finishes, press to factory settings 1 Turn the TV on. 2 Hold down on the remote control. 3 Press and release ...is finished; Perform Auto Program again to program receivable channels. 1 Press to turn itself off, then back on the TV front panel to set up your TV. The Initial Setup screen appears. Basic Functions Initial Setup First please connect cable/antenna Auto Program [CH+] Exit [CH-] 2 Press on the ...
Operating Instructions
Page 26
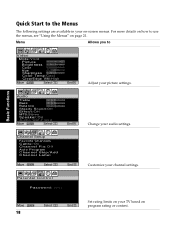
...Menu Allows you to the Menus The following settings are available in your on your audio settings. Move 18 Set rating limits on -screen menus. Basic Functions Audio Treble Bass Balance Steady Sound:Off Effect:Off MTS:Stereo Speaker:On Audio Out:Fixed Move Select End Channel ...Setup Favorite Channels Cable:On Channel Fix:Off Auto Program Channel Skip/Add Channel Label Move Select End Parental Control Password: Change your TV based on page 21. Quick Start to Video Mode:Vivid Picture Brightness Color Hue Sharpness Color Temp:Cool ClearEdge VM:High Move Select End...
...Menu Allows you to the Menus The following settings are available in your on your audio settings. Move 18 Set rating limits on -screen menus. Basic Functions Audio Treble Bass Balance Steady Sound:Off Effect:Off MTS:Stereo Speaker:On Audio Out:Fixed Move Select End Channel ...Setup Favorite Channels Cable:On Channel Fix:Off Auto Program Channel Skip/Add Channel Label Move Select End Parental Control Password: Change your TV based on page 21. Quick Start to Video Mode:Vivid Picture Brightness Color Hue Sharpness Color Temp:Cool ClearEdge VM:High Move Select End...


