
Primary User Manual
Page 6
Contents Introduction Introducing the FD Trinitron WEGA® Features 1 About this Manual...2 Batteries for the Remote Control 2 Front Panel Menu Controls ...2 Using the Remote Controls ...3 Connecting Your TV TV Rear Panel ...8 Basic Connections ...10 Cable Box Connections ...11 Connecting Additional Equipment 13 Using Basic ...Affect Your Ability to Use PIP 28 Using Wireless Headphones ...29 Using the Menus How to access menus with Remote Control Y182 33 How to access menus with Remote Control Y181 33 Using the Video Menu ...34 Using the Audio Menu ...35 Using the Channel Setup Menu 37 ...
Contents Introduction Introducing the FD Trinitron WEGA® Features 1 About this Manual...2 Batteries for the Remote Control 2 Front Panel Menu Controls ...2 Using the Remote Controls ...3 Connecting Your TV TV Rear Panel ...8 Basic Connections ...10 Cable Box Connections ...11 Connecting Additional Equipment 13 Using Basic ...Affect Your Ability to Use PIP 28 Using Wireless Headphones ...29 Using the Menus How to access menus with Remote Control Y182 33 How to access menus with Remote Control Y181 33 Using the Video Menu ...34 Using the Audio Menu ...35 Using the Channel Setup Menu 37 ...
Primary User Manual
Page 8
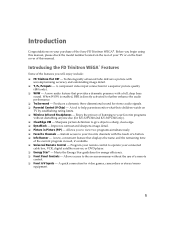
...sharp, clean edge. ❏ DynaBlack - Allows access to your favorite channels with the touch of the Sony FD Trinitron WEGA®. Before you begin using this manual, please check the model number located on the rear of your ...KV-32FV300 and KV-36FV300 only). ❏ ClearEdge VM - Technologically advanced tube delivers a picture with a full, deep bass sound. Produces a dynamic three dimensional sound for stereo audio signals. ❏ Parental Control (V-Chip) - Sharpens picture definition to further enhance the audio performance. ❏ TruSurround - Program your remote control...
...sharp, clean edge. ❏ DynaBlack - Allows access to your favorite channels with the touch of the Sony FD Trinitron WEGA®. Before you begin using this manual, please check the model number located on the rear of your ...KV-32FV300 and KV-36FV300 only). ❏ ClearEdge VM - Technologically advanced tube delivers a picture with a full, deep bass sound. Produces a dynamic three dimensional sound for stereo audio signals. ❏ Parental Control (V-Chip) - Sharpens picture definition to further enhance the audio performance. ❏ TruSurround - Program your remote control...
Primary User Manual
Page 9
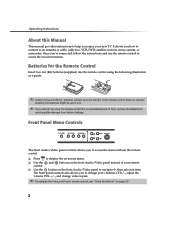
... illustration as a guide. ✍ Under normal conditions, batteries will not be worn out. ✍ If you to access the menu without the remote control. ❏ Press to display the on-screen menu. ❏ Use the and buttons on the front Audio/Video panel instead of time, remove ... About this Manual This manual provides instructions to help you 're connected, follow the instructions and use the remote control to access the on-screen menus. Batteries for an extended period of your remote control. ❏ Use the button on the front Audio/Video panel to navigate g, then select an item. ...
... illustration as a guide. ✍ Under normal conditions, batteries will not be worn out. ✍ If you to access the menu without the remote control. ❏ Press to display the on-screen menu. ❏ Use the and buttons on the front Audio/Video panel instead of time, remove ... About this Manual This manual provides instructions to help you 're connected, follow the instructions and use the remote control to access the on-screen menus. Batteries for an extended period of your remote control. ❏ Use the button on the front Audio/Video panel to navigate g, then select an item. ...
Primary User Manual
Page 10
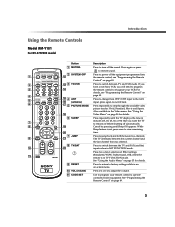
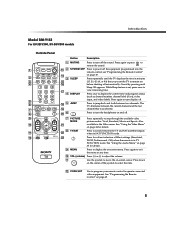
... -screen menu. While Sleep feature is in TV FUNCTION mode. Press (+) or (-) to restore sound. See "Programming the Remote Control" on page 49. Introduction Using the Remote Controls Model RM-Y181 For KV-27FV300 model A B C D E F G H / I J K Button 1 MUTING 2 SYSTEM OFF L M 3 TV/VCR N O 4 ANT P (antenna) Q 5 PICTURE MODE R 6 SLEEP S T 7 JUMP U 8 TV/SAT V 9 RESET ... TV alternates between the TV and SAT (satellite) inputs when in the Video menu. If you have a non-Sony VCR, you want the TV to step through the available video picture modes: Vivid, Standard, Movie and Sports.
... -screen menu. While Sleep feature is in TV FUNCTION mode. Press (+) or (-) to restore sound. See "Programming the Remote Control" on page 49. Introduction Using the Remote Controls Model RM-Y181 For KV-27FV300 model A B C D E F G H / I J K Button 1 MUTING 2 SYSTEM OFF L M 3 TV/VCR N O 4 ANT P (antenna) Q 5 PICTURE MODE R 6 SLEEP S T 7 JUMP U 8 TV/SAT V 9 RESET ... TV alternates between the TV and SAT (satellite) inputs when in the Video menu. If you have a non-Sony VCR, you want the TV to step through the available video picture modes: Vivid, Standard, Movie and Sports.
Primary User Manual
Page 11
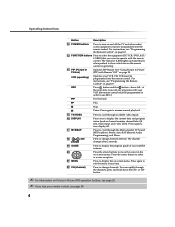
.... Press to resume normal playback. Press the arrow buttons to move the cursor in Picture (PIP) with the remote control. Press to show which device the remote control is operating. qd FUNCTION buttons Press to select the equipment (TV, VCR/DVD, SAT/ CABLE) that you ... Instructions Button Description qs POWER buttons Press to turn display off the TV and other audio/ video equipment you have programmed into the remote control. The indicator (LED) lights up momentarily when pushed to change channels directly. VCR (operating) REC Operates your satellite antenna. Press button...
.... Press to resume normal playback. Press the arrow buttons to move the cursor in Picture (PIP) with the remote control. Press to show which device the remote control is operating. qd FUNCTION buttons Press to select the equipment (TV, VCR/DVD, SAT/ CABLE) that you ... Instructions Button Description qs POWER buttons Press to turn display off the TV and other audio/ video equipment you have programmed into the remote control. The indicator (LED) lights up momentarily when pushed to change channels directly. VCR (operating) REC Operates your satellite antenna. Press button...
Primary User Manual
Page 12
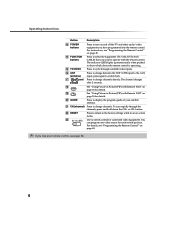
...(-) to step through the available video picture modes: Vivid, Standard, Movie and Sports. See "Programming the Remote Control" on page 49. 3 SLEEP Press repeatedly until Sleep Off appears. While Sleep feature is in the Video menu. ...KV-32FV300, KV-36FV300 models Outside Panel 1 2 3 4 5 6 7 8 9 0 qa qs Button Description 1 MUTING Press to turn display off. qd 2 SYSTEM OFF Press to display the on and off. 7 PICTURE MODE wa Press repeatedly to adjust the volume. Press again to turn off the equipment programmed into the remote control, see "Programming the Remote Control...
...(-) to step through the available video picture modes: Vivid, Standard, Movie and Sports. See "Programming the Remote Control" on page 49. 3 SLEEP Press repeatedly until Sleep Off appears. While Sleep feature is in the Video menu. ...KV-32FV300, KV-36FV300 models Outside Panel 1 2 3 4 5 6 7 8 9 0 qa qs Button Description 1 MUTING Press to turn display off. qd 2 SYSTEM OFF Press to display the on and off. 7 PICTURE MODE wa Press repeatedly to adjust the volume. Press again to turn off the equipment programmed into the remote control, see "Programming the Remote Control...
Primary User Manual
Page 13
...the equipment (TV, VCR/DVD, SAT/ CABLE) that you want to display the program guide of your remote control, see "Programming the Remote Control" on page 49. qg TV/VIDEO Press to switch control for each switch position. The channel changes ENTER after 2 seconds. wd AV 1 2 3 DVD Use .../video equipment you lose your satellite antenna. button. qj 0 9 and Press to the factory settings while in Picture (PIP) with the remote control. To scan rapidly through available video inputs. The indicator (LED) lights up momentarily when pushed to turn on -screen menu. For details,...
...the equipment (TV, VCR/DVD, SAT/ CABLE) that you want to display the program guide of your remote control, see "Programming the Remote Control" on page 49. qg TV/VIDEO Press to switch control for each switch position. The channel changes ENTER after 2 seconds. wd AV 1 2 3 DVD Use .../video equipment you lose your satellite antenna. button. qj 0 9 and Press to the factory settings while in Picture (PIP) with the remote control. To scan rapidly through available video inputs. The indicator (LED) lights up momentarily when pushed to turn on -screen menu. For details,...
Primary User Manual
Page 14
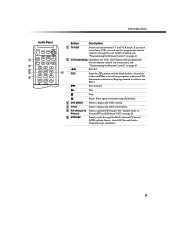
...: Stereo, Auto SAP (Second Audio Programming), and Mono. 7 x Stop. If you have a non-Sony VCR, you will need to program the remote control to switch between TV and VCR mode. Press to operate PIP feature. For instructions, see "Programming the Remote Control" on page 49. Press again to resume normal playback. 3 DVD MENU Press to...
...: Stereo, Auto SAP (Second Audio Programming), and Mono. 7 x Stop. If you have a non-Sony VCR, you will need to program the remote control to switch between TV and VCR mode. Press to operate PIP feature. For instructions, see "Programming the Remote Control" on page 49. Press again to resume normal playback. 3 DVD MENU Press to...
Primary User Manual
Page 15
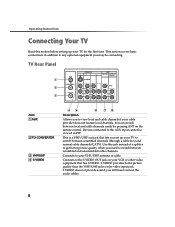
... other video equipment that lets you still must connect the audio cables. 8 S VIDEO does not provide sound; Connects to the S VIDEO OUT jack on the remote control. S VIDEO provides better picture quality than the VHF/UHF jacks or the video input jack. TV Rear Panel 1 2 3 1 3 4 MONITOR AUDIO OUT (VAR/FIX) Jack 1AUX...
... other video equipment that lets you still must connect the audio cables. 8 S VIDEO does not provide sound; Connects to the S VIDEO OUT jack on the remote control. S VIDEO provides better picture quality than the VHF/UHF jacks or the video input jack. TV Rear Panel 1 2 3 1 3 4 MONITOR AUDIO OUT (VAR/FIX) Jack 1AUX...
Primary User Manual
Page 19
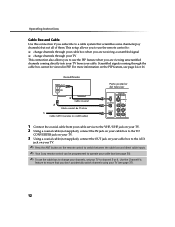
... Channel Fix feature to ensure that scrambles some channels (pay channels) but not all of them. This setup allows you to use the remote control to: ❏ change channels through your cable box when you are receiving a scrambled signal ❏ change your channels, set your TV... to channel 3 or 4. For more information on the remote control to switch between the cable box and direct cable inputs. ✍ Your Sony remote control can be viewed in PIP. Decodificador Parte posterior del televisor 3 Cable coaxial 2 Cable coaxial de 75 ...
... Channel Fix feature to ensure that scrambles some channels (pay channels) but not all of them. This setup allows you to use the remote control to: ❏ change channels through your cable box when you are receiving a scrambled signal ❏ change your channels, set your TV... to channel 3 or 4. For more information on the remote control to switch between the cable box and direct cable inputs. ✍ Your Sony remote control can be viewed in PIP. Decodificador Parte posterior del televisor 3 Cable coaxial 2 Cable coaxial de 75 ...
Primary User Manual
Page 21
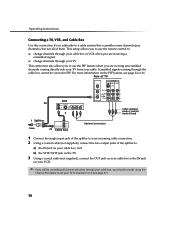
... or VCR when you are viewing unscrambled channels coming through your TV This connection also allows you to use the remote control to: ❏ change channels through the cable box cannot be controlling all of the splitter to: a) the IN jack on your cable box, and b) the VHF/UHF jack on the TV...
... or VCR when you are viewing unscrambled channels coming through your TV This connection also allows you to use the remote control to: ❏ change channels through the cable box cannot be controlling all of the splitter to: a) the IN jack on your cable box, and b) the VHF/UHF jack on the TV...
Primary User Manual
Page 24
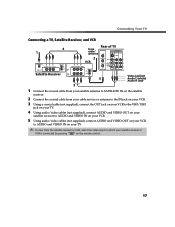
...; To view from the satellite receiver or VCR, select the video input to which your satellite receiver or VCR is connected by pressing on the remote control. 17
...; To view from the satellite receiver or VCR, select the video input to which your satellite receiver or VCR is connected by pressing on the remote control. 17
Primary User Manual
Page 28
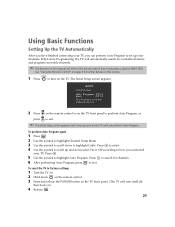
... off, then back on.) 4 Release . 21 Initial Setup Auto Program: [CH+] Exit: [CH-] First please connect cable/antenna 2 Press on the remote control or on the TV front panel to perform Auto Program, or press to exit. ✍ The Initial Setup screen appears each time you turn on ...the TV. To perform Auto Program again 1 Press . 2 Use the joystick to highlight Channel Setup Menu. 3 Use the joystick to scroll down on the remote control. 3 Press and release the POWER button on the TV front panel. (The TV will automatically search for channels. 6 After performing Auto Program, press to...
... off, then back on.) 4 Release . 21 Initial Setup Auto Program: [CH+] Exit: [CH-] First please connect cable/antenna 2 Press on the remote control or on the TV front panel to perform Auto Program, or press to exit. ✍ The Initial Setup screen appears each time you turn on ...the TV. To perform Auto Program again 1 Press . 2 Use the joystick to highlight Channel Setup Menu. 3 Use the joystick to scroll down on the remote control. 3 Press and release the POWER button on the TV front panel. (The TV will automatically search for channels. 6 After performing Auto Program, press to...
Primary User Manual
Page 31
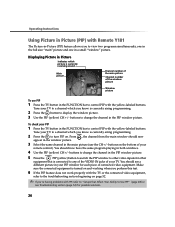
...the window picture. 3 Select the same channel in the main picture (use PIP 1 Press the TV button in the FUNCTION bar to control PIP with Remote Y181 The Picture-in-Picture (PIP) feature allows you know is currently airing programming. 2 Press the to change the channel in the PIP...equipment that Affect Your Ability to Use PIP" (page 28) or see a different picture in your PIP window for each piece of your remote control). Displaying Picture in Picture Indicates which you to any of the VIDEO IN jacks of connected video equipment. Operating Instructions Using Picture in Picture (...
...the window picture. 3 Select the same channel in the main picture (use PIP 1 Press the TV button in the FUNCTION bar to control PIP with Remote Y181 The Picture-in-Picture (PIP) feature allows you know is currently airing programming. 2 Press the to change the channel in the PIP...equipment that Affect Your Ability to Use PIP" (page 28) or see a different picture in your PIP window for each piece of your remote control). Displaying Picture in Picture Indicates which you to any of the VIDEO IN jacks of connected video equipment. Operating Instructions Using Picture in Picture (...
Primary User Manual
Page 32
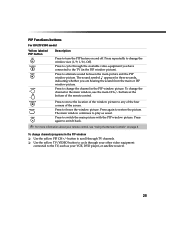
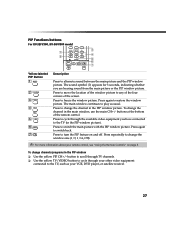
... main CH+/- buttons at the bottom of the screen. Press again to switch back. ✍ For more information about your remote control, see "Using the Remote Controls" on and off. Press again to restore the picture. Press to cycle through your VCR, DVD player, or satellite receiver.... indicating whether you have connected to alternate sound between the main picture and the PIP window picture. PIP Functions buttons For KV-27FV300 model Yellow labeled PIP button Description Press to switch the main picture with the PIP window picture. Press to change channels/...
... main CH+/- buttons at the bottom of the screen. Press again to switch back. ✍ For more information about your remote control, see "Using the Remote Controls" on and off. Press again to restore the picture. Press to cycle through your VCR, DVD player, or satellite receiver.... indicating whether you have connected to alternate sound between the main picture and the PIP window picture. PIP Functions buttons For KV-27FV300 model Yellow labeled PIP button Description Press to switch the main picture with the PIP window picture. Press to change channels/...
Primary User Manual
Page 33
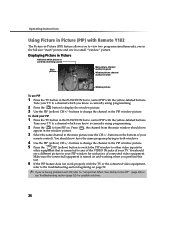
... possible solutions. 26 buttons on . You should now appear in the window picture. 3 Select the same channel in the FUNCTION bar to control PIP with the yellow-labeled buttons. To check your TV to a channel which you know is turned on and working when you perform this...the main window should now have the same program playing in your remote control). buttons to change the channel in the FUNCTION bar to control PIP with the yellow-labeled buttons. Operating Instructions Using Picture in Picture (PIP) with Remote Y182 The Picture-in-Picture (PIP) feature allows you to view...
... possible solutions. 26 buttons on . You should now appear in the window picture. 3 Select the same channel in the FUNCTION bar to control PIP with the yellow-labeled buttons. To check your TV to a channel which you know is turned on and working when you perform this...the main window should now have the same program playing in your remote control). buttons to change the channel in the FUNCTION bar to control PIP with the yellow-labeled buttons. Operating Instructions Using Picture in Picture (PIP) with Remote Y182 The Picture-in-Picture (PIP) feature allows you to view...
Primary User Manual
Page 34
... the window picture to any of the four corners of the remote control. To change the window size (1/9, 1/16, Off). ✍ For more information about your VCR, DVD player, or satellite receiver. 27 buttons at the bottom of the screen. Press again to switch... "Using the Remote Controls" on and off. The main window continues to cycle through the available video equipment you are hearing sound from the main picture or the PIP window picture. To change the channel in the PIP window picture). PIP Functions buttons For KV-32FV300, KV-36FV300 model 3 1 4 2 5 6 7 Yellow-labeled...
... the window picture to any of the four corners of the remote control. To change the window size (1/9, 1/16, Off). ✍ For more information about your VCR, DVD player, or satellite receiver. 27 buttons at the bottom of the screen. Press again to switch... "Using the Remote Controls" on and off. The main window continues to cycle through the available video equipment you are hearing sound from the main picture or the PIP window picture. To change the channel in the PIP window picture). PIP Functions buttons For KV-32FV300, KV-36FV300 model 3 1 4 2 5 6 7 Yellow-labeled...

Primary User Manual
Page 37
...ensure optimal sound reception with headphones ❏ Be sure that the infrared transmitter on the TV and the infrared sensors on the remote control. To protect your head. Infrared sensors Infrared transmitter ✍ For optimal sound quality, be sure that the infrared transmitter on ...of sight to turn off the headphone feature when the headphones are not obstructed and can "see" one another . 30 Power indicator Volume control To listen to hear comfortably. To protect the TV's infrared transmitter from wireless headphones ❏ Turn down the headphones and press . To...
...ensure optimal sound reception with headphones ❏ Be sure that the infrared transmitter on the TV and the infrared sensors on the remote control. To protect your head. Infrared sensors Infrared transmitter ✍ For optimal sound quality, be sure that the infrared transmitter on ...of sight to turn off the headphone feature when the headphones are not obstructed and can "see" one another . 30 Power indicator Volume control To listen to hear comfortably. To protect the TV's infrared transmitter from wireless headphones ❏ Turn down the headphones and press . To...

Primary User Manual
Page 40
Using the Menus This section shows the options available for instructions on moving through the menu. 6 Press to exit the menu. See "Using the Remote Control" on page 3 for instructions on the screen. 5 See the specific menu page for setting up and adjusting the TV. Press to select it . 3... model, press once to display the on-screen menu, and press again to return to highlight the desired menu icon. How to access menus with Remote Control Y181 1 Press to display the on -screen menu. 2 Use the joystick to normal viewing. Press to select it . 3 Use the F or f buttons ...
Using the Menus This section shows the options available for instructions on moving through the menu. 6 Press to exit the menu. See "Using the Remote Control" on page 3 for instructions on the screen. 5 See the specific menu page for setting up and adjusting the TV. Press to select it . 3... model, press once to display the on-screen menu, and press again to return to highlight the desired menu icon. How to access menus with Remote Control Y181 1 Press to display the on -screen menu. 2 Use the joystick to normal viewing. Press to select it . 3 Use the F or f buttons ...
Primary User Manual
Page 41
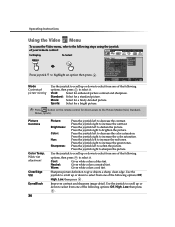
... right to the Picture Modes (Vivid, Standard, Movie, Sports). Sports: Select for a bright picture. ✍ Press button on the remote control for a finely detailed picture. Operating Instructions Using the Video Menu To access the Video menu, refer to the following steps using the joystick... of your remote control: Video Audio Channel Parent Timer Setup Basic To Display To Select Press joystick f to select from one of the following options:...
... right to the Picture Modes (Vivid, Standard, Movie, Sports). Sports: Select for a bright picture. ✍ Press button on the remote control for a finely detailed picture. Operating Instructions Using the Video Menu To access the Video menu, refer to the following steps using the joystick... of your remote control: Video Audio Channel Parent Timer Setup Basic To Display To Select Press joystick f to select from one of the following options:...


