
Warranty Card
Page 1
... state. This warranty does not cover customer instruction, installation, set up adjustments or signal reception problems. This warranty does not cover cosmetic damage or damage due to acts of God, accident, misuse, abuse, negligence, commercial use, or modification of purchase, labor for 19" (measured diagonally), or larger screen size through a Sony authorized service facility. This warranty is invalid if the factory applied serial number has been altered...
... state. This warranty does not cover customer instruction, installation, set up adjustments or signal reception problems. This warranty does not cover cosmetic damage or damage due to acts of God, accident, misuse, abuse, negligence, commercial use, or modification of purchase, labor for 19" (measured diagonally), or larger screen size through a Sony authorized service facility. This warranty is invalid if the factory applied serial number has been altered...
Operating Instructions
Page 3
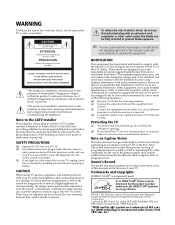
... outlet on UHF or VHF or transmitted by qualified personnel before operating it checked by cable companies for the use this manual could void your warranty because they are registered trademarks of misuse. WEGA®, FD Trinitron, Caption Vision, Dynamic Bass Response System and Steady Sound are the results of Sony Corporation. NOTIFICATION This equipment has been tested and found to...
... outlet on UHF or VHF or transmitted by qualified personnel before operating it checked by cable companies for the use this manual could void your warranty because they are registered trademarks of misuse. WEGA®, FD Trinitron, Caption Vision, Dynamic Bass Response System and Steady Sound are the results of Sony Corporation. NOTIFICATION This equipment has been tested and found to...
Operating Instructions
Page 4
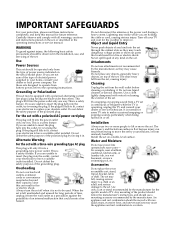
... disconnect the antenna or the power cord during a heavy storm. Water and Moisture Do not use liquid cleaners or aerosol cleaners. Accessories Do not place the set on the set, or described in the operating instructions or service manual. If you are unable to insert the plug fully into the outlet, contact your electrician to have a suitable outlet installed. This is flat. This...
... disconnect the antenna or the power cord during a heavy storm. Water and Moisture Do not use liquid cleaners or aerosol cleaners. Accessories Do not place the set on the set, or described in the operating instructions or service manual. If you are unable to insert the plug fully into the outlet, contact your electrician to have a suitable outlet installed. This is flat. This...
Operating Instructions
Page 5
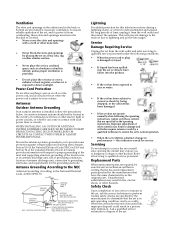
... the power cord or plug is exposed to provide some protection against voltage surges and built-up static charges. Be sure the antenna system is installed, follow the precautions below. GROUND CLAMP ELECTRIC SERVICE EQUIPMENT NEC - Service Damage Requiring Service Unplug the set near or over the power cord, and do not place the set exhibits a distinct change in performance - Adjust only those controls that...
... the power cord or plug is exposed to provide some protection against voltage surges and built-up static charges. Be sure the antenna system is installed, follow the precautions below. GROUND CLAMP ELECTRIC SERVICE EQUIPMENT NEC - Service Damage Requiring Service Unplug the set near or over the power cord, and do not place the set exhibits a distinct change in performance - Adjust only those controls that...
Operating Instructions
Page 7
... FD Trinitron WEGA® Features 1 About this Manual...2 Batteries for the Remote Control 2 Front Panel Menu Controls ...2 Using the Remote Control Remote Control Description...3 Programming the Remote Control 5 Manufacturer's Codes ...6 Using your TV Remote Control with Other Equipment 7 Connecting Your TV TV Rear Panel ...9 Basic Connections ...10 Dynamic Bass Response System Connection (Subwoofer 11 Connecting Additional Equipment 12 Using Basic Functions Setting Up the TV...19 Quick Start to the Menus ...20 Using the Menus How to Access Menus...23 Using the Video Menu ...24 Picture...
... FD Trinitron WEGA® Features 1 About this Manual...2 Batteries for the Remote Control 2 Front Panel Menu Controls ...2 Using the Remote Control Remote Control Description...3 Programming the Remote Control 5 Manufacturer's Codes ...6 Using your TV Remote Control with Other Equipment 7 Connecting Your TV TV Rear Panel ...9 Basic Connections ...10 Dynamic Bass Response System Connection (Subwoofer 11 Connecting Additional Equipment 12 Using Basic Functions Setting Up the TV...19 Quick Start to the Menus ...20 Using the Menus How to Access Menus...23 Using the Video Menu ...24 Picture...

Operating Instructions
Page 9
... on -screen menus without the use of a remote control. ❏ Front A/V Inputs - Provides component video inputs for energy efficiency. ❏ Front Panel Controls - Gives sound more impact by establishing rating limits. ❏ Favorite Channels - Provides instant access to the on your purchase of the Sony FD Trinitron WEGA®. New and exclusive from Sony. ❏ Y, PB, PR Inputs - Allows access to your connected cable box, VCR, digital satellite receiver, or DVD player. ❏ Energy Star® - Helps parents monitor what...
... on -screen menus without the use of a remote control. ❏ Front A/V Inputs - Provides component video inputs for energy efficiency. ❏ Front Panel Controls - Gives sound more impact by establishing rating limits. ❏ Favorite Channels - Provides instant access to the on your purchase of the Sony FD Trinitron WEGA®. New and exclusive from Sony. ❏ Y, PB, PR Inputs - Allows access to your connected cable box, VCR, digital satellite receiver, or DVD player. ❏ Energy Star® - Helps parents monitor what...

Operating Instructions
Page 10
...-screen menus. Operating Instructions About this Manual This manual provides instructions to help you to access the menu without the remote control. ❏ Press to display the on-screen menu. ❏ Use the and buttons on the front Audio/Video panel instead of time, remove the batteries to avoid possible damage from battery leakage. Once your new TV. Front Panel Menu Controls The front Audio/Video panel controls allow you will last up to an antenna or cable, cable box, VCR, DVD, satellite receiver...
...-screen menus. Operating Instructions About this Manual This manual provides instructions to help you to access the menu without the remote control. ❏ Press to display the on-screen menu. ❏ Use the and buttons on the front Audio/Video panel instead of time, remove the batteries to avoid possible damage from battery leakage. Once your new TV. Front Panel Menu Controls The front Audio/Video panel controls allow you will last up to an antenna or cable, cable box, VCR, DVD, satellite receiver...

Operating Instructions
Page 11
... not A K work with your satellite receiver. 3 qj 0 9 and ENTER Change the channels directly. Cycles through the Multi-Channel TV Sound (MTS) options: Stereo, Mono, and Auto SAP (Second Audio Program). Using the Remote Control Remote Control Description Button Description 1 MUTING Instantly turns off . Your VCR C M4 PICTURE MODE power will remain on or off automatically in an onscreen menu. P6 JUMP Q Press to operate connected video equipment (see page 26). CODE SET Use to program your remote control to...
... not A K work with your satellite receiver. 3 qj 0 9 and ENTER Change the channels directly. Cycles through the Multi-Channel TV Sound (MTS) options: Stereo, Mono, and Auto SAP (Second Audio Program). Using the Remote Control Remote Control Description Button Description 1 MUTING Instantly turns off . Your VCR C M4 PICTURE MODE power will remain on or off automatically in an onscreen menu. P6 JUMP Q Press to operate connected video equipment (see page 26). CODE SET Use to program your remote control to...

Operating Instructions
Page 13
... than one code number is listed, use your remote control with other equipment, you need to program your remote control, see "Troubleshooting" on page 39. 5 Use the following procedure to enter the three-digit manufacturer's code number. 5 Press . 6 To check if the code number works, aim the TV's remote control at the component and press on the green POWER button (VCR/DVD, SAT/CABLE, TV) that corresponds with that manufacturer. ✍ If you have problems programming your remote control. If...
... than one code number is listed, use your remote control with other equipment, you need to program your remote control, see "Troubleshooting" on page 39. 5 Use the following procedure to enter the three-digit manufacturer's code number. 5 Press . 6 To check if the code number works, aim the TV's remote control at the component and press on the green POWER button (VCR/DVD, SAT/CABLE, TV) that corresponds with that manufacturer. ✍ If you have problems programming your remote control. If...
Operating Instructions
Page 17
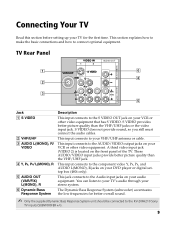
... must connect the audio cables. This jack connects to the Audio input jacks on the front panel of the TV. Connecting Your TV Read this section before setting up your TV for better overall sound. ✍ Only the supplied Dynamic Bass Response System unit should be connected to the KV-20FA210 Sony TV inputs (SUBWOOFER +/-). 9 S VIDEO provides better picture quality than the VHF/UHF jack. A third video input jack (VIDEO 2) is located...
... must connect the audio cables. This jack connects to the Audio input jacks on the front panel of the TV. Connecting Your TV Read this section before setting up your TV for better overall sound. ✍ Only the supplied Dynamic Bass Response System unit should be connected to the KV-20FA210 Sony TV inputs (SUBWOOFER +/-). 9 S VIDEO provides better picture quality than the VHF/UHF jack. A third video input jack (VIDEO 2) is located...
Operating Instructions
Page 20
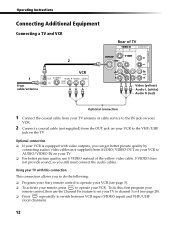
... Channel Fix feature to set your TV to channel 3 or 4 (see page 5). ❏ To activate your remote, press to the VHF/UHF jack on the TV. To do the following: ❏ Program your Sony remote control to operate your VCR. S VIDEO does not provide sound, so you to switch between VCR input (VIDEO input) and VHF/UHF (local channels). 12 Operating Instructions Connecting Additional Equipment Connecting a TV and VCR 1 From cable/antenna 2 VCR Rear...
... Channel Fix feature to set your TV to channel 3 or 4 (see page 5). ❏ To activate your remote, press to the VHF/UHF jack on the TV. To do the following: ❏ Program your Sony remote control to operate your VCR. S VIDEO does not provide sound, so you to switch between VCR input (VIDEO input) and VHF/UHF (local channels). 12 Operating Instructions Connecting Additional Equipment Connecting a TV and VCR 1 From cable/antenna 2 VCR Rear...
Operating Instructions
Page 22
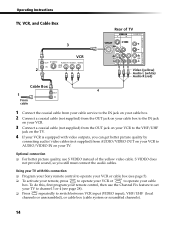
... cable box (cable system or scrambled channels). 14 S VIDEO does not provide sound, so you can get better picture quality by connecting audio/video cables (not supplied) from the OUT jack on your VCR to the VHF/UHF jack on your TV. Using your TV with this , first program your remote control, then use S VIDEO instead of TV 1 3 SUBWOOFER AUDIO (VAR/FIX) VCR AUDIO AUDIO 2 Video (yellow) Audio L (white) Audio R (red) Cable Box 4 1 From cable 1 Connect the coaxial cable from your cable service to...
... cable box (cable system or scrambled channels). 14 S VIDEO does not provide sound, so you can get better picture quality by connecting audio/video cables (not supplied) from the OUT jack on your VCR to the VHF/UHF jack on your TV. Using your TV with this , first program your remote control, then use S VIDEO instead of TV 1 3 SUBWOOFER AUDIO (VAR/FIX) VCR AUDIO AUDIO 2 Video (yellow) Audio L (white) Audio R (red) Cable Box 4 1 From cable 1 Connect the coaxial cable from your cable service to...

Operating Instructions
Page 23
... Receiver From cable/ antenna 2 1 Satellite antenna cable Satellite receiver 3 Connecting Your TV Rear of TV 1 3 SUBWOOFER AUDIO (VAR/FIX) AUDIO AUDIO Video (yellow) Audio L (white) Audio R (red) 1 Connect the cable from your satellite antenna to SATELLITE IN on your satellite receiver. 2 Connect the coaxial cable from your cable service or antenna to the VHF/UHF jack on your TV. 3 Using audio/video cables (not supplied), connect AUDIO/VIDEO OUT on your satellite receiver to AUDIO/VIDEO IN on how ❏ Press repeatedly to switch to satellite receiver input (VIDEO input...
... Receiver From cable/ antenna 2 1 Satellite antenna cable Satellite receiver 3 Connecting Your TV Rear of TV 1 3 SUBWOOFER AUDIO (VAR/FIX) AUDIO AUDIO Video (yellow) Audio L (white) Audio R (red) 1 Connect the cable from your satellite antenna to SATELLITE IN on your satellite receiver. 2 Connect the coaxial cable from your cable service or antenna to the VHF/UHF jack on your TV. 3 Using audio/video cables (not supplied), connect AUDIO/VIDEO OUT on your satellite receiver to AUDIO/VIDEO IN on how ❏ Press repeatedly to switch to satellite receiver input (VIDEO input...

Operating Instructions
Page 26
... your stereo. 2 Set the Speaker option to Off. Front A/V Panel A/V output Audio R (red) Audio L (white) Video (yellow) Connecting Headphones Connect the headphones to the jack on your TV to control the volume through the connected audio system. Using the audio/video cables (not supplied), connect the AUDIO/VIDEO OUT on your camcorder to the AUDIO/VIDEO IN on the Audio Menu and select Fixed to one of the unused line inputs (e.g. Front A/V Panel Connecting an Audio System 1 Using audio/video cables (not supplied), connect AUDIO OUT on the front Audio/Video panel.
... your stereo. 2 Set the Speaker option to Off. Front A/V Panel A/V output Audio R (red) Audio L (white) Video (yellow) Connecting Headphones Connect the headphones to the jack on your TV to control the volume through the connected audio system. Using the audio/video cables (not supplied), connect the AUDIO/VIDEO OUT on your camcorder to the AUDIO/VIDEO IN on the Audio Menu and select Fixed to one of the unused line inputs (e.g. Front A/V Panel Connecting an Audio System 1 Using audio/video cables (not supplied), connect AUDIO OUT on the front Audio/Video panel.

Operating Instructions
Page 36
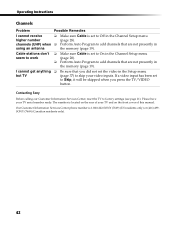
... the appropriate channel (usually 3 or 4) and use the cable box's or VCR's remote control for channel selection. Press F or f to move the cursor to the Cable Use the F or f buttons to highlight one of the following options, then press to highlight an option; then press . Operating Instructions Using the Channel Setup Menu To access the Channel Setup menu, use the following steps: To Display To Highlight To Select Channel Setup Favorite Channels Cable : On Channel Fix : Off Auto Program Channel Skip...
... the appropriate channel (usually 3 or 4) and use the cable box's or VCR's remote control for channel selection. Press F or f to move the cursor to the Cable Use the F or f buttons to highlight one of the following options, then press to highlight an option; then press . Operating Instructions Using the Channel Setup Menu To access the Channel Setup menu, use the following steps: To Display To Highlight To Select Channel Setup Favorite Channels Cable : On Channel Fix : Off Auto Program Channel Skip...
Operating Instructions
Page 47
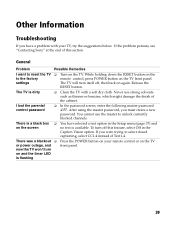
... TV front panel. 39 The TV will turn itself off this section. The TV is a black box on again. I want to reset the TV ❏ to the factory settings Turn on the TV. To turn on and the timer LED is flashing Press the POWER button on your TV, try the suggestions below. If you must create a new password. Never use the master to select closed captioning, select...
... TV front panel. 39 The TV will turn itself off this section. The TV is a black box on again. I want to reset the TV ❏ to the factory settings Turn on the TV. To turn on and the timer LED is flashing Press the POWER button on your TV, try the suggestions below. If you must create a new password. Never use the master to select closed captioning, select...
Operating Instructions
Page 49
...; Adjust the antenna. ❏ Move the TV away from the screen (page 3). ❏ Check your cable service. Audio Problem Good picture, no picture, good sound No color Only snow appears on the screen Dotted lines or stripes Double images or ghosts Possible Remedies ❏ Make sure the power cord is plugged in. ❏ If a red light is flashing on the rear panel of your local service center. ❏ Check the TV/VIDEO setting...
...; Adjust the antenna. ❏ Move the TV away from the screen (page 3). ❏ Check your cable service. Audio Problem Good picture, no picture, good sound No color Only snow appears on the screen Dotted lines or stripes Double images or ghosts Possible Remedies ❏ Make sure the power cord is plugged in. ❏ If a red light is flashing on the rear panel of your local service center. ❏ Check the TV/VIDEO setting...
Operating Instructions
Page 50
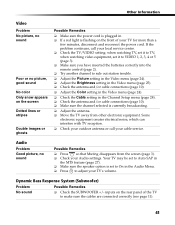
... Channel Setup menu (page 28). Perform Auto Program to skip your video inputs. Contacting Sony Before calling our Customer Information Services Center, reset the TV to add channels that you press the TV/VIDEO button. Please have your TV and on the rear of this manual. I cannot receive ❏ higher number channels (UHF) when ❏ using an antenna Make sure Cable is set to On in the Channel Setup menu (page 28). ❏ Perform Auto Program to factory settings...
... Channel Setup menu (page 28). Perform Auto Program to skip your video inputs. Contacting Sony Before calling our Customer Information Services Center, reset the TV to add channels that you press the TV/VIDEO button. Please have your TV and on the rear of this manual. I cannot receive ❏ higher number channels (UHF) when ❏ using an antenna Make sure Cable is set to On in the Channel Setup menu (page 28). ❏ Perform Auto Program to factory settings...
Operating Instructions
Page 51
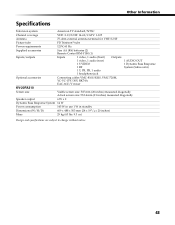
... Antenna Picture tube 75-ohm external antenna terminal for VHF/UHF FD Trinitron® tube Power requirements 120V, 60 Hz Supplied accessories Size AA (R6) batteries (2) Remote Control RM-Y180 (1) Inputs/outputs Inputs 1 video, 1 audio (front) 1 video, 1 audio (rear) 1 S VIDEO 1 RF 1 Y, PB, PR, 1 audio 1 headphone jack Outputs 1 AUDIO OUT 1 Dynamic Bass Response System (Subwoofer) Optional accessories Connecting cables VMC-810S/820S, VMC-720M, YC-YC-15V/30V, RK74A EAC-66U/V mixer KV-20FA210 Screen size Visible screen size: 507 mm (20 inches) measured...
... Antenna Picture tube 75-ohm external antenna terminal for VHF/UHF FD Trinitron® tube Power requirements 120V, 60 Hz Supplied accessories Size AA (R6) batteries (2) Remote Control RM-Y180 (1) Inputs/outputs Inputs 1 video, 1 audio (front) 1 video, 1 audio (rear) 1 S VIDEO 1 RF 1 Y, PB, PR, 1 audio 1 headphone jack Outputs 1 AUDIO OUT 1 Dynamic Bass Response System (Subwoofer) Optional accessories Connecting cables VMC-810S/820S, VMC-720M, YC-YC-15V/30V, RK74A EAC-66U/V mixer KV-20FA210 Screen size Visible screen size: 507 mm (20 inches) measured...

Operating Instructions
Page 53
... SLEEP 3 Specifications 43 Steady Sound 26 T Tilt Correction 37 Timer 1 and Timer 2 36 Treble 26 Troubleshooting 39 TV Features 1 V Video Label 37 Front Panel 2 45 Index A L Auto Program 19, 29 Language 37 B M Balance 26 Bass 26 Menus Audio 26 Batteries Inserting in remote 2 Replacing 2 Channel Setup 28 Parental Control 30 Picture Controls 25 C Cable 28 Cable Box Connections 13 Operating 8 Caption Vision 37 Channel Fix 28 Channel Label 29 Channel Skip/Add 29 CODE SET button Definition 3 Operating 5 Connections Cable and antenna 10 Connecting a Camcorder 18 Connecting a DVD Player...
... SLEEP 3 Specifications 43 Steady Sound 26 T Tilt Correction 37 Timer 1 and Timer 2 36 Treble 26 Troubleshooting 39 TV Features 1 V Video Label 37 Front Panel 2 45 Index A L Auto Program 19, 29 Language 37 B M Balance 26 Bass 26 Menus Audio 26 Batteries Inserting in remote 2 Replacing 2 Channel Setup 28 Parental Control 30 Picture Controls 25 C Cable 28 Cable Box Connections 13 Operating 8 Caption Vision 37 Channel Fix 28 Channel Label 29 Channel Skip/Add 29 CODE SET button Definition 3 Operating 5 Connections Cable and antenna 10 Connecting a Camcorder 18 Connecting a DVD Player...


