

Operating Instructions
Page 2
...appliance. You are the result of misuse. As an ENERGY STAR Partner, Sony Corporation has determined that this product meets the ENERGY STAR guidelines for help.... aucune pattie a decouvert. REFER SERVICING TO QUALIFIED SERVICE PERSONNEL. CAUTION When using TV games, computers, and similar products with your authority to provide reasonable protection against ... - This document is connected. - Reorient or relocate the receiving antennas - MODELS: KP-48V75 / 53V75 / 53V75C / 61V75. Connect the equipment into an outlet on a circuit different from the broadcaster, cable ...
...appliance. You are the result of misuse. As an ENERGY STAR Partner, Sony Corporation has determined that this product meets the ENERGY STAR guidelines for help.... aucune pattie a decouvert. REFER SERVICING TO QUALIFIED SERVICE PERSONNEL. CAUTION When using TV games, computers, and similar products with your authority to provide reasonable protection against ... - This document is connected. - Reorient or relocate the receiving antennas - MODELS: KP-48V75 / 53V75 / 53V75C / 61V75. Connect the equipment into an outlet on a circuit different from the broadcaster, cable ...

Operating Instructions
Page 3
...TM) / CH INDEX 30 Freezing the picture (FREEZE) 30 Adjusting the picture (VIDEO) I:l_l 31 Adjusting the color temperature (TRINITONE) 32 Selecting the video mode (VIDEO) 32 Adjusting the sound (AUDIO) 33 Using audio effect (EFFECT) 34 Selecting ...Sony dealer regarding this product. Serial No. 4 Welcome! 4 Precautions Getting Started 5 Step 1: Installing the projection TV 6 Step 2: Hookup 20 Step 3: Setting up the remote control 21 Step 4: Setting up the projection TV automatically (AUTOSETUP) 25 Changing the menu language Operations 26 Watching the TV 28 Watching two programs at the rear...
...TM) / CH INDEX 30 Freezing the picture (FREEZE) 30 Adjusting the picture (VIDEO) I:l_l 31 Adjusting the color temperature (TRINITONE) 32 Selecting the video mode (VIDEO) 32 Adjusting the sound (AUDIO) 33 Using audio effect (EFFECT) 34 Selecting ...Sony dealer regarding this product. Serial No. 4 Welcome! 4 Precautions Getting Started 5 Step 1: Installing the projection TV 6 Step 2: Hookup 20 Step 3: Setting up the remote control 21 Step 4: Setting up the projection TV automatically (AUTOSETUP) 25 Changing the menu language Operations 26 Watching the TV 28 Watching two programs at the rear...

Operating Instructions
Page 4
...solid object fall into the power outlet only one way. This feature is wider than the other for models KP48V75, KP-53V75, KP-53V75C, and KP-61V75. You can also use strong solvents such as thinner or benzine for several days or more. Safety • Operate the ...TV's input mode, turn on cleaning Clean the cabinet of mild soap and warm water. Note on the VCR, and play button. Model KP-53V75 is transported direttly from the ceiling or to direct illumination or direct sunlight. Here are indicated in the text, for purchasing the Sony Color Rear Video Projection TV...
...solid object fall into the power outlet only one way. This feature is wider than the other for models KP48V75, KP-53V75, KP-53V75C, and KP-61V75. You can also use strong solvents such as thinner or benzine for several days or more. Safety • Operate the ...TV's input mode, turn on cleaning Clean the cabinet of mild soap and warm water. Note on the VCR, and play button. Model KP-53V75 is transported direttly from the ceiling or to direct illumination or direct sunlight. Here are indicated in the text, for purchasing the Sony Color Rear Video Projection TV...
Operating Instructions
Page 5
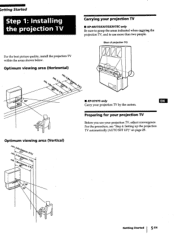
Getting Started I 5"EN Preparing for your projection TV Before you use your projection TV • KP-48V75/53V75/53V75C only Be sure to grasp the areas indicated when caliI3ril_g the projection TV, and to use more than two people. (Rear of projection TV) For the best picture quality, install the projection TV within the areas shown below. For...
Getting Started I 5"EN Preparing for your projection TV Before you use your projection TV • KP-48V75/53V75/53V75C only Be sure to grasp the areas indicated when caliI3ril_g the projection TV, and to use more than two people. (Rear of projection TV) For the best picture quality, install the projection TV within the areas shown below. For...
Operating Instructions
Page 6
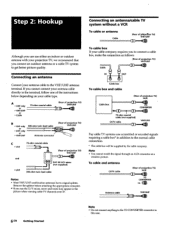
...VHF only • UHF only oor r • VHF/UHF 300-ohm twin lead cable (Rear of projection TV) VHF/UHF [ '__ Antenna connector C • VHF 75-ohm coaxial cable _, (Rear of projection TV) AUX TO CONVERTER Antenna cable VHFIUHF 6-EN Getting Started Note • Do not connect anything to...the splitter before attaching the appropriate connector. •" If you connect an outdoor antenna or a cable TV system to get better picture quality. To cable and antenna CATV cable (Rear of projection TV) and • UHF __F EAC-66 U/V mixer _j_ (not supplied) 300-ohm twin lead cable...
...VHF only • UHF only oor r • VHF/UHF 300-ohm twin lead cable (Rear of projection TV) VHF/UHF [ '__ Antenna connector C • VHF 75-ohm coaxial cable _, (Rear of projection TV) AUX TO CONVERTER Antenna cable VHFIUHF 6-EN Getting Started Note • Do not connect anything to...the splitter before attaching the appropriate connector. •" If you connect an outdoor antenna or a cable TV system to get better picture quality. To cable and antenna CATV cable (Rear of projection TV) and • UHF __F EAC-66 U/V mixer _j_ (not supplied) 300-ohm twin lead cable...

Operating Instructions
Page 7
...to do the following: • View the playback of video tapes • Record one TV program while viewing another program • Watch two TV programs at once using PIP Without a cable box Rear of projection "IV i IN VIDE01 VIDEO 3 "rv OUT |ONITOR AUDIO (W,_,'FL_) _o®...;@ TO %-I AUDIO ® "VIDEO (yellow) _ AUDIO-L (white) AUDIO-R (red) --_ / Antenna cable VCR I AUDIO VIDEO LINE[_OUT 1l • _...
...to do the following: • View the playback of video tapes • Record one TV program while viewing another program • Watch two TV programs at once using PIP Without a cable box Rear of projection "IV i IN VIDE01 VIDEO 3 "rv OUT |ONITOR AUDIO (W,_,'FL_) _o®...;@ TO %-I AUDIO ® "VIDEO (yellow) _ AUDIO-L (white) AUDIO-R (red) --_ / Antenna cable VCR I AUDIO VIDEO LINE[_OUT 1l • _...

Operating Instructions
Page 8
...signals separately iSreventing degradation, and gives better picture quality compared to the S VIDEO input connector, the projection TV automatically receives S video signals. AUtO I VAl_qx] S VIDEO' m , AUX ® TO VIDEO' @ L AUDIO I R-- @ VHFAJHF VHF/UHF S VIDEO YC-15V/30V (not supplied) L With a cable box I . ...Rear of Y (luminance) and C (chroma) signals. Without a cable box Rear of projection W IN OUT _DEOI, WOEOS "rv uK_n'_ ! aux Antenna cable S video output II VCR uoovooL o LINE _D,, _. To an s video equipped VCR If your VCR has an S VIDEO...
...signals separately iSreventing degradation, and gives better picture quality compared to the S VIDEO input connector, the projection TV automatically receives S video signals. AUtO I VAl_qx] S VIDEO' m , AUX ® TO VIDEO' @ L AUDIO I R-- @ VHFAJHF VHF/UHF S VIDEO YC-15V/30V (not supplied) L With a cable box I . ...Rear of Y (luminance) and C (chroma) signals. Without a cable box Rear of projection W IN OUT _DEOI, WOEOS "rv uK_n'_ ! aux Antenna cable S video output II VCR uoovooL o LINE _D,, _. To an s video equipped VCR If your VCR has an S VIDEO...

Operating Instructions
Page 9
... of he DBS (Digital Broadcasting Satellites) receiver. ,o a projection TV Rear of projection TV I IN i _9tE01 V1DE03 OUT "i_ )1_ AUDIO lX Cable or cable box DBS receiver VHFAJHF IN AUDIO VIDEO S VIDEO [_ _ LINEIN I Satellite UNE OUT _ antenna | input Audio outputs output _ Video c0_r RTER INF Audio inputs Video input VCR S VIDEO [_ LINE IN LINE OUT r:_l 7 AUDIO-L (white...
... of he DBS (Digital Broadcasting Satellites) receiver. ,o a projection TV Rear of projection TV I IN i _9tE01 V1DE03 OUT "i_ )1_ AUDIO lX Cable or cable box DBS receiver VHFAJHF IN AUDIO VIDEO S VIDEO [_ _ LINEIN I Satellite UNE OUT _ antenna | input Audio outputs output _ Video c0_r RTER INF Audio inputs Video input VCR S VIDEO [_ LINE IN LINE OUT r:_l 7 AUDIO-L (white...

Operating Instructions
Page 10
...-L (white) Notes • To connect a monaural camcorder, connect the audio output of the camcorder to the S VIDEO connector of VIDEO 2 INPUT on the projection TV. • To connect a camcorder equipped with the supplied remote control. Rear ofprojection TV IN VlOEO 1 VIDEO 3 I ! i AUDIO OUT-L (VAR/FIX) (white) AUDIO OUT-R (VAR/FIX) (red) RK-74A (not supplied) Set...
...-L (white) Notes • To connect a monaural camcorder, connect the audio output of the camcorder to the S VIDEO connector of VIDEO 2 INPUT on the projection TV. • To connect a camcorder equipped with the supplied remote control. Rear ofprojection TV IN VlOEO 1 VIDEO 3 I ! i AUDIO OUT-L (VAR/FIX) (white) AUDIO OUT-R (VAR/FIX) (red) RK-74A (not supplied) Set...

Operating Instructions
Page 11
... I_,_,!,, l ___ AUIDDEIO-L(ye(lwlohwit)e) q F AUDIO-R (red) TV audio input _ I VMC-810SI820S (not supplied) "IV video input Getting Started I 1 1-EN AUDIO-R (red) AUDIO-L (white) VIDEO (yellow) n VII )1 _.0 "IV AUE_ S YIOEO, 1 _2 Rear of the projection TV. If your AV receiver has the TV input jacks, connect them to the VIDEO 1 IN jacks at the rear of the projection...
... I_,_,!,, l ___ AUIDDEIO-L(ye(lwlohwit)e) q F AUDIO-R (red) TV audio input _ I VMC-810SI820S (not supplied) "IV video input Getting Started I 1 1-EN AUDIO-R (red) AUDIO-L (white) VIDEO (yellow) n VII )1 _.0 "IV AUE_ S YIOEO, 1 _2 Rear of the projection TV. If your AV receiver has the TV input jacks, connect them to the VIDEO 1 IN jacks at the rear of the projection...

Operating Instructions
Page 12
...VIDEO (yellow) --__ __ _ i VMC-810S/820S (not supplied) Vnipdu_/audi° Notes • Do not change the input signal while editing through MONITOR OUT, or the output signal will also change. • You can record input images displayed on the screen. Rear of a second VCR. Rear of projection TV VIDE01 V1DE03 OUT TV... WOt_OR AUDIO VCR (for recording. • When connecting a single VCR to the projection TV, do not connect the MONITOR OUT to the VCR's line...
...VIDEO (yellow) --__ __ _ i VMC-810S/820S (not supplied) Vnipdu_/audi° Notes • Do not change the input signal while editing through MONITOR OUT, or the output signal will also change. • You can record input images displayed on the screen. Rear of a second VCR. Rear of projection TV VIDE01 V1DE03 OUT TV... WOt_OR AUDIO VCR (for recording. • When connecting a single VCR to the projection TV, do not connect the MONITOR OUT to the VCR's line...

Operating Instructions
Page 13
...; Connect your DVD player directly to your DVD player does not have S video output connector, use composite video connector for the video connection. • Video signals are composed of projection TV IN vg)E01 _n0Eo3 OUT TV _ AUDIO ;VAI_lX_ -@ S video output i UNEOUT .SLOV.III DDV(_p_B_WEOIIOSuUTNK! Rear of Y (luminance) and C (chroma) signals. I 13 "EN The S connection sends the...
...; Connect your DVD player directly to your DVD player does not have S video output connector, use composite video connector for the video connection. • Video signals are composed of projection TV IN vg)E01 _n0Eo3 OUT TV _ AUDIO ;VAI_lX_ -@ S video output i UNEOUT .SLOV.III DDV(_p_B_WEOIIOSuUTNK! Rear of Y (luminance) and C (chroma) signals. I 13 "EN The S connection sends the...

Operating Instructions
Page 14
.... If your DVD player has component video output connectors, connect them to your TV. VMC-10HG (not supplied) ill CcB.(b(rlueed) ) _ Y (green) _l_ _0' .y Rear of your DVD player directly to VIDEO 4 IN on the projection TV in the VIDEO menu (see SHARPNESS on a DVD ...I RK-74A (not supplied) outputs Audio Notes • Connect your DVD player kave different colors, make connections according to R-Y. • The jacks of the source. If line output connectors of projection TV Component video outputs L LINEOUT IlSVOEDOUTII _ g_EO( II S4JNK I [1GT#LOUT kAUDIO-R (red) AUDIO-L...
.... If your DVD player has component video output connectors, connect them to your TV. VMC-10HG (not supplied) ill CcB.(b(rlueed) ) _ Y (green) _l_ _0' .y Rear of your DVD player directly to VIDEO 4 IN on the projection TV in the VIDEO menu (see SHARPNESS on a DVD ...I RK-74A (not supplied) outputs Audio Notes • Connect your DVD player kave different colors, make connections according to R-Y. • The jacks of the source. If line output connectors of projection TV Component video outputs L LINEOUT IlSVOEDOUTII _ g_EO( II S4JNK I [1GT#LOUT kAUDIO-R (red) AUDIO-L...

Operating Instructions
Page 15
...: Q, --., _)--._. {_. RK-74A (not suppliedA)UDIOOUT-L(wAhiRte/F) IX)_! 1 AUDIO OUT-R (VAR/FIX) (red) Getting Started I 15"EN Rear of Dolby Laboratories Licensing Corporation. c.,, IN OUT VI_EOI WDEO$ W _mNn'o_ AUI_X3 CENTER SPEKER m CENTER SPEAKER IN (_ CENTER SPEAKER IN Q--,,, @@_@@... system, you use the projection TV's center speaker. I I I connecting an amplifier with Dolby Pro Logic decoder If you can still use an amplifier with Dolby* I" _ I ear I speaker _ (L) I III I I i_;On_erl I Front I I (" I I speaker I I (R) I I Rear I speaker I [ (R) I ! See "...
...: Q, --., _)--._. {_. RK-74A (not suppliedA)UDIOOUT-L(wAhiRte/F) IX)_! 1 AUDIO OUT-R (VAR/FIX) (red) Getting Started I 15"EN Rear of Dolby Laboratories Licensing Corporation. c.,, IN OUT VI_EOI WDEO$ W _mNn'o_ AUI_X3 CENTER SPEKER m CENTER SPEAKER IN (_ CENTER SPEAKER IN Q--,,, @@_@@... system, you use the projection TV's center speaker. I I I connecting an amplifier with Dolby Pro Logic decoder If you can still use an amplifier with Dolby* I" _ I ear I speaker _ (L) I III I I i_;On_erl I Front I I (" I I speaker I I (R) I I Rear I speaker I [ (R) I ! See "...

Operating Instructions
Page 16
...• Cm IN OUT VIDEO 1 VIDEO 3 "rv NIONn'oF _ AUDIO W_iRX) ®__ @- 60 @- Connecting a Sony SAVA series speaker system If you have a Sony SAVA series speaker system, connect your speakers to the AUDIO (VAR/FIX) OUT jacks on the rear of the projection TV with the audio cable supplied ...with the supplied remote control. You can take advantage of projection TV O@-&°, @- - Rear of the speakers' Dolby Pro Logic surround system and super woofer mode, and control them with the speakers. When connecting a Sony SAVA series speaker system, see page 35 for more information. S...
...• Cm IN OUT VIDEO 1 VIDEO 3 "rv NIONn'oF _ AUDIO W_iRX) ®__ @- 60 @- Connecting a Sony SAVA series speaker system If you have a Sony SAVA series speaker system, connect your speakers to the AUDIO (VAR/FIX) OUT jacks on the rear of the projection TV with the audio cable supplied ...with the supplied remote control. You can take advantage of projection TV O@-&°, @- - Rear of the speakers' Dolby Pro Logic surround system and super woofer mode, and control them with the speakers. When connecting a Sony SAVA series speaker system, see page 35 for more information. S...

Operating Instructions
Page 17
... connect the S-Link cable to the projection TV without a Sony AV receiver To make your Sony components work together. YCR(g(rreede)n_ i_ RK-74A (not supplied) Rear of the cable to the VCR. • When making the S-Link connection, be sure to connect the video equipment to the VIDEO IN and S-LINK connectors with the...
... connect the S-Link cable to the projection TV without a Sony AV receiver To make your Sony components work together. YCR(g(rreede)n_ i_ RK-74A (not supplied) Rear of the cable to the VCR. • When making the S-Link connection, be sure to connect the video equipment to the VIDEO IN and S-LINK connectors with the...

Operating Instructions
Page 18
... to ON (see page 35). Rear of projection TV LLoJ) I Getting Started I• I I AudiolvideOoutp_u_ts S-LINK 18"EN I _-_ @-.c= @_& _)-= _DEO IlN_10EO _ TV Am @ S-LINK VIDEO 1 VIDEO 1 IN VIDEO S-LINK TV OUT TV OUT RK-G34, etc. (not supplied)_ Video cable (not supplied) MONITOR OUT (S-LINK) MONITOR OUT (Video output) Audio/video cable (not supplied) TV IN {S-LINK and video/audio inputs) Sony AVreceiverijl _ ,-,-_-_-_- .Using the S-Link...
... to ON (see page 35). Rear of projection TV LLoJ) I Getting Started I• I I AudiolvideOoutp_u_ts S-LINK 18"EN I _-_ @-.c= @_& _)-= _DEO IlN_10EO _ TV Am @ S-LINK VIDEO 1 VIDEO 1 IN VIDEO S-LINK TV OUT TV OUT RK-G34, etc. (not supplied)_ Video cable (not supplied) MONITOR OUT (S-LINK) MONITOR OUT (Video output) Audio/video cable (not supplied) TV IN {S-LINK and video/audio inputs) Sony AVreceiverijl _ ,-,-_-_-_- .Using the S-Link...

Operating Instructions
Page 19
Rear of the equipment to control your projection TV and other Sony equipment with the projection TV's remote control, connect the input of projection 13/ o__ @- To control other Sony equipment with one remote control. Connecting other Sony equipment with CONTROL S jack This feature allows you to CONTROL S OUT jack on the projection TV. L ° 119EN Getting Started
Rear of the equipment to control your projection TV and other Sony equipment with the projection TV's remote control, connect the input of projection 13/ o__ @- To control other Sony equipment with one remote control. Connecting other Sony equipment with CONTROL S jack This feature allows you to CONTROL S OUT jack on the projection TV. L ° 119EN Getting Started

Operating Instructions
Page 20
... wet. • Do not place the remote control in different colors to represent the available fu'_ctions. Inserting batteries Insert two size... sunlight, near a heater, or where the humidity is high. Button color Transparent ....... Green Buttons relevant to the diagram inside the battery should leak...time. • Do not handle the remote control roughly. Label color White TV/VCR/DBS/Cable buttons. To prevent the electrolyte from leaking, ...and replace the old batteries with new ones. Getting to six months. TV / VCR / DBS / Cable box function (light up) buttons. Blue Green m Blue...
... wet. • Do not place the remote control in different colors to represent the available fu'_ctions. Inserting batteries Insert two size... sunlight, near a heater, or where the humidity is high. Button color Transparent ....... Green Buttons relevant to the diagram inside the battery should leak...time. • Do not handle the remote control roughly. Label color White TV/VCR/DBS/Cable buttons. To prevent the electrolyte from leaking, ...and replace the old batteries with new ones. Getting to six months. TV / VCR / DBS / Cable box function (light up) buttons. Blue Green m Blue...

Operating Instructions
Page 21
... adjusts the convergence and changes the onscreen menu language. To exit AUTO PROGRAM Pressany button. 6 Adjust convergence, (1) Press CHANNEL +. Press TV/VIDEO so that a channel number appears. (Front of the menus will be sure to connect the antenna or cable to English, you cannot ... UP. - CONT I -]1--11-III o"" 3 Press CHANNEL +1- You can change the on-screen menu language. - To set to a video input, you can set up the projection TV manually, see page 6). 1 Press POWER to the factory preset condition in the selected language. 4 Press VOLUME - VOLUME + -CHARNEL +...
... adjusts the convergence and changes the onscreen menu language. To exit AUTO PROGRAM Pressany button. 6 Adjust convergence, (1) Press CHANNEL +. Press TV/VIDEO so that a channel number appears. (Front of the menus will be sure to connect the antenna or cable to English, you cannot ... UP. - CONT I -]1--11-III o"" 3 Press CHANNEL +1- You can change the on-screen menu language. - To set to a video input, you can set up the projection TV manually, see page 6). 1 Press POWER to the factory preset condition in the selected language. 4 Press VOLUME - VOLUME + -CHARNEL +...


