
Limited Warranty (U.S. Only)
Page 1
... questions: To locate the servicer or dealer nearest you . LABOR: For a period of , or to any accessories) against defects in the United States. 4-557-168-03 ® LIMITED WARRANTY HDTV Color TV XBR Projection TV Sony Electronics Inc. ("Sony") warrants this Product is determined to be presented to obtain warranty service. This warranty does not cover customer instruction, installation, set up adjustments or signal reception problems. This...
... questions: To locate the servicer or dealer nearest you . LABOR: For a period of , or to any accessories) against defects in the United States. 4-557-168-03 ® LIMITED WARRANTY HDTV Color TV XBR Projection TV Sony Electronics Inc. ("Sony") warrants this Product is determined to be presented to obtain warranty service. This warranty does not cover customer instruction, installation, set up adjustments or signal reception problems. This...
Operating Instructions
Page 2
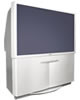
... located at the rear of the projection TV, below . Therefore when viewing conventional (4:3) aspect ratio TV programs, select Wide Mode settings that this product or product models meets the ENERGY STAR guidelines for energy efficiency. This will become imprinted on the screens. · This TV was designed primarily for viewing TV broadcasts in wide screen mode (16:9 aspect ratio). IMAGE RETENTION IS NOT COVERED BY YOUR WARRANTY As an ENERGY STAR® Partner, Sony...
... located at the rear of the projection TV, below . Therefore when viewing conventional (4:3) aspect ratio TV programs, select Wide Mode settings that this product or product models meets the ENERGY STAR guidelines for energy efficiency. This will become imprinted on the screens. · This TV was designed primarily for viewing TV broadcasts in wide screen mode (16:9 aspect ratio). IMAGE RETENTION IS NOT COVERED BY YOUR WARRANTY As an ENERGY STAR® Partner, Sony...
Operating Instructions
Page 3
... and receiver. ❑ Connect the equipment into the outlet, contact your authority to cover the windows that to install the projection TV in a room where the floor and walls are designed to direct illumination or direct sunlight. Safety ❑ Operate the projection TV only on a circuit different from the broadcaster/cable company and/or program owner. Steady Sound, Digital Reality Creation, CineMotion, and Twin View...
... and receiver. ❑ Connect the equipment into the outlet, contact your authority to cover the windows that to install the projection TV in a room where the floor and walls are designed to direct illumination or direct sunlight. Safety ❑ Operate the projection TV only on a circuit different from the broadcaster/cable company and/or program owner. Steady Sound, Digital Reality Creation, CineMotion, and Twin View...
Operating Instructions
Page 6
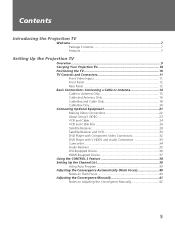
... Video Connections 22 About Using S VIDEO 23 VCR and Cable 24 VCR and Cable Box 26 Satellite Receiver 28 Satellite Receiver and VCR 30 DVD Player with Component Video Connectors 32 DVD Player with S VIDEO and Audio Connectors 33 Camcorder 34 Audio Receiver 35 DVI-Equipped Device 36 HDMI-Equipped Device 37 Using the CONTROL S Feature 38 Setting Up the Channel List 39 Using Auto Program 39 Adjusting the Convergence Automatically (Flash Focus 40 Notes on Flash Focus 40 Adjusting the Convergence Manually 41 Notes on Adjusting the Convergence Manually...
... Video Connections 22 About Using S VIDEO 23 VCR and Cable 24 VCR and Cable Box 26 Satellite Receiver 28 Satellite Receiver and VCR 30 DVD Player with Component Video Connectors 32 DVD Player with S VIDEO and Audio Connectors 33 Camcorder 34 Audio Receiver 35 DVI-Equipped Device 36 HDMI-Equipped Device 37 Using the CONTROL S Feature 38 Setting Up the Channel List 39 Using Auto Program 39 Adjusting the Convergence Automatically (Flash Focus 40 Notes on Flash Focus 40 Adjusting the Convergence Manually 41 Notes on Adjusting the Convergence Manually...
Operating Instructions
Page 8
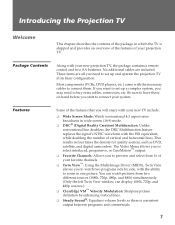
... need to connect your new projection TV, the package contains a remote control and two AA batteries. This results in which the TV is consistent output between programs and commercials. 7 The Video Menu allows you to select interlaced, progressive, or CineMotion™ output. ❑ Favorite Channels: Allows you to preview and select from 16 of your favorite channels. ❑ Twin View™: Using the Multi-Image Driver (MIDX), Twin View...
... need to connect your new projection TV, the package contains a remote control and two AA batteries. This results in which the TV is consistent output between programs and commercials. 7 The Video Menu allows you to select interlaced, progressive, or CineMotion™ output. ❑ Favorite Channels: Allows you to preview and select from 16 of your favorite channels. ❑ Twin View™: Using the Multi-Image Driver (MIDX), Twin View...
Operating Instructions
Page 13
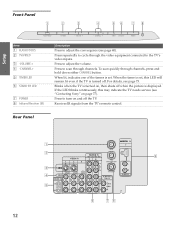
... the TV needs service (see "Contacting Sony" on , then shuts off . For details, see page 40). To scan quickly through channels. Press to the TV's video inputs. VOLUME + - Press to scan through channels, press and hold down either CHANNEL button. When lit, indicates one of the timers is displayed. Press to adjust the volume. CHANNEL + TIMER STAND BY POWER Item 1 FLASH FOCUS 2 TV/VIDEO 3 -VOLUME + 4 -CHANNEL+ 5 TIMER LED 6 STAND BY LED 7 POWER 8 Infrared Receiver (IR) Description Press to adjust the convergence (see page 73. When the timer is set . Rear Panel SETUP...
... the TV needs service (see "Contacting Sony" on , then shuts off . For details, see page 40). To scan quickly through channels. Press to the TV's video inputs. VOLUME + - Press to scan through channels, press and hold down either CHANNEL button. When lit, indicates one of the timers is displayed. Press to adjust the volume. CHANNEL + TIMER STAND BY POWER Item 1 FLASH FOCUS 2 TV/VIDEO 3 -VOLUME + 4 -CHANNEL+ 5 TIMER LED 6 STAND BY LED 7 POWER 8 Infrared Receiver (IR) Description Press to adjust the convergence (see page 73. When the timer is set . Rear Panel SETUP...

Operating Instructions
Page 14
...-channel digital audio. SETUP Setup Jack Description 1 AUX Auxiliary RF input that connects to your cable box input jack. This VHF/UHF output jack lets you need to switch between this jack instead of your TV's audio through a cable box) and unscrambled cable channels. Use this TV and any HDMI-equipped audio/video component, such as a set -top box's component video (Y, PB, PR) (1080i/720p/480p/480i) and audio (L/R) jacks. These video connections provide better picture quality than 3, 4, or 8). 7 AUDIO OUT (VAR/FIX) Connects...
...-channel digital audio. SETUP Setup Jack Description 1 AUX Auxiliary RF input that connects to your cable box input jack. This VHF/UHF output jack lets you need to switch between this jack instead of your TV's audio through a cable box) and unscrambled cable channels. Use this TV and any HDMI-equipped audio/video component, such as a set -top box's component video (Y, PB, PR) (1080i/720p/480p/480i) and audio (L/R) jacks. These video connections provide better picture quality than 3, 4, or 8). 7 AUDIO OUT (VAR/FIX) Connects...

Operating Instructions
Page 19
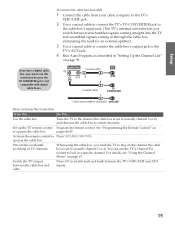
... input. (The TV's tuner provides a better signal than the cable box.) About Using This Connection with digital cable boxes. For best results, use this connection if: ❑ Your cable company scrambles some of the dual picture features for channels coming through the cable box to AUX - For example, if you turn on page 46.) ❑ Use the TV remote control to change channels coming through the cable box to change channels coming directly into the TV's VHF/UHF input jack. SETUP SETUP SETUP SETUP 18 SETUP Setup Cable Box and Cable Only ✍ DIGITAL CABLE BOX USERS...
... input. (The TV's tuner provides a better signal than the cable box.) About Using This Connection with digital cable boxes. For best results, use this connection if: ❑ Your cable company scrambles some of the dual picture features for channels coming through the cable box to AUX - For example, if you turn on page 46.) ❑ Use the TV remote control to change channels coming through the cable box to change channels coming directly into the TV's VHF/UHF input jack. SETUP SETUP SETUP SETUP 18 SETUP Setup Cable Box and Cable Only ✍ DIGITAL CABLE BOX USERS...
Operating Instructions
Page 20
... use the TV's Channel Fix feature to (usually channel 3 or 4). SETUP Setup SETUP To connect the cable box and cable 1 Connect the cable from your cable company to the TV's VHF/UHF jack. 2 Use a coaxial cable to connect the TV's TO CONVERTER jack to the cable box's input jack. (The TV's internal converter lets you switch between unscrambled signals coming straight into the TV and scrambled signals coming in through the cable box, eliminating the need the TV to stay on the channel the cable box is set to lock in "Setting...
... use the TV's Channel Fix feature to (usually channel 3 or 4). SETUP Setup SETUP To connect the cable box and cable 1 Connect the cable from your cable company to the TV's VHF/UHF jack. 2 Use a coaxial cable to connect the TV's TO CONVERTER jack to the cable box's input jack. (The TV's internal converter lets you switch between unscrambled signals coming straight into the TV and scrambled signals coming in through the cable box, eliminating the need the TV to stay on the channel the cable box is set to lock in "Setting...
Operating Instructions
Page 41
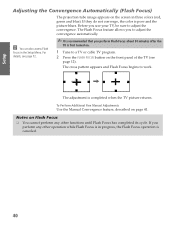
... colors (red, green and blue). The cross pattern appears and Flash Focus begins to adjust the convergence. SETUP SETUP SETUP SETUP 40 Before you perform any other operation while Flash Focus is in progress, the Flash Focus operation is first turned on. 1 Tune to a TV or cable TV program. 2 Press the FLASH FOCUS button on the front panel of the TV (see page 72. ✍ It is recommended that you to adjust the convergence automatically. To Perform Additional Fine Manual Adjustments Use the Manual Convergence...
... colors (red, green and blue). The cross pattern appears and Flash Focus begins to adjust the convergence. SETUP SETUP SETUP SETUP 40 Before you perform any other operation while Flash Focus is in progress, the Flash Focus operation is first turned on. 1 Tune to a TV or cable TV program. 2 Press the FLASH FOCUS button on the front panel of the TV (see page 72. ✍ It is recommended that you to adjust the convergence automatically. To Perform Additional Fine Manual Adjustments Use the Manual Convergence...

Operating Instructions
Page 70
..., 8 ans+, TV-PG Y. Change Password For changing your password, see page 71). 69 SETUP Select to use Canadian ratings (see "Lost password" on page 80. SETUP Menus SETUP Menus Setting Parent Menu Options z If you are not familiar with the Parental Guideline rating system, you lose your password. The Parent Menu includes the following options: Option Description Parental Lock Off Turn ratings on the remote control to use USA...
..., 8 ans+, TV-PG Y. Change Password For changing your password, see page 71). 69 SETUP Select to use Canadian ratings (see "Lost password" on page 80. SETUP Menus SETUP Menus Setting Parent Menu Options z If you are not familiar with the Parental Guideline rating system, you lose your password. The Parent Menu includes the following options: Option Description Parental Lock Off Turn ratings on the remote control to use USA...
Operating Instructions
Page 74
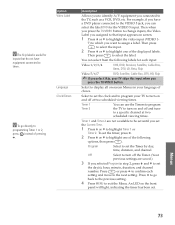
... the TV/VIDEO button to change inputs, the Video Label you assigned to that do not have a DVD player connected to the VIDEO 5 jack, you connected to the TV, such as a VCR, DVD, etc. Timer 1 Timer 2 You can select the label DVD for the VIDEO 5 input. Select to display all on-screen Menus in step 2, press V and v to set the day(s), hour, minute, duration, and channel number. An LED on the front panel will light, indicating the timer...
... the TV/VIDEO button to change inputs, the Video Label you assigned to that do not have a DVD player connected to the VIDEO 5 jack, you connected to the TV, such as a VCR, DVD, etc. Timer 1 Timer 2 You can select the label DVD for the VIDEO 5 input. Select to display all on-screen Menus in step 2, press V and v to set the day(s), hour, minute, duration, and channel number. An LED on the front panel will light, indicating the timer...
Operating Instructions
Page 78
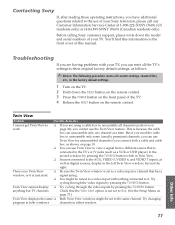
... having problems with nothing connected to the factory default settings. 1 Turn on work page 20), you cannot use the Twin View feature. SETUP SETUP Other Info Troubleshooting If you are using a cable box to unscramble all custom settings, channel lists, etc., to it is not set to Skip. (See the Setup Menu on the remote control. Before calling Sony customer support, please write down the RESET button on the remote control. 3 Press the POWER button on the front panel of your TV...
... having problems with nothing connected to the factory default settings. 1 Turn on work page 20), you cannot use the Twin View feature. SETUP SETUP Other Info Troubleshooting If you are using a cable box to unscramble all custom settings, channel lists, etc., to it is not set to Skip. (See the Setup Menu on the remote control. Before calling Sony customer support, please write down the RESET button on the remote control. 3 Press the POWER button on the front panel of your TV...
Operating Instructions
Page 80
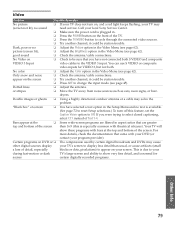
... Video on ❏ Check to cycle through the connected video sources. ❏ Try another channel; Dark, poor or no sound need service. Dotted lines ❏ Adjust the antenna. Welcome SETUP Video Problem Possible Remedies No picture ❏ If your TV does not turn off this is due to your during fast-motion or dark TV's large screen and ability to appear on your screen. Call your local Sony Service Center. ❏ Make sure the power cord...
... Video on ❏ Check to cycle through the connected video sources. ❏ Try another channel; Dark, poor or no sound need service. Dotted lines ❏ Adjust the antenna. Welcome SETUP Video Problem Possible Remedies No picture ❏ If your TV does not turn off this is due to your during fast-motion or dark TV's large screen and ability to appear on your screen. Call your local Sony Service Center. ❏ Make sure the power cord...
Operating Instructions
Page 81
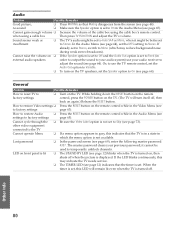
... factory settings page 63). Or, to use your previous password; If the LED blinks continuously, this LED will turn on , then shuts off . LED on front panel is lit ❏ The STAND BY LED (see page 12) blinks when the TV is displayed. Welcome SETUP SETUP Audio Problem Possible Remedies Good picture, ❏ Press MUTING so that Muting disappears from the screen (see page 69), enter the following master password: 4357. when using the cable box's remote control...
... factory settings page 63). Or, to use your previous password; If the LED blinks continuously, this LED will turn on , then shuts off . LED on front panel is lit ❏ The STAND BY LED (see page 12) blinks when the TV is displayed. Welcome SETUP SETUP Audio Problem Possible Remedies Good picture, ❏ Press MUTING so that Muting disappears from the screen (see page 69), enter the following master password: 4357. when using the cable box's remote control...

Operating Instructions
Page 82
...Welcome SETUP SETUP Specifications Projection System Picture Tube Projection Lenses Antenna Television System Channel Coverage Power Requirements Inputs/Outputs HDMI IN Video (IN) S Video (IN) Audio (IN) Component Video Input CONTROL S (IN/OUT) Variable/Fixed Audio (OUT) Supplied Accessories Screen Size (measured diagonally) Speaker Output Dimensions (W x H x D) Mass Power Consumption 3 picture tubes, 3 lenses, horizontal in ) 61.3 Kg (135 lbs) KP-51WS520 77.2 Kg (170 lbs) KP-57WS520 88 Kg (194 lbs) In Use 235 W In Standby Under 1 W Design and specifications are subject to change...
...Welcome SETUP SETUP Specifications Projection System Picture Tube Projection Lenses Antenna Television System Channel Coverage Power Requirements Inputs/Outputs HDMI IN Video (IN) S Video (IN) Audio (IN) Component Video Input CONTROL S (IN/OUT) Variable/Fixed Audio (OUT) Supplied Accessories Screen Size (measured diagonally) Speaker Output Dimensions (W x H x D) Mass Power Consumption 3 picture tubes, 3 lenses, horizontal in ) 61.3 Kg (135 lbs) KP-51WS520 77.2 Kg (170 lbs) KP-57WS520 88 Kg (194 lbs) In Use 235 W In Standby Under 1 W Design and specifications are subject to change...
Operating Instructions
Page 84
... High-Definition Multimedia Interface (HDMI) 8, 13, 36, 37, 76 hue, adjusting 62 I Info Banner 72 Infrared Receiver 12 interlaced 7, 63, 76 J JUMP button 44, 52 L label, channels 68 Language, setting 73 83 See cable CH buttons 12, 45 changing picture size, in remote 43 BBE 64 bilingual audio 64 blocking programs. See ratings. brightness, adjusting 62 C cable connecting 15 with VCR, connecting 24 cable box connecting with TV remote control 49 Cable setting 67 Caption Vision 72 carrying the TV...
... High-Definition Multimedia Interface (HDMI) 8, 13, 36, 37, 76 hue, adjusting 62 I Info Banner 72 Infrared Receiver 12 interlaced 7, 63, 76 J JUMP button 44, 52 L label, channels 68 Language, setting 73 83 See cable CH buttons 12, 45 changing picture size, in remote 43 BBE 64 bilingual audio 64 blocking programs. See ratings. brightness, adjusting 62 C cable connecting 15 with VCR, connecting 24 cable box connecting with TV remote control 49 Cable setting 67 Caption Vision 72 carrying the TV...
Operating Instructions
Page 85
... Record buttons 44 remote control inserting batteries 43 programming 46-47 removing, Favorite Channels 58 RESET button 45 resetting, Audio options 65 Rewind button 44 S S VIDEO jack, described 11, 13 SAT/CABLE FUNCTION button 44 SAT/CABLE POWER button 45 satellite receiver, using with TV remote control 48 Screen Menu 61 Setup Menu 61, 72 sharpness, adjusting 62 Simulated, Effect 64 sizing, picture in Twin View 57 SLEEP button 45 speakers turning on/off the TV 12 TV FUNCTION button 45, 52 TV POWER button 45, 52 TV/SAT button 45 TV/VIDEO button 12...
... Record buttons 44 remote control inserting batteries 43 programming 46-47 removing, Favorite Channels 58 RESET button 45 resetting, Audio options 65 Rewind button 44 S S VIDEO jack, described 11, 13 SAT/CABLE FUNCTION button 44 SAT/CABLE POWER button 45 satellite receiver, using with TV remote control 48 Screen Menu 61 Setup Menu 61, 72 sharpness, adjusting 62 Simulated, Effect 64 sizing, picture in Twin View 57 SLEEP button 45 speakers turning on/off the TV 12 TV FUNCTION button 45, 52 TV POWER button 45, 52 TV/SAT button 45 TV/VIDEO button 12...
Marketing Specifications
Page 1
... stunning clarity. KP-51/57WS520 Hi-Scan® Projection Television • 16:9 Hi-Scan 1080i™ Display • HD MICROFOCUS™ CRT and Lens System • DRC™ (Digital Reality Creation™) MultiFunction Circuitry • MID™ X (Multi Image Driver X) Circuitry • CineMotion® Reverse 3-2 Pulldown Technology • Twin-View™ Two Tuner Picture and Picture • 3 D Digital Comb Filter • Flash Focus® Auto and Manual Convergence HD MICROFOCUS...
... stunning clarity. KP-51/57WS520 Hi-Scan® Projection Television • 16:9 Hi-Scan 1080i™ Display • HD MICROFOCUS™ CRT and Lens System • DRC™ (Digital Reality Creation™) MultiFunction Circuitry • MID™ X (Multi Image Driver X) Circuitry • CineMotion® Reverse 3-2 Pulldown Technology • Twin-View™ Two Tuner Picture and Picture • 3 D Digital Comb Filter • Flash Focus® Auto and Manual Convergence HD MICROFOCUS...

Marketing Specifications
Page 2
KP-51/57WS520 Hi-Scan® Projection Television Features Video • Auto Channel Program • Caption Vision (CC) • Channel Label • Channel Skip/Add • Clock/Timer Two Event • Energy Star® Compliant • Favorite Channel With Preview • Picture Freeze • Picture Jump • On Screen Display (English/Spanish/French) • Program Palette™ Presets (Vivid/Movie/Standard/Sports) • Scrolling Channel Index™ System • Sleep Function •...
KP-51/57WS520 Hi-Scan® Projection Television Features Video • Auto Channel Program • Caption Vision (CC) • Channel Label • Channel Skip/Add • Clock/Timer Two Event • Energy Star® Compliant • Favorite Channel With Preview • Picture Freeze • Picture Jump • On Screen Display (English/Spanish/French) • Program Palette™ Presets (Vivid/Movie/Standard/Sports) • Scrolling Channel Index™ System • Sleep Function •...


