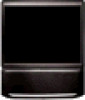

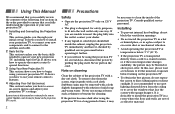
Child Safety: It Makes A Difference Where Your TV Stands
Page 1
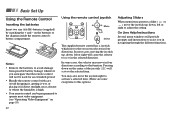
... inappropriately situated on the proper TV stands. The Consumer Electronics Association formed the Home Entertainment Support Safety Committee comprised of TVs such as VCRs and remotes that may pique the children's curiosity. 6 Remember that is large enough to support the weight of your television (and other electronic components). 2 Use appropriate angle...
... inappropriately situated on the proper TV stands. The Consumer Electronics Association formed the Home Entertainment Support Safety Committee comprised of TVs such as VCRs and remotes that may pique the children's curiosity. 6 Remember that is large enough to support the weight of your television (and other electronic components). 2 Use appropriate angle...
Operating Instructions
Page 2
...You are designed to provide reasonable protection against harmful interference in accordance with the instruction manual. As an ENERGY STAR Partner, Sony Corporation has determined that interference will not occur in accordance with the instructions, may be permanently imprinted onto the screen. REFER...or shock hazard, do not use your authority to operate this product meets the ENERGY STAR guidelines for the remote control RM-Y905 MODELS: KP-48V85, KP-53V85, KP-61V85 Please keep the brightness and contrast functions at a high brightness or contrast setting, the image can radiate...
...You are designed to provide reasonable protection against harmful interference in accordance with the instruction manual. As an ENERGY STAR Partner, Sony Corporation has determined that interference will not occur in accordance with the instructions, may be permanently imprinted onto the screen. REFER...or shock hazard, do not use your authority to operate this product meets the ENERGY STAR guidelines for the remote control RM-Y905 MODELS: KP-48V85, KP-53V85, KP-61V85 Please keep the brightness and contrast functions at a high brightness or contrast setting, the image can radiate...
Operating Instructions
Page 3
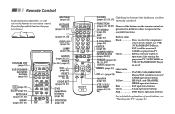
...Player operation buttons For a detailed explanation of most buttons, see "Watching the TV" on the remote control are TV/VIDEO (page 26) presented in different colors to know the buttons on the (pages 25, 56, 57) remote control FUNCTION (pages 25, 55-57) Names of the buttons on page 25. ANT (...page 27) 0-9 buttons (page 25) ENTER (page 25) CHANNEL INDEX/ PIP/P&P/ACTIVE (pages 28-32) Button color Black...
...Player operation buttons For a detailed explanation of most buttons, see "Watching the TV" on the remote control are TV/VIDEO (page 26) presented in different colors to know the buttons on the (pages 25, 56, 57) remote control FUNCTION (pages 25, 55-57) Names of the buttons on page 25. ANT (...page 27) 0-9 buttons (page 25) ENTER (page 25) CHANNEL INDEX/ PIP/P&P/ACTIVE (pages 28-32) Button color Black...
Operating Instructions
Page 4
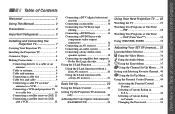
...Dolby Pro Logic decoder 19 Using the S-Link Function 20 Using the S-Link function without a Sony AV receiver 20 Using the S-Link function with a Sony AV receiver 21 Basic Set Up 22 Using the Remote Control 22 Setting Up the Projection TV Automatically 23 Adjusting the Convergence Automatically (FLASH FOCUS 24... at One Time - P&P (Twin ViewTM 30 Using CHANNEL INDEX 32 Adjusting Your SET UP (menus) ... 33 Learning Menu Selection 33 Using the Video Menu 34 Using the Audio Menu 35 Using the Timer Menu 37 ch Using the Channel Set Up Menu ...... 38 Setting and Selecting Favorite Channel...
...Dolby Pro Logic decoder 19 Using the S-Link Function 20 Using the S-Link function without a Sony AV receiver 20 Using the S-Link function with a Sony AV receiver 21 Basic Set Up 22 Using the Remote Control 22 Setting Up the Projection TV Automatically 23 Adjusting the Convergence Automatically (FLASH FOCUS 24... at One Time - P&P (Twin ViewTM 30 Using CHANNEL INDEX 32 Adjusting Your SET UP (menus) ... 33 Learning Menu Selection 33 Using the Video Menu 34 Using the Audio Menu 35 Using the Timer Menu 37 ch Using the Channel Set Up Menu ...... 38 Setting and Selecting Favorite Channel...
Operating Instructions
Page 6
.... Instructions in this case, please wait a few hours to let the moisture evaporate before operating it may be blurred or show poor color. Consult qualified service personnel. Installing • To prevent internal heat buildup, do not expose the screen to insert the plug fully into... Never use spot lighting directed down from the screen, wipe it checked by pulling the plug itself. It shows you how to operate the remote control's special functions. 3 Using Your New Projection TV This section shows you are unable to direct illumination or direct sunlight. Similar controls may...
.... Instructions in this case, please wait a few hours to let the moisture evaporate before operating it may be blurred or show poor color. Consult qualified service personnel. Installing • To prevent internal heat buildup, do not expose the screen to insert the plug fully into... Never use spot lighting directed down from the screen, wipe it checked by pulling the plug itself. It shows you how to operate the remote control's special functions. 3 Using Your New Projection TV This section shows you are unable to direct illumination or direct sunlight. Similar controls may...
Operating Instructions
Page 12
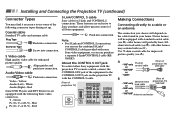
... TV) VHF/UHF • UHF only or • VHF/UHF Antenna connector still other Sony equipment with the projection TV's remote control, connect the CONTROL S IN jack of the equipment to the CONTROL S OUT jack ...Rear of projection TV) CONTROL S OUT IN VIDEO 1 VIDEO 3 VIDEO 4 VIDEO 5 S VIDEO CENTER SPEAKER IN VIDEO 40W(NOM) 80W(MAX)16 L (MONO) AUDIO R Y PB PR L AUDIO R OUT TV MONITOR AUDIO (VAR/FIX) VIDEO L (MONO) AUDIO R CONTROL S OUT S-LINK VIDEO 1 VIDEO 3 VIDEO 4 IN VIDEO 5 S-LINK AUDIO TV MONITOR (VAR/FIX) OUT Making Connections Connecting directly to use some Sony video...
... TV) VHF/UHF • UHF only or • VHF/UHF Antenna connector still other Sony equipment with the projection TV's remote control, connect the CONTROL S IN jack of the equipment to the CONTROL S OUT jack ...Rear of projection TV) CONTROL S OUT IN VIDEO 1 VIDEO 3 VIDEO 4 VIDEO 5 S VIDEO CENTER SPEAKER IN VIDEO 40W(NOM) 80W(MAX)16 L (MONO) AUDIO R Y PB PR L AUDIO R OUT TV MONITOR AUDIO (VAR/FIX) VIDEO L (MONO) AUDIO R CONTROL S OUT S-LINK VIDEO 1 VIDEO 3 VIDEO 4 IN VIDEO 5 S-LINK AUDIO TV MONITOR (VAR/FIX) OUT Making Connections Connecting directly to use some Sony video...

Operating Instructions
Page 13
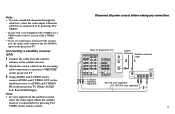
..." in this set up , you are able to operate your cable box), and normal (CATV) channels by pressing ANT on your remote control. Connection is the simplest connection. Coaxial cable (Rear of projection TV) VHF/UHF and • UHF EAC-66 U/V mixer (not supplied) 300-ohm twin lead cable Cable or antenna... Satellite Receiver (SAT)" on page 57) • During PIP, P&P, CHANNEL INDEX or Favorite Channel viewing, the AUX input can only be able to program your Sony remote control to receive using an antenna. Cable and antenna You may be viewed in the main picture. 9
..." in this set up , you are able to operate your cable box), and normal (CATV) channels by pressing ANT on your remote control. Connection is the simplest connection. Coaxial cable (Rear of projection TV) VHF/UHF and • UHF EAC-66 U/V mixer (not supplied) 300-ohm twin lead cable Cable or antenna... Satellite Receiver (SAT)" on page 57) • During PIP, P&P, CHANNEL INDEX or Favorite Channel viewing, the AUX input can only be able to program your Sony remote control to receive using an antenna. Cable and antenna You may be viewed in the main picture. 9
Operating Instructions
Page 15
...-AUDIO Right). Disconnect all power sources before making any connections. (Rear of the S VIDEO cable. ** If you are connecting a monaural VCR, connect only the single audio output to by pressing TV/ VIDEO. * If your VCR is connected to the left (MONO) input on the remote control. Connecting a satellite receiver (SAT) 1 Connect the cable from...
...-AUDIO Right). Disconnect all power sources before making any connections. (Rear of the S VIDEO cable. ** If you are connecting a monaural VCR, connect only the single audio output to by pressing TV/ VIDEO. * If your VCR is connected to the left (MONO) input on the remote control. Connecting a satellite receiver (SAT) 1 Connect the cable from...

Operating Instructions
Page 16
S VIDEO (Rear of the S VIDEO cable. Note: • To view input from the incoming cable connection or antenna to VHF/UHF IN on the VCR. 3 Using a coaxial cable, connect VHF/UHF OUT on the VCR to VHF/UHF on the projection TV. 4 Using AUDIO and S VIDEO* cables, connect AUDIO and S VIDEO OUT on the satellite receiver...
S VIDEO (Rear of the S VIDEO cable. Note: • To view input from the incoming cable connection or antenna to VHF/UHF IN on the VCR. 3 Using a coaxial cable, connect VHF/UHF OUT on the VCR to VHF/UHF on the projection TV. 4 Using AUDIO and S VIDEO* cables, connect AUDIO and S VIDEO OUT on the satellite receiver...
Operating Instructions
Page 22
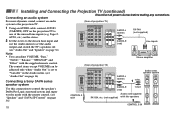
... "Bass," "Treble," "Balance," "MTS/SAP" and "Effect" with the speakers 2 CONTROL S IN 18 For more dynamic sound, connect an audio (Rear of projection TV) system to the projection TV. 1 Using an AUDIO cable, connect AUDIO (VAR/FIX) OUT on page 36) Note: • You... speaker's Dolby Pro Logic surround system and super woofer mode with the remote control. (see "Audio Out" on page 36) Connecting a Sony SAVA series speaker system Use this connection to one of projection TV) IN VIDEO 1 VIDEO 3 VIDEO 4 VIDEO 5 S VIDEO CENTER SPEAKER IN VIDEO 40W(NOM) 80W(MAX)16 L (MONO) AUDIO R Y PB ...
... "Bass," "Treble," "Balance," "MTS/SAP" and "Effect" with the speakers 2 CONTROL S IN 18 For more dynamic sound, connect an audio (Rear of projection TV) system to the projection TV. 1 Using an AUDIO cable, connect AUDIO (VAR/FIX) OUT on page 36) Note: • You... speaker's Dolby Pro Logic surround system and super woofer mode with the remote control. (see "Audio Out" on page 36) Connecting a Sony SAVA series speaker system Use this connection to one of projection TV) IN VIDEO 1 VIDEO 3 VIDEO 4 VIDEO 5 S VIDEO CENTER SPEAKER IN VIDEO 40W(NOM) 80W(MAX)16 L (MONO) AUDIO R Y PB ...
Operating Instructions
Page 26
...batteries Insert two size AA (R6) batteries (supplied) by matching the + and - Select The supplied remote control has a joystick which moves the on page 55) 22 Using the remote control joystick AUDIO INDEX VOL MENU FREEZE GUIDE CH RESET Move . Notes: • Remove the batteries... is high. • Your remote control can be used for an extended period. • Handle the remote control with care. You may also move the joystick right to the diagram inside the remote control's battery compartment. In most video equipment. (see "Operating Video Equipment" on -screen selector in...
...batteries Insert two size AA (R6) batteries (supplied) by matching the + and - Select The supplied remote control has a joystick which moves the on page 55) 22 Using the remote control joystick AUDIO INDEX VOL MENU FREEZE GUIDE CH RESET Move . Notes: • Remove the batteries... is high. • Your remote control can be used for an extended period. • Handle the remote control with care. You may also move the joystick right to the diagram inside the remote control's battery compartment. In most video equipment. (see "Operating Video Equipment" on -screen selector in...
Operating Instructions
Page 29
... select channel 10, press 1 and 0). If a video input indication (e.g., VIDEO 1, VIDEO 2) appears on page 34. 25 Press 0-9 to scan through the remote control. Press to select a channel (for use with the projection TV. to change after 2 seconds, or you can also perform the "Picture Adjustment" (such as "Brightness," "Color," etc.) to adjust the volume (+ up...
... select channel 10, press 1 and 0). If a video input indication (e.g., VIDEO 1, VIDEO 2) appears on page 34. 25 Press 0-9 to scan through the remote control. Press to select a channel (for use with the projection TV. to change after 2 seconds, or you can also perform the "Picture Adjustment" (such as "Brightness," "Color," etc.) to adjust the volume (+ up...

Operating Instructions
Page 30
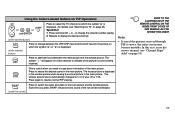
... Press to copy down information that appears on the TV's screen. Press to scroll through available video inputs: TV, VIDEO 1, VIDEO 2, VIDEO 3, VIDEO 4 and VIDEO 5. The projection TV will skip the video input you need to alternate or jump back and forth between the current channel and the last channel...while viewing the normal picture of the current channel on the top of the remote control. Using Your New Projection TV (continued) Using the White Labeled Buttons for Projection TV Operations TV/VIDEO Press repeatedly to display the channel number, current time, channel caption (if...
... Press to copy down information that appears on the TV's screen. Press to scroll through available video inputs: TV, VIDEO 1, VIDEO 2, VIDEO 3, VIDEO 4 and VIDEO 5. The projection TV will skip the video input you need to alternate or jump back and forth between the current channel and the last channel...while viewing the normal picture of the current channel on the top of the remote control. Using Your New Projection TV (continued) Using the White Labeled Buttons for Projection TV Operations TV/VIDEO Press repeatedly to display the channel number, current time, channel caption (if...

Operating Instructions
Page 31
... before shutting off the projection TV and all other equipment connected with S- (under the cover) Link. (see page 20) REFER TO THE ILLUSTRATION OF THE REMOTE CONTROL ON THE INSIDE FRONT COVER OF THIS MANUAL AS YOU REVIEW THIS CHART 27 Caption Vision Displayed on the screen if the broadcaster offers...
... before shutting off the projection TV and all other equipment connected with S- (under the cover) Link. (see page 20) REFER TO THE ILLUSTRATION OF THE REMOTE CONTROL ON THE INSIDE FRONT COVER OF THIS MANUAL AS YOU REVIEW THIS CHART 27 Caption Vision Displayed on the screen if the broadcaster offers...
Operating Instructions
Page 33
... viewing. The frozen picture is displayed in the window picture while viewing the normal picture in the main picture. REFER TO THE ILLUSTRATION OF THE REMOTE CONTROL ON THE INSIDE FRONT COVER OF THIS MANUAL AS YOU REVIEW THIS CHART Note: • If one of the two will appear for a few... the AUX input for the picture on which picture's sound is being received. The window picture size is automatically changed to switch the audio and video of the main picture. Each time you need to copy down information of the main picture and the window picture. ANT (white labeled button) ...
... viewing. The frozen picture is displayed in the window picture while viewing the normal picture in the main picture. REFER TO THE ILLUSTRATION OF THE REMOTE CONTROL ON THE INSIDE FRONT COVER OF THIS MANUAL AS YOU REVIEW THIS CHART Note: • If one of the two will appear for a few... the AUX input for the picture on which picture's sound is being received. The window picture size is automatically changed to switch the audio and video of the main picture. Each time you need to copy down information of the main picture and the window picture. ANT (white labeled button) ...

Operating Instructions
Page 35
...(see "Channel Skip/ Add" on the TV's screen. The symbol " " will be exchanged. SWAP (under the cover) Press to switch the audio and video of the left (sub) picture is monaural. • Caption Vision is being received. Press to alternate sound between the right and left pictures. REFER TO... THE ILLUSTRATION OF THE REMOTE CONTROL ON THE INSIDE FRONT COVER OF THIS MANUAL AS YOU REVIEW THIS CHART Notes: • The sound of the right and left pictures....
...(see "Channel Skip/ Add" on the TV's screen. The symbol " " will be exchanged. SWAP (under the cover) Press to switch the audio and video of the left (sub) picture is monaural. • Caption Vision is being received. Press to alternate sound between the right and left pictures. REFER TO... THE ILLUSTRATION OF THE REMOTE CONTROL ON THE INSIDE FRONT COVER OF THIS MANUAL AS YOU REVIEW THIS CHART Notes: • The sound of the right and left pictures....

Operating Instructions
Page 38
... NTSC Standard: Select to display a standard picture for direct selection of the Video menu. Press PICTURE MODE on the remote control while the Video menu is selected. Movie: Select to give the white colors a blueish tint. Medium: Select to display a finely detailed picture for enhanced ... the mode to give the white colors a neutral tint. left (down ) to cancel the feature. Select Off to soften it . To select the Video menu: Display / Highlight / Select MENU To restore the factory settings Press RESET on the remote control for normal viewing environments. left...
... NTSC Standard: Select to display a standard picture for direct selection of the Video menu. Press PICTURE MODE on the remote control while the Video menu is selected. Movie: Select to give the white colors a blueish tint. Medium: Select to display a finely detailed picture for enhanced ... the mode to give the white colors a neutral tint. left (down ) to cancel the feature. Select Off to soften it . To select the Video menu: Display / Highlight / Select MENU To restore the factory settings Press RESET on the remote control for normal viewing environments. left...
Operating Instructions
Page 39
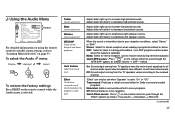
...decrease low pitched sounds. On: Sound output coming from TV speakers have different sound transmission levels. Quick Effect access: Press on the remote control while the Audio menu is selected) Mono: Select for all channel audio inputs when broadcasts have the volume level equalized for mono...Volume: On ch Effect: Trusurround Speaker: On Audio Out: Variable SAVA SP Control Move Select Exit MENU For detailed information on using the remote control to modify menu settings, refer to "Learning Menu Selection" on the program's audio type. To select the Audio menu: Display /...
...decrease low pitched sounds. On: Sound output coming from TV speakers have different sound transmission levels. Quick Effect access: Press on the remote control while the Audio menu is selected) Mono: Select for all channel audio inputs when broadcasts have the volume level equalized for mono...Volume: On ch Effect: Trusurround Speaker: On Audio Out: Variable SAVA SP Control Move Select Exit MENU For detailed information on using the remote control to modify menu settings, refer to "Learning Menu Selection" on the program's audio type. To select the Audio menu: Display /...
Operating Instructions
Page 40
..." below) Center: Select to use the projection TV as center speaker when you want to use your remote control to control the output of volume adjustment "Audio Out" can only be set when Sony SAVA speaker system is connected to the AUDIO (VAR/FIX) OUT connectors and "Speaker" is set to... "SAVA SP." (see "Speaker" above) You can only be set to the projection TV's sound only through the Sony SAVA series speaker system. Use the AV receiver's remote control to activate the SAVA Speaker's super woofer mode. 36 Useful when you connect an amplifier with a Dolby Pro Logic decoder...
..." below) Center: Select to use the projection TV as center speaker when you want to use your remote control to control the output of volume adjustment "Audio Out" can only be set when Sony SAVA speaker system is connected to the AUDIO (VAR/FIX) OUT connectors and "Speaker" is set to... "SAVA SP." (see "Speaker" above) You can only be set to the projection TV's sound only through the Sony SAVA series speaker system. Use the AV receiver's remote control to activate the SAVA Speaker's super woofer mode. 36 Useful when you connect an amplifier with a Dolby Pro Logic decoder...

Operating Instructions
Page 41
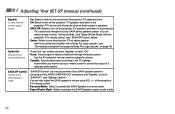
... down to compensate for the Timer. Daylight Savings Automatically adjusts the time. Current Time Necessary for Daylight Saving Time. For detailed information on using the remote control to modify menu settings, refer to Sun 12:00AM Move Select Exit MENU remain on and off. Press MENU to exit. AM Select Exit...
... down to compensate for the Timer. Daylight Savings Automatically adjusts the time. Current Time Necessary for Daylight Saving Time. For detailed information on using the remote control to modify menu settings, refer to Sun 12:00AM Move Select Exit MENU remain on and off. Press MENU to exit. AM Select Exit...


