Revision History
Page 6
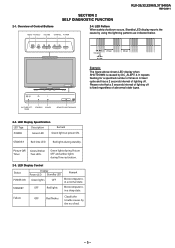
KLV-26,32,32/H/S,37 S400A RM-GA011 SECTION 2 SELF DIAGNOSTIC FUNCTION 2-1. Please note that...fixed regardless of red. - 5 - Overview of lighting off is in a normal state. PICTURE OFF/ STANDBY POWER TIMER REMOTE/LIGHT SENSOR 2-2. STANDBY Red: One LED Red lights during Timer activation. 2-3. It repeats flashing for a specified number of times... in 0.3sec/ cycle and has a 2 seconds interval of Control Buttons MENU TV/VIDEO VOLUME CHANNEL POWER 2-4. LED Pattern When safety shutdown occurs, Standby LED display reports the cause by using the...
KLV-26,32,32/H/S,37 S400A RM-GA011 SECTION 2 SELF DIAGNOSTIC FUNCTION 2-1. Please note that...fixed regardless of red. - 5 - Overview of lighting off is in a normal state. PICTURE OFF/ STANDBY POWER TIMER REMOTE/LIGHT SENSOR 2-2. STANDBY Red: One LED Red lights during Timer activation. 2-3. It repeats flashing for a specified number of times... in 0.3sec/ cycle and has a 2 seconds interval of Control Buttons MENU TV/VIDEO VOLUME CHANNEL POWER 2-4. LED Pattern When safety shutdown occurs, Standby LED display reports the cause by using the...
Revision History
Page 22
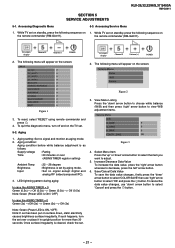
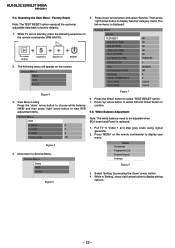
...remote commander and press . 4. LED lightning pattern during aging: In case the AGING TIMER > 0 Green (0.5s) --> Off (0.5s) --> Green (0.5s) --> Off (0.5s) Note: Green (Power LED is cleared, check the set by aging mode. : Set no signal and monitor as follows: Supply voltage... 'left' arrow button. 6. SECTION 5 SERVICE ADJUSTMENTS KLV-26,32,32/H/S,37 S400A RM-GA011 5-1. Accessing Service Menu 1. The following menu...select 'Cancel' and press the button. While TV set . 5-2. Aging 1. The following menu will appear on the remote commander (RM-GA011). To cancel the data value...
...remote commander and press . 4. LED lightning pattern during aging: In case the AGING TIMER > 0 Green (0.5s) --> Off (0.5s) --> Green (0.5s) --> Off (0.5s) Note: Green (Power LED is cleared, check the set by aging mode. : Set no signal and monitor as follows: Supply voltage... 'left' arrow button. 6. SECTION 5 SERVICE ADJUSTMENTS KLV-26,32,32/H/S,37 S400A RM-GA011 5-1. Accessing Service Menu 1. The following menu...select 'Cancel' and press the button. While TV set . 5-2. Aging 1. The following menu will appear on the remote commander (RM-GA011). To cancel the data value...
Revision History
Page 23
... select 'TEST RESET' option. 7. KLV-26,32,32/H/S,37 S400A RM-GA011 5-4. Resetting the User Menu - The following sequence on the remote commander (RM-GA011). Press the 'Enter' button to display setting options. - 22 - While TV set on standby, press the following menu will ...appear on the remote commander to view W/B adjustment items. Service Menu W/B R_DRIVE 0 G_DRIVE...
... select 'TEST RESET' option. 7. KLV-26,32,32/H/S,37 S400A RM-GA011 5-4. Resetting the User Menu - The following sequence on the remote commander (RM-GA011). Press the 'Enter' button to display setting options. - 22 - While TV set on standby, press the following menu will ...appear on the remote commander to view W/B adjustment items. Service Menu W/B R_DRIVE 0 G_DRIVE...
Revision History
Page 42
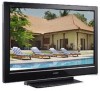
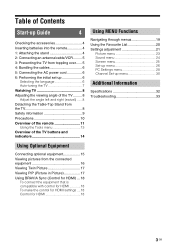
...up 6 Selecting the language 6 Auto-tuning the TV 7 Watching TV 8 Adjusting the viewing angle of the TV ......... 8 Adjust the angle left and right (swivel) ......8 Detaching the Table-Top Stand from the TV 8 Safety information 9 Precautions 10 Overview of the remote 11 Using the Tools menu 13 Overview of the...23 Sound menu 24 Screen menu 25 Set-up menu 26 PC Settings menu 28 Channel Set-up menu 30 32 Additional Information Specifications 32 Troubleshooting 33 Connecting optional equipment 15 Viewing pictures from the connected equipment 16 Viewing Twin Picture 17 Viewing PIP ...
...up 6 Selecting the language 6 Auto-tuning the TV 7 Watching TV 8 Adjusting the viewing angle of the TV ......... 8 Adjust the angle left and right (swivel) ......8 Detaching the Table-Top Stand from the TV 8 Safety information 9 Precautions 10 Overview of the remote 11 Using the Tools menu 13 Overview of the...23 Sound menu 24 Screen menu 25 Set-up menu 26 PC Settings menu 28 Channel Set-up menu 30 32 Additional Information Specifications 32 Troubleshooting 33 Connecting optional equipment 15 Viewing pictures from the connected equipment 16 Viewing Twin Picture 17 Viewing PIP ...
Revision History
Page 43
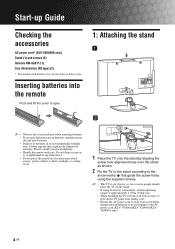
... that guide the screw holes using the supplied screws. ~ • This TV is very heavy, so two or more people should place the TV on it, or spill liquid of any kind onto it. • Do not place the remote in an environmentally friendly way. Start-up Guide Checking the accessories AC... power cord* (KLV-40S400A only) Stand (1) and screws (3) Remote RM-GA011 (1) Size AA batteries (R6 ...
... that guide the screw holes using the supplied screws. ~ • This TV is very heavy, so two or more people should place the TV on it, or spill liquid of any kind onto it. • Do not place the remote in an environmentally friendly way. Start-up Guide Checking the accessories AC... power cord* (KLV-40S400A only) Stand (1) and screws (3) Remote RM-GA011 (1) Size AA batteries (R6 ...
Revision History
Page 45
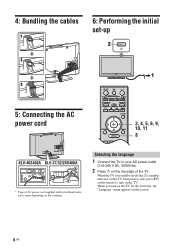
... in standby mode (the 1 (standby) indicator on the TV front panel is red), press "/1 on the remote to your AC power outlet (110-240 V AC, 50/60 Hz). 2 Press 1 on the TV. Selecting the language 1 Connect the TV to turn on the TV for the first time, the "Language" menu appears on the countries. When... cables 6: Performing the initial set-up , 1 5: Connecting the AC power cord BRAVIA Sync SYNC MENU THEATRE AUDIO 3, 4, 5, 6, 9, RETURN TOOLS 10, 11 8 KLV-40S400A KLV-37/32/26S400A * Type of the...
... in standby mode (the 1 (standby) indicator on the TV front panel is red), press "/1 on the remote to your AC power outlet (110-240 V AC, 50/60 Hz). 2 Press 1 on the TV. Selecting the language 1 Connect the TV to turn on the TV for the first time, the "Language" menu appears on the countries. When... cables 6: Performing the initial set-up , 1 5: Connecting the AC power cord BRAVIA Sync SYNC MENU THEATRE AUDIO 3, 4, 5, 6, 9, RETURN TOOLS 10, 11 8 KLV-40S400A KLV-37/32/26S400A * Type of the...
Revision History
Page 46
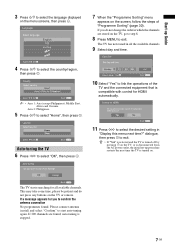
... the AC power outlet, the initial set-up Guide 3 Press F/f to select the language displayed on the TV or remote. Please connect antenna (aerial) and select "Confirm" to enable control for HDMI automatically. Auto-tuning the TV 6 Press G/g to select "OK", then press . 11 Press G/g to confirm the antenna connection No programmes found...
... the AC power outlet, the initial set-up Guide 3 Press F/f to select the language displayed on the TV or remote. Please connect antenna (aerial) and select "Confirm" to enable control for HDMI automatically. Auto-tuning the TV 6 Press G/g to select "OK", then press . 11 Press G/g to confirm the antenna connection No programmes found...
Revision History
Page 49
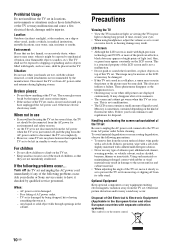
...TV set cracks, do not touch it checked by being dropped, hit or having something thrown at the seashore, on the remote control. 10 GB AC power cord is not a malfunction. • The LCD screen contains a small amount of the LCD... your dealer or Sony service centre to disconnect the TV set . • Keep small accessories out of the reach of children, so that require the TV set . Location:...systems) This symbol is sometimes contained depending on the TV. Handling and cleaning the screen surface/cabinet of the TV set Be sure to unplug the AC power cord connected to the TV...
...TV set cracks, do not touch it checked by being dropped, hit or having something thrown at the seashore, on the remote control. 10 GB AC power cord is not a malfunction. • The LCD screen contains a small amount of the LCD... your dealer or Sony service centre to disconnect the TV set . • Keep small accessories out of the reach of children, so that require the TV set . Location:...systems) This symbol is sometimes contained depending on the TV. Handling and cleaning the screen surface/cabinet of the TV set Be sure to unplug the AC power cord connected to the TV...
Revision History
Page 50
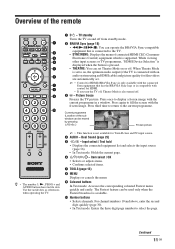
...TV. • SYNC MENU: Displays the menu of the remote BRAVIA Sync SYNC MENU THEATRE AUDIO RETURN TOOLS 1 "/1 - While viewing other input screens or TV...third time to return to select the page. Dual Sound (page 25) 5 / - Continued 11 GB TV standby Turns the TV on or off from standby mode. 2 ...BRAVIA Sync (page 18) • m/N/X/M/x: You can set . ~ • Control for HDMI (BRAVIA Sync) is only available with the connected Sony... which is compatible with an audio system using an HDMI cable) and picture quality for film ...
...TV. • SYNC MENU: Displays the menu of the remote BRAVIA Sync SYNC MENU THEATRE AUDIO RETURN TOOLS 1 "/1 - While viewing other input screens or TV...third time to return to select the page. Dual Sound (page 25) 5 / - Continued 11 GB TV standby Turns the TV on or off from standby mode. 2 ...BRAVIA Sync (page 18) • m/N/X/M/x: You can set . ~ • Control for HDMI (BRAVIA Sync) is only available with the connected Sony... which is compatible with an audio system using an HDMI cable) and picture quality for film ...
Revision History
Page 53
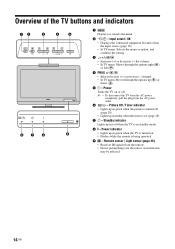
...in green when the picture is turned off . ~ • To disconnect the TV from the AC power completely, pull the plug from the remote. • Do not put anything over the sensor, as its function may be affected. 14 GB Remote sensor / Light sensor (page 28) • Receives IR signals from the AC... power outlet. 6 / - Picture Off / Timer indicator • Lights up in green when the TV is turned on or off (page 28). • Lights up ( ) or ...
...in green when the picture is turned off . ~ • To disconnect the TV from the AC power completely, pull the plug from the remote. • Do not put anything over the sensor, as its function may be affected. 14 GB Remote sensor / Light sensor (page 28) • Receives IR signals from the AC... power outlet. 6 / - Picture Off / Timer indicator • Lights up in green when the TV is turned on or off (page 28). • Lights up ( ) or ...
Revision History
Page 57
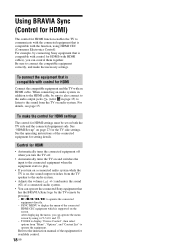
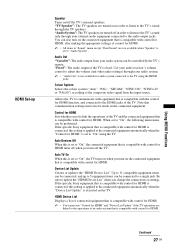
Control for HDMI (with HDMI cables), you can operate the connected Sony equipment that has the BRAVIA Sync logo by the TV remote by pressing: - Refer to the instruction manual of the equipment for HDMI function enables the TV to communicate with the connected equipment that is compatible with control for HDMI ...the audio output jacks (refer G in page 15) to listen to display the menu of the connected equipment for the TV side settings. When connecting an audio system, in addition to the HDMI cable, be set on the screen. See the operating instructions of the connected HDMI CEC ...
Control for HDMI (with HDMI cables), you can operate the connected Sony equipment that has the BRAVIA Sync logo by the TV remote by pressing: - Refer to the instruction manual of the equipment for HDMI function enables the TV to communicate with the connected equipment that is compatible with control for HDMI ...the audio output jacks (refer G in page 15) to listen to display the menu of the connected equipment for the TV side settings. When connecting an audio system, in addition to the HDMI cable, be set on the screen. See the operating instructions of the connected HDMI CEC ...
Revision History
Page 66
...control for HDMI. If the specific Sony equipment that is compatible with control for HDMI, after making the appropriate settings of control for HDMI. ~ • All items in "Sound" menu except "Dual Sound" are linked to the operations of the TV and the connected equipment that is compatible... according to 11 compatible equipment items can be controlled by the TV's remote. Allows the TV to "Audio System". When set to "On", the TV turns on when you turn on in order to listen to the TV's sound only through the TV speakers. Device List Update Creates or updates the "HDMI Device ...
...control for HDMI. If the specific Sony equipment that is compatible with control for HDMI, after making the appropriate settings of control for HDMI. ~ • All items in "Sound" menu except "Dual Sound" are linked to the operations of the TV and the connected equipment that is compatible... according to 11 compatible equipment items can be controlled by the TV's remote. Allows the TV to "Audio System". When set to "On", the TV turns on when you turn on in order to listen to the TV's sound only through the TV speakers. Device List Update Creates or updates the "HDMI Device ...
Revision History
Page 69
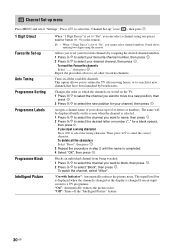
...the "Intelligent Picture" feature. 30 GB The name will be displayed briefly on the TV. 1 Press F/f to select the channel you cannot select channel numbers 10 and above entering two digits using one preset number button (0 - 9) on the remote. ~ • When "1 Digit Direct" is set to "On", you to ...retune the TV after moving house, or to select the wrong character. If you want to move to a new position, then...
...the "Intelligent Picture" feature. 30 GB The name will be displayed briefly on the TV. 1 Press F/f to select the channel you cannot select channel numbers 10 and above entering two digits using one preset number button (0 - 9) on the remote. ~ • When "1 Digit Direct" is set to "On", you to ...retune the TV after moving house, or to select the wrong character. If you want to move to a new position, then...
Revision History
Page 73
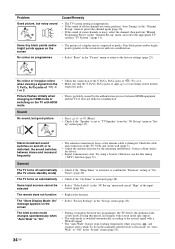
... mode, set to "Off" in the "Screen" menu (page 25). 34 GB Sound No sound, but noisy sound Cause/Remedy • The TV system setting is inappropriate. • If the sound of pixels. Otherwise, use the fine tuning ("AFT") function (page 31). During this period, an ...up" menu to HDMI mode or switching on the TV with a Wide ID signal. • The "Auto Wide" feature stops working temporarily when you press , and resumes after a while. The remote does not function • Replace the batteries. Contact a Sony dealer for the minimum interference. Problem Good picture, but...
... mode, set to "Off" in the "Screen" menu (page 25). 34 GB Sound No sound, but noisy sound Cause/Remedy • The TV system setting is inappropriate. • If the sound of pixels. Otherwise, use the fine tuning ("AFT") function (page 31). During this period, an ...up" menu to HDMI mode or switching on the TV with a Wide ID signal. • The "Auto Wide" feature stops working temporarily when you press , and resumes after a while. The remote does not function • Replace the batteries. Contact a Sony dealer for the minimum interference. Problem Good picture, but...


