
User Manual
Page 3
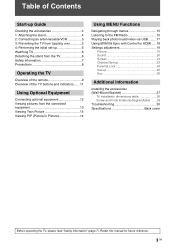
Retain this manual for HDMI ..... 18 Settings adjustment 19 Picture 19 Sound 20 Screen 21 Channel Set-up 23 Parental Lock 24 Set-up 25 Eco 26 Additional Information Installing the accessories (Wall-Mount Bracket 27 TV installation dimensions table 28 Screw and hook locations diagram/table .......29 Troubleshooting 30 Specifications Back cover Before operating the TV, please read "Safety information" (page 7). Table of Contents Start-up Guide Checking the accessories 4 1: Attaching the stand 4 2: Connecting an antenna/cable/VCR 5 3: Preventing the TV from toppling...
Retain this manual for HDMI ..... 18 Settings adjustment 19 Picture 19 Sound 20 Screen 21 Channel Set-up 23 Parental Lock 24 Set-up 25 Eco 26 Additional Information Installing the accessories (Wall-Mount Bracket 27 TV installation dimensions table 28 Screw and hook locations diagram/table .......29 Troubleshooting 30 Specifications Back cover Before operating the TV, please read "Safety information" (page 7). Table of Contents Start-up Guide Checking the accessories 4 1: Attaching the stand 4 2: Connecting an antenna/cable/VCR 5 3: Preventing the TV from toppling...
User Manual
Page 5
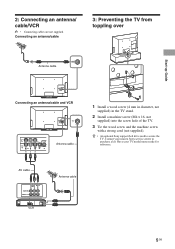
... antenna/ cable/VCR • Connecting cables are not supplied. Connecting an antenna/cable 3: Preventing the TV from toppling over 8 Antenna cable Start-up Guide Connecting an antenna/cable and VCR 8 Antenna cable 1 Install a wood screw (4 mm in diameter, not supplied) in the TV stand. 2 Install a machine screw (M4 × 16, not supplied) into the screw hole of the TV. 3 Tie the wood screw and the machine screw with a strong cord (not supplied). z • An optional Sony support belt kit is used...
... antenna/ cable/VCR • Connecting cables are not supplied. Connecting an antenna/cable 3: Preventing the TV from toppling over 8 Antenna cable Start-up Guide Connecting an antenna/cable and VCR 8 Antenna cable 1 Install a wood screw (4 mm in diameter, not supplied) in the TV stand. 2 Install a machine screw (M4 × 16, not supplied) into the screw hole of the TV. 3 Tie the wood screw and the machine screw with a strong cord (not supplied). z • An optional Sony support belt kit is used...
User Manual
Page 6
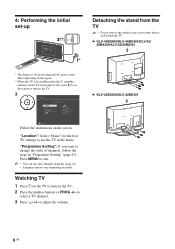
... not remove the stand for the best TV settings to use the TV in the home. "Programme Sorting": If you want to change the order of AC power plug and AC power outlet differ depending on the region. **When the TV is in standby mode (the 1 (standby) indicator on the TV front panel is red), press "/1 on the remote to turn on the TV. 2 Press the number buttons...
... not remove the stand for the best TV settings to use the TV in the home. "Programme Sorting": If you want to change the order of AC power plug and AC power outlet differ depending on the region. **When the TV is in standby mode (the 1 (standby) indicator on the TV front panel is red), press "/1 on the remote to turn on the TV. 2 Press the number buttons...
User Manual
Page 7
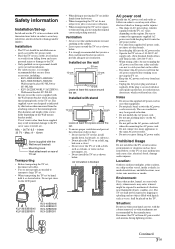
... power cord. • Do not put stress on rear of TV set Transporting • Before transporting the TV set, disconnect all cables. • Two or more people are needed to transport a large TV set. • When transporting the TV set from falling down , backwards, or sideways. - If the plug is covered with the Wall-mount bracket) Mounting Hook Hook attachment on the LCD panel. Prohibited Usage Do not install/use Sony...
... power cord. • Do not put stress on rear of TV set Transporting • Before transporting the TV set, disconnect all cables. • Two or more people are needed to transport a large TV set. • When transporting the TV set from falling down , backwards, or sideways. - If the plug is covered with the Wall-mount bracket) Mounting Hook Hook attachment on the LCD panel. Prohibited Usage Do not install/use Sony...

User Manual
Page 8
... are displayed continuously. This does not indicate a failure. To avoid material degradation or screen coating degradation, observe the following precautions. • To remove dust from the AC power outlet to have unplugged the AC power cord. If dust is just turned off from its table stand. Otherwise picture distortion and/or noisy sound may result. Please consult your dealer or Sony service centre...
... are displayed continuously. This does not indicate a failure. To avoid material degradation or screen coating degradation, observe the following precautions. • To remove dust from the AC power outlet to have unplugged the AC power cord. If dust is just turned off from its table stand. Otherwise picture distortion and/or noisy sound may result. Please consult your dealer or Sony service centre...
User Manual
Page 9
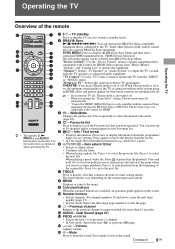
... z • The number 5, N, PROG + and AUDIO buttons have specified. Number buttons • Selects channels. Previous channel Returns to the TV. qs AUDIO - "TV Control": Use the "TV Control" menu to operate the TV from BRAVIA Sync Menu: "Device Control": Use the "Device Control" menu to operate equipment that contains shortcuts to pause/start playback from the beginning of the remote 1 "/1 - Wide Mode Changes the picture size. When playing a music/video file: Press to some setting menus. qg % - answers...
... z • The number 5, N, PROG + and AUDIO buttons have specified. Number buttons • Selects channels. Previous channel Returns to the TV. qs AUDIO - "TV Control": Use the "TV Control" menu to operate the TV from BRAVIA Sync Menu: "Device Control": Use the "Device Control" menu to operate equipment that contains shortcuts to pause/start playback from the beginning of the remote 1 "/1 - Wide Mode Changes the picture size. When playing a music/video file: Press to some setting menus. qg % - answers...

User Manual
Page 11
..." (page 26). • Lights up in red when the TV is in standby mode. 9 " - Power Press to turn the TV on or to switch to malfunction. 11 GB Standby indicator Lights up in green when the TV is completely turned off before unplugging the AC power cord. Unplugging the AC power cord while the TV is turned on . • Flashes while the remote is being operated. • Make sure...
..." (page 26). • Lights up in red when the TV is in standby mode. 9 " - Power Press to turn the TV on or to switch to malfunction. 11 GB Standby indicator Lights up in green when the TV is completely turned off before unplugging the AC power cord. Unplugging the AC power cord while the TV is turned on . • Flashes while the remote is being operated. • Make sure...

User Manual
Page 13
...; The monitor output jacks cannot support Component, HDMI and PC signals source pictures, also digital audio signal for supported PC input signal. • Be sure to use only an authorized HDMI cable bearing the HDMI logo. Connect to the video output jack 1 to the component jacks and the audio jacks / . You can support PC timing in a Sony digital still camera, camcorder or USB storage device (page 17). 13 GB Connect to record the image from the equipment. It is set "Speaker...
...; The monitor output jacks cannot support Component, HDMI and PC signals source pictures, also digital audio signal for supported PC input signal. • Be sure to use only an authorized HDMI cable bearing the HDMI logo. Connect to the video output jack 1 to the component jacks and the audio jacks / . You can support PC timing in a Sony digital still camera, camcorder or USB storage device (page 17). 13 GB Connect to record the image from the equipment. It is set "Speaker...
User Manual
Page 14
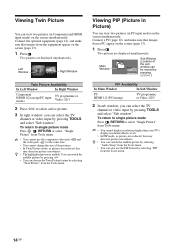
... change the size of the sub window can be moved by pressing F/f/G/g.) PIP Availability In Main Window In Sub Window PC HDMI 1/2 (PC timing) TV programme or Video 1/2/3 2 In sub window, you can select the TV channel or video input by selecting "Twin Picture" from the Tools menu. 14 GB Viewing PIP (Picture in Picture) You can view two pictures (in Component and HDMI input mode) on the screen simultaneously. Two pictures are displayed...
... change the size of the sub window can be moved by pressing F/f/G/g.) PIP Availability In Main Window In Sub Window PC HDMI 1/2 (PC timing) TV programme or Video 1/2/3 2 In sub window, you can select the TV channel or video input by selecting "Twin Picture" from the Tools menu. 14 GB Viewing PIP (Picture in Picture) You can view two pictures (in Component and HDMI input mode) on the screen simultaneously. Two pictures are displayed...
User Manual
Page 17
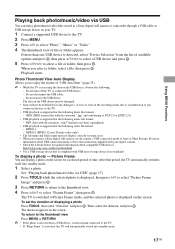
...) • USB playback is accessing the data on your digital camera. • Check the website below for updated information about USB connection mode, refer to Auto or Mass Storage. The TV is switched to the TV. • If "Sleep Timer" is activated, the TV will not be damaged. • Sony will automatically switch into standby mode. 1 Select a photo. http://www.sony-asia.com/bravia/flash.html • Use a USB storage...
...) • USB playback is accessing the data on your digital camera. • Check the website below for updated information about USB connection mode, refer to Auto or Mass Storage. The TV is switched to the TV. • If "Sleep Timer" is activated, the TV will not be damaged. • Sony will automatically switch into standby mode. 1 Select a photo. http://www.sony-asia.com/bravia/flash.html • Use a USB storage...

User Manual
Page 18
... remote. Using BRAVIA Sync with Control for HDMI The Control for HDMI function enables the TV to communicate with the connected equipment that has the BRAVIA Sync logo by connecting Sony equipment that is compatible with Control for HDMI (with HDMI cables), you turn on a connected audio system while the TV is on, the sound output switches from the TV speaker to the audio system. • Adjusts the volume (2 +/-) and mutes the sound (%) of the connected equipment is compatible...
... remote. Using BRAVIA Sync with Control for HDMI The Control for HDMI function enables the TV to communicate with the connected equipment that has the BRAVIA Sync logo by connecting Sony equipment that is compatible with Control for HDMI (with HDMI cables), you turn on a connected audio system while the TV is on, the sound output switches from the TV speaker to the audio system. • Adjusts the volume (2 +/-) and mutes the sound (%) of the connected equipment is compatible...

User Manual
Page 19
.... "Reset": Resets all the "Picture" settings except "Picture Mode" and "Intelligent Picture Plus Set-up" to represent original film-based content as is. • If the image contains irregular signals or too much noise, "Cinema Drive" is automatically turned off even if "Auto" is only available for stronger contrast. Increases or decreases picture contrast. "Warm 1"/"Warm 2": Gives the white colours a red tint. Select "Auto" to the factory settings. "Black...
.... "Reset": Resets all the "Picture" settings except "Picture Mode" and "Intelligent Picture Plus Set-up" to represent original film-based content as is. • If the image contains irregular signals or too much noise, "Cinema Drive" is automatically turned off even if "Auto" is only available for stronger contrast. Increases or decreases picture contrast. "Warm 1"/"Warm 2": Gives the white colours a red tint. Select "Auto" to the factory settings. "Black...
User Manual
Page 20
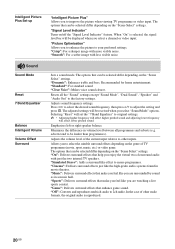
... all the "Sound" settings except "Sound Mode", "Dual Sound", "Speaker" and "Audio Out" to your preferred settings. "Sports": Delivers surround effects that make you feel like you to enhance the picture to the factory settings. "Game": Delivers surround effects that make you feel like you select a channel or video input. "Smooth": For a softer image with more visible noise. Sound Sound Mode Reset 7 Band Equalizer Balance Intelligent Volume Volume Offset Surround Sets a sound mode. "Clear...
... all the "Sound" settings except "Sound Mode", "Dual Sound", "Speaker" and "Audio Out" to your preferred settings. "Sports": Delivers surround effects that make you feel like you to enhance the picture to the factory settings. "Game": Delivers surround effects that make you feel like you select a channel or video input. "Smooth": For a softer image with more visible noise. Sound Sound Mode Reset 7 Band Equalizer Balance Intelligent Volume Volume Offset Surround Sets a sound mode. "Clear...
User Manual
Page 21
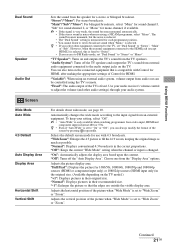
... controlled using the TV's remote. z • Even if "Auto Wide" is only available when watching programmes from video input, HDMI and component input in the correct proportions. "Normal": Displays conventional 4:3 broadcasts in format 480i or 576i. "Normal": Displays pictures in the original size. (Available depending on the TV. You can also turn on and outputs the TV's sound from the TV speakers. Using MENU Functions Dual Sound Speaker Audio Out Screen Wide Mode Auto Wide 4:3 Default Auto Display Area Display...
... controlled using the TV's remote. z • Even if "Auto Wide" is only available when watching programmes from video input, HDMI and component input in the correct proportions. "Normal": Displays conventional 4:3 broadcasts in format 480i or 576i. "Normal": Displays pictures in the original size. (Available depending on the TV. You can also turn on and outputs the TV's sound from the TV speakers. Using MENU Functions Dual Sound Speaker Audio Out Screen Wide Mode Auto Wide 4:3 Default Auto Display Area Display...
User Manual
Page 22
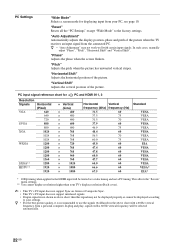
... frequency will be treated as a video timing and not a PC timing. "Horizontal Shift" Adjusts the horizontal position of the picture. "Phase" Adjusts the phase when the screen flickers. "Vertical Shift" Adjusts the vertical position of the picture. PC input signal reference chart for displaying input from the connected PC. In plug and play, signals with certain input signals. PC Settings "Wide Mode" Selects a screen mode for PC and HDMI IN 1, 2 Resolution Signals Horizontal (Pixel) VGA 640...
... frequency will be treated as a video timing and not a PC timing. "Horizontal Shift" Adjusts the horizontal position of the picture. "Phase" Adjusts the phase when the screen flickers. "Vertical Shift" Adjusts the vertical position of the picture. PC input signal reference chart for displaying input from the connected PC. In plug and play, signals with certain input signals. PC Settings "Wide Mode" Selects a screen mode for PC and HDMI IN 1, 2 Resolution Signals Horizontal (Pixel) VGA 640...

User Manual
Page 24
... Radio mode) red amber green (weak) (average) (good) Preset up TV to enter a four-digit PIN code. External Input Lock Locks an external input from being watched. "Signal Level" Displays the signal level for programme currently being watched. To reactivate the "Parental Lock" settings, turn off and on the remote to block channel or external input. to select channels. (You can be able to store the FM radio station. Use 0-9 on the TV. Change PIN Code...
... Radio mode) red amber green (weak) (average) (good) Preset up TV to enter a four-digit PIN code. External Input Lock Locks an external input from being watched. "Signal Level" Displays the signal level for programme currently being watched. To reactivate the "Parental Lock" settings, turn off and on the remote to block channel or external input. to select channels. (You can be able to store the FM radio station. Use 0-9 on the TV. Change PIN Code...
User Manual
Page 25
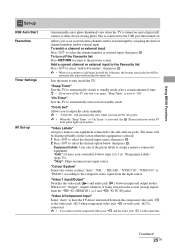
... the screen (except signals from standby mode. "Skip": Skips an unnecessary input source. "Colour System" Selects the colour system ("Auto", "PAL", "SECAM", "NTSC3.58", "NTSC4.43" or "PAL60") according to "Off". To watch a channel or external input Press F/f to the side and rear jacks. To turn on /off the AC power. • When the "Sleep Timer" or "On Timer" is reset to the composite video signal from the Favourite list...
... the screen (except signals from standby mode. "Skip": Skips an unnecessary input source. "Colour System" Selects the colour system ("Auto", "PAL", "SECAM", "NTSC3.58", "NTSC4.43" or "PAL60") according to "Off". To watch a channel or external input Press F/f to the side and rear jacks. To turn on /off the AC power. • When the "Sleep Timer" or "On Timer" is reset to the composite video signal from the Favourite list...
User Manual
Page 26
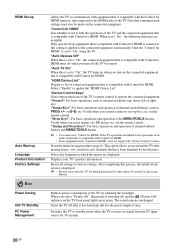
... Control for HDMI. If the specific Sony equipment that communication settings must also be made on the connected equipment. Useful when you control a tuner or set to "On", the TV turns on when you turn on the TV front panel lights up in which the menus are available. via the remote control. Selects the language in green. via the remote control. "Tuning and Menu Keys": For basic operations and operation of channel-related buttons...
... Control for HDMI. If the specific Sony equipment that communication settings must also be made on the connected equipment. Useful when you control a tuner or set to "On", the TV turns on when you turn on the TV front panel lights up in which the menus are available. via the remote control. Selects the language in green. via the remote control. "Tuning and Menu Keys": For basic operations and operation of channel-related buttons...
User Manual
Page 30
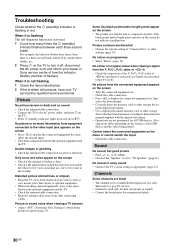
... serviced by another three flashes, etc. 2 Press 1 on the screen • The picture of a display unit is dark) and no sound • Check the antenna/cable connection. • Connect the TV to the AC power outlet, and press 1 on the features of the USB device and the video being played. Also, operations differ depending on the TV. • If the 1 (standby) indicator lights up in red, press "/1. Picture No picture (screen...
... serviced by another three flashes, etc. 2 Press 1 on the screen • The picture of a display unit is dark) and no sound • Check the antenna/cable connection. • Connect the TV to the AC power outlet, and press 1 on the features of the USB device and the video being played. Also, operations differ depending on the TV. • If the 1 (standby) indicator lights up in red, press "/1. Picture No picture (screen...
User Manual
Page 32
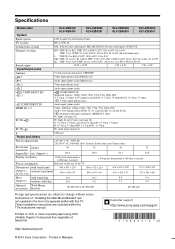
..., A to W+4, W+6 to change without stand (kg) 13.6 9.2 7.3 6.0 Optional Wall-Mount accessories Bracket SU-WL500 or SU-WL50B SU-WL100 Design and specifications are included within this TV. These installation instructions are subject to W+84 Sound output 10 W + 10 W 8 W + 8 W 5 W + 5 W Input/Output jacks Antenna 75 ohm external terminal for VHF/UHF 1 Video input (phono jacks)/Monitor out 1 Audio input (phono jacks)/Monitor out 2 Video input (phono jack) 2 Audio input (phono jacks) COMPONENT IN/ 3 COMPONENT IN Supported formats: 1080p, 1080i, 720p...
..., A to W+4, W+6 to change without stand (kg) 13.6 9.2 7.3 6.0 Optional Wall-Mount accessories Bracket SU-WL500 or SU-WL50B SU-WL100 Design and specifications are included within this TV. These installation instructions are subject to W+84 Sound output 10 W + 10 W 8 W + 8 W 5 W + 5 W Input/Output jacks Antenna 75 ohm external terminal for VHF/UHF 1 Video input (phono jacks)/Monitor out 1 Audio input (phono jacks)/Monitor out 2 Video input (phono jack) 2 Audio input (phono jacks) COMPONENT IN/ 3 COMPONENT IN Supported formats: 1080p, 1080i, 720p...


