
Operating Instructions
Page 1
KLV-37S550A KLV-32S550A KLV-32S530A KLV-26S550A © 2009 Sony Corporation LCD Colour TV Operating Instructions 4-130-985-13(1)
KLV-37S550A KLV-32S550A KLV-32S530A KLV-26S550A © 2009 Sony Corporation LCD Colour TV Operating Instructions 4-130-985-13(1)

Operating Instructions
Page 2
...Sony product. To reset the TV to ENERGY RATING qualified settings, select "Home" mode from the initial set up, it for future reference. Trademark information • HDMI, the HDMI logo and High-Definition Multimedia Interface are trademarks or registered trademarks of HDMI Licensing LLC. • "BRAVIA" and are of Sony...Factory Settings" under the "Set-up procedure in the "Home" mode. Before operating the TV, please read this manual are trademarks of the KLV-32S550A unless otherwise stated. ENERGY RATING is a programme designed to promote energy efficient products and practices...
...Sony product. To reset the TV to ENERGY RATING qualified settings, select "Home" mode from the initial set up, it for future reference. Trademark information • HDMI, the HDMI logo and High-Definition Multimedia Interface are trademarks or registered trademarks of HDMI Licensing LLC. • "BRAVIA" and are of Sony...Factory Settings" under the "Set-up procedure in the "Home" mode. Before operating the TV, please read this manual are trademarks of the KLV-32S550A unless otherwise stated. ENERGY RATING is a programme designed to promote energy efficient products and practices...

Operating Instructions
Page 3
...Selecting the language, country/region and location 5 Auto-tuning the TV 6 Watching TV 6 Detaching the Table-Top Stand from the TV...... 6 Safety information 7 Precautions 8 Overview of the remote 9 Using the Tools menu 10 Overview of the TV buttons and indicators....... 11 12 Using Optional Equipment Connecting optional ... Set-up menu 21 Eco menu 23 24 Additional Information Installing the Accessories (Wall-Mount Bracket 24 TV installation dimensions table 25 Screw and Hook locations diagram/table ....... 26 Troubleshooting 27 Specifications Back cover Before operating the...
...Selecting the language, country/region and location 5 Auto-tuning the TV 6 Watching TV 6 Detaching the Table-Top Stand from the TV...... 6 Safety information 7 Precautions 8 Overview of the remote 9 Using the Tools menu 10 Overview of the TV buttons and indicators....... 11 12 Using Optional Equipment Connecting optional ... Set-up menu 21 Eco menu 23 24 Additional Information Installing the Accessories (Wall-Mount Bracket 24 TV installation dimensions table 25 Screw and Hook locations diagram/table ....... 26 Troubleshooting 27 Specifications Back cover Before operating the...

Operating Instructions
Page 4
... or If cannot receive FM signal Antenna selector FM signal 8 TV signal Antenna cable (not supplied) 8 Connecting an antenna/cable and VCR B KLV-32S550A/KLV-32S530A/KLV-26S550A 8 8 Antenna cable (not supplied) • This TV is very heavy, so two or more people should place the TV onto the stand. • If using an electric screwdriver, set...
... or If cannot receive FM signal Antenna selector FM signal 8 TV signal Antenna cable (not supplied) 8 Connecting an antenna/cable and VCR B KLV-32S550A/KLV-32S530A/KLV-26S550A 8 8 Antenna cable (not supplied) • This TV is very heavy, so two or more people should place the TV onto the stand. • If using an electric screwdriver, set...
Operating Instructions
Page 5
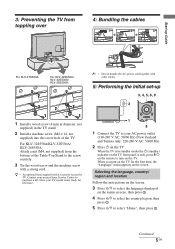
For KLV-32S550A/KLV-32S530A/ KLV-26S550A: Attach a nut (M4, not supplied) from the bottom of the TV. Continued 5 GB z • An optional Sony support belt kit is used to secure the TV. When the TV is in the TV stand. 2 Install a machine screw (M4 × 14, not supplied) into... screw and the machine screw with other cables. 5: Performing the initial set-up Guide 3: Preventing the TV from toppling over 4: Bundling the cables 1 2 3 For KLV-37S550A: For KLV-32S550A/ KLV-32S530A/ KLV-26S550A: • Do not bundle the AC power cord together with a strong cord. Have your...
For KLV-32S550A/KLV-32S530A/ KLV-26S550A: Attach a nut (M4, not supplied) from the bottom of the TV. Continued 5 GB z • An optional Sony support belt kit is used to secure the TV. When the TV is in the TV stand. 2 Install a machine screw (M4 × 14, not supplied) into... screw and the machine screw with other cables. 5: Performing the initial set-up Guide 3: Preventing the TV from toppling over 4: Bundling the cables 1 2 3 For KLV-37S550A: For KLV-32S550A/ KLV-32S530A/ KLV-26S550A: • Do not bundle the AC power cord together with a strong cord. Have your...

Operating Instructions
Page 6
...available channels. B KLV-37S550A B KLV-32S550A/KLV-32S530A/KLV-26S550A 6 GB z • If "Yes" is selected and the TV is turned off by pressing 1 on the TV, or is disconnected from the TV • Do not remove the Table-Top Stand for any reason other than to wall-mount the TV. Please connect ... message appears for all the available channels. 9 Press G/g to confirm the antenna connection No programmes found , auto-tuning is turned on the TV. 2 Press the number buttons or PROG +/- If you to select the desired setting in which the channels are found . to start auto-tuning...
...available channels. B KLV-37S550A B KLV-32S550A/KLV-32S530A/KLV-26S550A 6 GB z • If "Yes" is selected and the TV is turned off by pressing 1 on the TV, or is disconnected from the TV • Do not remove the Table-Top Stand for any reason other than to wall-mount the TV. Please connect ... message appears for all the available channels. 9 Press G/g to confirm the antenna connection No programmes found , auto-tuning is turned on the TV. 2 Press the number buttons or PROG +/- If you to select the desired setting in which the channels are found . to start auto-tuning...
Operating Instructions
Page 7
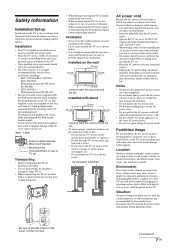
... TV set in accordance with liquids, such as vases, shall be placed on the TV. Safety information Installation/Set-up moisture, its insulation may deteriorate, which could result in a fire. KLV-37S550A/KLV-32S550A/ KLV...put stress on the LCD panel. • When lifting or moving , pack it to transport a large TV set. • When transporting the TV set by the manufacturer. Disconnect the TV set may be ...plug is blocked. Do not cover the TV set . Unplug the AC power plug and clean it is strongly recommended that you use a Sony wall-mount bracket in order to provide ...
... TV set in accordance with liquids, such as vases, shall be placed on the TV. Safety information Installation/Set-up moisture, its insulation may deteriorate, which could result in a fire. KLV-37S550A/KLV-32S550A/ KLV...put stress on the LCD panel. • When lifting or moving , pack it to transport a large TV set. • When transporting the TV set by the manufacturer. Disconnect the TV set may be ...plug is blocked. Do not cover the TV set . Unplug the AC power plug and clean it is strongly recommended that you use a Sony wall-mount bracket in order to provide ...

Operating Instructions
Page 8
...of climbing on top of the LCD screen and is not a malfunction. • Do not push or scratch the front filter, or place objects on furniture to reach the television or its table stand. Follow your dealer or Sony service centre to the TV set . Using such materials ..., particularly to children, can be potentially hazardous due to be damaged. • If this TV set is damaged by the manufacturer of time, strains your local authority. • Handle the remote with separate collection systems) This symbol is made with a diluted mild detergent solution. • Never use •...
...of climbing on top of the LCD screen and is not a malfunction. • Do not push or scratch the front filter, or place objects on furniture to reach the television or its table stand. Follow your dealer or Sony service centre to the TV set . Using such materials ..., particularly to children, can be potentially hazardous due to be damaged. • If this TV set is damaged by the manufacturer of time, strains your local authority. • Handle the remote with separate collection systems) This symbol is made with a diluted mild detergent solution. • Never use •...

Operating Instructions
Page 9
... 7 TOOLS (page 10) 8 MENU Displays or cancels the menu. 9 Number buttons • Selects channels. Favourite list references when operating the TV. qa - z • In standby mode, if you enjoy your game-playing experience to select the desired wide mode. answers to the previous... channel watched (for selected scene are automatically set. Previous channel Returns to a quiz). 6 F/f/G/g/ - Press once to a TV display when displaying external input. Each time you experience dynamic and clear sound like atmosphere with superb picture and sound quality. Text In...
... 7 TOOLS (page 10) 8 MENU Displays or cancels the menu. 9 Number buttons • Selects channels. Favourite list references when operating the TV. qa - z • In standby mode, if you enjoy your game-playing experience to select the desired wide mode. answers to the previous... channel watched (for selected scene are automatically set. Previous channel Returns to a quiz). 6 F/f/G/g/ - Press once to a TV display when displaying external input. Each time you experience dynamic and clear sound like atmosphere with superb picture and sound quality. Text In...
Operating Instructions
Page 10
For TV, Video, Component or HDMI (except PC input) Wide Zoom* Enlarges the centre portion of the picture may not be cut off. • You cannot select "...-up Description See page 17. The options displayed vary depending on the PC input signal. * Parts of the top and bottom of the picture. Viewing TV programme Options Picture Mode Sound Mode Intelligent Picture MPEG Noise Reduction Speaker Add to fill the screen vertically. See page 18. See page 20. Side...
For TV, Video, Component or HDMI (except PC input) Wide Zoom* Enlarges the centre portion of the picture may not be cut off. • You cannot select "...-up Description See page 17. The options displayed vary depending on the PC input signal. * Parts of the top and bottom of the picture. Viewing TV programme Options Picture Mode Sound Mode Intelligent Picture MPEG Noise Reduction Speaker Add to fill the screen vertically. See page 18. See page 20. Side...

Operating Instructions
Page 11
Input select / OK • Displays the connected equipment list and selects the input source (page 13). • In TV menu: Selects the menu or option, and confirms the setting. 5 Displays or cancels the menu. 6 - Remote sensor Receives IR signals from ...the AC PROG power outlet. 2 PROG +/-/ / • Selects the next (+) or previous (-) channel. • In TV menu: Moves through the options right ( ) or left ( ). 4 / - Timer indicator Lights up ( ) or down ( ). 3 2 +/-/ / • Increases (+) or decreases (-) the volume. ...
Input select / OK • Displays the connected equipment list and selects the input source (page 13). • In TV menu: Selects the menu or option, and confirms the setting. 5 Displays or cancels the menu. 6 - Remote sensor Receives IR signals from ...the AC PROG power outlet. 2 PROG +/-/ / • Selects the next (+) or previous (-) channel. • In TV menu: Moves through the options right ( ) or left ( ). 4 / - Timer indicator Lights up ( ) or down ( ). 3 2 +/-/ / • Increases (+) or decreases (-) the volume. ...

Operating Instructions
Page 12
Home theatre system S VHS/Hi8/ DVC camcorder Headphones Not available for KLV-32S530A DVD player with HDMI output Blu-ray disc player Digital video camcorder For service use only PC Video game equipment DVD player without component video output VCR DVD player with component video output DVD recorder VCR 12 GB Using Optional Equipment Connecting optional equipment You can connect a wide range of optional equipment to your TV. • The below terminals vary depending on TV models.
Home theatre system S VHS/Hi8/ DVC camcorder Headphones Not available for KLV-32S530A DVD player with HDMI output Blu-ray disc player Digital video camcorder For service use only PC Video game equipment DVD player without component video output VCR DVD player with component video output DVD recorder VCR 12 GB Using Optional Equipment Connecting optional equipment You can connect a wide range of optional equipment to your TV. • The below terminals vary depending on TV models.

Operating Instructions
Page 13
...under the "AV Set-up" menu (page 19), that bears the HDMI logo (recommended Sony HDMI cable). • To connect a PC, use a PC cable with ferrite core. ... to the video output jack to "Audio System" (page 19). To turn off the sound of the TV speakers, set to display the connected equipment ...TV. Connect to the i jack to listen to the L(MONO) jack 1. Connect to select the desired input source. You can also press F/f to the component jacks and the audio jacks / . Connect to the audio output jacks to the HDMI IN (KLV-32S530A), HDMI IN 1 or 2 (KLV-37S550A/ KLV-32S550A/KLV...
...under the "AV Set-up" menu (page 19), that bears the HDMI logo (recommended Sony HDMI cable). • To connect a PC, use a PC cable with ferrite core. ... to the video output jack to "Audio System" (page 19). To turn off the sound of the TV speakers, set to display the connected equipment ...TV. Connect to the i jack to listen to the L(MONO) jack 1. Connect to select the desired input source. You can also press F/f to the component jacks and the audio jacks / . Connect to the audio output jacks to the HDMI IN (KLV-32S530A), HDMI IN 1 or 2 (KLV-37S550A/ KLV-32S550A/KLV...

Operating Instructions
Page 14
... picture and no sound Component *HDMI (except PC input mode) **HDMI 1 (except PC input mode) **HDMI 2 (except PC input mode) TV programme * For KLV-32S530A ** For KLV-37S550A/KLV-32S550A/KLV-26S550A 2 Press G/g to select the TV channel. to single picture mode Press , or RETURN. • You cannot change the size of the sub window can be...
... picture and no sound Component *HDMI (except PC input mode) **HDMI 1 (except PC input mode) **HDMI 2 (except PC input mode) TV programme * For KLV-32S530A ** For KLV-37S550A/KLV-32S550A/KLV-26S550A 2 Press G/g to select the TV channel. to single picture mode Press , or RETURN. • You cannot change the size of the sub window can be...
Operating Instructions
Page 15
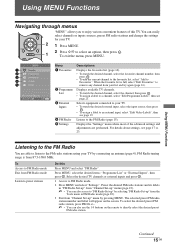
... 15). You can also access to "FM Radio Set-up" by selecting "FM Radio Set-up " menu by connecting an antenna (page 4). Displays available TV channels. • To watch the desired channel, select the favourite channel number, then press . • To add the current channel to the favourite list,... "MENU" allows you to enjoy various convenient features of the advanced settings and adjustments are able to listen to the FM radio stations using your TV. • To watch the desired external input, select the input source, then press . • To assign a label to an external input, select "...
... 15). You can also access to "FM Radio Set-up" by selecting "FM Radio Set-up " menu by connecting an antenna (page 4). Displays available TV channels. • To watch the desired channel, select the favourite channel number, then press . • To add the current channel to the favourite list,... "MENU" allows you to enjoy various convenient features of the advanced settings and adjustments are able to listen to the FM radio stations using your TV. • To watch the desired external input, select the input source, then press . • To assign a label to an external input, select "...

Operating Instructions
Page 17
...dark images scenes. Choose either "High", "Medium", "Low" or "Off ". This setting is set /change the settings of your TV from the brightness of the screen. "Clear White": Emphasises white colours. Increases or decreases picture contrast. Brightens or darkens the picture.... redder tint than "Warm 1". • "Warm 1" and "Warm 2" are not available when "Picture Mode" is especially effective for an NTSC colour system (e.g. "Gamma": Adjusts the balance between bright and dark areas of film videos. "Live Colour": Makes colours more detail. Unavailable options are greyed ...
...dark images scenes. Choose either "High", "Medium", "Low" or "Off ". This setting is set /change the settings of your TV from the brightness of the screen. "Clear White": Emphasises white colours. Increases or decreases picture contrast. Brightens or darkens the picture.... redder tint than "Warm 1". • "Warm 1" and "Warm 2" are not available when "Picture Mode" is especially effective for an NTSC colour system (e.g. "Gamma": Adjusts the balance between bright and dark areas of film videos. "Live Colour": Makes colours more detail. Unavailable options are greyed ...

Operating Instructions
Page 18
... a stereo broadcast signal when "Mono" is fixed to "Stereo". • If you select other inputs. z • If you access to FM Radio mode, set your TV to the factory settings. 2 Press G/g to select the desired sound frequency, then press F/f to other equipment connected to the... TV, set "Dual Sound" to "Stereo" or "Mono". 18 GB The selection varies, depending on the Broadcasting. Minimizes the difference in volume level between all the "...
... a stereo broadcast signal when "Mono" is fixed to "Stereo". • If you select other inputs. z • If you access to FM Radio mode, set your TV to the factory settings. 2 Press G/g to select the desired sound frequency, then press F/f to other equipment connected to the... TV, set "Dual Sound" to "Stereo" or "Mono". 18 GB The selection varies, depending on the Broadcasting. Minimizes the difference in volume level between all the "...

Operating Instructions
Page 19
... to connected equipment. Adjusts the vertical size of the picture. to retune the TV after moving house, or to search for new channels that you do not need to "Audio System". "Audio System": The TV speakers are turned on /off in format 480i or 576i. Continued 19 GB ...Adjusts the horizontal position of the preset labels to assign a name to the TV's sound only through the TV speakers. However, this operation because it...
... to connected equipment. Adjusts the vertical size of the picture. to retune the TV after moving house, or to search for new channels that you do not need to "Audio System". "Audio System": The TV speakers are turned on /off in format 480i or 576i. Continued 19 GB ...Adjusts the horizontal position of the preset labels to assign a name to the TV's sound only through the TV speakers. However, this operation because it...

Operating Instructions
Page 20
... any buttons. Adjusts the pitch when the picture has unwanted vertical stripes. Timer Settings Product Information Factory Settings Colour System Selects the colour system ("Auto", "PAL", "SECAM", "NTSC3.58", "NTSC4.43" or "PAL60") according to the composite video signal from your TV's product information. "Time": Sets the desired period of the picture when the...
... any buttons. Adjusts the pitch when the picture has unwanted vertical stripes. Timer Settings Product Information Factory Settings Colour System Selects the colour system ("Auto", "PAL", "SECAM", "NTSC3.58", "NTSC4.43" or "PAL60") according to the composite video signal from your TV's product information. "Time": Sets the desired period of the picture when the...

Operating Instructions
Page 21
Allows you to set your favourite channels by broadcasters. Changes the order in above entering next digit using the remote. If you to retune the TV after moving house, or to search for new channels that have been launched by assigning the desired channel numbers. 1 Press F/f to select your favourite channel ... input does not support interlaced signals. • If input signal is not shown in which the channels are stored on the TV. 1 Press F/f to select the channel you want to move to a new position, then press . 2 Press F/f to select the new position for your channel, then press . ...
Allows you to set your favourite channels by broadcasters. Changes the order in above entering next digit using the remote. If you to retune the TV after moving house, or to search for new channels that have been launched by assigning the desired channel numbers. 1 Press F/f to select your favourite channel ... input does not support interlaced signals. • If input signal is not shown in which the channels are stored on the TV. 1 Press F/f to select the channel you want to move to a new position, then press . 2 Press F/f to select the new position for your channel, then press . ...


