
Operating Instructions
Page 8
... come in contact with respect to proper grounding of the mast and supporting structure, grounding of the lead-in wire to an antenna discharge unit, size of grounding conductors, location of antenna discharge unit, connection to wear or abuse. Power-Cord Protection Do not allow anything on or roll over the...
... come in contact with respect to proper grounding of the mast and supporting structure, grounding of the lead-in wire to an antenna discharge unit, size of grounding conductors, location of antenna discharge unit, connection to wear or abuse. Power-Cord Protection Do not allow anything on or roll over the...

Operating Instructions
Page 12
Using the Remote Control Overview 51 Inserting Batteries 51 Button Descriptions 52 Programming the Remote Control 54 Using Other Equipment with Your TV Remote Control 56 All Equipment 56 Operating a VCR 56 Operating a Satellite Receiver 56 Operating a Cable Box 57 Operating a DVD Player... 57 Operating an MDP (Laserdisc Player 57 Using the Features Overview 59 Watching TV 60 Using Wide Mode 61 Using Twin View 62 Displaying Twin Pictures 62 Activating the Picture 63 Changing the Picture Size 64 Using Favorite Channels 65 Creating a List of Favorite Channels 65 Displaying a...
Using the Remote Control Overview 51 Inserting Batteries 51 Button Descriptions 52 Programming the Remote Control 54 Using Other Equipment with Your TV Remote Control 56 All Equipment 56 Operating a VCR 56 Operating a Satellite Receiver 56 Operating a Cable Box 57 Operating a DVD Player... 57 Operating an MDP (Laserdisc Player 57 Using the Features Overview 59 Watching TV 60 Using Wide Mode 61 Using Twin View 62 Displaying Twin Pictures 62 Activating the Picture 63 Changing the Picture Size 64 Using Favorite Channels 65 Creating a List of Favorite Channels 65 Displaying a...
Operating Instructions
Page 15
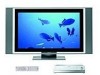
...you want to set up a complex system, you need to connect your new TV include: s WEGA Engine™: Delivers superb picture quality from any video source...LDM-3000) s Media receiver unit (MBT-XBR900L) s Remote control (RM-927Y) and two size AAA (LR03) batteries s Two AC power cords s Display interface cable s Antenna cable s ... These items are all you may need to set up and operate the TV in the digital processing system which enhances input signal to connect them. This...This engine features unique Sony technology, including: • Composite Component Processor (CCP): The first step...
...you want to set up a complex system, you need to connect your new TV include: s WEGA Engine™: Delivers superb picture quality from any video source...LDM-3000) s Media receiver unit (MBT-XBR900L) s Remote control (RM-927Y) and two size AAA (LR03) batteries s Two AC power cords s Display interface cable s Antenna cable s ... These items are all you may need to set up and operate the TV in the digital processing system which enhances input signal to connect them. This...This engine features unique Sony technology, including: • Composite Component Processor (CCP): The first step...

Operating Instructions
Page 53
...direct sunlight, near a heater, or where the humidity is high. 51 Insert two size AAA (LR03) batteries (supplied) by matching the e and E terminals on the batteries to set up, program, and use the TV's remote control. m < Remove the batteries to avoid damage from possible battery leakage whenever... you anticipate that the remote control will not be used for an extended period. Handle the remote control with Your TV Remote Control Page 51 52 54 56 Inserting Batteries 1 2 3 Open the battery compartment as illustrated below. Topic Inserting Batteries Button ...
...direct sunlight, near a heater, or where the humidity is high. 51 Insert two size AAA (LR03) batteries (supplied) by matching the e and E terminals on the batteries to set up, program, and use the TV's remote control. m < Remove the batteries to avoid damage from possible battery leakage whenever... you anticipate that the remote control will not be used for an extended period. Handle the remote control with Your TV Remote Control Page 51 52 54 56 Inserting Batteries 1 2 3 Open the battery compartment as illustrated below. Topic Inserting Batteries Button ...

Operating Instructions
Page 63
... the 4:3 picture to an equal aspect ratio that fills the wide screen. Full m Zoom Zoom Mode enlarges the 4:3 picture horizontally and vertically to its original size. For details, see page 83. Wide Zoom enlarges the 4:3 picture, while the upper and lower parts of the picture are changed, set 4:3 Default to the...
... the 4:3 picture to an equal aspect ratio that fills the wide screen. Full m Zoom Zoom Mode enlarges the 4:3 picture horizontally and vertically to its original size. For details, see page 83. Wide Zoom enlarges the 4:3 picture, while the upper and lower parts of the picture are changed, set 4:3 Default to the...
Operating Instructions
Page 64
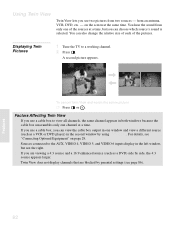
..., see two pictures from two sources - Features 62 on page 29. Displaying Twin Pictures 1 Tune the TV to view all channels, the same channel appears in the left window, but you can also change the relative size of each of the sources at a time. s If you are blocked by side, the 4:3 source... View does not display channels that are viewing a 4:3 source and a 16:9 enhanced source (such as a VCR or DVD player) in the second window by using TV/VIDEO. s If you use a cable box to a working channel. 2 Press .
..., see two pictures from two sources - Features 62 on page 29. Displaying Twin Pictures 1 Tune the TV to view all channels, the same channel appears in the left window, but you can also change the relative size of each of the sources at a time. s If you are blocked by side, the 4:3 source... View does not display channels that are viewing a 4:3 source and a 16:9 enhanced source (such as a VCR or DVD player) in the second window by using TV/VIDEO. s If you use a cable box to a working channel. 2 Press .

Operating Instructions
Page 65
To activate the picture in the left window s Press B. , < Functions Available in the right window s Press b. Press MUTING (press again to the TV's A/V inputs Change the picture size Do This ... Press 0-9 and then ENTER (or wait 3 seconds) or Press CH+/- Tune to a channel Adjust the volume Mute the volume Switch the TV's input between sources connected to unmute) Press TV/VIDEO Press V or v. (For details, see "Changing the Picture Size" on page 64.) Features 63 Press VOL +/- Activating the Picture To activate the picture in the Active Window To Do This ...
To activate the picture in the left window s Press B. , < Functions Available in the right window s Press b. Press MUTING (press again to the TV's A/V inputs Change the picture size Do This ... Press 0-9 and then ENTER (or wait 3 seconds) or Press CH+/- Tune to a channel Adjust the volume Mute the volume Switch the TV's input between sources connected to unmute) Press TV/VIDEO Press V or v. (For details, see "Changing the Picture Size" on page 64.) Features 63 Press VOL +/- Activating the Picture To activate the picture in the Active Window To Do This ...

Operating Instructions
Page 66
Features When you want to resize. 2 Press V to enlarge the picture. 3 Press v to make the picture smaller. Changing the Picture Size The zoom feature lets you vary the relative size of the left and right pictures. 1 Press B or b to activate the picture that you adjust the picture sizes, the TV memorizes the change. The next time you use the Twin View function, the memorized sizes appear. 64
Features When you want to resize. 2 Press V to enlarge the picture. 3 Press v to make the picture smaller. Changing the Picture Size The zoom feature lets you vary the relative size of the left and right pictures. 1 Press B or b to activate the picture that you adjust the picture sizes, the TV memorizes the change. The next time you use the Twin View function, the memorized sizes appear. 64

Operating Instructions
Page 75
... Memory Stick Index Menu Page Page + - + Directory Name: 900MSDCF Page 1/42 Filename: DSC00004 Image: 12/254 Date & Time: 4/12/2001 6:43PM Picture Size: 640x480 Move: V v B b Select: The selected image is displayed. Press b. If you press B while viewing the first image, the last image is ...Stick Index z The Page and folder ( ) buttons are available only if the Memory Stick contains more images or folders than can do not operate the TV. 4 Press V v B b to highlight an image and press to select the image. Press B. Display the Memory Stick Index Press . 5 ...
... Memory Stick Index Menu Page Page + - + Directory Name: 900MSDCF Page 1/42 Filename: DSC00004 Image: 12/254 Date & Time: 4/12/2001 6:43PM Picture Size: 640x480 Move: V v B b Select: The selected image is displayed. Press b. If you press B while viewing the first image, the last image is ...Stick Index z The Page and folder ( ) buttons are available only if the Memory Stick contains more images or folders than can do not operate the TV. 4 Press V v B b to highlight an image and press to select the image. Press B. Display the Memory Stick Index Press . 5 ...

Operating Instructions
Page 77
... Rotate Picture and press . J J Rotate Picture Menu Page Page + - + Directory Name: 900MSDCF Page 1/42 Filename: DSC00004 Image: 12/254 Date & Time: 4/27/2001 6:43PM Picture Size: 640x480 Move: V v B b Select: 2 Press V v B b to highlight an image that the image does not support a thumbnail view and cannot be displayed on .
... Rotate Picture and press . J J Rotate Picture Menu Page Page + - + Directory Name: 900MSDCF Page 1/42 Filename: DSC00004 Image: 12/254 Date & Time: 4/27/2001 6:43PM Picture Size: 640x480 Move: V v B b Select: 2 Press V v B b to highlight an image that the image does not support a thumbnail view and cannot be displayed on .

Operating Instructions
Page 84
... that require the display of black bands at the top and bottom of the picture. Wide Mode: Wide Zoom 4:3 Default: Wide Zoom Vertical Center Vertical Size Move: V v B b Select: End: MENU Selecting Screen Mode Options z To change settings. Wide Mode is recommended for 4:3 sources. Menus 82 For ...page 98. Zoom Select to enlarge the 4:3 picture horizontally and vertically to exit the Menu. Description Wide Zoom Select to enlarge the 4:3 size picture, while the upper and lower parts of the picture are condensed to an option. Using the Screen Menu To select the Screen Menu ...
... that require the display of black bands at the top and bottom of the picture. Wide Mode: Wide Zoom 4:3 Default: Wide Zoom Vertical Center Vertical Size Move: V v B b Select: End: MENU Selecting Screen Mode Options z To change settings. Wide Mode is recommended for 4:3 sources. Menus 82 For ...page 98. Zoom Select to enlarge the 4:3 picture horizontally and vertically to exit the Menu. Description Wide Zoom Select to enlarge the 4:3 size picture, while the upper and lower parts of the picture are condensed to an option. Using the Screen Menu To select the Screen Menu ...

Operating Instructions
Page 85
...equal aspect ratio that fills the wide screen. Vertical Center Allows you to adjust the vertical size of the picture. (Available only in Wide Zoom and Zoom modes.) Press V or v and press to choose ...a correction between +7 and -7. Vertical Size Allows you to move the position of the picture are changed . To retain the current Wide Mode... anything but Off, the Wide Mode setting changes only for 4:3 sources Normal Select to enlarge the 4:3 size picture, while the upper and lower parts of the picture up and down in the window. (Available only...
...equal aspect ratio that fills the wide screen. Vertical Center Allows you to adjust the vertical size of the picture. (Available only in Wide Zoom and Zoom modes.) Press V or v and press to choose ...a correction between +7 and -7. Vertical Size Allows you to move the position of the picture are changed . To retain the current Wide Mode... anything but Off, the Wide Mode setting changes only for 4:3 sources Normal Select to enlarge the 4:3 size picture, while the upper and lower parts of the picture up and down in the window. (Available only...

Operating Instructions
Page 99
...appears s Be sure the LOCK switch on the Memory Stick is not DCF-compliant. Selecting the a thumbnail image icon, however, displays the full-size image on the hookup you are using equipment that device. You may need to the wall outlet. For example, if you used (see page 70...). Cannot hear audio while using your Sony TV remote.You may be operated by the TV (see page 68). s There is connected securely to use the equipment's original remote control. Blank square appears instead of the ...
...appears s Be sure the LOCK switch on the Memory Stick is not DCF-compliant. Selecting the a thumbnail image icon, however, displays the full-size image on the hookup you are using equipment that device. You may need to the wall outlet. For example, if you used (see page 70...). Cannot hear audio while using your Sony TV remote.You may be operated by the TV (see page 68). s There is connected securely to use the equipment's original remote control. Blank square appears instead of the ...

Operating Instructions
Page 103
... maximum volume setting (Variable) More than 408 mVrms (Fixed) Impedance (output): 2 kilohms ×1 1 phono jack 2 1 30 inches 10 w × 2, 4 ohms Display unit LDM-3000: 971.2 × 594.4 × 229 mm (38 ...) Variable/Fixed Audio (OUT) Monitor/Fixed Audio (OUT) Sub woofer (OUT) RF Inputs Converter Screen Size (measured diagonally) Speaker Output Dimensions (W × H × D) Mass Liquid Crystal Display panel Display...) × 768 pixels (vertical) 75 ohm external terminal for VHF/UHF NTSC, American TV Standard VHF 2-13 UHF 14-69 CATV 1-125 120 V, 60 Hz 1 terminal, 3....
... maximum volume setting (Variable) More than 408 mVrms (Fixed) Impedance (output): 2 kilohms ×1 1 phono jack 2 1 30 inches 10 w × 2, 4 ohms Display unit LDM-3000: 971.2 × 594.4 × 229 mm (38 ...) Variable/Fixed Audio (OUT) Monitor/Fixed Audio (OUT) Sub woofer (OUT) RF Inputs Converter Screen Size (measured diagonally) Speaker Output Dimensions (W × H × D) Mass Liquid Crystal Display panel Display...) × 768 pixels (vertical) 75 ohm external terminal for VHF/UHF NTSC, American TV Standard VHF 2-13 UHF 14-69 CATV 1-125 120 V, 60 Hz 1 terminal, 3....

Operating Instructions
Page 106
DVD player using with TV remote control 57 with TV remote control 57 Caption Vision 89 CATV. See Digital Visual Interface. See Digital Reality Creation. brightness, adjusting 78 C cable connecting 23 setting On/Off 84 with VCR, connecting 30 cable box connecting with VCR 32 Twin View issues 62 using 66 ...Full mode, setting 82 See cable CH buttons 17, 53, 60 changing picture size, in remote 51 bilingual audio 80 blocking programs. See ratings. DVI-HDTV...
DVD player using with TV remote control 57 with TV remote control 57 Caption Vision 89 CATV. See Digital Visual Interface. See Digital Reality Creation. brightness, adjusting 78 C cable connecting 23 setting On/Off 84 with VCR, connecting 30 cable box connecting with VCR 32 Twin View issues 62 using 66 ...Full mode, setting 82 See cable CH buttons 17, 53, 60 changing picture size, in remote 51 bilingual audio 80 blocking programs. See ratings. DVI-HDTV...

Operating Instructions
Page 108
... 17, 18 SAT/CABLE indicator 52 SAT/CABLE power button 52 satellite receiver, using with TV remote control 56 setting up channels 49 Setup Menu 89 sharpness, adjusting 78 Simulated, Effect 80 sizing, picture in Twin View 64 slideshow 74 speakers turning on/off 81 using external speakers 81... 62-64 Twin View button 52 V Variable audio setting 81 VCR using with TV remote control 56 with cable box, connecting 32 with cable, connecting 30 with satellite receiver, connecting 38 Vertical Center, adjusting 83 Vertical Size 83 VHF/UHF jack, described 18 VIDEO (L/R)/AUDIO jacks, described 18 Video Menu...
... 17, 18 SAT/CABLE indicator 52 SAT/CABLE power button 52 satellite receiver, using with TV remote control 56 setting up channels 49 Setup Menu 89 sharpness, adjusting 78 Simulated, Effect 80 sizing, picture in Twin View 64 slideshow 74 speakers turning on/off 81 using external speakers 81... 62-64 Twin View button 52 V Variable audio setting 81 VCR using with TV remote control 56 with cable box, connecting 32 with cable, connecting 30 with satellite receiver, connecting 38 Vertical Center, adjusting 83 Vertical Size 83 VHF/UHF jack, described 18 VIDEO (L/R)/AUDIO jacks, described 18 Video Menu...


