Operating Instructions
Page 1
LCD Projection TV KF-50XBR800/60XBR800 4-091-169-12(1) © 2002 Sony Corporation
LCD Projection TV KF-50XBR800/60XBR800 4-091-169-12(1) © 2002 Sony Corporation
Operating Instructions
Page 2
... prevent electric shock, do not expose the LCD Projection TV to the point of important operating and maintenance (... not occur in a residential installation. If this equipment does cause harmful interference to radio or television reception, which can be determined by turning the equipment off and on, the user is encouraged...Consult the dealer or an experienced radio/TV technician for a Class B digital device pursuant to provide reasonable protection against harmful interference in a particular installation. MODEL: KF-50XBR800, KF-60XBR800 Please keep this equipment. Note to CATV...
... prevent electric shock, do not expose the LCD Projection TV to the point of important operating and maintenance (... not occur in a residential installation. If this equipment does cause harmful interference to radio or television reception, which can be determined by turning the equipment off and on, the user is encouraged...Consult the dealer or an experienced radio/TV technician for a Class B digital device pursuant to provide reasonable protection against harmful interference in a particular installation. MODEL: KF-50XBR800, KF-60XBR800 Please keep this equipment. Note to CATV...
Operating Instructions
Page 3
...block the ventilation openings. ❑ Do not install the LCD Projection TV in a hot or humid place, or in a place subject to excessive dust or mechanical vibration. ❑ Avoid operating the LCD Projection TV at the rear of BBE Sound, Inc. under license from SRS Labs, Inc.... Refer to direct illumination or direct sunlight. TruSurround and the ( ) symbol are trademarks of the LCD Projection TV, below the Sony logo, on the sticker, and also on the LCD Projection TV. ❑...
...block the ventilation openings. ❑ Do not install the LCD Projection TV in a hot or humid place, or in a place subject to excessive dust or mechanical vibration. ❑ Avoid operating the LCD Projection TV at the rear of BBE Sound, Inc. under license from SRS Labs, Inc.... Refer to direct illumination or direct sunlight. TruSurround and the ( ) symbol are trademarks of the LCD Projection TV, below the Sony logo, on the sticker, and also on the LCD Projection TV. ❑...
Operating Instructions
Page 5
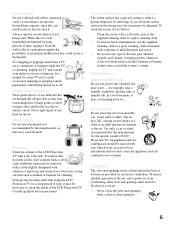
...cloth moistened with a solution of time, unplug it gently with a soft cloth. The set may be moved with solution of the LCD Projection TV. When the set through the cabinet slots as these slots and openings must never be blocked or covered. ❑ Never cover the ...water. ❑ Do not use attachments not recommended by the manufacturer for cleaning. If the picture becomes dark after using the LCD Projection TV for necessary ventilation. An appliance and cart combination should be necessary to overturn. Ventilation The slots and openings in the cabinet and in...
...cloth moistened with a solution of time, unplug it gently with a soft cloth. The set may be moved with solution of the LCD Projection TV. When the set through the cabinet slots as these slots and openings must never be blocked or covered. ❑ Never cover the ...water. ❑ Do not use attachments not recommended by the manufacturer for cleaning. If the picture becomes dark after using the LCD Projection TV for necessary ventilation. An appliance and cart combination should be necessary to overturn. Ventilation The slots and openings in the cabinet and in...
Operating Instructions
Page 7
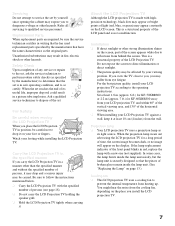
...red, replace the lamp with the specified number of the horizontal viewing area. ❑ When installing your LCD projection TV, and within 60° of the vertical viewing area, and 130° of persons (see page 18). ❑ Do not carry the LCD...structural property of the LCD Projection TV. This is not a malfunction. When the projection lamp wears out after using the LCD projection TV for KF-60XBR800 away from your LCD Projection TV against a wall, keep it . For Safety Be careful when moving the LCD Projection TV When you install the LCD projection TV. 7 Servicing Do not ...
...red, replace the lamp with the specified number of the horizontal viewing area. ❑ When installing your LCD projection TV, and within 60° of the vertical viewing area, and 130° of persons (see page 18). ❑ Do not carry the LCD...structural property of the LCD Projection TV. This is not a malfunction. When the projection lamp wears out after using the LCD projection TV for KF-60XBR800 away from your LCD Projection TV against a wall, keep it . For Safety Be careful when moving the LCD Projection TV When you install the LCD projection TV. 7 Servicing Do not ...
Operating Instructions
Page 8
...Sony LCD Projection TV Presenting the Sony LCD Projection TV 9 Using This Manual 10 Enjoying Your LCD Projection TV 11 Replacing the Lamp 13 Installing and Connecting the LCD Projection TV Contents 17 Inserting Batteries into the Remote Control ..........17 Carrying Your LCD Projection TV 18 To Prevent the LCD Projection TV from Falling Down 19 When Installing Your LCD Projection TV... for Tape Editing 42 Using the CONTROL S Feature 43 Setting Up the LCD projection TV Automatically 44 Watching Digital TV 49 Using Favorite Channels 50 Using Twin View 51 Using the Freeze Function 54 ...
...Sony LCD Projection TV Presenting the Sony LCD Projection TV 9 Using This Manual 10 Enjoying Your LCD Projection TV 11 Replacing the Lamp 13 Installing and Connecting the LCD Projection TV Contents 17 Inserting Batteries into the Remote Control ..........17 Carrying Your LCD Projection TV 18 To Prevent the LCD Projection TV from Falling Down 19 When Installing Your LCD Projection TV... for Tape Editing 42 Using the CONTROL S Feature 43 Setting Up the LCD projection TV Automatically 44 Watching Digital TV 49 Using Favorite Channels 50 Using Twin View 51 Using the Freeze Function 54 ...
Operating Instructions
Page 9
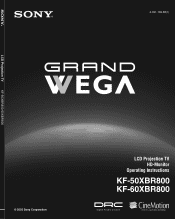
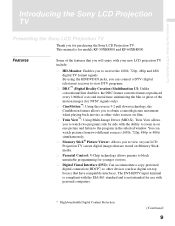
... and is for models KF-50XBR800 and KF-60XBR800. By using the HD/DVD IN jacks, you will enjoy with your LCD Projection TV screen digital images that have compatible interfaces. This manual is not intended for purchasing the Sony LCD Projection TV. Features Some of the...window. Introducing the Sony LCD Projection TV Introducing the Sony LCD Projection TV Presenting the Sony LCD Projection TV Thank you to the program in on one picture and listen to receive the 1080i, 720p, 480p and 480i digital TV format signals. You can connect a DTV (digital television) receiver to view ...
... and is for models KF-50XBR800 and KF-60XBR800. By using the HD/DVD IN jacks, you will enjoy with your LCD Projection TV screen digital images that have compatible interfaces. This manual is not intended for purchasing the Sony LCD Projection TV. Features Some of the...window. Introducing the Sony LCD Projection TV Introducing the Sony LCD Projection TV Presenting the Sony LCD Projection TV Thank you to the program in on one picture and listen to receive the 1080i, 720p, 480p and 480i digital TV format signals. You can connect a DTV (digital television) receiver to view ...
Operating Instructions
Page 10
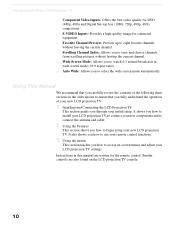
... you how to select the wide screen mode automatically. Instructions in this manual are also found on -screen menus and adjust your new LCD projection TV. Introducing the Sony LCD Projection TV ❑ Component Video Inputs: Offers the best video quality for DVD (480p, 480i) and Digital Set-top box (1080i, 720p, 480p, 480i) connections...
... you how to select the wide screen mode automatically. Instructions in this manual are also found on -screen menus and adjust your new LCD projection TV. Introducing the Sony LCD Projection TV ❑ Component Video Inputs: Offers the best video quality for DVD (480p, 480i) and Digital Set-top box (1080i, 720p, 480p, 480i) connections...
Operating Instructions
Page 11
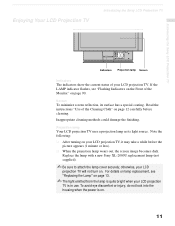
...). ✍ Be sure to attach the lamp cover securely; Projection lamp Your LCD projection TV uses a projection lamp as its surface has a special coating. otherwise, your LCD projection TV. Screen To minimize screen reflection, its light source. Enjoying Your LCD Projection TV Introducing the Sony LCD Projection TV Introducing the Sony LCD Projection TV Indicators Projection lamp Screen Indicators The indicators show the current status...
...). ✍ Be sure to attach the lamp cover securely; Projection lamp Your LCD projection TV uses a projection lamp as its surface has a special coating. otherwise, your LCD projection TV. Screen To minimize screen reflection, its light source. Enjoying Your LCD Projection TV Introducing the Sony LCD Projection TV Introducing the Sony LCD Projection TV Indicators Projection lamp Screen Indicators The indicators show the current status...
Operating Instructions
Page 12
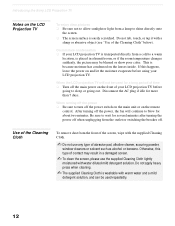
... contact may be used for a long period of time ❑ Turn off the main power on the front of your LCD projection TV before using your LCD projection TV is transported directly from a cold to sleep or going to a warm location, is washable with water diluted mild detergent solution.... shine directly onto the screen. ❑ The screen surface is because moisture has condensed on the lenses inside. Introducing the Sony LCD Projection TV Notes on the LCD Projection TV To enjoy clear pictures ❑ Be sure not to allow sunlight or light from a lamp to blow for about two ...
... contact may be used for a long period of time ❑ Turn off the main power on the front of your LCD projection TV before using your LCD projection TV is transported directly from a cold to sleep or going to a warm location, is washable with water diluted mild detergent solution.... shine directly onto the screen. ❑ The screen surface is because moisture has condensed on the lenses inside. Introducing the Sony LCD Projection TV Notes on the LCD Projection TV To enjoy clear pictures ❑ Be sure not to allow sunlight or light from a lamp to blow for about two ...
Operating Instructions
Page 13
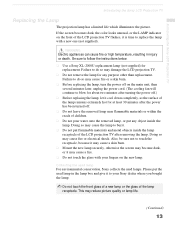
... remains extremely hot for about two minutes after removing the lamp. Also, be sure not to your fingers on the front of the LCD projection TV flashes, it cool down completely, as the surface of the lamp receptacle. Please put any purpose other than replacement. If the screen becomes dark..., the color looks unusual, or the LAMP indicator on the new lamp. Introducing the Sony LCD Projection TV Introducing the Sony LCD Projection TV Replacing the Lamp The projection lamp has a limited life which illuminates the picture.
... remains extremely hot for about two minutes after removing the lamp. Also, be sure not to your fingers on the front of the LCD projection TV flashes, it cool down completely, as the surface of the lamp receptacle. Please put any purpose other than replacement. If the screen becomes dark..., the color looks unusual, or the LAMP indicator on the new lamp. Introducing the Sony LCD Projection TV Introducing the Sony LCD Projection TV Replacing the Lamp The projection lamp has a limited life which illuminates the picture.

Operating Instructions
Page 14
... does not move. Grasping the right end of the box. 3 Remove the front panel. Hold the LCD projection TV firmly so that it . Introducing the Sony LCD Projection TV 1 Turn off the power switch on the LCD projection TV and after several minutes, unplug the power cord. (The cooling fan will continue to blow for about two...
... does not move. Grasping the right end of the box. 3 Remove the front panel. Hold the LCD projection TV firmly so that it . Introducing the Sony LCD Projection TV 1 Turn off the power switch on the LCD projection TV and after several minutes, unplug the power cord. (The cooling fan will continue to blow for about two...
Operating Instructions
Page 15
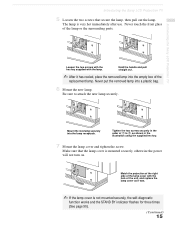
... supplied hex key. 7 Mount the lamp cover and tighten the screw. Mount the new lamp securely into a plastic bag. 6 Mount the new lamp. Introducing the Sony LCD Projection TV Loosen the two screws with the hex key supplied with the hole of the lamp or the surrounding parts. Match the... replace the lamp cover as it has cooled, place the removed lamp into the empty box of 1 to attach the new lamp securely. Introducing the Sony LCD Projection TV 5 Loosen the two screws that the lamp cover is very hot immediately after use. Make sure that secure the lamp, then pull out the...
... supplied hex key. 7 Mount the lamp cover and tighten the screw. Mount the new lamp securely into a plastic bag. 6 Mount the new lamp. Introducing the Sony LCD Projection TV Loosen the two screws with the hex key supplied with the hole of the lamp or the surrounding parts. Match the... replace the lamp cover as it has cooled, place the removed lamp into the empty box of 1 to attach the new lamp securely. Introducing the Sony LCD Projection TV 5 Loosen the two screws that the lamp cover is very hot immediately after use. Make sure that secure the lamp, then pull out the...
Operating Instructions
Page 16
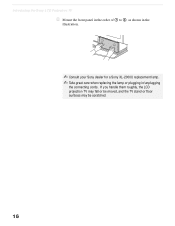
If you handle them roughly, the LCD projection TV may fall or be moved, and the TV stand or floor surfaces may be scratched. 16 Introducing the Sony LCD Projection TV 8 Mount the front panel in the order of 1 to 2, as shown in the illustration. ✍ Consult your Sony dealer for a Sony XL-2000U replacement lamp. ✍ Take great care when replacing the lamp or plugging in/unplugging the connecting cords.
If you handle them roughly, the LCD projection TV may fall or be moved, and the TV stand or floor surfaces may be scratched. 16 Introducing the Sony LCD Projection TV 8 Mount the front panel in the order of 1 to 2, as shown in the illustration. ✍ Consult your Sony dealer for a Sony XL-2000U replacement lamp. ✍ Take great care when replacing the lamp or plugging in/unplugging the connecting cords.
Operating Instructions
Page 17
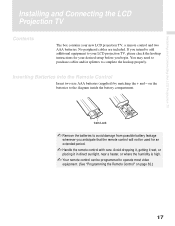
...eE Coin Lock ✍ Remove the batteries to operate most video equipment. (See "Programming the Remote Control" on the batteries to your LCD projection TV, please check the hookup instructions for an extended period. ✍ Handle the remote control with care. Avoid dropping it, getting it wet,...control will not be used for your new LCD projection TV, a remote control and two AAA batteries. If you begin. on page 82.) 17 Installing and Connecting the LCD Projection TV Installing and Connecting the LCD Projection TV Contents The box contains your desired setup before you...
...eE Coin Lock ✍ Remove the batteries to operate most video equipment. (See "Programming the Remote Control" on the batteries to your LCD projection TV, please check the hookup instructions for an extended period. ✍ Handle the remote control with care. Avoid dropping it, getting it wet,...control will not be used for your new LCD projection TV, a remote control and two AAA batteries. If you begin. on page 82.) 17 Installing and Connecting the LCD Projection TV Installing and Connecting the LCD Projection TV Contents The box contains your desired setup before you...

Operating Instructions
Page 18
Do not grasp the pedestal or the front panel of the LCD projection TV, otherwise these parts might break off. When moving the LCD projection TV, support the screen bottom with one hand while grasping the top part with the other hand, as shown in the illustration below. Installing and Connecting the LCD Projection TV Carrying Your LCD Projection TV Carrying the LCD projection TV requires at least two people. Do not grasp the pedestal or the front panel of the LCD projecttion TV. 18
Do not grasp the pedestal or the front panel of the LCD projection TV, otherwise these parts might break off. When moving the LCD projection TV, support the screen bottom with one hand while grasping the top part with the other hand, as shown in the illustration below. Installing and Connecting the LCD Projection TV Carrying Your LCD Projection TV Carrying the LCD projection TV requires at least two people. Do not grasp the pedestal or the front panel of the LCD projecttion TV. 18

Operating Instructions
Page 19
... supplied) with the screws (supplied) to a wall or a pillar, etc. If children should climb onto or push the LCD projection TV or its stand, it to the upper rear sides of the LCD projection TV (left and right sides). 2 Pass a strong cord or chain (not supplied) through each bracket and then secure it may fall...
... supplied) with the screws (supplied) to a wall or a pillar, etc. If children should climb onto or push the LCD projection TV or its stand, it to the upper rear sides of the LCD projection TV (left and right sides). 2 Pass a strong cord or chain (not supplied) through each bracket and then secure it may fall...
Operating Instructions
Page 20
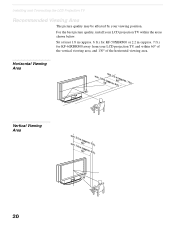
.... 7 ft.) 65˚ 65˚ Vertical Viewing Area min. Sit at least 1.8 m (approx. 6 ft.) for KF-50XBR800 or 2.2 m (approx. 7 ft.) for KF-60XBR800 away from your viewing position. For the best picture quality, install your LCD projection TV within 60° of the vertical viewing area, and 130° of the horizontal viewing area. m 5(0a"pprox...
.... 7 ft.) 65˚ 65˚ Vertical Viewing Area min. Sit at least 1.8 m (approx. 6 ft.) for KF-50XBR800 or 2.2 m (approx. 7 ft.) for KF-60XBR800 away from your viewing position. For the best picture quality, install your LCD projection TV within 60° of the vertical viewing area, and 130° of the horizontal viewing area. m 5(0a"pprox...

Operating Instructions
Page 21
Installing and Connecting the LCD Projection TV How to the on-screen menus without the use of a remote control. Installing and Connecting the LCD Projection TV LCD Projection TV Controls and Connectors Front Panel Menu Controls The front panel menu controls allow access to open and close the front panel To open To close OPEN (Continued) 21 Pressing MENU brings up the on -screen cursor in the menus and by pressing the button selects the menu item. The arrow buttons move the on -screen menus.
Installing and Connecting the LCD Projection TV How to the on-screen menus without the use of a remote control. Installing and Connecting the LCD Projection TV LCD Projection TV Controls and Connectors Front Panel Menu Controls The front panel menu controls allow access to open and close the front panel To open To close OPEN (Continued) 21 Pressing MENU brings up the on -screen cursor in the menus and by pressing the button selects the menu item. The arrow buttons move the on -screen menus.
Operating Instructions
Page 22
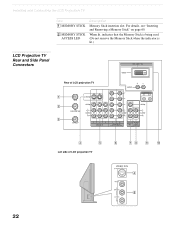
When lit, indicates that the Memory Stick is being read. (Do not remove the Memory Stick when the indicator is lit.) LCD Projection TV Rear and Side Panel Connectors Rear of LCD projection TV 22 Left side of LCD projection TV VIDEO 2 IN S VIDEO VIDEO L (MONO) AUDIO R Installing and Connecting the LCD Projection TV Item 1 MEMORY STICK 2 MEMORY STICK ACCESS LED Description Memory Stick insertion slot. For details, see "Inserting and Removing a Memory Stick" on page 60.
When lit, indicates that the Memory Stick is being read. (Do not remove the Memory Stick when the indicator is lit.) LCD Projection TV Rear and Side Panel Connectors Rear of LCD projection TV 22 Left side of LCD projection TV VIDEO 2 IN S VIDEO VIDEO L (MONO) AUDIO R Installing and Connecting the LCD Projection TV Item 1 MEMORY STICK 2 MEMORY STICK ACCESS LED Description Memory Stick insertion slot. For details, see "Inserting and Removing a Memory Stick" on page 60.


