
Child Safety: It Makes A Difference Where Your TV Stands
Page 1
... 6 Remember that children can become excited while watching a program and can potentially push or pull a TV over. 7 Share our safety message on top of TVs such as VCRs and remotes that is a growing trend, and larger televisions are popular purchases and are not always supported on dressers... Safety Committee comprised of the home with your family and friends. Sometimes televisions are improperly secured or inappropriately situated on the proper TV stands. Use the appropriate furniture that may cause unnecessary injury. Many homes, in fact, have a television in your furniture to...
... 6 Remember that children can become excited while watching a program and can potentially push or pull a TV over. 7 Share our safety message on top of TVs such as VCRs and remotes that is a growing trend, and larger televisions are popular purchases and are not always supported on dressers... Safety Committee comprised of the home with your family and friends. Sometimes televisions are improperly secured or inappropriately situated on the proper TV stands. Use the appropriate furniture that may cause unnecessary injury. Many homes, in fact, have a television in your furniture to...
Operating Instructions
Page 5
Table of Contents Table of Contents Installing and Connecting the TV Unpacking 6 Inserting Batteries into the Remote Control ... 6 Preventing the TV from Falling Down 6 Connector Types 7 Identifying Front and Rear Connectors .......... 8 Basic Connections (Connecting Cable TV or Antenna 9 Connecting directly to cable or an antenna ... 30 Changing the Wide Setup 30 Setting the Video Inputs 32 Operating Video Equipment with Your TV Remote Control 33 Programming the remote control 33 Operating optional equipment 35 Using Favorite Channels 36 Setting your favorite channels 36 Watching...
Table of Contents Table of Contents Installing and Connecting the TV Unpacking 6 Inserting Batteries into the Remote Control ... 6 Preventing the TV from Falling Down 6 Connector Types 7 Identifying Front and Rear Connectors .......... 8 Basic Connections (Connecting Cable TV or Antenna 9 Connecting directly to cable or an antenna ... 30 Changing the Wide Setup 30 Setting the Video Inputs 32 Operating Video Equipment with Your TV Remote Control 33 Programming the remote control 33 Operating optional equipment 35 Using Favorite Channels 36 Setting your favorite channels 36 Watching...
Operating Instructions
Page 6
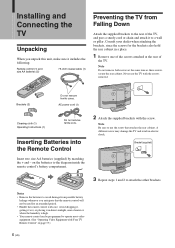
... the brackets, since the screws for an extended period. • Handle the remote control with Your TV Remote Control" on the batteries to attach the other brackets. Never use the screw that the remote control will not be programmed to a wall or pillar. Note Do not remove... in electric shock. Installing and Connecting the TV Installing and Connecting the TV Unpacking When you unpack this unit, make sure it includes the following: Remote control (1) and size AA batteries (2) 75-ohm coaxial cable (1) Preventing the TV from possible battery leakage whenever you anticipate that...
... the brackets, since the screws for an extended period. • Handle the remote control with Your TV Remote Control" on the batteries to attach the other brackets. Never use the screw that the remote control will not be programmed to a wall or pillar. Note Do not remove... in electric shock. Installing and Connecting the TV Installing and Connecting the TV Unpacking When you unpack this unit, make sure it includes the following: Remote control (1) and size AA batteries (2) 75-ohm coaxial cable (1) Preventing the TV from possible battery leakage whenever you anticipate that...
Operating Instructions
Page 9
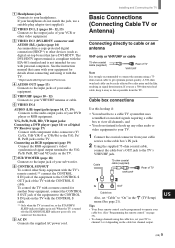
... your sub woofer. 8 CONTROL S IN/OUT To control other Sony equipment with the TV's remote control,** connect the CONTROL S IN jack of the equipment to the CONTROL S OUT jack of the TV with the CONTROL S cable. ** Only when the TV is strongly recommended to connect the antenna using it away as far... as digital set "Cable" to "On" in signal deterioration. To control the TV with a remote control for another Sony equipment, connect the CONTROL S OUT jack of TV VHF/UHF Note It is turned on, or the STANDBY/ SLEEP indicator lights up any other devices (such as...
... your sub woofer. 8 CONTROL S IN/OUT To control other Sony equipment with the TV's remote control,** connect the CONTROL S IN jack of the equipment to the CONTROL S OUT jack of the TV with the CONTROL S cable. ** Only when the TV is strongly recommended to connect the antenna using it away as far... as digital set "Cable" to "On" in signal deterioration. To control the TV with a remote control for another Sony equipment, connect the CONTROL S OUT jack of TV VHF/UHF Note It is turned on, or the STANDBY/ SLEEP indicator lights up any other devices (such as...
Operating Instructions
Page 12
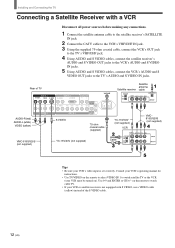
...(not supplied) YC-15V/30V (not supplied) Cable Tips • Be sure your VCR's operating manual for instructions. • Use TV/VIDEO on the remote to select VIDEO IN 1 to the TV's AUDIO and S VIDEO IN jacks. on ). Consult your VCR's video input is not equipped with a VCR Disconnect all power sources before... to the VCR's AUDIO and S VIDEO IN jacks. 5 Using AUDIO and S VIDEO cables, connect the VCR's AUDIO and S VIDEO OUT jacks to watch satellite TV or the VCR (your VCR must be turned on the remote to watch cable TV. • If your VCR or satellite receiver is set correctly.
...(not supplied) YC-15V/30V (not supplied) Cable Tips • Be sure your VCR's operating manual for instructions. • Use TV/VIDEO on the remote to select VIDEO IN 1 to the TV's AUDIO and S VIDEO IN jacks. on ). Consult your VCR's video input is not equipped with a VCR Disconnect all power sources before... to the VCR's AUDIO and S VIDEO IN jacks. 5 Using AUDIO and S VIDEO cables, connect the VCR's AUDIO and S VIDEO OUT jacks to watch satellite TV or the VCR (your VCR must be turned on the remote to watch cable TV. • If your VCR or satellite receiver is set correctly.

Operating Instructions
Page 15
...(Custom Setup) menu (see page 10). US (US) 15 Rear of the S VIDEO cable. on the remote to watch the pictures input from the S VIDEO input jack, set the TV's aspect ratio to 16:9 on your DVD player. For details, refer to the operating instructions supplied with A/V .... Use 0-9 and ENTER or CH +/- Tip If your DVD player has video component output connectors, for best picture quality, use a VIDEO cable (yellow) instead of TV AUDIO-R (red) AUDIO-L (white) VIDEO IN 1 R AUDIO L VIDEO S VIDEO VIDEO IN 2 VIDEO IN 3 R AUDIO L DVI-HDTV AUDIO OUT R L R AUDIO L Y/G PB/B ...
...(Custom Setup) menu (see page 10). US (US) 15 Rear of the S VIDEO cable. on the remote to watch the pictures input from the S VIDEO input jack, set the TV's aspect ratio to 16:9 on your DVD player. For details, refer to the operating instructions supplied with A/V .... Use 0-9 and ENTER or CH +/- Tip If your DVD player has video component output connectors, for best picture quality, use a VIDEO cable (yellow) instead of TV AUDIO-R (red) AUDIO-L (white) VIDEO IN 1 R AUDIO L VIDEO S VIDEO VIDEO IN 2 VIDEO IN 3 R AUDIO L DVI-HDTV AUDIO OUT R L R AUDIO L Y/G PB/B ...
Operating Instructions
Page 20
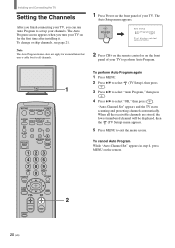
.... 1 Press Power on the front panel of your TV to perform Auto Program. 1 MUTING POWER VCR/DVD SAT/CABLE TV SYSTEM FUNCTION OFF VCR/DVD SAT/CABLE TV SLEEP PICTURE MODE WIDE MODE DISPLAY TV/VIDEO 123 456 7 JUMP FAVORITES 89 ENTER 0 MTS/SAP TV/SAT GUIDE POWER SAVING MENU VOL CH...Auto-Channel Set" appears in step 4, press MENU on the front panel of your TV. POWER , Auto Setup Auto Program: [CH+ Exit [CH- [ [ First please connect cable/antenna 2 Press CH+ on the remote control or on the remote. To change or skip channels, see page 21. The Auto Program ...
.... 1 Press Power on the front panel of your TV to perform Auto Program. 1 MUTING POWER VCR/DVD SAT/CABLE TV SYSTEM FUNCTION OFF VCR/DVD SAT/CABLE TV SLEEP PICTURE MODE WIDE MODE DISPLAY TV/VIDEO 123 456 7 JUMP FAVORITES 89 ENTER 0 MTS/SAP TV/SAT GUIDE POWER SAVING MENU VOL CH...Auto-Channel Set" appears in step 4, press MENU on the front panel of your TV. POWER , Auto Setup Auto Program: [CH+ Exit [CH- [ [ First please connect cable/antenna 2 Press CH+ on the remote control or on the remote. To change or skip channels, see page 21. The Auto Program ...
Operating Instructions
Page 23
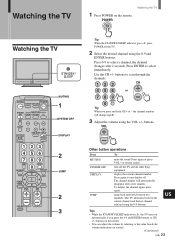
... channel, the channel changes after a few minutes. Press 0-9 to turn off the TV and all other Sony equipment. To display the channel again, press again. The TV alternates between two channels. buttons on the TV. 2 Select the desired channel using the 0-9 and ENTER buttons. jump back and ...CH +/- turn display off , press POWER on the remote. • You can adjust the volume by referring to restore sound. Press again or press VOL + to the value beside the volume indication (on the remote. POWER TV Watching the TV Tip When the STANDBY/SLEEP indicator goes off .
... channel, the channel changes after a few minutes. Press 0-9 to turn off the TV and all other Sony equipment. To display the channel again, press again. The TV alternates between two channels. buttons on the TV. 2 Select the desired channel using the 0-9 and ENTER buttons. jump back and ...CH +/- turn display off , press POWER on the remote. • You can adjust the volume by referring to restore sound. Press again or press VOL + to the value beside the volume indication (on the remote. POWER TV Watching the TV Tip When the STANDBY/SLEEP indicator goes off .
Operating Instructions
Page 32
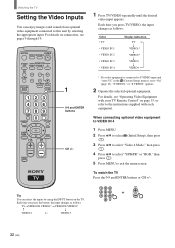
... with each equipment. Each time you press the button, the input changes as follows: Select • TV • VIDEO IN 1 • VIDEO IN 2 • VIDEO IN 3 • VIDEO IN 4 Display indication TV T r VIDEO1* r VIDEO2* r VIDEO3 r VIDEO4 * If a video equipment is connected to S... the instructions supplied with your TV Remote Control" on the TV. Each time you press TV/VIDEO, the input changes as follows: TVtVIDEO1/S VIDEO1*tVIDEO2/S VIDEO2* R r VIDEO 4 T VIDEO 3 1 Press TV/VIDEO repeatedly until the desired video input appears. To watch the TV Press the 0-9 and ENTER ...
... with each equipment. Each time you press the button, the input changes as follows: Select • TV • VIDEO IN 1 • VIDEO IN 2 • VIDEO IN 3 • VIDEO IN 4 Display indication TV T r VIDEO1* r VIDEO2* r VIDEO3 r VIDEO4 * If a video equipment is connected to S... the instructions supplied with your TV Remote Control" on the TV. Each time you press TV/VIDEO, the input changes as follows: TVtVIDEO1/S VIDEO1*tVIDEO2/S VIDEO2* R r VIDEO 4 T VIDEO 3 1 Press TV/VIDEO repeatedly until the desired video input appears. To watch the TV Press the 0-9 and ENTER ...
Operating Instructions
Page 33
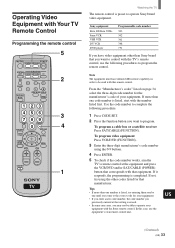
... GUIDE POWER SAVING VOL MENU CH CODE SET 1 Watching the TV The remote control is erased. • In some rare cases, you want to the correct code for your equipment with the Sony remote control. If more than Sony brand that manufacturer. In this remote control. Note The equipment must have video equipment other codes listed...
... GUIDE POWER SAVING VOL MENU CH CODE SET 1 Watching the TV The remote control is erased. • In some rare cases, you want to the correct code for your equipment with the Sony remote control. If more than Sony brand that manufacturer. In this remote control. Note The equipment must have video equipment other codes listed...
Operating Instructions
Page 53
...Color System Menu Function Auto Shutoff Timer/Clock Channel Fix TV...satellite receiver connected. 2-6: Select this TV. On/Off: If the MENU button is no broadcast or input... the connected equipment. Serial number allocated for each TV If "NG" flashes, follow the procedure in ...to 2-6 and use Channel Skip/Add or Auto Program in the TV Setup menu. If the button is pressed, the menu screen ... (See page 58). Model name of this to 'fix' your TV's channel setting to the standby mode automatically if there is selected. If...TV to turn off the Channel Fix feature. Select how the MENU...
...Color System Menu Function Auto Shutoff Timer/Clock Channel Fix TV...satellite receiver connected. 2-6: Select this TV. On/Off: If the MENU button is no broadcast or input... the connected equipment. Serial number allocated for each TV If "NG" flashes, follow the procedure in ...to 2-6 and use Channel Skip/Add or Auto Program in the TV Setup menu. If the button is pressed, the menu screen ... (See page 58). Model name of this to 'fix' your TV's channel setting to the standby mode automatically if there is selected. If...TV to turn off the Channel Fix feature. Select how the MENU...
Operating Instructions
Page 58
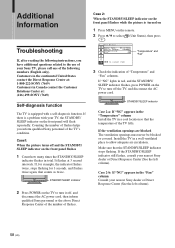
...twice. STANDBY/SLEEP indicator 2 Press POWER on the remote. 2 Press V/v to select (Unit Status), then press . If there is turned on 1 Press MENU on the TV to turn it off and the STANDBY/ SLEEP indicator on the front panel flashes while the picture is a problem with a ...the STANDBY/ SLEEP indicator flashes, press POWER on the front panel will flash repeatedly. Install the TV in Canada contact the Customer Relations Center at: (416) 499-SONY (7669) Self-diagnosis function The TV is equipped with your Sony TV, please call one of the following numbers (English only). Additional...
...twice. STANDBY/SLEEP indicator 2 Press POWER on the remote. 2 Press V/v to select (Unit Status), then press . If there is turned on 1 Press MENU on the TV to turn it off and the STANDBY/ SLEEP indicator on the front panel flashes while the picture is a problem with a ...the STANDBY/ SLEEP indicator flashes, press POWER on the front panel will flash repeatedly. Install the TV in Canada contact the Customer Relations Center at: (416) 499-SONY (7669) Self-diagnosis function The TV is equipped with your Sony TV, please call one of the following numbers (English only). Additional...
Operating Instructions
Page 59
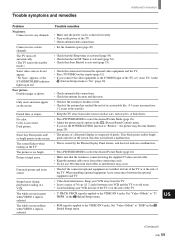
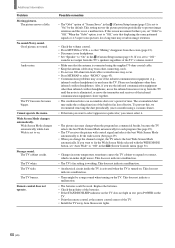
...is connected securely. • Turn on the remote (page 32). • If you connect the video equipment to the S VIDEO input of the TV, set the POWER SAVING function to "Y/ PB...between the optional equipment and TV. • Video head interference. Double images or ghosts. Dark picture. The whole screen is green when VIDEO 4 input is composed of a flat panel display is selected. Set... caused by the Plasma Display Panel feature, and does not indicate a malfunction. • Press PICTURE MODE to "RGB" in red. Dotted lines or stripes No color. Color is selected. Picture (stripe)...
...is connected securely. • Turn on the remote (page 32). • If you connect the video equipment to the S VIDEO input of the TV, set the POWER SAVING function to "Y/ PB...between the optional equipment and TV. • Video head interference. Double images or ghosts. Dark picture. The whole screen is green when VIDEO 4 input is composed of a flat panel display is selected. Set... caused by the Plasma Display Panel feature, and does not indicate a malfunction. • Press PICTURE MODE to "RGB" in red. Dotted lines or stripes No color. Color is selected. Picture (stripe)...
Operating Instructions
Page 60
... The ventilation holes can make the cooling function of the built-in red, press POWER on the TV. • Point the remote control at the remote control sensor of the TV. • Install the TV away from the screen (page 23). • Disconnect your headphones. • Set "Speaker" ...Wide Screen Mode changes automatically while Auto Wide is working. Possible remedies • The"Orbit" option of "Screen Saver" in a pale color, you use the infrared communication equipment other connecting cords. • Do not use headphones other than infrared cordless headphones, move the transmitter...
... The ventilation holes can make the cooling function of the built-in red, press POWER on the TV. • Point the remote control at the remote control sensor of the TV. • Install the TV away from the screen (page 23). • Disconnect your headphones. • Set "Speaker" ...Wide Screen Mode changes automatically while Auto Wide is working. Possible remedies • The"Orbit" option of "Screen Saver" in a pale color, you use the infrared communication equipment other connecting cords. • Do not use headphones other than infrared cordless headphones, move the transmitter...
Operating Instructions
Page 61
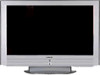
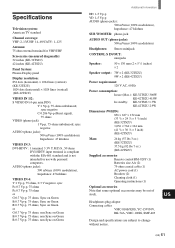
... American TV standard Channel coverage: VHF: 2-13/UHF: 14-69/CATV: 1-125 Antenna: 75 ohm external terminal for VHF/UHF Screen size (measured diagonally): 32 inches (KE-32TS2U) 42 inches (KE-42TS2U) Panel System: Plasma Display panel Display ...KE-32TS2U:300W KE-42TS2U:415W In standby: KE-32TS2U:1.7W KE-42TS2U:2.9W Dimensions (W/H/D): 856 × 627 × 132 mm (33 3/4 × 24 3/4 × 5 1/4 inch) (KE-32TS2U) 1,056 × 764 × 124 mm (41 5/8 × 30 1/8 × 5 inch) (KE-42TS2U) Mass: 26 kg (57 lbs 3 oz.) (KE-32TS2U) 37.5 kg (82 lbs 7 oz.) (KE-42TS2U) Supplied accessories Remote...
... American TV standard Channel coverage: VHF: 2-13/UHF: 14-69/CATV: 1-125 Antenna: 75 ohm external terminal for VHF/UHF Screen size (measured diagonally): 32 inches (KE-32TS2U) 42 inches (KE-42TS2U) Panel System: Plasma Display panel Display ...KE-32TS2U:300W KE-42TS2U:415W In standby: KE-32TS2U:1.7W KE-42TS2U:2.9W Dimensions (W/H/D): 856 × 627 × 132 mm (33 3/4 × 24 3/4 × 5 1/4 inch) (KE-32TS2U) 1,056 × 764 × 124 mm (41 5/8 × 30 1/8 × 5 inch) (KE-42TS2U) Mass: 26 kg (57 lbs 3 oz.) (KE-32TS2U) 37.5 kg (82 lbs 7 oz.) (KE-42TS2U) Supplied accessories Remote...
Operating Instructions
Page 62
... 30 C Channel setting 20 Clock Display 55 Clock Set 55 CONTROL S jacks 9 Closed Caption 24 Color Matrix 52 Color System 53 Connecting 7 antenna 9 audio receiver 13 cable box 9 digital TV receiver 17 DVD player 14,15 RGB equipment 19 satellite receiver 11 sub woofer 18 VCR 10 D ... On/Off Timer 56 Optional equipment 33 P Parental Control 43 password 45 ratings 48 Picture Mode 26 Power Saving 28 R RGB Mode 52 Remote control 6 battery installation 6 operating optional equipment 35 programming 33 S Screen Saver 52 Screen Shift 38 Screen Size 38 Screen Zoom 52 Self-...
... 30 C Channel setting 20 Clock Display 55 Clock Set 55 CONTROL S jacks 9 Closed Caption 24 Color Matrix 52 Color System 53 Connecting 7 antenna 9 audio receiver 13 cable box 9 digital TV receiver 17 DVD player 14,15 RGB equipment 19 satellite receiver 11 sub woofer 18 VCR 10 D ... On/Off Timer 56 Optional equipment 33 P Parental Control 43 password 45 ratings 48 Picture Mode 26 Power Saving 28 R RGB Mode 52 Remote control 6 battery installation 6 operating optional equipment 35 programming 33 S Screen Saver 52 Screen Shift 38 Screen Size 38 Screen Zoom 52 Self-...


