
Operating Instructions
Page 3
...Setup Guide (separate volume) Provides a variety of BRAVIA™ The Four Steps to the World of optional equipment connection diagrams. Customer Support http://www.sony.com/tvsupport On-line Registration United States http://productregistration.sony.com Canada http://www.SonyStyle.ca/registration 3 ...Connecting the TV 13 Cable System or VHF/UHF Antenna System 13 Cable System and VHF/UHF Antenna System 13 HD Cable Box/HD Satellite Box 13 PC 15 Other Equipment 16 Using HDMI Control for BRAVIA Theatre Sync 17 4. Locating Inputs...
...Setup Guide (separate volume) Provides a variety of BRAVIA™ The Four Steps to the World of optional equipment connection diagrams. Customer Support http://www.sony.com/tvsupport On-line Registration United States http://productregistration.sony.com Canada http://www.SonyStyle.ca/registration 3 ...Connecting the TV 13 Cable System or VHF/UHF Antenna System 13 Cable System and VHF/UHF Antenna System 13 HD Cable Box/HD Satellite Box 13 PC 15 Other Equipment 16 Using HDMI Control for BRAVIA Theatre Sync 17 4. Locating Inputs...
Operating Instructions
Page 7
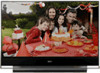
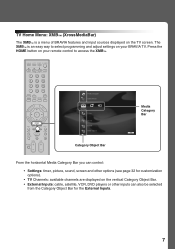
...settings on the vertical Category Object Bar. • External Inputs: cable, satellite, VCR, DVD players or other inputs can also be selected from the Category Object Bar for the External Inputs. 7 The XMB™ is a menu of BRAVIA features and input sources displayed on the TV screen. Press the HOME button... on your BRAVIA TV. TV Home Menu: XMB™ (XrossMediaBar) The XMB™ is an easy way...
...settings on the vertical Category Object Bar. • External Inputs: cable, satellite, VCR, DVD players or other inputs can also be selected from the Category Object Bar for the External Inputs. 7 The XMB™ is a menu of BRAVIA features and input sources displayed on the TV screen. Press the HOME button... on your BRAVIA TV. TV Home Menu: XMB™ (XrossMediaBar) The XMB™ is an easy way...

Operating Instructions
Page 11
... such as a VCR or other video equipment that connects to the composite video and audio output jacks on your Cable or VHF/UHF antenna. 2. Locating Inputs and Outputs Left Side Getting Started 0 1 2 3 VHF/UHF/CABLE S VIDEO 1 DMex/ SERVICE VIDEO IN 2 3 COMPONENT IN (1080p/1080i/720p/480p/... 1 2 3 RGB PC IN 56 7 8 9 Item 1 VHF/UHF/CABLE 2 VIDEO IN 1 S VIDEO 3 VIDEO IN 1/2/3 VIDEO/ L(MONO)AUDIO-R Description RF input that has S VIDEO. Connects to the S VIDEO output jack of your VCR or other video equipment. (Continued) 11 The S VIDEO provides better picture quality than...
... such as a VCR or other video equipment that connects to the composite video and audio output jacks on your Cable or VHF/UHF antenna. 2. Locating Inputs and Outputs Left Side Getting Started 0 1 2 3 VHF/UHF/CABLE S VIDEO 1 DMex/ SERVICE VIDEO IN 2 3 COMPONENT IN (1080p/1080i/720p/480p/... 1 2 3 RGB PC IN 56 7 8 9 Item 1 VHF/UHF/CABLE 2 VIDEO IN 1 S VIDEO 3 VIDEO IN 1/2/3 VIDEO/ L(MONO)AUDIO-R Description RF input that has S VIDEO. Connects to the S VIDEO output jack of your VCR or other video equipment. (Continued) 11 The S VIDEO provides better picture quality than...
Operating Instructions
Page 12
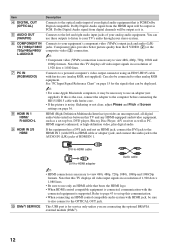
... R-AUDIO-L 9 HDMI IN 2/3 HDMI Description Connects to your equipment's component video (YPBPR) output jack and audio (L/R) jacks. Connects to the optical audio input of your digital audio equipment that is noisy, flickering or not clear, adjust Phase and Pitch of Screen settings on page 15 for service only... unless you are connecting the optional BRAVIA external module (DMex). 12 Note that can use an adapter (not supplied). If this communication. • When connecting an HDMI control...
... R-AUDIO-L 9 HDMI IN 2/3 HDMI Description Connects to your equipment's component video (YPBPR) output jack and audio (L/R) jacks. Connects to the optical audio input of your digital audio equipment that is noisy, flickering or not clear, adjust Phase and Pitch of Screen settings on page 15 for service only... unless you are connecting the optional BRAVIA external module (DMex). 12 Note that can use an adapter (not supplied). If this communication. • When connecting an HDMI control...
Operating Instructions
Page 13
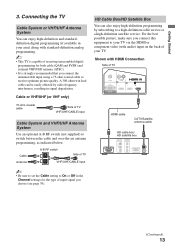
...for both cable (QAM and 8VSB) and external VHF/UHF antenna (ATSC). • It is strongly recommended that you connect the antenna/cable input using a 75-ohm coaxial cable to switch between the cable and over-the-air antenna programming, as indicated below. HD Cable Box/HD ...) to receive optimum picture quality. Getting Started 3. Shown with standard-definition analog programming. ~ • This TV is capable of TV B VHF/UHF/CABLE input ~ • Be sure to set the Cable setting to a high-definition cable service or a high-definition satellite service. A 300-ohm twin lead cable ...
...for both cable (QAM and 8VSB) and external VHF/UHF antenna (ATSC). • It is strongly recommended that you connect the antenna/cable input using a 75-ohm coaxial cable to switch between the cable and over-the-air antenna programming, as indicated below. HD Cable Box/HD ...) to receive optimum picture quality. Getting Started 3. Shown with standard-definition analog programming. ~ • This TV is capable of TV B VHF/UHF/CABLE input ~ • Be sure to set the Cable setting to a high-definition cable service or a high-definition satellite service. A 300-ohm twin lead cable ...
Operating Instructions
Page 15
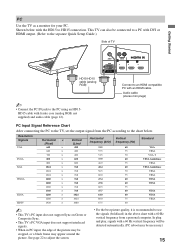
... picture may be cropped, or a black frame may be detected automatically. (PC reboot may appear around the picture. Resolution Signals VGA SVGA XGA WXGA SXGA HDTV Horizontal × (Pixel) 640 × 640 × 720 × 800 × 800 × 1024 × 1024 × 1024 × 1280 × 1280 &#...from the PC according to the PC using an HD15HD15 cable with an HDMI cable. PC Use the TV as a monitor for your PC. PC Input Signal Reference Chart After connecting the PC to the TV, set the output signal from a personal computer. Audio cable (stereo mini plugs) ~ &#...
... picture may be cropped, or a black frame may be detected automatically. (PC reboot may appear around the picture. Resolution Signals VGA SVGA XGA WXGA SXGA HDTV Horizontal × (Pixel) 640 × 640 × 720 × 800 × 800 × 1024 × 1024 × 1024 × 1280 × 1280 &#...from the PC according to the PC using an HD15HD15 cable with an HDMI cable. PC Use the TV as a monitor for your PC. PC Input Signal Reference Chart After connecting the PC to the TV, set the output signal from a personal computer. Audio cable (stereo mini plugs) ~ &#...
Operating Instructions
Page 17
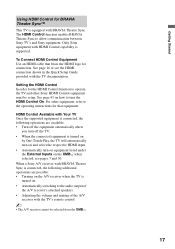
...the respective HDMI input. • Automatically turn on equipment listed under the External Inputs on how to the audio output of the A/V receiver's attached speakers. • Adjusting the volume and muting of the A/V receiver with the TV documentation. When a Sony A/V receiver with BRAVIA Theatre Sync is... the TV and other equipment, refer to allow communication between Sony TV's and Sony equipment. The HDMI Control function enables BRAVIA Theatre Sync to the operating instructions for that bears the HDMI logo for BRAVIA Theatre Sync™ This TV is equipped with HDMI Control ...
...the respective HDMI input. • Automatically turn on equipment listed under the External Inputs on how to the audio output of the A/V receiver's attached speakers. • Adjusting the volume and muting of the A/V receiver with the TV documentation. When a Sony A/V receiver with BRAVIA Theatre Sync is... the TV and other equipment, refer to allow communication between Sony TV's and Sony equipment. The HDMI Control function enables BRAVIA Theatre Sync to the operating instructions for that bears the HDMI logo for BRAVIA Theatre Sync™ This TV is equipped with HDMI Control ...
Operating Instructions
Page 18
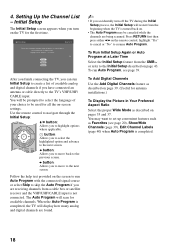
... next screen. You will apply to be canceled while the channels are receiving channels from a cable box or satellite receiver and the VHF/UHF/CABLE input is completed, the TV will display how many analog and digital channels are found. ~ • If you are being scanned. b button: Allows you to move... in Your Preferred Aspect Ratio Select the proper Wide Mode as Favorites (see page 39. Highlight a choice and press to the TV's VHF/UHF/ CABLE input. The Auto Program will restart from the XMB™ or refer to the previous screen.
... next screen. You will apply to be canceled while the channels are receiving channels from a cable box or satellite receiver and the VHF/UHF/CABLE input is completed, the TV will display how many analog and digital channels are found. ~ • If you are being scanned. b button: Allows you to move... in Your Preferred Aspect Ratio Select the proper Wide Mode as Favorites (see page 39. Highlight a choice and press to the TV's VHF/UHF/ CABLE input. The Auto Program will restart from the XMB™ or refer to the previous screen.

Operating Instructions
Page 19
... you want the TV to show which external equipment the remote control is set the display to remain on the remote control. 2 3 POWER CHANNEL VOLUME INPUT HOME ~ • The 5, PLAY and CH + buttons have a tactile dot.
... you want the TV to show which external equipment the remote control is set the display to remain on the remote control. 2 3 POWER CHANNEL VOLUME INPUT HOME ~ • The 5, PLAY and CH + buttons have a tactile dot.
Operating Instructions
Page 22
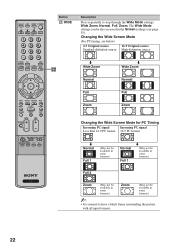
... the Wide Screen Mode (For PC timing, see page 35). Button ws WIDE Description Press repeatedly to have a black frame surrounding the picture with all input formats. 22 The Wide Mode settings can be also accessed in the Screen settings (see below) 4:3 Original source 16:9 Original source Standard-definition source High...
... the Wide Screen Mode (For PC timing, see page 35). Button ws WIDE Description Press repeatedly to have a black frame surrounding the picture with all input formats. 22 The Wide Mode settings can be also accessed in the Screen settings (see below) 4:3 Original source 16:9 Original source Standard-definition source High...

Operating Instructions
Page 23
... Press repeatedly to cycle through the available picture modes: Vivid, Standard, Cinema, Photo, Custom. (Available options depend on setting up the External Inputs labels, including the Skip feature. Press to exit the XMB™. The OPTIONS menu items vary based on page 32. wg Menu Item Reference...page 39 Digital Rating See page 41 Screen See page 35 wl wj HOME ~ • Motion Enhancer can only be set for the current input. • When Digital Rating is displayed. • See page 42 on the current mode.) The picture modes can be accessed in the Picture...
... Press repeatedly to cycle through the available picture modes: Vivid, Standard, Cinema, Photo, Custom. (Available options depend on setting up the External Inputs labels, including the Skip feature. Press to exit the XMB™. The OPTIONS menu items vary based on page 32. wg Menu Item Reference...page 39 Digital Rating See page 41 Screen See page 35 wl wj HOME ~ • Motion Enhancer can only be set for the current input. • When Digital Rating is displayed. • See page 42 on the current mode.) The picture modes can be accessed in the Picture...

Operating Instructions
Page 27
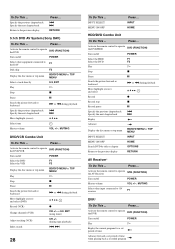
...Display SAT Guide OPTIONS Display SAT Menu HOME Move highlight (cursor) V v B b Select item VCR* To Do This ... Press ... Press INPUT repeatedly until you have a DVD changer, to skip disc F1 Play H Stop x Pause X (press again to resume normal playback) Step ... ... Using Other Equipment with your connected equipment. Activate the remote control to operate the VCR STB (FUNCTION) Turn on /off POWER INPUT SELECT INPUT Select a channel 0-9, ENT Change channels CH +/- Press ... Back to disc step backward Select a track directly 0-9, ENT Display the ...
...Display SAT Guide OPTIONS Display SAT Menu HOME Move highlight (cursor) V v B b Select item VCR* To Do This ... Press ... Press INPUT repeatedly until you have a DVD changer, to skip disc F1 Play H Stop x Pause X (press again to resume normal playback) Step ... ... Using Other Equipment with your connected equipment. Activate the remote control to operate the VCR STB (FUNCTION) Turn on /off POWER INPUT SELECT INPUT Select a channel 0-9, ENT Change channels CH +/- Press ... Back to disc step backward Select a track directly 0-9, ENT Display the ...
Operating Instructions
Page 28
INPUT HOME HDD/DVD Combo Unit To Do This ... . > Replay Advance Display the disc menu or top menu BD/DVD MENU or TOP MENU INPUT SELECT INPUT MENU ON/OFF HOME Search DVD by title or chapter OPTIONS Return to operate the DVR DVD ...Specify the next chapter/track Return to AV receiver F1 DVR* To Do This ... Press ... Press ... INPUT SELECT MENU ON/OFF Press ... Activate the remote control to operate the DVD/HDD DVD (FUNCTION) Turn ...the DVD DVD (FUNCTION) Turn on/off POWER Select other input connected to the previous display Press ... . > RETURN 5.1ch DVD AV System...
INPUT HOME HDD/DVD Combo Unit To Do This ... . > Replay Advance Display the disc menu or top menu BD/DVD MENU or TOP MENU INPUT SELECT INPUT MENU ON/OFF HOME Search DVD by title or chapter OPTIONS Return to operate the DVR DVD ...Specify the next chapter/track Return to AV receiver F1 DVR* To Do This ... Press ... Press ... INPUT SELECT MENU ON/OFF Press ... Activate the remote control to operate the DVD/HDD DVD (FUNCTION) Turn ...the DVD DVD (FUNCTION) Turn on/off POWER Select other input connected to the previous display Press ... . > RETURN 5.1ch DVD AV System...
Operating Instructions
Page 30
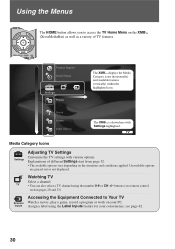
... of different Settings start from page 32. • The available options vary depending on the situations and conditions applied. Watching TV Select a channel. Inputs Assign a label using the number 0-9 or CH +/- TV Media Category Icons Settings Adjusting TV Settings Customize the TV settings with Settings highlighted. Accessing ... control section pages 20 and 23). Explanations of TV features. TV • You can also select a TV channel using the Label Inputs feature for your PC. Sound Screen Video Options The XMB™ is shown here with various options.
... of different Settings start from page 32. • The available options vary depending on the situations and conditions applied. Watching TV Select a channel. Inputs Assign a label using the number 0-9 or CH +/- TV Media Category Icons Settings Adjusting TV Settings Customize the TV settings with Settings highlighted. Accessing ... control section pages 20 and 23). Explanations of TV features. TV • You can also select a TV channel using the Label Inputs feature for your PC. Sound Screen Video Options The XMB™ is shown here with various options.
Operating Instructions
Page 31
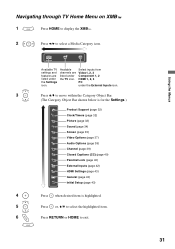
...Home Menu on XMB™ 1 Press HOME to display the XMB™. 2 Press B/b to exit. 31 Available channels are listed under the External Inputs icon. 3 Press V/v to move within the Category Object Bar. (The Category Object Bar shown below is for the Settings.) Product Support (page 32...page 35) Video Options (page 37) Audio Options (page 38) Channel (page 39) CC Closed Captions (CC) (page 40) Parental Lock (page 40) External Inputs (page 42) HDMI Settings (page 43) General (page 43) Initial Setup (page 43) 4 Press when desired item is highlighted. 5 Press or, V/v to ...
...Home Menu on XMB™ 1 Press HOME to display the XMB™. 2 Press B/b to exit. 31 Available channels are listed under the External Inputs icon. 3 Press V/v to move within the Category Object Bar. (The Category Object Bar shown below is for the Settings.) Product Support (page 32...page 35) Video Options (page 37) Audio Options (page 38) Channel (page 39) CC Closed Captions (CC) (page 40) Parental Lock (page 40) External Inputs (page 42) HDMI Settings (page 43) General (page 43) Initial Setup (page 43) 4 Press when desired item is highlighted. 5 Press or, V/v to ...

Operating Instructions
Page 33
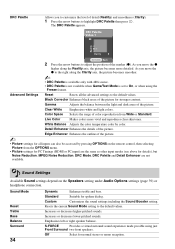
... Brightness Color Hue Color Temperature White adjustment Sharpness Noise Reduction MPEG Noise Reduction DRC Mode ~ • Picture Mode for all inputs can obtain the best brightness and contrast suited for your TV viewing. Increases or decreases picture contrast. Reduces the mosaic effect ... Increases or decreases color intensity. Min With this option, the screen has a high level of connected equipment, and the VHF/UHF/CABLE input. Neutral Gives the white colors a neutral tint. It is at a maximum. High Density Creates a high-resolution picture with 480i source....
... Brightness Color Hue Color Temperature White adjustment Sharpness Noise Reduction MPEG Noise Reduction DRC Mode ~ • Picture Mode for all inputs can obtain the best brightness and contrast suited for your TV viewing. Increases or decreases picture contrast. Reduces the mosaic effect ... Increases or decreases color intensity. Min With this option, the screen has a high level of connected equipment, and the VHF/UHF/CABLE input. Neutral Gives the white colors a neutral tint. It is at a maximum. High Density Creates a high-resolution picture with 480i source....
Operating Instructions
Page 34
... Corrector Enhances black areas of color reproduction from the OPTIONS menu. • Picture settings for PC Timings (HDMI or PC input) are the same as other input modes (see above for details), but Noise Reduction, MPEG Noise Reduction, DRC Mode, DRC Palette and Detail Enhancer are not... not available when Game/Text Mode is set to On, or when using just Front Surround two front speakers. Advanced Settings Reset Resets all inputs can also be accessed by color. Detail Enhancer Enhances the details of the picture. ~ • Picture settings for stronger contrast. S-FORCE...
... Corrector Enhances black areas of color reproduction from the OPTIONS menu. • Picture settings for PC Timings (HDMI or PC input) are the same as other input modes (see above for details), but Noise Reduction, MPEG Noise Reduction, DRC Mode, DRC Palette and Detail Enhancer are not... not available when Game/Text Mode is set to On, or when using just Front Surround two front speakers. Advanced Settings Reset Resets all inputs can also be accessed by color. Detail Enhancer Enhances the details of the picture. ~ • Picture settings for stronger contrast. S-FORCE...
Operating Instructions
Page 35
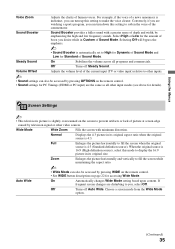
.... (Continued) 35 Selecting Off will bypass the emphasis. ~ • Sound Booster is slightly overscanned on the screen to prevent artifacts or lack of the current input (TV or video input) relative to other inputs. ~ • Sound settings can turn up this setting to you can also be accessed by television signal or other...
.... (Continued) 35 Selecting Off will bypass the emphasis. ~ • Sound Booster is slightly overscanned on the screen to prevent artifacts or lack of the current input (TV or video input) relative to other inputs. ~ • Sound settings can turn up this setting to you can also be accessed by television signal or other...
Operating Instructions
Page 36
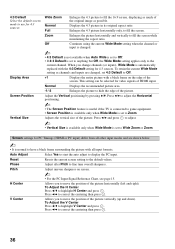
...picture vertically (up and down). To Adjust the V Center Press V/v to fill the screen. Screen settings for PC Timings (HDMI or PC input) differ from all input formats. Full Enlarges the 4:3 picture horizontally only, to highlight V Center and press . Press B/b to adjust the Horizontal positioning. ~ •...Vertical Size Wide Zoom Enlarges the 4:3 picture to fill the 16:9 screen, displaying as much of the original image as channels and inputs are shown below. ~ • It is normal to have a black frame surrounding the picture with a black frame on screen. ~ •...
...picture vertically (up and down). To Adjust the V Center Press V/v to fill the screen. Screen settings for PC Timings (HDMI or PC input) differ from all input formats. Full Enlarges the 4:3 picture horizontally only, to highlight V Center and press . Press B/b to adjust the Horizontal positioning. ~ •...Vertical Size Wide Zoom Enlarges the 4:3 picture to fill the 16:9 screen, displaying as much of the original image as channels and inputs are shown below. ~ • It is normal to have a black frame surrounding the picture with a black frame on screen. ~ •...

Operating Instructions
Page 37
... the effect visually, even if you have changed the setting. • Motion Enhancer is not available when Game/Text Mode is set separately for each input (except PC IN). (Continued) 37
... the effect visually, even if you have changed the setting. • Motion Enhancer is not available when Game/Text Mode is set separately for each input (except PC IN). (Continued) 37


