
The Sony Guide to Home Theater
Page 20
.... So they are no convergence. The Sony Guide to screen sizes of 30 inches and less, although larger sizes are far thinner, lighter and sleeker than CRTs, making them favorites of viscous liquid sandwiched in the marketplace. BENEFITS. LIMITATIONS. Liquid-crystal display technology first appeared in front projectors, rear-projection TVs, and flat-panel...
.... So they are no convergence. The Sony Guide to screen sizes of 30 inches and less, although larger sizes are far thinner, lighter and sleeker than CRTs, making them favorites of viscous liquid sandwiched in the marketplace. BENEFITS. LIMITATIONS. Liquid-crystal display technology first appeared in front projectors, rear-projection TVs, and flat-panel...
The Sony Guide to Home Theater
Page 21
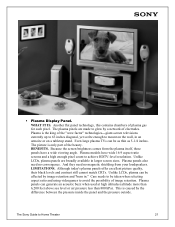
... wide viewing angle. Plasma panels can be as thin as 5-1/4 inches. Even large plasma TVs can be affected by image retention and "burn in larger screen sizes. Because the screen... picture is the king of image retention. LIMITATIONS. BENEFITS. Plasma panels also need no convergence. Although today's plasma panels offer excellent picture quality, their black levels and contrast still cannot...aspect ratio screens and a high enough pixel count to mount on the wall, in an armoire or on a tabletop stand. ƒ Plasma Display Panel. The Sony Guide to avoid the possibility...
... wide viewing angle. Plasma panels can be as thin as 5-1/4 inches. Even large plasma TVs can be affected by image retention and "burn in larger screen sizes. Because the screen... picture is the king of image retention. LIMITATIONS. BENEFITS. Plasma panels also need no convergence. Although today's plasma panels offer excellent picture quality, their black levels and contrast still cannot...aspect ratio screens and a high enough pixel count to mount on the wall, in an armoire or on a tabletop stand. ƒ Plasma Display Panel. The Sony Guide to avoid the possibility...
The Sony Guide to Home Theater
Page 22
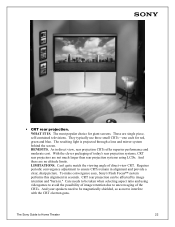
.... BENEFITS. As in seconds. And there are no altitude limits. The resulting light is projected through a lens and mirror system behind the screen. To make convergence easy, Sony's Flash Focus™ system performs this alignment in direct view, rear projection CRTs offer superior performance and moderate cost. WHAT IT IS. And your speakers need...
.... BENEFITS. As in seconds. And there are no altitude limits. The resulting light is projected through a lens and mirror system behind the screen. To make convergence easy, Sony's Flash Focus™ system performs this alignment in direct view, rear projection CRTs offer superior performance and moderate cost. WHAT IT IS. And your speakers need...
The Sony Guide to Home Theater
Page 23
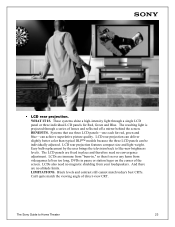
...off a mirror behind the screen. The Sony Guide to like-new brightness levels. WHAT IT IS. LCD rear projection can deliver slightly better color than typical DLP... high-intensity light through a series of direct-view CRT. Systems that use three LCD panels-one each for Red, Green and Blue. The resulting light is projected ...through a single LCD panel or three individual LCD panels for red, green and blue-can be individually adjusted. LCDs also need no magnetic shielding from videogames left on too long, DVDs in place and therefore need no convergence...
...off a mirror behind the screen. The Sony Guide to like-new brightness levels. WHAT IT IS. LCD rear projection can deliver slightly better color than typical DLP... high-intensity light through a series of direct-view CRT. Systems that use three LCD panels-one each for Red, Green and Blue. The resulting light is projected ...through a single LCD panel or three individual LCD panels for red, green and blue-can be individually adjusted. LCDs also need no magnetic shielding from videogames left on too long, DVDs in place and therefore need no convergence...
The Sony Guide to Home Theater
Page 24
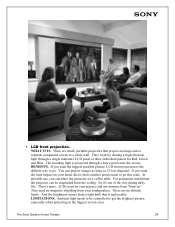
...If you can project images as large as 25 feet diagonal. There are small, portable projectors that project an image ...onto a separate component screen or a white wall. And the brightness comes from the ceiling. Ambient light needs to be suspended from a light bulb that 's another good reason to go this route. The Sony... Guide to get the brightest picture, especially when projecting at the biggest screen ...projection is the definite way to go . These are no convergence and are immune from your home décor, that is projected...
...If you can project images as large as 25 feet diagonal. There are small, portable projectors that project an image ...onto a separate component screen or a white wall. And the brightness comes from the ceiling. Ambient light needs to be suspended from a light bulb that 's another good reason to go this route. The Sony... Guide to get the brightest picture, especially when projecting at the biggest screen ...projection is the definite way to go . These are no convergence and are immune from your home décor, that is projected...

Primary User Manual
Page 3
..., and Uniform Brightness Screen are designed to adjust convergence. Be sure to follow the instructions mentioned below 5°C (41°F). ❑ If the projection TV is desirable to carry the unit (KDP-65WS550 only). 2 Safety ❑ Operate the projection TV only on 120 V AC. ❑ The ... the ENERGY STAR® guidelines for the use to install the projection TV in a particular installation. It is transported directly from SRS Labs, Inc. As an ENERGY STAR® Partner, Sony has determined that face the screen with radio communications. and are licensed...
..., and Uniform Brightness Screen are designed to adjust convergence. Be sure to follow the instructions mentioned below 5°C (41°F). ❑ If the projection TV is desirable to carry the unit (KDP-65WS550 only). 2 Safety ❑ Operate the projection TV only on 120 V AC. ❑ The ... the ENERGY STAR® guidelines for the use to install the projection TV in a particular installation. It is transported directly from SRS Labs, Inc. As an ENERGY STAR® Partner, Sony has determined that face the screen with radio communications. and are licensed...

Primary User Manual
Page 6
Contents Introducing the Digital Projection TV Welcome ...9 Package Contents 9 Features 9 Setting Up the Digital Projection TV Overview ...11 Carrying Your Projection TV 12 Installing the TV 12 TV Controls and Connectors 13 Front Video Controls 13 Front Panel 14 Rear Panel 16 Basic Connections: Connecting a Cable or Antenna 18 Cable or Antenna Only ... Connecting a Device with an Optical IN Connector 39 Using the CONTROL S Feature 40 Setting Up the Channel List 41 Using Auto Program 41 Adjusting the Convergence Automatically (Flash Focus 42 Notes on Flash Focus 42 Adjusting the...
Contents Introducing the Digital Projection TV Welcome ...9 Package Contents 9 Features 9 Setting Up the Digital Projection TV Overview ...11 Carrying Your Projection TV 12 Installing the TV 12 TV Controls and Connectors 13 Front Video Controls 13 Front Panel 14 Rear Panel 16 Basic Connections: Connecting a Cable or Antenna 18 Cable or Antenna Only ... Connecting a Device with an Optical IN Connector 39 Using the CONTROL S Feature 40 Setting Up the Channel List 41 Using Auto Program 41 Adjusting the Convergence Automatically (Flash Focus 42 Notes on Flash Focus 42 Adjusting the...

Primary User Manual
Page 12
... VCR and Cable VCR and Cable Box Two VCRs for setting up your TV. Setting Up the Digital Projection TV Overview This chapter includes illustrated instructions for Tape Editing Satellite Receiver Satellite Receiver and... VCR DVD Player with Component Video Connectors DVD Player with S VIDEO and Audio Connectors Camcorder Audio Receiver Connecting a Device with an Optical IN Connector Using the CONTROL S Feature Setting Up the Channel List Adjusting the Convergence...
... VCR and Cable VCR and Cable Box Two VCRs for setting up your TV. Setting Up the Digital Projection TV Overview This chapter includes illustrated instructions for Tape Editing Satellite Receiver Satellite Receiver and... VCR DVD Player with Component Video Connectors DVD Player with S VIDEO and Audio Connectors Camcorder Audio Receiver Connecting a Device with an Optical IN Connector Using the CONTROL S Feature Setting Up the Channel List Adjusting the Convergence...

Primary User Manual
Page 16
...LED 6 i.LINK STANDBY LED 7 -CHANNEL+ 8 -VOLUME + 9 TV/VIDEO 0 FLASH FOCUS Description When lit, indicates that i.LINK Standby is turned off the TV. For details, see page 42). Press to turn on page 69. Press to adjust the convergence (see "Inserting and Removing a Memory Stick" on and off . Press... to adjust the volume. Receives IR signals from the TV's remote control. When lit in orange, indicates that the Memory Stick is...
...LED 6 i.LINK STANDBY LED 7 -CHANNEL+ 8 -VOLUME + 9 TV/VIDEO 0 FLASH FOCUS Description When lit, indicates that i.LINK Standby is turned off the TV. For details, see page 42). Press to turn on page 69. Press to adjust the convergence (see "Inserting and Removing a Memory Stick" on and off . Press... to adjust the volume. Receives IR signals from the TV's remote control. When lit in orange, indicates that the Memory Stick is...

Primary User Manual
Page 43
...appears and Flash Focus begins to the factory setting. If you perform Flash Focus about 30 minutes after the TV is canceled. ❑ Flash Focus will not set the TV's convergence to work. , The adjustment is poor and the picture blurs. If they do this, press RESET while ... allows you use your TV, be sure to a TV or cable TV program. 2 Press the FLASH FOCUS button on Flash Focus ❑ You cannot perform any other functions until Flash Focus has completed its cycle. SETUP Setup Adjusting the Convergence Automatically (Flash Focus) The projection tube image appears on page...
...appears and Flash Focus begins to the factory setting. If you perform Flash Focus about 30 minutes after the TV is canceled. ❑ Flash Focus will not set the TV's convergence to work. , The adjustment is poor and the picture blurs. If they do this, press RESET while ... allows you use your TV, be sure to a TV or cable TV program. 2 Press the FLASH FOCUS button on Flash Focus ❑ You cannot perform any other functions until Flash Focus has completed its cycle. SETUP Setup Adjusting the Convergence Automatically (Flash Focus) The projection tube image appears on page...

Primary User Manual
Page 44
...SETUP - -- - < Full/Normal Move < < < Select: End: Menu You can scroll up and down through the 9 x 7 field of crosses to manually converge all portions of the crosses. Once you must first perform Flash Focus (as described on using the Setup Menu, see page 103. 1 Press MENU to... highlight the Setup icon and press . 3 Move the joystick to adjust other crosses. When finished, press MENU to fine-tune the convergence. ✍ Before adjusting the convergence manually for the first time, you have finished this , press . Aligned crosses (which do not need adjustment) look white and have...
...SETUP - -- - < Full/Normal Move < < < Select: End: Menu You can scroll up and down through the 9 x 7 field of crosses to manually converge all portions of the crosses. Once you must first perform Flash Focus (as described on using the Setup Menu, see page 103. 1 Press MENU to... highlight the Setup icon and press . 3 Move the joystick to adjust other crosses. When finished, press MENU to fine-tune the convergence. ✍ Before adjusting the convergence manually for the first time, you have finished this , press . Aligned crosses (which do not need adjustment) look white and have...

Primary User Manual
Page 45
...button on the remote to toggle through the wide mode screens. ❑ To optimize the conditions for about 30 minutes before you adjust the convergence. ❑ For best results, stand about 3 to Pro or Movie and lower the Picture level settings (see page 92). You can ... ❑ You can reset the adjustments by pressing the RESET button on the remote control. SETUP Notes on Adjusting the Convergence Manually ❑ Allow the TV to warm up for convergence adjustment, in each wide mode: Full/Normal, Zoom, Wide Zoom, and Memory Stick/1080i highdefinition input. (These features share...
...button on the remote to toggle through the wide mode screens. ❑ To optimize the conditions for about 30 minutes before you adjust the convergence. ❑ For best results, stand about 3 to Pro or Movie and lower the Picture level settings (see page 92). You can ... ❑ You can reset the adjustments by pressing the RESET button on the remote control. SETUP Notes on Adjusting the Convergence Manually ❑ Allow the TV to warm up for convergence adjustment, in each wide mode: Full/Normal, Zoom, Wide Zoom, and Memory Stick/1080i highdefinition input. (These features share...
Primary User Manual
Page 47
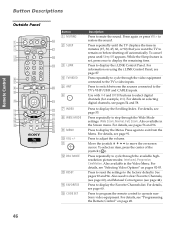
... the i.LINK Control Panel, see page 44). SETUP SETUP Remote Control Button Descriptions Outside Panel 1 2 3 4 5 MUTING SLEEP SAT/CABLE POWER FUNCTION i.LINK SAT/CABLE TV TV/VIDEO ANT PIC MODE Button 1 MUTING qh 2 SLEEP qj qk ql 3 i.LINK ENTER 6 7 8 WIDE MODE FLIP OPEN INDEX TWIN VIEW w; 9 MENU VOL CH... qg FREEZE EXIT wh wj wk TV RM-Y192 4 TV/VIDEO 5 ANT 6 7 INDEX 8 WIDE MODE 9 MENU q; To cancel press until the TV displays the time in minutes (15, 30, 45, 60, or 90) that you want the TV to clear Favorite Channels, (see page 60), and Manual Convergence (see page 87.
... the i.LINK Control Panel, see page 44). SETUP SETUP Remote Control Button Descriptions Outside Panel 1 2 3 4 5 MUTING SLEEP SAT/CABLE POWER FUNCTION i.LINK SAT/CABLE TV TV/VIDEO ANT PIC MODE Button 1 MUTING qh 2 SLEEP qj qk ql 3 i.LINK ENTER 6 7 8 WIDE MODE FLIP OPEN INDEX TWIN VIEW w; 9 MENU VOL CH... qg FREEZE EXIT wh wj wk TV RM-Y192 4 TV/VIDEO 5 ANT 6 7 INDEX 8 WIDE MODE 9 MENU q; To cancel press until the TV displays the time in minutes (15, 30, 45, 60, or 90) that you want the TV to clear Favorite Channels, (see page 60), and Manual Convergence (see page 87.

Primary User Manual
Page 104
... version of the dialog or sound effects of a program. (Should be set to highlight Caption Vision: Off Video Label Language: English Clock/Timers Flash Focus Convergence i.LINK Standby: On Demo an option. Displays when the channel is changed setting. 5 Press MENU to analog programs. To set up closed captioning for most...
... version of the dialog or sound effects of a program. (Should be set to highlight Caption Vision: Off Video Label Language: English Clock/Timers Flash Focus Convergence i.LINK Standby: On Demo an option. Displays when the channel is changed setting. 5 Press MENU to analog programs. To set up closed captioning for most...
Primary User Manual
Page 106
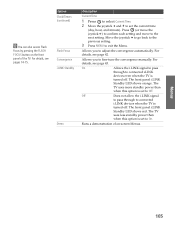
... move the joystick b) to confirm each setting and move to fine-tune the convergence manually. Allows you to exit the Menu. On Allows the i.LINK signal to pass through to connected i.LINK devices even when the TV is set to set to Off. Off Does not allow the i.LINK signal ... 43. Move the joystick B to go back to the previous setting. 3 Press MENU to adjust the convergence automatically. Menus SETUP Menus SETUP 105 Runs a demonstration of on the front panel of the TV. For details, see page 42. SETUP SETUP z You can also access Flash Focus by pressing the FLASH...
... move the joystick b) to confirm each setting and move to fine-tune the convergence manually. Allows you to exit the Menu. On Allows the i.LINK signal to pass through to connected i.LINK devices even when the TV is set to set to Off. Off Does not allow the i.LINK signal ... 43. Move the joystick B to go back to the previous setting. 3 Press MENU to adjust the convergence automatically. Menus SETUP Menus SETUP 105 Runs a demonstration of on the front panel of the TV. For details, see page 42. SETUP SETUP z You can also access Flash Focus by pressing the FLASH...

Primary User Manual
Page 118
...caption modes 91, 103 CODE SET button 46 color, adjusting 92 CONTROL S 40 CONTROL S IN/OUT jacks, described 17 Convergence 15, 105 adjusting automatically 42 adjusting manually 43 convergence 105 Cool, Color Temperature 92 D Demo, Menus 105 DIGITAL AUDIO OPTICAL jack 17 Digital Caption Setup 65 Digital Caption Setup menu...47 DRC. brightness, adjusting 92 C cable connecting 19 with VCR, connecting 24 cable box connecting with VCR 26 Twin View issues 57 using with TV remote control 52 DVI. DVD player connecting 34, 36 using 61 Full Mode 56 Full mode, setting 96 G GUIDE button 47, 63 Guide ...
...caption modes 91, 103 CODE SET button 46 color, adjusting 92 CONTROL S 40 CONTROL S IN/OUT jacks, described 17 Convergence 15, 105 adjusting automatically 42 adjusting manually 43 convergence 105 Cool, Color Temperature 92 D Demo, Menus 105 DIGITAL AUDIO OPTICAL jack 17 Digital Caption Setup 65 Digital Caption Setup menu...47 DRC. brightness, adjusting 92 C cable connecting 19 with VCR, connecting 24 cable box connecting with VCR 26 Twin View issues 57 using with TV remote control 52 DVI. DVD player connecting 34, 36 using 61 Full Mode 56 Full mode, setting 96 G GUIDE button 47, 63 Guide ...


