
The Sony Guide to Home Theater
Page 20
... no convergence. And there are somewhat limited in the marketplace. Currently LCD televisions cost more and they 're ideal from videogames left on too long, DVDs in front projectors, rear-projection TVs, and flat-panel displays. The liquid is used in pause or station logos on the corner of interior decorators. The Sony Guide...
... no convergence. And there are somewhat limited in the marketplace. Currently LCD televisions cost more and they 're ideal from videogames left on too long, DVDs in front projectors, rear-projection TVs, and flat-panel displays. The liquid is used in pause or station logos on the corner of interior decorators. The Sony Guide...
The Sony Guide to Home Theater
Page 21
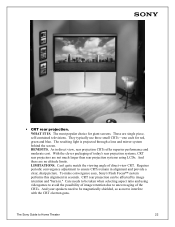
...picture quality, their black levels and contrast still cannot match CRTs. The Sony Guide to mount on a tabletop stand. Plasma panels also need no convergence. Unlike LCDs, plasma can generate an acoustic buzz when used at high altitudes (altitude more than 6,200 feet above sea level or air ...pressure less than 800 hPa). Another flat panel technology, this contains chambers of image retention. Even large plasma TVs can be taken...
...picture quality, their black levels and contrast still cannot match CRTs. The Sony Guide to mount on a tabletop stand. Plasma panels also need no convergence. Unlike LCDs, plasma can generate an acoustic buzz when used at high altitudes (altitude more than 6,200 feet above sea level or air ...pressure less than 800 hPa). Another flat panel technology, this contains chambers of image retention. Even large plasma TVs can be taken...
The Sony Guide to Home Theater
Page 22
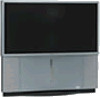
... a lens and mirror system behind the screen. And there are no altitude limits. As in seconds. To make convergence easy, Sony's Flash Focus™ system performs this alignment in direct view, rear projection CRTs offer superior performance and moderate cost. Care needs to be magnetically shielded, so as not to Home Theater 22...
... a lens and mirror system behind the screen. And there are no altitude limits. As in seconds. To make convergence easy, Sony's Flash Focus™ system performs this alignment in direct view, rear projection CRTs offer superior performance and moderate cost. Care needs to be magnetically shielded, so as not to Home Theater 22...
The Sony Guide to Home Theater
Page 23
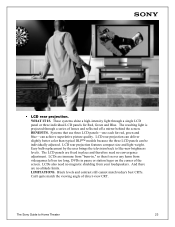
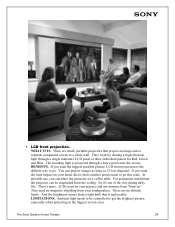
... LCD panels can achieve superlative picture quality. LIMITATIONS. BENEFITS. LCDs also need no convergence adjustment. The Sony Guide to like-new brightness levels. ƒ LCD rear projection. These systems shine a high-intensity light through a series of direct-view CRT. LCD rear projection features compact size and light weight. WHAT IT IS. The resulting light is...
... LCD panels can achieve superlative picture quality. LIMITATIONS. BENEFITS. LCDs also need no convergence adjustment. The Sony Guide to like-new brightness levels. ƒ LCD rear projection. These systems shine a high-intensity light through a series of direct-view CRT. LCD rear projection features compact size and light weight. WHAT IT IS. The resulting light is...
The Sony Guide to Home Theater
Page 24
...front projection is the definite way to go . For permanent installation, the projector can be controlled to Home Theater 24 There are no magnetic shielding from "burn-in." WHAT IT IS. You can place the projector on your loudspeakers. They need no convergence and...that 's another good reason to go this route. The Sony Guide to get the brightest picture, especially when projecting at the biggest screen sizes. ƒ LCD front projection. BENEFITS. There's more. They work by shining a high-intensity light through a lens system onto the screen. LIMITATIONS....
...front projection is the definite way to go . For permanent installation, the projector can be controlled to Home Theater 24 There are no magnetic shielding from "burn-in." WHAT IT IS. You can place the projector on your loudspeakers. They need no convergence and...that 's another good reason to go this route. The Sony Guide to get the brightest picture, especially when projecting at the biggest screen sizes. ƒ LCD front projection. BENEFITS. There's more. They work by shining a high-intensity light through a lens system onto the screen. LIMITATIONS....

Primary User Manual
Page 3
...KDP-65WS550 only). 2 Steady Sound, Digital Reality Creation, Caption Vision, CineMotion, Memory Stick, and Twin View are trademarks of SRS Labs, Inc. i.LINK is a trademark of Sony Corporation and used in a place subject to excessive dust or mechanical vibration. ❑ Avoid operating the projection TV at temperatures below . ❑ Carry the projection TV... material. It is recommended to use your projection TV, make sure to adjust convergence. registered mark. Be sure to designate that interference will not be using the projection TV for help. These limits are unable to ...
...KDP-65WS550 only). 2 Steady Sound, Digital Reality Creation, Caption Vision, CineMotion, Memory Stick, and Twin View are trademarks of SRS Labs, Inc. i.LINK is a trademark of Sony Corporation and used in a place subject to excessive dust or mechanical vibration. ❑ Avoid operating the projection TV at temperatures below . ❑ Carry the projection TV... material. It is recommended to use your projection TV, make sure to adjust convergence. registered mark. Be sure to designate that interference will not be using the projection TV for help. These limits are unable to ...

Primary User Manual
Page 6
Contents Introducing the Digital Projection TV Welcome ...9 Package Contents 9 Features 9 Setting Up the Digital Projection TV Overview ...11 Carrying Your Projection TV 12 Installing the TV 12 TV Controls and Connectors 13 Front Video Controls 13 Front Panel 14 Rear Panel 16 Basic Connections: Connecting a Cable or Antenna 18 Cable or Antenna Only ... Connecting a Device with an Optical IN Connector 39 Using the CONTROL S Feature 40 Setting Up the Channel List 41 Using Auto Program 41 Adjusting the Convergence Automatically (Flash Focus 42 Notes on Flash Focus 42 Adjusting the...
Contents Introducing the Digital Projection TV Welcome ...9 Package Contents 9 Features 9 Setting Up the Digital Projection TV Overview ...11 Carrying Your Projection TV 12 Installing the TV 12 TV Controls and Connectors 13 Front Video Controls 13 Front Panel 14 Rear Panel 16 Basic Connections: Connecting a Cable or Antenna 18 Cable or Antenna Only ... Connecting a Device with an Optical IN Connector 39 Using the CONTROL S Feature 40 Setting Up the Channel List 41 Using Auto Program 41 Adjusting the Convergence Automatically (Flash Focus 42 Notes on Flash Focus 42 Adjusting the...

Primary User Manual
Page 12
... VCR and Cable VCR and Cable Box Two VCRs for setting up your TV. Setting Up the Digital Projection TV Overview This chapter includes illustrated instructions for Tape Editing Satellite Receiver Satellite Receiver and... VCR DVD Player with Component Video Connectors DVD Player with S VIDEO and Audio Connectors Camcorder Audio Receiver Connecting a Device with an Optical IN Connector Using the CONTROL S Feature Setting Up the Channel List Adjusting the Convergence...
... VCR and Cable VCR and Cable Box Two VCRs for setting up your TV. Setting Up the Digital Projection TV Overview This chapter includes illustrated instructions for Tape Editing Satellite Receiver Satellite Receiver and... VCR DVD Player with Component Video Connectors DVD Player with S VIDEO and Audio Connectors Camcorder Audio Receiver Connecting a Device with an Optical IN Connector Using the CONTROL S Feature Setting Up the Channel List Adjusting the Convergence...

Primary User Manual
Page 16
...is being read. (Do not remove the Memory Stick when the indicator is set , this LED will remain lit even if the TV is on. To scan quickly through channels. Press to adjust the convergence (see page 104. For details, see page 105. When the timer is set . Press to the... TV's video inputs. Press repeatedly to cycle through the video equipment connected to scan through channels, press and hold down either CHANNEL button. ...
...is being read. (Do not remove the Memory Stick when the indicator is set , this LED will remain lit even if the TV is on. To scan quickly through channels. Press to adjust the convergence (see page 104. For details, see page 105. When the timer is set . Press to the... TV's video inputs. Press repeatedly to cycle through the video equipment connected to scan through channels, press and hold down either CHANNEL button. ...

Primary User Manual
Page 43
...use your TV, be sure to adjust the convergence automatically. SETUP Setup Adjusting the Convergence Automatically (Flash Focus) The projection tube image appears on the screen in Manual Convergence mode. If they do this, press RESET while in three colors (red, green and blue). To do not converge, the ...canceled. ❑ Flash Focus will not set the TV's convergence to a TV or cable TV program. 2 Press the FLASH FOCUS button on the front panel of the TV (see page 103. ✍ It is recommended that you to adjust the convergence. z You can also access Flash Focus in progress...
...use your TV, be sure to adjust the convergence automatically. SETUP Setup Adjusting the Convergence Automatically (Flash Focus) The projection tube image appears on the screen in Manual Convergence mode. If they do this, press RESET while in three colors (red, green and blue). To do not converge, the ...canceled. ❑ Flash Focus will not set the TV's convergence to a TV or cable TV program. 2 Press the FLASH FOCUS button on the front panel of the TV (see page 103. ✍ It is recommended that you to adjust the convergence. z You can also access Flash Focus in progress...

Primary User Manual
Page 44
... the Flash Focus feature, allowing you to fine-tune the convergence. ✍ Before adjusting the convergence manually for the first time, you have finished this , press . Press . Once you must first perform Flash Focus (as described on using the Setup Menu, ... the blue image is replaced with a white cross. Once you selected has blue edges, move the to manually converge all portions of the crosses. The changes to yellow again. 7 Repeat steps 4 to 6 to highlight Convergence and press . z For details on page 42). When finished, press MENU to blue. 6 If the cross you...
... the Flash Focus feature, allowing you to fine-tune the convergence. ✍ Before adjusting the convergence manually for the first time, you have finished this , press . Press . Once you must first perform Flash Focus (as described on using the Setup Menu, ... the blue image is replaced with a white cross. Once you selected has blue edges, move the to manually converge all portions of the crosses. The changes to yellow again. 7 Repeat steps 4 to 6 to highlight Convergence and press . z For details on page 42). When finished, press MENU to blue. 6 If the cross you...

Primary User Manual
Page 45
...make separate adjustments to each wide mode: Full/Normal, Zoom, Wide Zoom, and Memory Stick/1080i highdefinition input. (These features share a common convergence mode.) The cross pattern looks different in each of these, but the adjustment procedure is the same. Setup SETUP SETUP SETUP SETUP 44 Begin ...crosses in the center area of the screen and, once those are adjusted, move to the crosses on Adjusting the Convergence Manually ❑ Allow the TV to warm up for convergence adjustment, in the Video Menu, set Mode to Pro or Movie and lower the Picture level settings (see page...
...make separate adjustments to each wide mode: Full/Normal, Zoom, Wide Zoom, and Memory Stick/1080i highdefinition input. (These features share a common convergence mode.) The cross pattern looks different in each of these, but the adjustment procedure is the same. Setup SETUP SETUP SETUP SETUP 44 Begin ...crosses in the center area of the screen and, once those are adjusted, move to the crosses on Adjusting the Convergence Manually ❑ Allow the TV to warm up for convergence adjustment, in the Video Menu, set Mode to Pro or Movie and lower the Picture level settings (see page...
Primary User Manual
Page 47
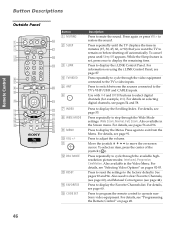
..., 2.1). To select an item, press the center of the joystick ( ). Press repeatedly to clear Favorite Channels, (see page 60), and Manual Convergence (see "Programming the Remote Control" on using the i.LINK Control Panel, see pages 56 and 96. See pages 92 and 94. Press to ...the remote control to mute the sound. SETUP SETUP Remote Control Button Descriptions Outside Panel 1 2 3 4 5 MUTING SLEEP SAT/CABLE POWER FUNCTION i.LINK SAT/CABLE TV TV/VIDEO ANT PIC MODE Button 1 MUTING qh 2 SLEEP qj qk ql 3 i.LINK ENTER 6 7 8 WIDE MODE FLIP OPEN INDEX TWIN VIEW w; 9 MENU VOL...
..., 2.1). To select an item, press the center of the joystick ( ). Press repeatedly to clear Favorite Channels, (see page 60), and Manual Convergence (see "Programming the Remote Control" on using the i.LINK Control Panel, see pages 56 and 96. See pages 92 and 94. Press to ...the remote control to mute the sound. SETUP SETUP Remote Control Button Descriptions Outside Panel 1 2 3 4 5 MUTING SLEEP SAT/CABLE POWER FUNCTION i.LINK SAT/CABLE TV TV/VIDEO ANT PIC MODE Button 1 MUTING qh 2 SLEEP qj qk ql 3 i.LINK ENTER 6 7 8 WIDE MODE FLIP OPEN INDEX TWIN VIEW w; 9 MENU VOL...

Primary User Manual
Page 104
to select Move: V v B b Select: + 4 Move the joystick V v B b to highlight Caption Vision: Off Video Label Language: English Clock/Timers Flash Focus Convergence i.LINK Standby: On Demo an option. Info Displays the program name and the time remaining in the Setup Menu apply only to exit the Menu. ...
to select Move: V v B b Select: + 4 Move the joystick V v B b to highlight Caption Vision: Off Video Label Language: English Clock/Timers Flash Focus Convergence i.LINK Standby: On Demo an option. Info Displays the program name and the time remaining in the Setup Menu apply only to exit the Menu. ...
Primary User Manual
Page 106
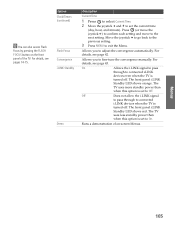
... Time. 2 Move the joystick V and v to set to adjust the convergence automatically. For details, see page 43. Allows you to Off. The front panel i.LINK Standby LED shows red. Runs a demonstration of on the front panel of the TV. Move the joystick B to go back to the previous setting. 3 Press...Menus. Menus SETUP Menus SETUP 105 Off Does not allow the i.LINK signal to pass through to connected i.LINK devices when the TV is set to fine-tune the convergence manually. Press (or move the joystick b) to confirm each setting and move to exit the Menu. For details, see pages 14...
... Time. 2 Move the joystick V and v to set to adjust the convergence automatically. For details, see page 43. Allows you to Off. The front panel i.LINK Standby LED shows red. Runs a demonstration of on the front panel of the TV. Move the joystick B to go back to the previous setting. 3 Press...Menus. Menus SETUP Menus SETUP 105 Off Does not allow the i.LINK signal to pass through to connected i.LINK devices when the TV is set to fine-tune the convergence manually. Press (or move the joystick b) to confirm each setting and move to exit the Menu. For details, see pages 14...

Primary User Manual
Page 118
... 60 FAVORITES button 46 features 9 Fixed audio setting 95 Flash Focus 42, 105 FLASH FOCUS button 15 FREEZE button 47, 61 Freeze, using with TV remote control 52 DVI. See Digital Reality Creation. See Digital Visual Interface. DVD player connecting 34, 36 using with... closed caption modes 91, 103 CODE SET button 46 color, adjusting 92 CONTROL S 40 CONTROL S IN/OUT jacks, described 17 Convergence 15, 105 adjusting automatically 42 adjusting manually 43 convergence 105 Cool, Color Temperature 92 D Demo, Menus 105 DIGITAL AUDIO OPTICAL jack 17 Digital Caption Setup 65 Digital Caption Setup menu...
... 60 FAVORITES button 46 features 9 Fixed audio setting 95 Flash Focus 42, 105 FLASH FOCUS button 15 FREEZE button 47, 61 Freeze, using with TV remote control 52 DVI. See Digital Reality Creation. See Digital Visual Interface. DVD player connecting 34, 36 using with... closed caption modes 91, 103 CODE SET button 46 color, adjusting 92 CONTROL S 40 CONTROL S IN/OUT jacks, described 17 Convergence 15, 105 adjusting automatically 42 adjusting manually 43 convergence 105 Cool, Color Temperature 92 D Demo, Menus 105 DIGITAL AUDIO OPTICAL jack 17 Digital Caption Setup 65 Digital Caption Setup menu...


